Ingredients
Scale
For the Red Velvet Waffles:
-
- 2 cups All-Purpose Flour: The foundation of our waffles, providing structure and a tender crumb.
-
- 2 tablespoons Granulated Sugar: Adds a touch of sweetness to complement the savory chicken.
-
- 2 teaspoons Baking Powder: The leavening agent that makes our waffles light and fluffy.
-
- 1/2 teaspoon Baking Soda: Works in tandem with baking powder for optimal rise and texture, and reacts with the buttermilk for that signature red velvet tang.
-
- 1/2 teaspoon Salt: Enhances the flavors and balances the sweetness.
-
- 1 tablespoon Unsweetened Cocoa Powder: The secret ingredient that gives red velvet its distinct chocolatey undertone and color depth. Use good quality cocoa for the best flavor.
-
- 1 cup Buttermilk: The key to red velvet’s signature tang and moistness. Buttermilk also reacts with the baking soda for a lighter texture. You can substitute with 1 cup of milk mixed with 1 tablespoon of lemon juice or white vinegar, letting it sit for 5 minutes.
-
- 2 Large Eggs: Bind the ingredients together and add richness and structure to the waffles.
-
- 1/2 cup Vegetable Oil: Adds moisture and tenderness. You can also use melted unsalted butter for a richer flavor.
-
- 1 teaspoon Vanilla Extract: Enhances the overall flavor profile and adds a touch of warmth.
-
- 1 teaspoon White Vinegar: Another key ingredient for the red velvet tang and helps activate the baking soda.
-
- 1 tablespoon Red Food Coloring (Liquid or Gel): The iconic ingredient that gives red velvet its vibrant hue. Gel food coloring is more concentrated, so you may need slightly less. Adjust to your desired color intensity.
-
- Non-stick Cooking Spray or Butter: For greasing your waffle iron and preventing sticking.
For the Crispy Fried Chicken:
-
- 1.5 – 2 lbs Bone-in, Skin-on Chicken Pieces (Thighs, Drumsticks, Wings): Bone-in, skin-on chicken pieces are ideal for frying as they retain moisture and develop crispy skin. Thighs and drumsticks are particularly flavorful and forgiving.
-
- 2 cups Buttermilk: For marinating the chicken, tenderizing it, and helping the breading adhere.
-
- 2 tablespoons Hot Sauce (Optional): Adds a subtle kick and depth of flavor. Use your favorite brand or omit if you prefer a milder flavor.
-
- 2 cups All-Purpose Flour: The base of our crispy breading.
-
- 1 cup Cornstarch: Adds extra crispiness to the breading and helps prevent it from becoming soggy.
-
- 2 tablespoons Paprika: Adds color and smoky flavor to the breading.
-
- 2 tablespoons Garlic Powder: For savory garlic goodness.
-
- 2 tablespoons Onion Powder: Adds depth of flavor.
-
- 1 tablespoon Dried Thyme: Adds a touch of herbaceousness.
-
- 1 tablespoon Dried Oregano: Complements the thyme and garlic.
-
- 1 tablespoon Salt: Seasons the breading and enhances the chicken’s flavor.
-
- 2 teaspoons Black Pepper: Adds a touch of spice.
-
- Vegetable Oil, for frying: Choose a neutral oil with a high smoke point, like vegetable, canola, or peanut oil. You’ll need enough oil to reach a depth of about 2-3 inches in your frying pan or pot.
Instructions
Part 1: Preparing the Crispy Fried Chicken
-
- Marinate the Chicken: In a large bowl, combine the chicken pieces, buttermilk, and hot sauce (if using). Ensure the chicken is fully submerged in the buttermilk. Cover the bowl with plastic wrap and refrigerate for at least 4 hours, or ideally overnight. Marinating tenderizes the chicken and infuses it with flavor.
-
- Prepare the Breading: In a separate large bowl, whisk together the flour, cornstarch, paprika, garlic powder, onion powder, thyme, oregano, salt, and pepper. This flavorful blend will create our crispy coating.
-
- Dredge the Chicken: Remove the chicken pieces from the buttermilk marinade, letting any excess drip off. One piece at a time, dredge each chicken piece in the breading mixture, ensuring it is fully coated. Press the breading into the chicken to help it adhere. For extra crispy chicken, you can double dredge: dip the breaded chicken back into the buttermilk, then back into the breading again.
-
- Heat the Oil: Pour vegetable oil into a large, heavy-bottomed pot or deep skillet to a depth of about 2-3 inches. Heat the oil over medium-high heat until it reaches 350°F (175°C). Use a candy thermometer or deep-fry thermometer to accurately monitor the oil temperature. Maintaining the correct oil temperature is crucial for crispy, evenly cooked chicken. If the oil is too cold, the chicken will be greasy; if it’s too hot, the outside will burn before the inside is cooked through.
-
- Fry the Chicken: Carefully place a few pieces of chicken into the hot oil, being careful not to overcrowd the pot. Overcrowding will lower the oil temperature and result in soggy chicken. Fry the chicken in batches, about 6-8 minutes per side for smaller pieces like wings, and 8-12 minutes per side for larger pieces like thighs and drumsticks, or until the chicken is cooked through and golden brown. The internal temperature of the chicken should reach 165°F (74°C). Use a meat thermometer to check for doneness, inserting it into the thickest part of the chicken, avoiding the bone.
-
- Drain the Chicken: Remove the fried chicken pieces from the oil and place them on a wire rack set over a baking sheet. This allows excess oil to drip off and keeps the chicken crispy. Do not place the chicken directly on paper towels, as this can make the bottom soggy.
-
- Keep Chicken Warm (Optional): To keep the fried chicken warm while you prepare the waffles, you can place the baking sheet with the wire rack in a preheated oven at 200°F (95°C).
Part 2: Crafting the Red Velvet Waffles
-
- Whisk Dry Ingredients: In a large mixing bowl, whisk together the flour, sugar, baking powder, baking soda, salt, and cocoa powder. This ensures the dry ingredients are evenly distributed.
-
- Whisk Wet Ingredients: In a separate bowl, whisk together the buttermilk, eggs, vegetable oil, vanilla extract, vinegar, and red food coloring. Whisk until well combined and the food coloring is evenly dispersed.
-
- Combine Wet and Dry Ingredients: Pour the wet ingredients into the bowl with the dry ingredients. Gently whisk until just combined. Do not overmix the batter; a few lumps are okay. Overmixing can develop gluten and result in tough waffles.
-
- Preheat Waffle Iron: Preheat your waffle iron according to the manufacturer’s instructions. Most waffle irons have an indicator light that signals when it’s ready.
-
- Grease Waffle Iron: Lightly grease the waffle iron with non-stick cooking spray or brush with melted butter. This prevents the waffles from sticking and ensures easy removal.
-
- Cook the Waffles: Pour the batter onto the hot waffle iron, using the amount recommended by your waffle iron manufacturer. Typically, this is about ½ to ¾ cup of batter per waffle, depending on the size of your iron. Close the waffle iron lid and cook according to your waffle iron’s instructions, usually until the waffle is golden brown and steam is no longer escaping from the sides.
-
- Remove and Repeat: Carefully remove the cooked waffle from the waffle iron. Repeat steps 6 and 7 with the remaining batter, keeping the cooked waffles warm in a low oven (200°F/95°C) if desired, while you finish making the rest.
Part 3: Assembling and Serving
-
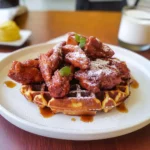
- Plate the Dish: Place a warm red velvet waffle on a plate. Top with a piece or two of crispy fried chicken.
-
- Add Toppings (Optional): Drizzle with maple syrup, honey, or a cream cheese glaze (recipe below). Garnish with fresh berries, a dusting of powdered sugar, or a sprinkle of chopped chives for a touch of savory contrast.
-
- Serve Immediately: Serve your Red Velvet Waffles and Chicken immediately for the best taste and texture. Enjoy the delightful combination of sweet and savory!
Cream Cheese Glaze (Optional):
-
- 4 ounces Cream Cheese, softened
-
- 1/4 cup Powdered Sugar
-
- 2-3 tablespoons Milk or Cream
-
- 1/2 teaspoon Vanilla Extract
Nutrition
- Serving Size: one normal portion
- Calories: 600-800