

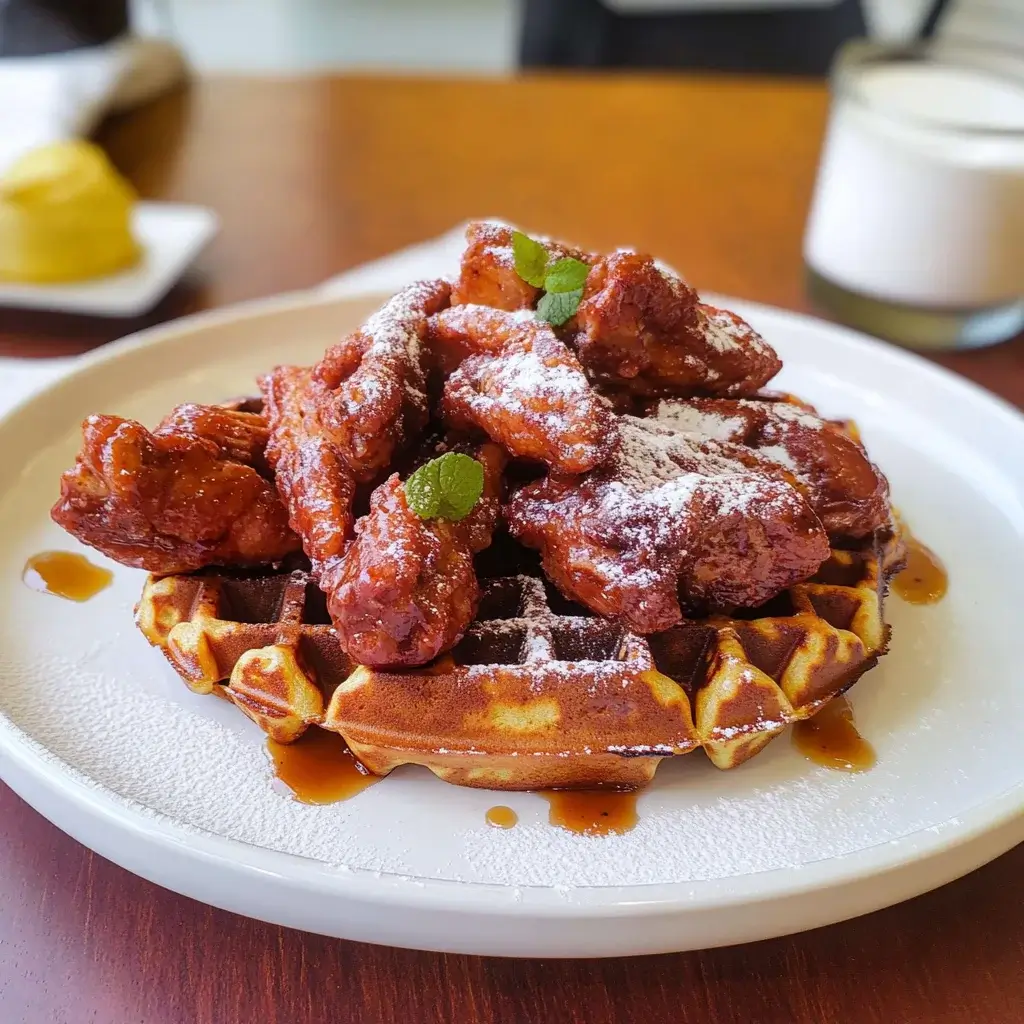
Let me tell you, there are some food combinations that just sound… wrong. Chicken and waffles? Red velvet anything savory? My initial reaction was definitely skeptical when I first stumbled upon the idea of Red Velvet Waffles and Chicken. But, curiosity, and my family’s insatiable appetite for brunch adventures, got the better of me. And oh boy, am I glad it did! From the first bite, we were hooked. The subtly sweet, cocoa-kissed red velvet waffles, with their tender crumb and hint of tang, provide the perfect canvas for crispy, juicy fried chicken. It’s a symphony of textures and flavors – sweet, savory, crispy, soft – that dances on your palate. My kids, who are usually picky eaters, devoured every last morsel, and my husband declared it his new favorite brunch dish. This isn’t just chicken and waffles; it’s an elevated, indulgent experience that’s perfect for special occasions or when you just want to treat yourself to something truly extraordinary. Prepare to be amazed, because this Red Velvet Waffles and Chicken recipe is about to become your new brunch obsession.
Ingredients: The Building Blocks of Deliciousness
To create this culinary masterpiece, we’ll break down the ingredients into two key components: the Red Velvet Waffles and the Crispy Fried Chicken. Let’s gather everything we need to bring this dream to life.
For the Red Velvet Waffles:
- 2 cups All-Purpose Flour: The foundation of our waffles, providing structure and a tender crumb.
- 2 tablespoons Granulated Sugar: Adds a touch of sweetness to complement the savory chicken.
- 2 teaspoons Baking Powder: The leavening agent that makes our waffles light and fluffy.
- 1/2 teaspoon Baking Soda: Works in tandem with baking powder for optimal rise and texture, and reacts with the buttermilk for that signature red velvet tang.
- 1/2 teaspoon Salt: Enhances the flavors and balances the sweetness.
- 1 tablespoon Unsweetened Cocoa Powder: The secret ingredient that gives red velvet its distinct chocolatey undertone and color depth. Use good quality cocoa for the best flavor.
- 1 cup Buttermilk: The key to red velvet’s signature tang and moistness. Buttermilk also reacts with the baking soda for a lighter texture. You can substitute with 1 cup of milk mixed with 1 tablespoon of lemon juice or white vinegar, letting it sit for 5 minutes.
- 2 Large Eggs: Bind the ingredients together and add richness and structure to the waffles.
- 1/2 cup Vegetable Oil: Adds moisture and tenderness. You can also use melted unsalted butter for a richer flavor.
- 1 teaspoon Vanilla Extract: Enhances the overall flavor profile and adds a touch of warmth.
- 1 teaspoon White Vinegar: Another key ingredient for the red velvet tang and helps activate the baking soda.
- 1 tablespoon Red Food Coloring (Liquid or Gel): The iconic ingredient that gives red velvet its vibrant hue. Gel food coloring is more concentrated, so you may need slightly less. Adjust to your desired color intensity.
- Non-stick Cooking Spray or Butter: For greasing your waffle iron and preventing sticking.
For the Crispy Fried Chicken:
- 1.5 – 2 lbs Bone-in, Skin-on Chicken Pieces (Thighs, Drumsticks, Wings): Bone-in, skin-on chicken pieces are ideal for frying as they retain moisture and develop crispy skin. Thighs and drumsticks are particularly flavorful and forgiving.
- 2 cups Buttermilk: For marinating the chicken, tenderizing it, and helping the breading adhere.
- 2 tablespoons Hot Sauce (Optional): Adds a subtle kick and depth of flavor. Use your favorite brand or omit if you prefer a milder flavor.
- 2 cups All-Purpose Flour: The base of our crispy breading.
- 1 cup Cornstarch: Adds extra crispiness to the breading and helps prevent it from becoming soggy.
- 2 tablespoons Paprika: Adds color and smoky flavor to the breading.
- 2 tablespoons Garlic Powder: For savory garlic goodness.
- 2 tablespoons Onion Powder: Adds depth of flavor.
- 1 tablespoon Dried Thyme: Adds a touch of herbaceousness.
- 1 tablespoon Dried Oregano: Complements the thyme and garlic.
- 1 tablespoon Salt: Seasons the breading and enhances the chicken’s flavor.
- 2 teaspoons Black Pepper: Adds a touch of spice.
- Vegetable Oil, for frying: Choose a neutral oil with a high smoke point, like vegetable, canola, or peanut oil. You’ll need enough oil to reach a depth of about 2-3 inches in your frying pan or pot.
Instructions: Crafting Culinary Magic Step-by-Step
Now that we have our ingredients ready, let’s embark on the journey of creating these delectable Red Velvet Waffles and Chicken. Follow these detailed instructions for a guaranteed success.
Part 1: Preparing the Crispy Fried Chicken
- Marinate the Chicken: In a large bowl, combine the chicken pieces, buttermilk, and hot sauce (if using). Ensure the chicken is fully submerged in the buttermilk. Cover the bowl with plastic wrap and refrigerate for at least 4 hours, or ideally overnight. Marinating tenderizes the chicken and infuses it with flavor.
- Prepare the Breading: In a separate large bowl, whisk together the flour, cornstarch, paprika, garlic powder, onion powder, thyme, oregano, salt, and pepper. This flavorful blend will create our crispy coating.
- Dredge the Chicken: Remove the chicken pieces from the buttermilk marinade, letting any excess drip off. One piece at a time, dredge each chicken piece in the breading mixture, ensuring it is fully coated. Press the breading into the chicken to help it adhere. For extra crispy chicken, you can double dredge: dip the breaded chicken back into the buttermilk, then back into the breading again.
- Heat the Oil: Pour vegetable oil into a large, heavy-bottomed pot or deep skillet to a depth of about 2-3 inches. Heat the oil over medium-high heat until it reaches 350°F (175°C). Use a candy thermometer or deep-fry thermometer to accurately monitor the oil temperature. Maintaining the correct oil temperature is crucial for crispy, evenly cooked chicken. If the oil is too cold, the chicken will be greasy; if it’s too hot, the outside will burn before the inside is cooked through.
- Fry the Chicken: Carefully place a few pieces of chicken into the hot oil, being careful not to overcrowd the pot. Overcrowding will lower the oil temperature and result in soggy chicken. Fry the chicken in batches, about 6-8 minutes per side for smaller pieces like wings, and 8-12 minutes per side for larger pieces like thighs and drumsticks, or until the chicken is cooked through and golden brown. The internal temperature of the chicken should reach 165°F (74°C). Use a meat thermometer to check for doneness, inserting it into the thickest part of the chicken, avoiding the bone.
- Drain the Chicken: Remove the fried chicken pieces from the oil and place them on a wire rack set over a baking sheet. This allows excess oil to drip off and keeps the chicken crispy. Do not place the chicken directly on paper towels, as this can make the bottom soggy.
- Keep Chicken Warm (Optional): To keep the fried chicken warm while you prepare the waffles, you can place the baking sheet with the wire rack in a preheated oven at 200°F (95°C).
Part 2: Crafting the Red Velvet Waffles
- Whisk Dry Ingredients: In a large mixing bowl, whisk together the flour, sugar, baking powder, baking soda, salt, and cocoa powder. This ensures the dry ingredients are evenly distributed.
- Whisk Wet Ingredients: In a separate bowl, whisk together the buttermilk, eggs, vegetable oil, vanilla extract, vinegar, and red food coloring. Whisk until well combined and the food coloring is evenly dispersed.
- Combine Wet and Dry Ingredients: Pour the wet ingredients into the bowl with the dry ingredients. Gently whisk until just combined. Do not overmix the batter; a few lumps are okay. Overmixing can develop gluten and result in tough waffles.
- Preheat Waffle Iron: Preheat your waffle iron according to the manufacturer’s instructions. Most waffle irons have an indicator light that signals when it’s ready.
- Grease Waffle Iron: Lightly grease the waffle iron with non-stick cooking spray or brush with melted butter. This prevents the waffles from sticking and ensures easy removal.
- Cook the Waffles: Pour the batter onto the hot waffle iron, using the amount recommended by your waffle iron manufacturer. Typically, this is about ½ to ¾ cup of batter per waffle, depending on the size of your iron. Close the waffle iron lid and cook according to your waffle iron’s instructions, usually until the waffle is golden brown and steam is no longer escaping from the sides.
- Remove and Repeat: Carefully remove the cooked waffle from the waffle iron. Repeat steps 6 and 7 with the remaining batter, keeping the cooked waffles warm in a low oven (200°F/95°C) if desired, while you finish making the rest.
Part 3: Assembling and Serving
- Plate the Dish: Place a warm red velvet waffle on a plate. Top with a piece or two of crispy fried chicken.
- Add Toppings (Optional): Drizzle with maple syrup, honey, or a cream cheese glaze (recipe below). Garnish with fresh berries, a dusting of powdered sugar, or a sprinkle of chopped chives for a touch of savory contrast.
- Serve Immediately: Serve your Red Velvet Waffles and Chicken immediately for the best taste and texture. Enjoy the delightful combination of sweet and savory!
Cream Cheese Glaze (Optional):
- 4 ounces Cream Cheese, softened
- 1/4 cup Powdered Sugar
- 2-3 tablespoons Milk or Cream
- 1/2 teaspoon Vanilla Extract
In a small bowl, beat the softened cream cheese with an electric mixer until smooth and creamy. Gradually add the powdered sugar, mixing until incorporated. Add milk or cream, one tablespoon at a time, until you reach your desired consistency for drizzling. Stir in vanilla extract.
Nutrition Facts: A Treat, Not an Everyday Meal
While Red Velvet Waffles and Chicken is undeniably delicious, it’s important to be mindful of its nutritional profile. This is a decadent treat meant for occasional indulgence, not a daily staple.
- Servings: This recipe typically yields approximately 6-8 servings, depending on the size of the chicken pieces and waffles.
- Estimated Calories per Serving: Approximately 600-800 calories per serving. This is a rough estimate and can vary based on portion sizes, specific ingredients used (e.g., type of oil, fat content of chicken), and added toppings.
Important Note: This calorie estimate is for a serving of Red Velvet Waffles and Chicken without additional toppings like syrup or glaze. Adding syrup, glaze, or other toppings will significantly increase the calorie count.
For a more accurate nutritional breakdown, you can use online nutrition calculators, inputting the specific brands and quantities of ingredients you used. Remember to enjoy this dish in moderation as part of a balanced diet.
Preparation Time: Plan Ahead for Brunch Perfection
To ensure a smooth cooking experience, it’s helpful to understand the time commitment involved in making Red Velvet Waffles and Chicken.
- Prep Time: Approximately 45-60 minutes (includes marinating chicken, preparing batter and breading). The chicken marinating time is a significant factor, ideally 4 hours or overnight. Active prep time is shorter, around 45-60 minutes.
- Cook Time: Approximately 30-45 minutes (includes frying chicken and cooking waffles). Frying chicken in batches and making waffles takes time, especially if you are making a larger batch.
- Total Time (excluding marinating): Approximately 1 hour 15 minutes – 1 hour 45 minutes.
- Total Time (including overnight marinating): Overnight + 1 hour 15 minutes – 1 hour 45 minutes.
Tips for Time Management:
- Marinate Chicken Ahead: Marinate the chicken the night before to save time on the day of cooking.
- Prepare Dry Ingredients: Measure out and mix the dry ingredients for both the waffles and chicken breading in advance.
- Work in Parallel: While the chicken is marinating, you can prepare the waffle batter (it can be made a couple of hours ahead and kept refrigerated).
- Teamwork: If cooking for a crowd, enlist help! One person can focus on frying the chicken while another makes waffles.
How to Serve: Elevating Your Brunch Presentation
Red Velvet Waffles and Chicken is a show-stopping dish on its own, but thoughtful serving suggestions can elevate the experience even further. Here are some ideas to make your brunch truly memorable:
- Classic Syrup Drizzle: The simplest and most traditional way to serve chicken and waffles is with a generous drizzle of warm maple syrup. The sweetness perfectly complements the savory chicken and subtly sweet waffles.
- Honey Butter: Elevate your butter game by making honey butter. Simply whip softened butter with honey until light and fluffy. Spread a dollop on top of the waffles for a rich and sweet-savory flavor combination.
- Cream Cheese Glaze: As mentioned earlier, a cream cheese glaze adds a tangy sweetness that echoes the red velvet flavor and complements both the waffles and chicken.
- Fresh Berries: A scattering of fresh berries like strawberries, raspberries, or blueberries adds a pop of color, freshness, and acidity to balance the richness of the dish.
- Powdered Sugar Dusting: A light dusting of powdered sugar adds a touch of elegance and visual appeal.
- Savory Garnish: For a more balanced flavor profile, consider a sprinkle of chopped fresh chives or parsley. This adds a savory element and a fresh herbal note.
- Side of Coleslaw: A creamy coleslaw provides a refreshing and crunchy contrast to the rich waffles and chicken.
- Mac and Cheese: For a truly indulgent brunch, serve a side of creamy mac and cheese. The cheesy richness complements the sweet and savory flavors.
- Green Salad: A simple green salad with a light vinaigrette can provide a refreshing counterpoint to the richness of the dish.
- Hot Sauce on the Side: Offer a variety of hot sauces on the side for those who like to add extra spice to their chicken and waffles.
Presentation is Key:
- Stack it High: Create a visually appealing stack of waffles topped with chicken.
- Garnish Generously: Don’t be shy with garnishes! Fresh herbs, berries, and powdered sugar elevate the presentation.
- Serve Warm: Ensure both the waffles and chicken are served warm for the best taste and texture.
Additional Tips for Red Velvet Waffles and Chicken Perfection
Want to take your Red Velvet Waffles and Chicken to the next level? Here are five essential tips for achieving brunch greatness:
- Don’t Overmix the Waffle Batter: Overmixing waffle batter develops gluten, resulting in tough waffles. Mix the wet and dry ingredients just until combined, leaving a few lumps. This ensures light and fluffy waffles.
- Control Oil Temperature for Crispy Chicken: Maintaining the correct oil temperature (350°F/175°C) is crucial for crispy, non-greasy fried chicken. Use a thermometer to monitor the temperature and adjust the heat as needed. Fry in batches to prevent overcrowding and keep the oil temperature consistent.
- Double Dredge for Extra Crispy Chicken: For an extra crispy coating, double dredge the chicken. After the first dredge in breading, dip it back into the buttermilk, then dredge it again in the breading. This creates a thicker, crispier crust.
- Keep Waffles Warm Without Sogging: To keep waffles warm while you cook the rest of the batch or fry the chicken, place them in a single layer on a wire rack in a preheated oven at 200°F (95°C). Avoid stacking them or placing them in a closed container, as this can trap steam and make them soggy.
- Customize the Sweetness and Spice: Adjust the sugar in the waffle batter to your preference. If you prefer less sweet waffles, reduce the sugar to 1 tablespoon. Similarly, adjust the amount of hot sauce in the chicken marinade to control the spice level. You can also add a pinch of cayenne pepper to the waffle batter for a subtle kick.
FAQ: Your Burning Questions Answered
Got questions about making Red Velvet Waffles and Chicken? We’ve got answers! Here are five frequently asked questions to help you on your culinary journey:
Q1: Can I make the waffle batter ahead of time?
A1: Yes, you can prepare the waffle batter up to 24 hours in advance. Store it covered in the refrigerator. Whisk it gently before using if it has thickened slightly.
Q2: Can I use boneless, skinless chicken?
A2: While bone-in, skin-on chicken is recommended for the best flavor and moisture in fried chicken, you can use boneless, skinless chicken thighs or breasts if preferred. However, boneless chicken tends to dry out more easily, so be careful not to overcook it. Reduce the frying time accordingly.
Q3: Can I bake the chicken instead of frying it?
A3: While frying is essential for achieving truly crispy fried chicken, you can bake the chicken for a healthier option. Preheat your oven to 400°F (200°C). Place the breaded chicken on a baking sheet lined with parchment paper or a wire rack. Bake for 30-40 minutes, or until cooked through and golden brown. The texture will be different from fried chicken, but still flavorful.
Q4: What can I use if I don’t have buttermilk?
A4: If you don’t have buttermilk, you can easily make a substitute. For each cup of buttermilk needed, combine 1 cup of milk with 1 tablespoon of lemon juice or white vinegar. Stir and let it sit for 5 minutes to curdle slightly before using.
Q5: Can I freeze leftover Red Velvet Waffles and Chicken?
A5: Yes, you can freeze both leftover waffles and chicken separately. Let them cool completely. Wrap waffles tightly in plastic wrap and then in a freezer bag. Freeze chicken in an airtight container or freezer bag. To reheat waffles, toast them in a toaster or toaster oven until crispy. Reheat chicken in the oven at 350°F (175°C) until heated through and crispy, or in an air fryer for a quicker and crispier result. The texture of the chicken may be slightly different after freezing and reheating.
Print
Red Velvet Waffles and Chicken recipe
Ingredients
For the Red Velvet Waffles:
-
- 2 cups All-Purpose Flour: The foundation of our waffles, providing structure and a tender crumb.
-
- 2 tablespoons Granulated Sugar: Adds a touch of sweetness to complement the savory chicken.
-
- 2 teaspoons Baking Powder: The leavening agent that makes our waffles light and fluffy.
-
- 1/2 teaspoon Baking Soda: Works in tandem with baking powder for optimal rise and texture, and reacts with the buttermilk for that signature red velvet tang.
-
- 1/2 teaspoon Salt: Enhances the flavors and balances the sweetness.
-
- 1 tablespoon Unsweetened Cocoa Powder: The secret ingredient that gives red velvet its distinct chocolatey undertone and color depth. Use good quality cocoa for the best flavor.
-
- 1 cup Buttermilk: The key to red velvet’s signature tang and moistness. Buttermilk also reacts with the baking soda for a lighter texture. You can substitute with 1 cup of milk mixed with 1 tablespoon of lemon juice or white vinegar, letting it sit for 5 minutes.
-
- 2 Large Eggs: Bind the ingredients together and add richness and structure to the waffles.
-
- 1/2 cup Vegetable Oil: Adds moisture and tenderness. You can also use melted unsalted butter for a richer flavor.
-
- 1 teaspoon Vanilla Extract: Enhances the overall flavor profile and adds a touch of warmth.
-
- 1 teaspoon White Vinegar: Another key ingredient for the red velvet tang and helps activate the baking soda.
-
- 1 tablespoon Red Food Coloring (Liquid or Gel): The iconic ingredient that gives red velvet its vibrant hue. Gel food coloring is more concentrated, so you may need slightly less. Adjust to your desired color intensity.
-
- Non-stick Cooking Spray or Butter: For greasing your waffle iron and preventing sticking.
For the Crispy Fried Chicken:
-
- 1.5 – 2 lbs Bone-in, Skin-on Chicken Pieces (Thighs, Drumsticks, Wings): Bone-in, skin-on chicken pieces are ideal for frying as they retain moisture and develop crispy skin. Thighs and drumsticks are particularly flavorful and forgiving.
-
- 2 cups Buttermilk: For marinating the chicken, tenderizing it, and helping the breading adhere.
-
- 2 tablespoons Hot Sauce (Optional): Adds a subtle kick and depth of flavor. Use your favorite brand or omit if you prefer a milder flavor.
-
- 2 cups All-Purpose Flour: The base of our crispy breading.
-
- 1 cup Cornstarch: Adds extra crispiness to the breading and helps prevent it from becoming soggy.
-
- 2 tablespoons Paprika: Adds color and smoky flavor to the breading.
-
- 2 tablespoons Garlic Powder: For savory garlic goodness.
-
- 2 tablespoons Onion Powder: Adds depth of flavor.
-
- 1 tablespoon Dried Thyme: Adds a touch of herbaceousness.
-
- 1 tablespoon Dried Oregano: Complements the thyme and garlic.
-
- 1 tablespoon Salt: Seasons the breading and enhances the chicken’s flavor.
-
- 2 teaspoons Black Pepper: Adds a touch of spice.
-
- Vegetable Oil, for frying: Choose a neutral oil with a high smoke point, like vegetable, canola, or peanut oil. You’ll need enough oil to reach a depth of about 2-3 inches in your frying pan or pot.
Instructions
Part 1: Preparing the Crispy Fried Chicken
-
- Marinate the Chicken: In a large bowl, combine the chicken pieces, buttermilk, and hot sauce (if using). Ensure the chicken is fully submerged in the buttermilk. Cover the bowl with plastic wrap and refrigerate for at least 4 hours, or ideally overnight. Marinating tenderizes the chicken and infuses it with flavor.
-
- Prepare the Breading: In a separate large bowl, whisk together the flour, cornstarch, paprika, garlic powder, onion powder, thyme, oregano, salt, and pepper. This flavorful blend will create our crispy coating.
-
- Dredge the Chicken: Remove the chicken pieces from the buttermilk marinade, letting any excess drip off. One piece at a time, dredge each chicken piece in the breading mixture, ensuring it is fully coated. Press the breading into the chicken to help it adhere. For extra crispy chicken, you can double dredge: dip the breaded chicken back into the buttermilk, then back into the breading again.
-
- Heat the Oil: Pour vegetable oil into a large, heavy-bottomed pot or deep skillet to a depth of about 2-3 inches. Heat the oil over medium-high heat until it reaches 350°F (175°C). Use a candy thermometer or deep-fry thermometer to accurately monitor the oil temperature. Maintaining the correct oil temperature is crucial for crispy, evenly cooked chicken. If the oil is too cold, the chicken will be greasy; if it’s too hot, the outside will burn before the inside is cooked through.
-
- Fry the Chicken: Carefully place a few pieces of chicken into the hot oil, being careful not to overcrowd the pot. Overcrowding will lower the oil temperature and result in soggy chicken. Fry the chicken in batches, about 6-8 minutes per side for smaller pieces like wings, and 8-12 minutes per side for larger pieces like thighs and drumsticks, or until the chicken is cooked through and golden brown. The internal temperature of the chicken should reach 165°F (74°C). Use a meat thermometer to check for doneness, inserting it into the thickest part of the chicken, avoiding the bone.
-
- Drain the Chicken: Remove the fried chicken pieces from the oil and place them on a wire rack set over a baking sheet. This allows excess oil to drip off and keeps the chicken crispy. Do not place the chicken directly on paper towels, as this can make the bottom soggy.
-
- Keep Chicken Warm (Optional): To keep the fried chicken warm while you prepare the waffles, you can place the baking sheet with the wire rack in a preheated oven at 200°F (95°C).
Part 2: Crafting the Red Velvet Waffles
-
- Whisk Dry Ingredients: In a large mixing bowl, whisk together the flour, sugar, baking powder, baking soda, salt, and cocoa powder. This ensures the dry ingredients are evenly distributed.
-
- Whisk Wet Ingredients: In a separate bowl, whisk together the buttermilk, eggs, vegetable oil, vanilla extract, vinegar, and red food coloring. Whisk until well combined and the food coloring is evenly dispersed.
-
- Combine Wet and Dry Ingredients: Pour the wet ingredients into the bowl with the dry ingredients. Gently whisk until just combined. Do not overmix the batter; a few lumps are okay. Overmixing can develop gluten and result in tough waffles.
-
- Preheat Waffle Iron: Preheat your waffle iron according to the manufacturer’s instructions. Most waffle irons have an indicator light that signals when it’s ready.
-
- Grease Waffle Iron: Lightly grease the waffle iron with non-stick cooking spray or brush with melted butter. This prevents the waffles from sticking and ensures easy removal.
-
- Cook the Waffles: Pour the batter onto the hot waffle iron, using the amount recommended by your waffle iron manufacturer. Typically, this is about ½ to ¾ cup of batter per waffle, depending on the size of your iron. Close the waffle iron lid and cook according to your waffle iron’s instructions, usually until the waffle is golden brown and steam is no longer escaping from the sides.
-
- Remove and Repeat: Carefully remove the cooked waffle from the waffle iron. Repeat steps 6 and 7 with the remaining batter, keeping the cooked waffles warm in a low oven (200°F/95°C) if desired, while you finish making the rest.
Part 3: Assembling and Serving
-
- Plate the Dish: Place a warm red velvet waffle on a plate. Top with a piece or two of crispy fried chicken.
-
- Add Toppings (Optional): Drizzle with maple syrup, honey, or a cream cheese glaze (recipe below). Garnish with fresh berries, a dusting of powdered sugar, or a sprinkle of chopped chives for a touch of savory contrast.
-
- Serve Immediately: Serve your Red Velvet Waffles and Chicken immediately for the best taste and texture. Enjoy the delightful combination of sweet and savory!
Cream Cheese Glaze (Optional):
-
- 4 ounces Cream Cheese, softened
-
- 1/4 cup Powdered Sugar
-
- 2-3 tablespoons Milk or Cream
-
- 1/2 teaspoon Vanilla Extract
Nutrition
- Serving Size: one normal portion
- Calories: 600-800