Ingredients
Scale
For the Crispy Fried Chicken:
-
- Chicken:
-
- 3 lbs (approx. 1.4 kg) bone-in, skin-on chicken pieces (a mix of thighs, drumsticks, and wings works best; breasts can be used but may cook faster and dry out if not careful)
-
- Chicken:
-
- Buttermilk Marinade (for tenderizing and flavor):
-
- 2 cups (480 ml) buttermilk
-
- 1 tablespoon hot sauce (e.g., Frank’s RedHot or your favorite brand)
-
- 1 tablespoon salt
-
- 1 teaspoon black pepper
-
- 2 cloves garlic, minced (optional)
-
- Buttermilk Marinade (for tenderizing and flavor):
-
- Seasoned Flour Dredge (for ultimate crispiness):
-
- 2 ½ cups (300g) all-purpose flour
-
- 1/2 cup (60g) cornstarch (the secret to extra crispiness!)
-
- 2 tablespoons paprika (smoked or sweet)
-
- 1 tablespoon garlic powder
-
- 1 tablespoon onion powder
-
- 1 tablespoon salt (adjust to taste, considering salt in marinade)
-
- 1 teaspoon black pepper
-
- 1 teaspoon cayenne pepper (adjust to your heat preference)
-
- 1/2 teaspoon dried thyme (optional)
-
- Seasoned Flour Dredge (for ultimate crispiness):
-
- Frying Oil:
-
- 4–6 cups (0.95 – 1.4 liters) neutral frying oil with a high smoke point (e.g., peanut oil, canola oil, vegetable oil)
-
- Frying Oil:
For the Classic Fluffy Waffles:
-
- Dry Ingredients:
-
- 2 cups (240g) all-purpose flour
-
- 2 tablespoons granulated sugar
-
- 1 tablespoon baking powder (make sure it’s fresh for maximum fluffiness)
-
- 1/2 teaspoon salt
-
- Dry Ingredients:
-
- Wet Ingredients:
-
- 2 large eggs, separated (yolks and whites)
-
- 1 ¾ cups (420 ml) milk (whole milk or buttermilk recommended)
-
- 1/2 cup (113g) unsalted butter, melted and slightly cooled (or 1/2 cup neutral oil)
-
- 1 teaspoon vanilla extract
-
- Wet Ingredients:
-
- For Cooking Waffles:
-
- Non-stick cooking spray or a little extra melted butter for the waffle iron
-
- For Cooking Waffles:
Instructions
Part 1: Preparing and Frying the Crispy Chicken
-
- Marinate the Chicken (Minimum 2 Hours, Preferably Overnight):
-
- In a large bowl or a large resealable plastic bag, combine the buttermilk, hot sauce, 1 tablespoon salt, 1 teaspoon black pepper, and minced garlic (if using).
-
- Add the chicken pieces to the marinade, ensuring each piece is well-coated.
-
- Cover the bowl or seal the bag and refrigerate for at least 2 hours, or ideally overnight (up to 24 hours). This step is crucial for tender, flavorful chicken.
-
- Marinate the Chicken (Minimum 2 Hours, Preferably Overnight):
-
- Prepare the Seasoned Flour Dredge:
-
- In a large, shallow dish or a large resealable bag, whisk together the all-purpose flour, cornstarch, paprika, garlic powder, onion powder, 1 tablespoon salt, 1 teaspoon black pepper, cayenne pepper, and dried thyme (if using). Mix thoroughly until all ingredients are evenly distributed.
-
- Prepare the Seasoned Flour Dredge:
-
- Set Up Your Frying Station:
-
- Pour your frying oil into a large, heavy-bottomed pot (like a Dutch oven) or a deep skillet to a depth of at least 1.5-2 inches. Make sure there’s enough headspace to prevent oil from bubbling over.
-
- Place a wire rack over a baking sheet nearby. This is where you’ll drain the fried chicken to keep it crispy.
-
- Have a kitchen thermometer (deep-fry or instant-read) ready.
-
- Set Up Your Frying Station:
-
- Dredge the Chicken:
-
- Remove chicken pieces from the buttermilk marinade one at a time, allowing excess marinade to drip off.
-
- Dredge each piece thoroughly in the seasoned flour mixture, pressing the flour onto the chicken to ensure it adheres well. For an extra-crispy crust (recommended!), dip the floured chicken back into the buttermilk marinade briefly, then dredge it again in the seasoned flour (this is a double dredge).
-
- Place the coated chicken pieces on a separate clean plate or wire rack and let them rest for 10-15 minutes. This helps the coating set and adhere better during frying.
-
- Dredge the Chicken:
-
- Heat the Frying Oil:
-
- Heat the oil over medium-high heat until it reaches a temperature of 325-350°F (160-175°C). Use your thermometer to monitor the temperature. It’s important to maintain this temperature range; too low and the chicken will be greasy, too high and the outside will burn before the inside is cooked.
-
- Heat the Frying Oil:
-
- Fry the Chicken in Batches:
-
- Carefully place a few pieces of chicken into the hot oil, ensuring not to overcrowd the pot (this lowers the oil temperature and results in soggy chicken). The oil should come about halfway up the sides of the chicken.
-
- Fry for about 6-8 minutes on the first side, or until deeply golden brown and crispy.
-
- Using tongs, carefully flip the chicken pieces and continue to fry for another 6-8 minutes on the other side, or until golden brown and the internal temperature reaches 165°F (74°C) in the thickest part, avoiding the bone. Wings will cook faster than thighs or drumsticks.
-
- Adjust the heat as needed to maintain the oil temperature.
-
- Fry the Chicken in Batches:
-
- Drain and Keep Warm:
-
- Once cooked, remove the chicken from the oil and place it on the prepared wire rack to drain. Do not place it on paper towels directly, as this can steam the bottom and make it less crispy.
-
- If cooking in multiple batches, you can keep the cooked chicken warm in a preheated oven at 200°F (95°C) on the wire rack while you fry the remaining pieces.
-
- Allow the oil temperature to return to 325-350°F before adding the next batch.
-
- Drain and Keep Warm:
Part 2: Making the Fluffy Waffles
-
- Prepare the Waffle Batter:
-
- Preheat your waffle iron according to the manufacturer’s instructions.
-
- In a large bowl, whisk together the dry ingredients: 2 cups all-purpose flour, sugar, baking powder, and 1/2 teaspoon salt.
-
- In a separate medium bowl, whisk together the egg yolks, milk, melted butter (or oil), and vanilla extract.
-
- In a clean, dry bowl (preferably glass or metal), beat the egg whites with an electric mixer until stiff peaks form. This is key for light and airy waffles.
-
- Pour the wet ingredients (yolk mixture) into the dry ingredients and mix until just combined. A few lumps are okay; do not overmix.
-
- Gently fold about one-third of the beaten egg whites into the batter to lighten it. Then, carefully fold in the remaining egg whites until just incorporated. Again, be careful not to overmix, as this will deflate the egg whites.
-
- Prepare the Waffle Batter:
-
- Cook the Waffles:
-
- Lightly grease the preheated waffle iron with non-stick cooking spray or a little melted butter (if your waffle iron requires it).
-
- Pour the recommended amount of batter (as per your waffle iron’s instructions) onto the hot waffle iron.
-
- Close the lid and cook for the time specified by your waffle iron manufacturer, usually 3-5 minutes, or until the waffles are golden brown and crisp. Steam will typically stop or lessen significantly when they are ready.
-
- Carefully remove the cooked waffle and place it on a wire rack to prevent it from getting soggy. You can keep cooked waffles warm in a 200°F (95°C) oven directly on the oven rack or on a baking sheet while you cook the remaining batter.
-
- Cook the Waffles:
Part 3: Assembling Your Crispy Chicken and Waffles
-
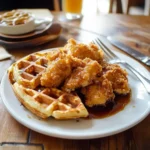
- Plate: Place a warm, fluffy waffle on each plate.
-
- Top: Arrange 1-2 pieces of crispy fried chicken on top of each waffle.
-
- Serve: Serve immediately with warm maple syrup, pats of butter, and any other desired accompaniments like hot sauce or hot honey. A light dusting of powdered sugar can add a nice visual touch.
Nutrition
- Serving Size: one normal portion
- Calories: 800-1200