

There are some dishes that just instantly transport you to a place of comfort and satisfaction, and for my family, this Teriyaki Vegetables recipe is definitely one of them. I remember the first time I made it on a busy weeknight, desperately needing something quick, healthy, and appealing to both adults and slightly picky kids. The sizzle of the vegetables hitting the hot wok, the fragrant steam rising infused with ginger and garlic, and that final glossy coat of homemade teriyaki sauce… it was magic. The vibrant colours looked incredible, but the taste? Even better. My partner, usually reserved with praise, declared it “restaurant-quality,” and the kids actually asked for seconds of the broccoli – a small miracle! Since then, this simple yet incredibly flavorful teriyaki vegetable stir-fry has become a staple in our rotation. It’s my go-to for using up leftover veggies, a reliable quick dinner, and proof that healthy eating can be absolutely delicious and incredibly easy. The balance of sweet, savoury, and umami in the homemade teriyaki sauce elevates humble vegetables into something truly special. It’s more than just a recipe; it’s a guaranteed win for dinner time, bringing smiles and satisfied appetites every single time. Whether you’re a seasoned cook or just starting, I promise this dish will impress.
The Ultimate Teriyaki Vegetables Recipe: Ingredients You’ll Need
Creating delicious, vibrant Teriyaki Vegetables at home is surprisingly simple, relying on fresh produce and a perfectly balanced homemade sauce. Forget the overly sweet, preservative-laden bottled stuff; making your own teriyaki sauce takes minutes and allows you to control the flavour and ingredients. Here’s what you’ll need to gather:
For the Homemade Teriyaki Sauce:
- Soy Sauce (or Tamari for Gluten-Free): ½ cup (120 ml) – This is the savoury, umami backbone of the sauce. Use a good quality naturally brewed soy sauce. For a gluten-free option, tamari is an excellent substitute, offering a slightly richer, less salty flavour.
- Water: ¼ cup (60 ml) – Helps to balance the saltiness and create the right consistency.
- Mirin: ¼ cup (60 ml) – A sweet Japanese rice wine essential for authentic teriyaki flavour. It adds a subtle sweetness and glossiness. If you can’t find mirin, you can substitute dry sherry or marsala wine with an extra teaspoon of sugar, though the flavour profile will differ slightly.
- Brown Sugar (Light or Dark): ¼ cup (50g), packed – Provides the characteristic sweetness that balances the salty soy sauce. You can adjust the amount slightly based on your preference. Maple syrup or honey can be substituted, but they will alter the flavour. Coconut sugar also works well.
- Fresh Ginger: 1 tablespoon, finely minced or grated (about a 1-inch piece) – Adds a warm, pungent spice that cuts through the richness. Fresh ginger is highly recommended over powdered for its vibrant flavour.
- Fresh Garlic: 2-3 cloves, finely minced or pressed – Provides an aromatic, savoury depth. Adjust the amount based on your love for garlic!
- Cornstarch (or Arrowroot Powder): 1 tablespoon – This is our thickening agent. It creates that beautiful glossy glaze that coats the vegetables. Arrowroot powder is a good gluten-free alternative.
- Cold Water: 2 tablespoons – Used to create a slurry with the cornstarch, preventing lumps when added to the hot sauce.
- Toasted Sesame Oil: 1 teaspoon (Optional, but recommended) – Added at the end for a nutty aroma and flavour boost. A little goes a long way.
For the Vegetables & Stir-Fry:
- Cooking Oil: 2 tablespoons – Choose a neutral oil with a high smoke point suitable for stir-frying, such as avocado oil, canola oil, grapeseed oil, or peanut oil.
- Broccoli Florets: 2 cups – Cut into bite-sized pieces. Broccoli holds up well to stir-frying and soaks up the sauce beautifully.
- Carrots: 1 large, peeled and thinly sliced on the diagonal – Adds sweetness, colour, and a pleasant crunch. Slicing diagonally increases the surface area for quicker cooking.
- Bell Peppers: 1 large (any colour – red, yellow, or orange recommended for vibrancy), deseeded and cut into 1-inch chunks – Adds sweetness and a lovely visual appeal.
- Snow Peas or Sugar Snap Peas: 1 cup, trimmed – Provide a delightful crispness and fresh, green flavour.
- Mushrooms: 8 oz (225g), sliced (Cremini, shiitake, or button mushrooms work well) – Offer a meaty texture and earthy flavour. Shiitake mushrooms, in particular, add a wonderful umami depth.
- Onion: ½ large, cut into wedges or thick slices – Adds a foundational savoury flavour. Red onion can also be used for a milder taste and pop of colour.
- Zucchini or Yellow Squash: 1 medium, halved lengthwise and sliced into ½-inch thick half-moons (Optional) – Adds bulk and absorbs the sauce well.
- Green Onions: 2-3, sliced (greens and whites separated) – The white parts can be added during cooking for flavour, while the green parts are perfect for garnish.
Optional Garnishes:
- Toasted Sesame Seeds: For crunch and nutty flavour.
- Reserved Sliced Green Onion Tops: For freshness and colour.
- Red Pepper Flakes: For a touch of heat.
Having all your ingredients prepped and ready before you start cooking (a technique known as mise en place) is crucial for a successful stir-fry, as the cooking process is very fast.
Step-by-Step Guide: How to Make Perfect Teriyaki Vegetables
Making restaurant-worthy Teriyaki Vegetables at home is all about technique and timing. Stir-frying is a fast cooking method, so preparation is key. Follow these steps for a vibrant, flavourful, and perfectly cooked dish every time.
Step 1: Prepare the Homemade Teriyaki Sauce
- Combine Base Ingredients: In a small saucepan, combine the soy sauce (or tamari), ¼ cup water, mirin, brown sugar, minced ginger, and minced garlic.
- Heat Gently: Place the saucepan over medium heat. Stir the mixture constantly until the brown sugar has completely dissolved. Don’t let it come to a rapid boil at this stage; you just want to meld the flavours and dissolve the sugar. This usually takes about 2-3 minutes.
- Prepare the Slurry: While the sauce base is heating, whisk together the cornstarch and 2 tablespoons of cold water in a small bowl until smooth. This mixture is called a slurry, and using cold water prevents the cornstarch from clumping when added to the hot liquid.
- Thicken the Sauce: Once the sugar is dissolved, slowly pour the cornstarch slurry into the saucepan while whisking continuously. Bring the mixture to a gentle simmer. Continue to cook and whisk for another 1-2 minutes, or until the sauce thickens to a syrupy, glaze-like consistency – it should coat the back of a spoon.
- Finish and Set Aside: Remove the saucepan from the heat. If using, stir in the toasted sesame oil for extra flavour and aroma. Set the teriyaki sauce aside while you prepare the vegetables. The sauce will thicken slightly more as it cools.
Step 2: Prepare the Vegetables (Mise en Place)
- Wash and Chop: Thoroughly wash all your vegetables. Pat them dry, as excess water can cause splattering in the hot oil and prevent proper searing.
- Uniform Cutting: Chop all the vegetables into relatively uniform, bite-sized pieces as specified in the ingredients list (broccoli florets, sliced carrots, chunked bell peppers, trimmed snow peas, sliced mushrooms, onion wedges, sliced zucchini if using). Uniformity ensures even cooking, so harder vegetables like carrots aren’t still raw when softer ones like mushrooms are overcooked.
- Separate Ingredients: Keep the prepared vegetables separate or grouped by cooking time. Harder vegetables like carrots and broccoli will need a slightly longer cooking time than softer ones like bell peppers, snow peas, and mushrooms. Slice the green onions, keeping the white/light green parts separate from the dark green tops (which are used for garnish).
- Have Everything Ready: Ensure your prepared vegetables, minced garlic/ginger (if adding extra to the stir-fry itself), cooking oil, and the prepared teriyaki sauce are all within easy reach of your stovetop. Stir-frying moves quickly!
Step 3: Stir-Fry the Vegetables
- Heat the Wok/Pan: Place a large wok or a large, heavy-bottomed skillet over high heat. Allow it to get really hot – you should feel the heat radiating from it when you hold your hand a few inches above the surface. A properly heated pan is crucial for achieving that characteristic stir-fry sear (wok hei) rather than just steaming the vegetables.
- Add Oil: Add the cooking oil to the hot wok. Swirl it around to coat the bottom and sides. The oil should shimmer slightly when it’s hot enough.
- Stir-Fry Harder Vegetables: Carefully add the harder vegetables first – typically the broccoli florets and sliced carrots. Stir-fry them constantly, tossing them around the wok for 2-3 minutes. They should start to become tender-crisp and slightly browned in spots. If you like your broccoli softer, you can add a tablespoon of water and briefly cover the wok to steam it slightly before proceeding.
- Add Remaining Vegetables: Add the remaining vegetables – bell peppers, snow peas (or snap peas), mushrooms, onion wedges, and zucchini (if using). Also, add the white/light green parts of the sliced green onions now if desired. Continue to stir-fry vigorously, keeping everything moving, for another 3-5 minutes. The goal is “tender-crisp” – the vegetables should be cooked through but still retain some bite and vibrant colour. Avoid overcrowding the pan; if necessary, cook the vegetables in batches to ensure they sear rather than steam. Overcrowding lowers the pan temperature significantly.
- Check for Doneness: Test a piece of carrot or broccoli – it should be tender but still have a slight firmness. The bell peppers should be slightly softened but still bright, and the snow peas should be bright green and crisp.
Step 4: Sauce and Finish
- Create a Well (Optional but helpful): Push the vegetables to the sides of the wok, creating a well in the centre. If adding extra garlic or ginger directly to the stir-fry for more intense flavour, add it to the well now with a tiny bit more oil and stir-fry for about 30 seconds until fragrant before mixing it back in with the vegetables.
- Add Teriyaki Sauce: Give your prepared teriyaki sauce a quick stir (as the cornstarch might settle) and pour it over the vegetables in the wok.
- Toss to Coat: Immediately start tossing the vegetables continuously to ensure they are evenly coated with the glossy sauce. The heat from the pan will help the sauce cling to the vegetables and bubble slightly. Cook for just another 1-2 minutes, allowing the sauce to heat through and perfectly glaze everything. Be careful not to cook too long at this stage, especially if your sauce is already quite thick, as it can become too sticky or burn due to the sugar content.
- Remove from Heat: Once the vegetables are beautifully glazed and the sauce is hot, remove the wok from the heat immediately.
Step 5: Serve
- Plate: Transfer the hot Teriyaki Vegetables to a serving platter or individual bowls.
- Garnish: Sprinkle generously with toasted sesame seeds and the reserved sliced green onion tops. Add a pinch of red pepper flakes if you desire a little heat.
- Serve Immediately: Teriyaki Vegetables are best enjoyed fresh and hot, while the vegetables are still vibrant and tender-crisp. See the “How to Serve” section for pairing suggestions.
Enjoy your delicious, homemade Teriyaki Vegetable stir-fry!
Nutritional Information: A Healthy Glance
Understanding the nutritional profile of your meals is helpful for maintaining a balanced diet. Please note that these values are estimates and can vary based on the specific ingredients used (e.g., type of oil, exact amount of sugar, specific vegetables chosen) and portion sizes.
- Servings: This recipe typically makes 4 servings when served as a main dish alongside rice or noodles, or 6-8 servings if used as a side dish.
- Calories per Serving (approximate, based on 4 main course servings): 250-350 calories per serving.
Key Nutritional Highlights:
- Vegetable Power: This dish is packed with vitamins, minerals, and dietary fibre from the variety of vegetables used. Broccoli is rich in Vitamin C and K, carrots provide Vitamin A, bell peppers offer Vitamin C, and mushrooms contribute B vitamins and selenium.
- Homemade Control: Making the teriyaki sauce from scratch allows you to control the sodium and sugar content compared to many store-bought versions, which can be very high in both. Using low-sodium soy sauce or tamari can further reduce sodium intake.
- Healthy Fats: Using oils like avocado or canola oil contributes monounsaturated fats. The optional toasted sesame oil adds flavour along with some polyunsaturated fats.
- Customizable: You can easily boost the protein content by adding tofu, edamame, chicken, shrimp, or beef, which will alter the nutritional profile accordingly (increasing protein and potentially calories/fat).
This Teriyaki Vegetables recipe offers a fantastic way to enjoy a flavourful, satisfying meal that is also rich in beneficial plant-based nutrients. It fits well into a healthy eating pattern, providing essential vitamins, minerals, and fibre while being relatively moderate in calories, especially when homemade sauce is used.
Quick & Easy: Preparation and Cook Time
One of the major appeals of this Teriyaki Vegetables recipe is its speed and efficiency, making it perfect for busy weeknights or when you need a delicious meal without spending hours in the kitchen.
- Preparation Time: 15-20 minutes
- This includes washing and chopping all the vegetables and measuring out the sauce ingredients. Having sharp knives and getting into a rhythm can speed this up. Pre-cut vegetables from the store can reduce this time further, although fresh chopping yields the best results. Preparing the sauce takes about 5-7 minutes within this time.
- Cook Time: 10-15 minutes
- This covers heating the wok/pan, stir-frying the vegetables in stages, and adding the sauce to glaze everything at the end. Stir-frying is inherently a quick cooking method.
- Total Time: Approximately 25-35 minutes
This timeframe makes Teriyaki Vegetables a genuinely quick meal option, faster than ordering takeout and significantly healthier and more flavourful! The key to achieving this speed lies in having all ingredients prepped and ready (mise en place) before you even turn on the stove.
Serving Suggestions: Elevate Your Teriyaki Vegetables
Teriyaki Vegetables are wonderfully versatile and can be served in numerous ways to create a complete and satisfying meal. Here are some delicious ideas to elevate your dish:
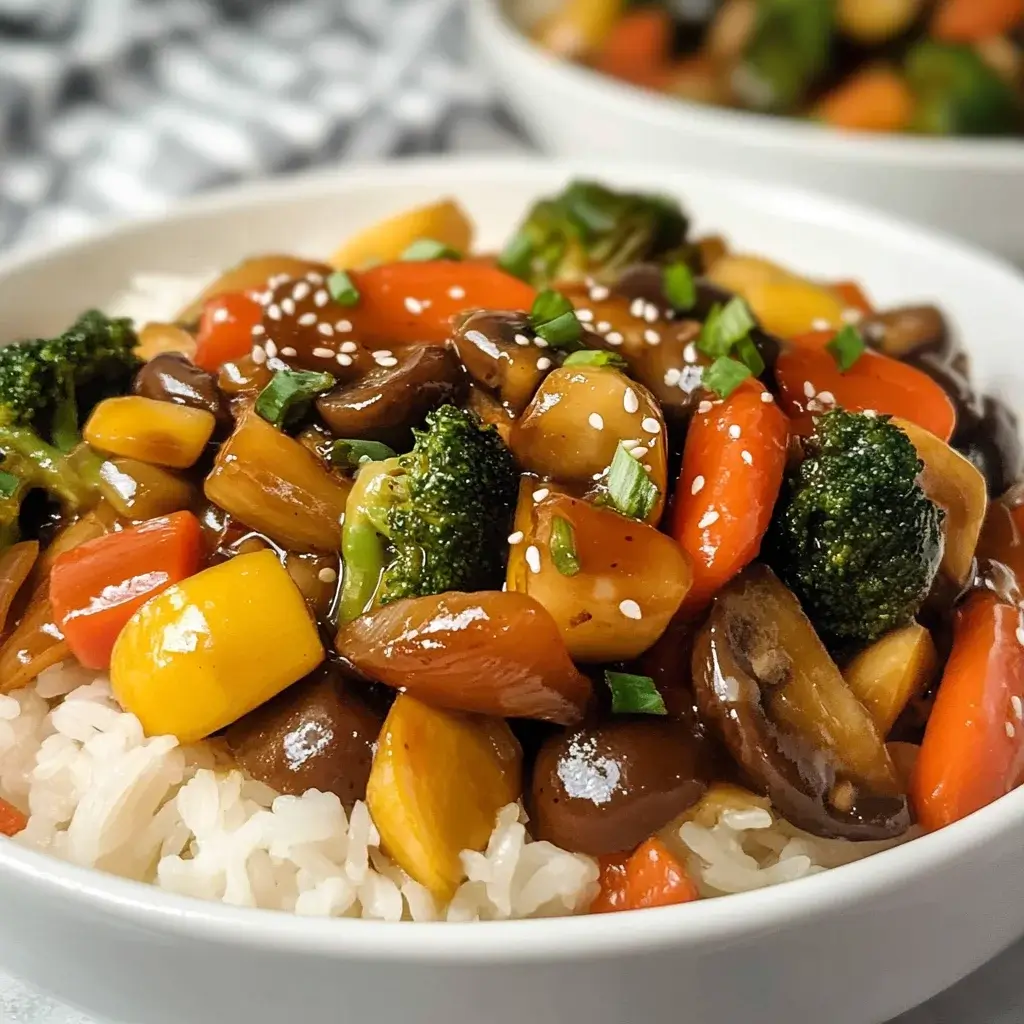
- Classic Rice Bowl:
- Serve the hot Teriyaki Vegetables generously over a bed of fluffy steamed rice (white, brown, jasmine, or basmati all work well).
- Drizzle any extra sauce from the pan over the top.
- Garnish with toasted sesame seeds and sliced green onions.
- Variation: Use sushi rice for a slightly sticky, authentic Japanese feel.
- Noodle Stir-Fry:
- Toss the cooked Teriyaki Vegetables with cooked noodles. Good options include:
- Udon Noodles: Thick, chewy wheat noodles that hold the sauce well.
- Soba Noodles: Buckwheat noodles offering a slightly nutty flavour (check packaging for 100% buckwheat if gluten-free).
- Ramen Noodles: Use fresh or dried ramen (discard the flavour packet).
- Egg Noodles: Classic stir-fry noodles.
- Spaghetti or Linguine: A readily available alternative if Asian noodles aren’t on hand.
- Ensure noodles are cooked al dente and tossed with the vegetables and sauce right at the end.
- Toss the cooked Teriyaki Vegetables with cooked noodles. Good options include:
- Protein Power-Up:
- Make it a complete meal by adding a protein source. Cook the protein separately first, remove it from the pan, stir-fry the vegetables, and then add the cooked protein back in with the sauce. Great additions include:
- Tofu: Pan-fried or baked cubes or triangles of firm or extra-firm tofu.
- Tempeh: Crumbled or cubed tempeh, pan-fried until golden.
- Edamame: Shelled edamame added along with the softer vegetables.
- Chicken: Bite-sized pieces of chicken breast or thigh.
- Shrimp: Peeled and deveined shrimp cook very quickly.
- Beef: Thinly sliced flank steak or sirloin stir-fried quickly.
- Make it a complete meal by adding a protein source. Cook the protein separately first, remove it from the pan, stir-fry the vegetables, and then add the cooked protein back in with the sauce. Great additions include:
- Quinoa or Grain Bowl:
- Serve over cooked quinoa for a protein and fibre boost.
- Other grains like farro, barley, or freekeh also make a hearty base.
- Lettuce Wraps:
- Spoon the Teriyaki Vegetables (perhaps chopped slightly smaller) into crisp lettuce cups (like butter lettuce, romaine hearts, or iceberg).
- Add optional toppings like chopped peanuts, water chestnuts for extra crunch, or a drizzle of sriracha for heat.
- As a Vibrant Side Dish:
- Serve smaller portions alongside grilled fish (like salmon), roasted chicken, or other main courses where a flavourful vegetable side is desired.
- Topping for Baked Potatoes or Sweet Potatoes:
- Spoon the saucy vegetables over a fluffy baked potato or roasted sweet potato for a unique and satisfying meal.
- Garnish Extravaganza: Don’t underestimate the power of garnishes! Beyond sesame seeds and green onions, consider:
- Chopped Cashews or Peanuts: For extra crunch and richness.
- Pickled Ginger: To cleanse the palate between bites.
- A Wedge of Lime: A squeeze of fresh lime juice at the end brightens the flavours.
- Furikake: A Japanese seaweed and sesame seed seasoning blend.
No matter how you choose to serve them, these Teriyaki Vegetables are sure to be a hit!
Pro Tips for Teriyaki Vegetable Perfection
Taking your Teriyaki Vegetables from good to absolutely fantastic often comes down to a few key techniques and considerations. Here are five pro tips to ensure stir-fry success:
- Master the Heat: High and Fast: Stir-frying relies on high heat. Ensure your wok or skillet is properly preheated before adding the oil. The oil should shimmer, or a drop of water should evaporate instantly. This high heat sears the vegetables quickly, locking in flavour and moisture while giving them that desirable slightly charred “wok hei” essence, rather than steaming them into softness. Keep the heat high throughout the main cooking process, only reducing it slightly if necessary when adding the sauce to prevent burning.
- Don’t Crowd the Pan: This is perhaps the most common stir-fry mistake. Adding too many vegetables to the pan at once dramatically lowers the temperature. Instead of searing, the vegetables will release water and start to steam, resulting in a soggy texture and muted flavours. If your pan isn’t large enough to comfortably hold all the vegetables with space to move them around, cook them in batches. Sear one batch, remove it to a plate, sear the next, and then return everything to the pan when adding the sauce. It takes slightly longer but guarantees a far superior texture.
- Prep Everything First (Mise en Place): Stir-frying is incredibly fast. Once you start, you won’t have time to stop and chop an onion or measure soy sauce. Have all your ingredients – chopped vegetables (grouped by cooking time), minced aromatics, measured sauce components, and the pre-mixed sauce itself – ready and within arm’s reach before you turn on the heat. This organised approach is crucial for a smooth, efficient, and stress-free cooking process.
- Uniform Cuts for Even Cooking: Pay attention to how you chop your vegetables. Cutting ingredients into relatively uniform sizes ensures they cook evenly. Harder vegetables like carrots should be sliced thinly or into smaller pieces than softer vegetables like bell peppers or zucchini. This prevents you from having perfectly cooked peppers alongside still-raw carrots or overcooked mushrooms next to perfectly tender-crisp broccoli. Aim for bite-sized pieces that are easy to eat and cook quickly.
- Sauce Timing is Key: Don’t add the teriyaki sauce too early. The sugars in the sauce (from mirin and brown sugar) can burn easily over high heat, leading to a bitter taste and a sticky, burnt mess in your pan. Stir-fry the vegetables until they are perfectly tender-crisp first. Then, add the sauce during the last minute or two of cooking, tossing continuously just long enough to heat the sauce through and evenly coat all the vegetables in that beautiful glaze. If your sauce seems too thick initially, you can add a splash of water; if too thin, let it bubble for an extra 30 seconds to reduce slightly. Adding the optional toasted sesame oil after removing the pan from the heat preserves its delicate nutty flavour and aroma.
By keeping these tips in mind, you’ll consistently produce vibrant, flavourful, and perfectly textured Teriyaki Vegetables that rival any restaurant’s offering.
Frequently Asked Questions (FAQ) about Teriyaki Vegetables
Here are answers to some common questions about making and enjoying Teriyaki Vegetables:
1. Can I make Teriyaki Vegetables ahead of time?
While Teriyaki Vegetables are definitely best enjoyed fresh immediately after cooking to maintain the ideal tender-crisp texture and vibrant colour, you can do some prep ahead.
- Prep Ahead: You can wash and chop all the vegetables a day or two in advance and store them in airtight containers in the refrigerator. You can also prepare the teriyaki sauce completely and store it in an airtight jar in the fridge for up to a week.
- Reheating Leftovers: Leftovers can be stored in an airtight container in the refrigerator for 2-3 days. However, be aware that the vegetables will soften upon reheating. The best way to reheat is quickly in a hot wok or skillet over medium-high heat with a tiny bit of oil or a splash of water, just until heated through. Microwaving works but tends to make the vegetables softer. Avoid over-reheating.
2. What other vegetables can I use in this recipe?
This recipe is incredibly versatile! Feel free to substitute or add other vegetables based on preference or what you have on hand. Some great additions or substitutions include:
- Crunchy: Bok choy (add leafy greens near the end), celery (sliced), water chestnuts, bamboo shoots.
- Softer: Asparagus (cut into 1-inch pieces), green beans (blanched first for best results), cauliflower florets, eggplant (cubed, might need slightly longer cooking or pre-salting).
- Leafy: Spinach or kale (added right at the end to wilt).
- Sweet: Corn kernels (fresh or frozen), peas.
Aim for a good mix of colours, textures, and flavours. Just remember to adjust cooking times based on the density of the vegetables you choose, adding harder ones first.
3. How can I make this recipe gluten-free?
Making this Teriyaki Vegetables recipe gluten-free is very simple. The main source of gluten is traditional soy sauce.
- Use Tamari: Substitute the regular soy sauce with Tamari sauce. Tamari is a Japanese sauce also made from fermented soybeans, but typically contains little to no wheat (always check the label to be sure it’s certified gluten-free). It has a slightly richer, less salty flavour than standard soy sauce that works beautifully in teriyaki.
- Check Mirin: While most mirin is naturally gluten-free, double-check the label as some less traditional brands might contain additives.
- Thickener: Cornstarch is naturally gluten-free. Arrowroot powder is another excellent gluten-free thickening alternative if you prefer to avoid corn.
4. My teriyaki sauce didn’t thicken properly. What went wrong?
There are a few common reasons why your sauce might not thicken:
- Not Enough Heat/Time: The cornstarch slurry needs heat to activate its thickening properties. Ensure you bring the sauce to a gentle simmer after adding the slurry and let it cook for 1-2 minutes while whisking.
- Incorrect Slurry Ratio: Ensure you used the correct ratio of cornstarch to cold water (typically 1 tablespoon cornstarch to 2 tablespoons cold water). Too much water will dilute the thickening power.
- Slurry Added to Cold Liquid: The main sauce liquid should be warm/hot (but not rapidly boiling) when you slowly whisk in the slurry.
- Old Cornstarch: Cornstarch can lose its potency over time. If your cornstarch is very old, it might not thicken as effectively.
- How to Fix: If the sauce is too thin after cooking, you can try making a little more slurry (e.g., ½ tbsp cornstarch + 1 tbsp cold water), whisk it in, and simmer gently for another minute. Be cautious not to make it too thick. Remember it will also thicken slightly as it cools and further when added to the hot vegetables.
5. Can I use store-bought teriyaki sauce instead of homemade?
Yes, you absolutely can use store-bought teriyaki sauce if you’re short on time or ingredients. However, keep a few things in mind:
- Flavour & Sweetness: Store-bought sauces vary greatly in sweetness, saltiness, and thickness. You may find some too sweet or salty for your liking compared to the balanced homemade version. Taste the sauce first.
- Thickness: Some store-bought teriyaki sauces are already quite thick (glaze-style), while others are thinner (marinade-style). If using a thinner sauce, you might want to simmer it briefly in the pan with the vegetables to thicken slightly, or even add a small cornstarch slurry (mix ½ tsp cornstarch with 1 tsp cold water) to the stir-fry along with the sauce to help it thicken and coat the vegetables better. If using a thick glaze, add it right at the very end and toss quickly to avoid burning.
- Ingredients: Homemade sauce allows you to control the ingredients, avoiding high-fructose corn syrup, preservatives, or excessive sodium often found in commercial brands.
While convenient, making the sauce from scratch (as outlined in the recipe) is highly recommended for the best flavour and control over the final dish. It only takes a few extra minutes and makes a noticeable difference.

Teriyaki Vegetables recipe
Ingredients
- Soy Sauce (or Tamari for Gluten-Free): ½ cup (120 ml) – This is the savoury, umami backbone of the sauce. Use a good quality naturally brewed soy sauce. For a gluten-free option, tamari is an excellent substitute, offering a slightly richer, less salty flavour.
- Water: ¼ cup (60 ml) – Helps to balance the saltiness and create the right consistency.
- Mirin: ¼ cup (60 ml) – A sweet Japanese rice wine essential for authentic teriyaki flavour. It adds a subtle sweetness and glossiness. If you can’t find mirin, you can substitute dry sherry or marsala wine with an extra teaspoon of sugar, though the flavour profile will differ slightly.
- Brown Sugar (Light or Dark): ¼ cup (50g), packed – Provides the characteristic sweetness that balances the salty soy sauce. You can adjust the amount slightly based on your preference. Maple syrup or honey can be substituted, but they will alter the flavour. Coconut sugar also works well.
- Fresh Ginger: 1 tablespoon, finely minced or grated (about a 1-inch piece) – Adds a warm, pungent spice that cuts through the richness. Fresh ginger is highly recommended over powdered for its vibrant flavour.
- Fresh Garlic: 2-3 cloves, finely minced or pressed – Provides an aromatic, savoury depth. Adjust the amount based on your love for garlic!
- Cornstarch (or Arrowroot Powder): 1 tablespoon – This is our thickening agent. It creates that beautiful glossy glaze that coats the vegetables. Arrowroot powder is a good gluten-free alternative.
- Cold Water: 2 tablespoons – Used to create a slurry with the cornstarch, preventing lumps when added to the hot sauce.
- Toasted Sesame Oil: 1 teaspoon (Optional, but recommended) – Added at the end for a nutty aroma and flavour boost. A little goes a long way.
For the Vegetables & Stir-Fry:
- Cooking Oil: 2 tablespoons – Choose a neutral oil with a high smoke point suitable for stir-frying, such as avocado oil, canola oil, grapeseed oil, or peanut oil.
- Broccoli Florets: 2 cups – Cut into bite-sized pieces. Broccoli holds up well to stir-frying and soaks up the sauce beautifully.
- Carrots: 1 large, peeled and thinly sliced on the diagonal – Adds sweetness, colour, and a pleasant crunch. Slicing diagonally increases the surface area for quicker cooking.
- Bell Peppers: 1 large (any colour – red, yellow, or orange recommended for vibrancy), deseeded and cut into 1-inch chunks – Adds sweetness and a lovely visual appeal.
- Snow Peas or Sugar Snap Peas: 1 cup, trimmed – Provide a delightful crispness and fresh, green flavour.
- Mushrooms: 8 oz (225g), sliced (Cremini, shiitake, or button mushrooms work well) – Offer a meaty texture and earthy flavour. Shiitake mushrooms, in particular, add a wonderful umami depth.
- Onion: ½ large, cut into wedges or thick slices – Adds a foundational savoury flavour. Red onion can also be used for a milder taste and pop of colour.
- Zucchini or Yellow Squash: 1 medium, halved lengthwise and sliced into ½-inch thick half-moons (Optional) – Adds bulk and absorbs the sauce well.
- Green Onions: 2-3, sliced (greens and whites separated) – The white parts can be added during cooking for flavour, while the green parts are perfect for garnish.
Optional Garnishes:
- Toasted Sesame Seeds: For crunch and nutty flavour.
- Reserved Sliced Green Onion Tops: For freshness and colour.
- Red Pepper Flakes: For a touch of heat.
Instructions
Step 1: Prepare the Homemade Teriyaki Sauce
- Combine Base Ingredients: In a small saucepan, combine the soy sauce (or tamari), ¼ cup water, mirin, brown sugar, minced ginger, and minced garlic.
- Heat Gently: Place the saucepan over medium heat. Stir the mixture constantly until the brown sugar has completely dissolved. Don’t let it come to a rapid boil at this stage; you just want to meld the flavours and dissolve the sugar. This usually takes about 2-3 minutes.
- Prepare the Slurry: While the sauce base is heating, whisk together the cornstarch and 2 tablespoons of cold water in a small bowl until smooth. This mixture is called a slurry, and using cold water prevents the cornstarch from clumping when added to the hot liquid.
- Thicken the Sauce: Once the sugar is dissolved, slowly pour the cornstarch slurry into the saucepan while whisking continuously. Bring the mixture to a gentle simmer. Continue to cook and whisk for another 1-2 minutes, or until the sauce thickens to a syrupy, glaze-like consistency – it should coat the back of a spoon.
- Finish and Set Aside: Remove the saucepan from the heat. If using, stir in the toasted sesame oil for extra flavour and aroma. Set the teriyaki sauce aside while you prepare the vegetables. The sauce will thicken slightly more as it cools.
Step 2: Prepare the Vegetables (Mise en Place)
- Wash and Chop: Thoroughly wash all your vegetables. Pat them dry, as excess water can cause splattering in the hot oil and prevent proper searing.
- Uniform Cutting: Chop all the vegetables into relatively uniform, bite-sized pieces as specified in the ingredients list (broccoli florets, sliced carrots, chunked bell peppers, trimmed snow peas, sliced mushrooms, onion wedges, sliced zucchini if using). Uniformity ensures even cooking, so harder vegetables like carrots aren’t still raw when softer ones like mushrooms are overcooked.
- Separate Ingredients: Keep the prepared vegetables separate or grouped by cooking time. Harder vegetables like carrots and broccoli will need a slightly longer cooking time than softer ones like bell peppers, snow peas, and mushrooms. Slice the green onions, keeping the white/light green parts separate from the dark green tops (which are used for garnish).
- Have Everything Ready: Ensure your prepared vegetables, minced garlic/ginger (if adding extra to the stir-fry itself), cooking oil, and the prepared teriyaki sauce are all within easy reach of your stovetop. Stir-frying moves quickly!
Step 3: Stir-Fry the Vegetables
- Heat the Wok/Pan: Place a large wok or a large, heavy-bottomed skillet over high heat. Allow it to get really hot – you should feel the heat radiating from it when you hold your hand a few inches above the surface. A properly heated pan is crucial for achieving that characteristic stir-fry sear (wok hei) rather than just steaming the vegetables.
- Add Oil: Add the cooking oil to the hot wok. Swirl it around to coat the bottom and sides. The oil should shimmer slightly when it’s hot enough.
- Stir-Fry Harder Vegetables: Carefully add the harder vegetables first – typically the broccoli florets and sliced carrots. Stir-fry them constantly, tossing them around the wok for 2-3 minutes. They should start to become tender-crisp and slightly browned in spots. If you like your broccoli softer, you can add a tablespoon of water and briefly cover the wok to steam it slightly before proceeding.
- Add Remaining Vegetables: Add the remaining vegetables – bell peppers, snow peas (or snap peas), mushrooms, onion wedges, and zucchini (if using). Also, add the white/light green parts of the sliced green onions now if desired. Continue to stir-fry vigorously, keeping everything moving, for another 3-5 minutes. The goal is “tender-crisp” – the vegetables should be cooked through but still retain some bite and vibrant colour. Avoid overcrowding the pan; if necessary, cook the vegetables in batches to ensure they sear rather than steam. Overcrowding lowers the pan temperature significantly.
- Check for Doneness: Test a piece of carrot or broccoli – it should be tender but still have a slight firmness. The bell peppers should be slightly softened but still bright, and the snow peas should be bright green and crisp.
Step 4: Sauce and Finish
- Create a Well (Optional but helpful): Push the vegetables to the sides of the wok, creating a well in the centre. If adding extra garlic or ginger directly to the stir-fry for more intense flavour, add it to the well now with a tiny bit more oil and stir-fry for about 30 seconds until fragrant before mixing it back in with the vegetables.
- Add Teriyaki Sauce: Give your prepared teriyaki sauce a quick stir (as the cornstarch might settle) and pour it over the vegetables in the wok.
- Toss to Coat: Immediately start tossing the vegetables continuously to ensure they are evenly coated with the glossy sauce. The heat from the pan will help the sauce cling to the vegetables and bubble slightly. Cook for just another 1-2 minutes, allowing the sauce to heat through and perfectly glaze everything. Be careful not to cook too long at this stage, especially if your sauce is already quite thick, as it can become too sticky or burn due to the sugar content.
- Remove from Heat: Once the vegetables are beautifully glazed and the sauce is hot, remove the wok from the heat immediately.
Step 5: Serve
- Plate: Transfer the hot Teriyaki Vegetables to a serving platter or individual bowls.
- Garnish: Sprinkle generously with toasted sesame seeds and the reserved sliced green onion tops. Add a pinch of red pepper flakes if you desire a little heat.
- Serve Immediately: Teriyaki Vegetables are best enjoyed fresh and hot, while the vegetables are still vibrant and tender-crisp. See the “How to Serve” section for pairing suggestions.
Nutrition
- Serving Size: one normal portion
- Calories: 250-350


