

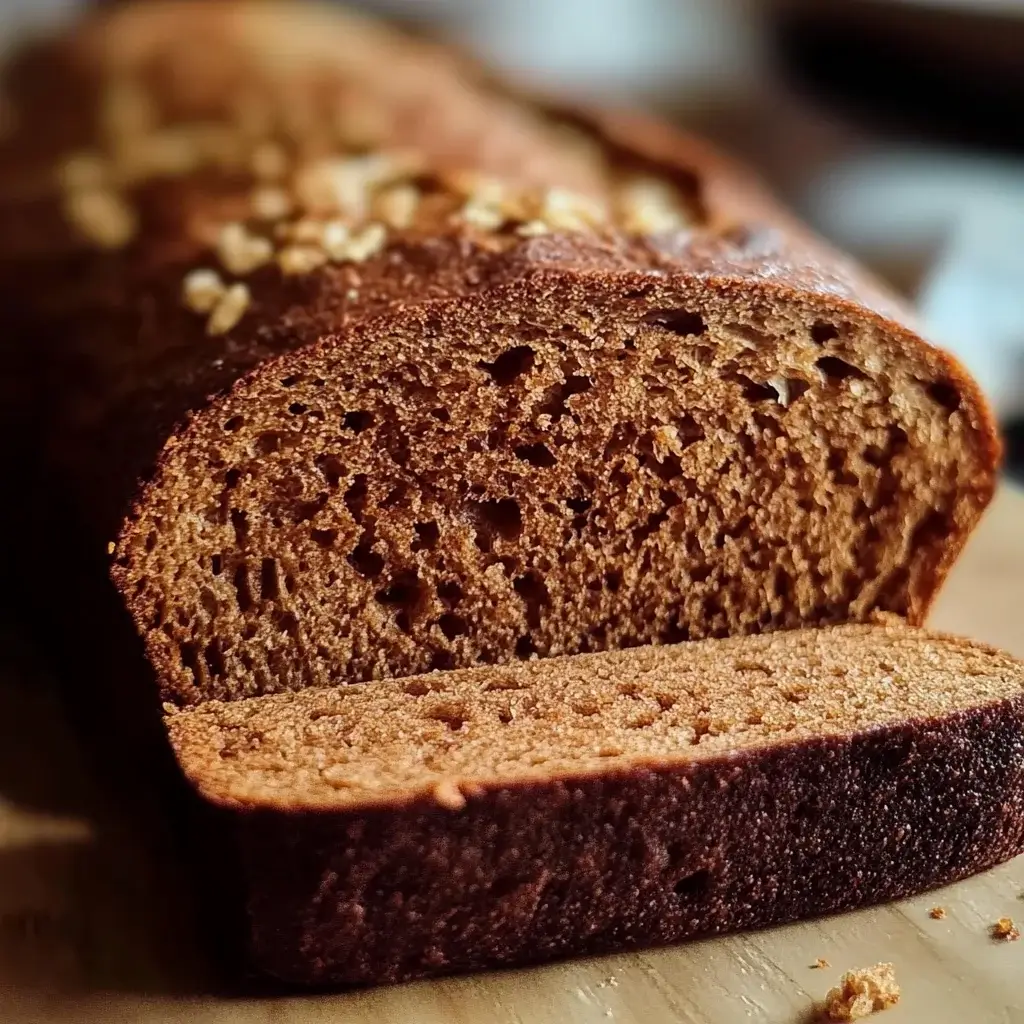
The aroma of freshly baked bread is, for me, one of life’s simplest yet most profound pleasures. And when that bread is a slightly sweet, deeply flavored brown bread, well, that’s pure bliss. I remember the first time I trialed this particular Sweet Brown Bread recipe. The house filled with a warm, inviting scent of molasses and wholesome grains. My kids, usually picky eaters, were drawn to the kitchen like magnets, their eyes wide with anticipation. The moment it came out of the oven, a beautiful deep mahogany loaf, we could barely wait for it to cool. Sliced thick and slathered with butter, it was an instant hit. It wasn’t just a snack; it was an experience – comforting, nourishing, and utterly delicious. This recipe has since become a staple in our home, perfect for a hearty breakfast, a comforting accompaniment to soup, or simply enjoyed on its own. It’s a recipe that brings warmth and smiles, and I’m thrilled to share it with you.
The Allure of Homemade Sweet Brown Bread
There’s something incredibly satisfying about baking your own bread. Beyond the delightful aroma that fills your home, the process itself is a therapeutic escape from the everyday hustle. This Sweet Brown Bread recipe, in particular, offers a unique blend of rustic charm and gentle sweetness that sets it apart.
Unlike some intensely sour or overtly savory brown breads, this version leans into a subtle sweetness, primarily derived from molasses and a touch of brown sugar. This doesn’t make it a dessert bread, but rather a versatile loaf that pairs beautifully with both sweet and savory accompaniments. The whole wheat flour provides a nutty depth and a wonderfully hearty texture, while the all-purpose flour ensures it remains tender and not overly dense.
The magic of this bread lies in its simplicity and the wholesome ingredients that come together to create something truly special. It’s a nod to traditional baking methods, yet accessible enough for even novice bakers. Whether you’re looking for a healthier alternative to store-bought bread, a comforting bake for a chilly day, or a unique addition to your recipe repertoire, this Sweet Brown Bread is sure to impress. Its rich color and inviting flavor profile make it a standout on any table.
Gather Your Ingredients: The Foundation of Flavor
To embark on your sweet brown bread baking adventure, you’ll need the following ingredients. Precise measurements are key to baking success, so have your measuring cups and spoons at the ready!
- Warm Water (105-115°F / 40-46°C): 1 ½ cups (360 ml) – crucial for activating the yeast.
- Active Dry Yeast: 2 ¼ teaspoons (1 standard packet, or 7g)
- Unsulphured Molasses: ½ cup (120 ml) – for that classic color and deep flavor.
- Brown Sugar, packed: ¼ cup (50g) – adds a touch more sweetness and moisture.
- Vegetable Oil (or melted unsalted butter): ¼ cup (60 ml) – for tenderness.
- Salt: 1 ½ teaspoons (9g) – enhances flavor and controls yeast activity.
- Whole Wheat Flour: 2 ½ cups (300g) – provides structure, fiber, and nutty flavor.
- All-Purpose Flour (Unbleached recommended): 2 to 2 ½ cups (240-300g), plus more for dusting – for a softer crumb. The exact amount may vary based on humidity.
- Optional: Rolled Oats or Coarse Cornmeal: For dusting the pan and topping the loaf for a rustic finish.
Essential Baking Equipment
Having the right tools makes the baking process smoother and more enjoyable:
- Large Mixing Bowl: For combining and kneading the dough.
- Measuring Cups and Spoons: For accurate ingredient measurement.
- Whisk: For combining dry ingredients.
- Sturdy Spoon or Dough Whisk: For initial mixing.
- 9×5 inch Loaf Pan: Standard size for this recipe.
- Clean Kitchen Towel or Plastic Wrap: For covering the dough during rising.
- Wire Cooling Rack: Essential for allowing the bread to cool properly.
Step-by-Step Instructions: Baking Your Perfect Sweet Brown Bread
Follow these instructions carefully, and you’ll be rewarded with a delicious, homemade loaf.
1. Activate the Yeast (Proofing):
* In your large mixing bowl, combine the warm water and brown sugar. Sprinkle the active dry yeast over the top.
* Let it sit for 5-10 minutes, or until the mixture becomes foamy and bubbly. This indicates the yeast is active and ready. If it doesn’t foam, your yeast may be old, or the water might have been too hot or too cold; you’ll need to start over with fresh yeast.
2. Combine Wet Ingredients:
* Once the yeast is proofed, stir in the molasses, vegetable oil (or melted butter), and salt. Mix until well combined.
3. Add the Flours:
* Gradually add the whole wheat flour to the wet ingredients, mixing with a sturdy spoon or dough whisk until just combined.
* Begin adding the all-purpose flour, ½ cup at a time, mixing after each addition. Continue adding flour until a shaggy dough forms that pulls away from the sides of the bowl. You may not need all 2 ½ cups of all-purpose flour, or you might need a little more. The dough should be slightly sticky but manageable.
4. Knead the Dough:
* Turn the dough out onto a lightly floured surface.
* Knead for 8-10 minutes. To knead, fold the dough over itself, then push it away from you with the heel of your hand. Rotate the dough a quarter turn and repeat.
* The dough should become smooth, elastic, and less sticky. If it’s too sticky, add a tablespoon of all-purpose flour at a time. If it’s too dry, wet your hands slightly. A well-kneaded dough will spring back slowly when poked.
5. First Rise (Bulk Fermentation):
* Lightly oil the large mixing bowl (you can use the same one, just give it a quick wipe if needed).
* Place the kneaded dough into the bowl, turning it once to coat the entire surface with oil. This prevents a crust from forming.
* Cover the bowl tightly with plastic wrap or a clean, damp kitchen towel.
* Let the dough rise in a warm, draft-free place for 1 to 1 ½ hours, or until it has doubled in size. The ideal temperature is around 75-80°F (24-27°C).
6. Shape the Loaf:
* Gently punch down the risen dough to release the air.
* Turn the dough out onto a lightly floured surface.
* Gently press the dough into a rectangle, roughly the length of your loaf pan.
* Roll the rectangle up tightly, starting from one of the shorter ends, to form a log. Pinch the seam and the ends to seal.
7. Second Rise (Proofing in Pan):
* Grease your 9×5 inch loaf pan thoroughly with butter, shortening, or cooking spray. You can also dust it with rolled oats or coarse cornmeal for a rustic touch and to prevent sticking.
* Place the shaped loaf, seam-side down, into the prepared pan.
* Cover the pan loosely with lightly greased plastic wrap or a clean kitchen towel.
* Let the dough rise again in a warm, draft-free place for 45-60 minutes, or until it has risen about 1 inch above the rim of the pan.
8. Preheat Oven and Bake:
* About 20 minutes before the second rise is complete, preheat your oven to 375°F (190°C). Position an oven rack in the center.
* Once the dough has completed its second rise, you can optionally brush the top lightly with an egg wash (1 egg beaten with 1 tablespoon of water) for a shinier crust, or simply leave it plain. You can also sprinkle some rolled oats on top.
* Place the loaf pan in the preheated oven.
* Bake for 35-45 minutes. The bread is done when it’s a deep golden brown (or rich mahogany due to the molasses) and sounds hollow when tapped on the bottom. An instant-read thermometer inserted into the center should register 190-200°F (88-93°C).
* If the top of the bread starts to brown too quickly, you can loosely tent it with aluminum foil for the last 10-15 minutes of baking.
9. Cool the Bread:
* Immediately remove the bread from the loaf pan and transfer it to a wire cooling rack.
* Allow the bread to cool completely (at least 1-2 hours) before slicing. This is a crucial step! Slicing warm bread can result in a gummy texture as the structure hasn’t fully set.
Nutrition Facts (Approximate)
- Servings: This recipe makes 1 standard loaf, yielding approximately 12-16 slices.
- Calories per serving (assuming 14 slices): Approximately 180-220 calories per slice.
Disclaimer: Nutritional information is an estimate and can vary based on specific ingredients used, precise measurements, and portion sizes.
A single slice (approx. 1/14th of the loaf) may contain:
- Fat: 3-5g
- Saturated Fat: <1g
- Cholesterol: 0mg (if using oil) / <5mg (if using butter)
- Sodium: 200-250mg
- Carbohydrates: 35-40g
- Fiber: 3-4g
- Sugars: 8-10g (includes natural sugars from molasses)
- Protein: 4-5g
This bread provides a good source of dietary fiber from the whole wheat flour.
Preparation Time Breakdown
Understanding the time commitment will help you plan your baking day:
- Active Preparation Time (mixing, kneading, shaping): 20-25 minutes
- Yeast Proofing Time: 5-10 minutes
- First Rise: 60-90 minutes
- Second Rise: 45-60 minutes
- Baking Time: 35-45 minutes
- Cooling Time (essential): At least 1-2 hours
Total Time (from start to ready-to-eat): Approximately 4 to 5 ½ hours (mostly inactive rising and cooling time).
The Perfect Slice: How to Serve Your Sweet Brown Bread
This versatile Sweet Brown Bread can be enjoyed in numerous delightful ways. Here are some ideas to inspire you:
- Classic Comfort:
- Serve warm slices with a generous spread of salted butter.
- Drizzle with honey or spread with your favorite fruit jam or preserves.
- A dollop of cream cheese offers a tangy contrast.
- Breakfast Boost:
- Toast it and top with scrambled eggs or a fried egg.
- Use it as the base for avocado toast with a sprinkle of everything bagel seasoning.
- Make exceptional French toast – the slight sweetness of the bread enhances this classic dish.
- Enjoy alongside a bowl of yogurt and fresh fruit.
- Lunch & Dinner Accompaniment:
- Perfect for dipping into hearty soups, stews, or chili. Its robust texture holds up well.
- Serve alongside a cheese board with sharp cheddar, creamy brie, or tangy goat cheese.
- Make unique sandwiches. Try it with:
- Roast turkey and cranberry sauce.
- Sharp cheddar and apple slices.
- Peanut butter and banana.
- Cream cheese and smoked salmon.
- Snack Time:
- A simple slice with a cup of tea or coffee makes for a wonderful afternoon pick-me-up.
- Top with nut butter (almond, peanut, cashew) for a protein-packed snack.
- Sweet Treats (with a twist):
- Lightly toast and spread with chocolate-hazelnut spread.
- Use it to make a rustic bread pudding.
Elevate Your Bake: 5 Additional Tips for Sweet Brown Bread Success
- Ingredient Temperature Matters: Ensure your warm water for the yeast is at the correct temperature (105-115°F / 40-46°C). Too hot will kill the yeast; too cold will not activate it properly. Other ingredients like eggs (if you were to add them) or oil are best at room temperature for better incorporation.
- Don’t Rush the Rise: Patience is key in bread making. Allow the dough to fully double in size during both rises. This develops the flavor and texture of the bread. Rising times can vary based on ambient temperature; a warmer room speeds it up, a cooler room slows it down.
- Measure Flour Correctly: The most common baking mistake is adding too much flour, resulting in dense, dry bread. Spoon the flour into your measuring cup and then level it off with a straight edge. Don’t scoop directly from the bag, as this compacts the flour.
- Know Your Dough’s Consistency: After adding the initial amount of flour, the dough should be slightly tacky but manageable. You’re looking for a dough that pulls away from the sides of the bowl but might still stick a bit to the bottom. It’s better to err on the side of a slightly stickier dough (which you can manage with floured hands/surface) than a dry one.
- The Windowpane Test for Kneading: To check if your dough is sufficiently kneaded, take a small piece and gently stretch it. If you can stretch it thin enough to see light through it without tearing (like a windowpane), it’s ready. If it tears easily, it needs more kneading to develop the gluten.
Troubleshooting Common Brown Bread Issues
Even seasoned bakers encounter hiccups. Here’s how to address some common sweet brown bread challenges:
- Bread is Too Dense/Heavy:
- Cause: Too much flour, not enough kneading, yeast was not active, or dough didn’t rise sufficiently.
- Solution: Measure flour correctly next time. Ensure yeast is fresh and proofs well. Knead until elastic. Allow full rising times in a warm spot.
- Bread Didn’t Rise Much:
- Cause: Expired or inactive yeast, water too hot/cold for yeast, rising environment too cold, or too much salt (which can inhibit yeast).
- Solution: Always check yeast expiration date and proof it. Use a thermometer for water. Find a consistently warm (but not hot) spot for rising. Measure salt accurately.
- Crust is Too Hard/Thick:
- Cause: Oven temperature too high, baked too long, or too much flour on the crust during shaping.
- Solution: Calibrate your oven or use an oven thermometer. Check for doneness earlier. Use minimal flour when shaping. You can also brush the crust with melted butter immediately after baking to soften it.
- Gummy or Doughy Center:
- Cause: Bread was underbaked or sliced while still too hot.
- Solution: Bake until an internal temperature of 190-200°F (88-93°C) is reached. Crucially, allow the bread to cool completely on a wire rack before slicing. This allows the crumb structure to set.
- Uneven Texture or Large Holes:
- Cause: Dough was not punched down properly after the first rise, or air pockets were not removed during shaping.
- Solution: Gently but firmly punch down the dough. When shaping, ensure you roll the dough tightly and press out any large air bubbles.
Variations and Customizations: Make It Your Own
This Sweet Brown Bread recipe is a fantastic canvas for your culinary creativity. Here are some ideas for variations:
- Nutty & Seedy: Add ½ to ¾ cup of chopped walnuts, pecans, sunflower seeds, pumpkin seeds, or flax seeds to the dough along with the flour for added texture and nutrition.
- Fruity Delight: Incorporate ½ cup of raisins, dried cranberries, chopped dates, or dried apricots into the dough during the last few minutes of kneading.
- Spice it Up: Add 1 teaspoon of cinnamon and ½ teaspoon of nutmeg or allspice to the dry ingredients for a warmer, spicier loaf, especially nice in autumn or winter.
- Oatmeal Enrichment: Replace ½ cup of the all-purpose flour with an equal amount of quick-cooking or old-fashioned rolled oats (not instant) for a softer, slightly chewier texture. You can also top the loaf with oats before baking.
- Coffee Infusion: Replace ¼ cup of the warm water with ¼ cup of strongly brewed, cooled coffee for a deeper, more complex flavor note that complements the molasses.
- Buttermilk Tang: If you have buttermilk, you can substitute it for part of the warm water (ensure the total liquid for yeast activation is warm). Buttermilk adds a slight tang and tenderizes the crumb. If using buttermilk, you might add ¼ teaspoon of baking soda as well.
The History and Charm of Brown Bread
Brown bread, in its many forms, has been a dietary staple across cultures for centuries. Historically, it was often the bread of the common people, made with whole grain flours like wheat, rye, or a mix, which were less refined and more readily available than the white flour favored by the aristocracy.
Different regions developed their own unique versions:
- Irish Brown Bread: Typically a soda bread, leavened with baking soda rather than yeast, often featuring coarse wholemeal flour and buttermilk, giving it a dense, moist crumb and a slightly tangy flavor.
- New England Brown Bread (Boston Brown Bread): A unique American tradition, this bread is often steamed rather than baked, traditionally in coffee cans. It includes cornmeal, rye flour, and whole wheat flour, and is sweetened with molasses, giving it a very dark color and moist, cake-like texture.
- Scandinavian Rye Breads (Rugbrød): Dark, dense, and often packed with seeds, these rye breads are deeply flavorful and highly nutritious.
The “sweet” aspect of this particular recipe likely draws from traditions that incorporated sweeteners like molasses, honey, or brown sugar to make the hearty whole grains more palatable or to preserve them. Molasses, a byproduct of sugar refining, was an affordable sweetener and also contributed a distinctive rich color and flavor that became characteristic of many brown breads.
Today, homemade brown bread, especially a slightly sweet version, evokes feelings of nostalgia, comfort, and a connection to simpler times. It represents wholesome goodness and the satisfaction of creating something nourishing from scratch.
Pairing Perfection: What Goes Well with Sweet Brown Bread
The subtle sweetness and robust flavor of this brown bread make it incredibly versatile for pairings:
- Cheeses:
- Sharp Cheddar: The saltiness and sharpness cut through the sweetness.
- Creamy Brie or Camembert: A luxurious contrast in textures.
- Goat Cheese: The tangy notes complement the molasses.
- Blue Cheese: For a bold sweet-and-savory experience.
- Spreads & Dips:
- Apple Butter or Pumpkin Butter: Enhances the autumnal flavors.
- Hummus: A savory and healthy option.
- Liver Pâté: A classic rustic pairing.
- Soups & Stews:
- Hearty Vegetable Soup: The bread is perfect for soaking up the broth.
- Beef Stew: The richness of the stew is well-matched by the bread.
- Creamy Tomato Soup: A comforting classic duo.
- Lentil Soup: The earthy flavors work beautifully together.
- Beverages:
- Hot Tea (Black or Herbal): A perfect afternoon treat.
- Coffee: A robust brew stands up well to the bread’s flavor.
- Milk: A simple and wholesome pairing, especially for kids.
- Stout or Porter Beer: The roasted, malty notes of dark beers can complement the molasses in the bread.
Storing Your Homemade Sweet Brown Bread
Proper storage will keep your delicious bread fresh for as long as possible:
- Cool Completely: First and foremost, ensure the bread is completely cool before storing. Storing warm bread will create condensation, leading to a soggy crust and quicker spoilage.
- Room Temperature (Short-Term):
- For 1-2 days: If you plan to eat the bread quickly, you can store it cut-side down on a cutting board, covered loosely with a clean kitchen towel or in a bread box. This helps maintain a decent crust.
- For 3-4 days: For slightly longer storage at room temperature, place the cooled loaf in a paper bag (which allows some air circulation and helps prevent a soggy crust) or wrap it loosely in plastic wrap or aluminum foil. A dedicated bread bag (cloth or plastic) also works well.
- Refrigeration (Longer-Term, but with a catch):
- Storing bread in the refrigerator can extend its shelf life to about 5-7 days by slowing down mold growth. However, refrigeration can also cause the bread to go stale faster (a process called retrogradation).
- If you choose to refrigerate, wrap the bread tightly in plastic wrap or place it in an airtight container to minimize moisture loss and staling. Toasting slices before serving can help revive their texture.
- Freezing (Best for Long-Term):
- For storage up to 2-3 months, freezing is the best option.
- Slice the completely cooled bread before freezing. This allows you to take out only what you need.
- Wrap the slices individually or in small portions tightly in plastic wrap, then place them in a freezer-safe zip-top bag or airtight container. Squeeze out as much air as possible.
- Alternatively, you can wrap the entire cooled loaf tightly in plastic wrap, then a layer of aluminum foil, or place it in a heavy-duty freezer bag.
- To Thaw: Remove slices as needed and let them thaw at room temperature for about 20-30 minutes, or toast them directly from frozen. For a whole loaf, let it thaw, still wrapped, at room temperature for several hours or overnight.
Avoid storing bread near strong-smelling foods, as it can absorb odors.
Your Sweet Brown Bread Questions Answered: FAQ
Q1: Can I use a different type of molasses?
A: Yes, but it will affect the flavor and color. Unsulphured molasses is generally recommended for its balanced flavor. Blackstrap molasses is much stronger, more bitter, and will result in a darker, more intensely flavored bread. Light molasses will give a milder flavor and lighter color. Avoid sulphured molasses, as it can sometimes impart an off-taste.
Q2: My dough seems too sticky/too dry. What should I do?
A: Dough consistency can vary based on humidity, flour type, and how you measure. If it’s too sticky, add all-purpose flour, one tablespoon at a time, during kneading until it’s manageable. If it’s too dry and crumbly, add warm water, one teaspoon at a time, until it comes together. The ideal dough for this bread should be slightly tacky but smooth and elastic after kneading.
Q3: Can I make this recipe without a stand mixer?
A: Absolutely! This recipe is written with instructions for hand mixing and kneading. While a stand mixer with a dough hook can save some effort, kneading by hand is a very satisfying process and allows you to get a better feel for the dough.
Q4: How do I know when the bread is perfectly baked?
A: There are a few indicators:
* Color: The crust should be a deep, rich brown (mahogany).
* Sound: Gently tap the bottom of the loaf. It should sound hollow.
* Internal Temperature: The most accurate way is to use an instant-read thermometer. Insert it into the center of the loaf; it should read between 190-200°F (88-93°C).
Q5: Can I substitute honey or maple syrup for the molasses or brown sugar?
A: Yes, you can make substitutions, but they will change the flavor profile and color:
* For Molasses: Honey or maple syrup can be used, but the bread won’t have that classic dark color or deep, slightly bitter molasses flavor. It will be sweeter and have the characteristic notes of honey or maple.
* For Brown Sugar: You can use granulated white sugar, but brown sugar adds moisture and a slight molasses note. Honey or maple syrup could also be used here, but you might need to slightly reduce the liquid elsewhere as they are liquid sweeteners.
Adjust quantities to taste, keeping in mind that liquid sweeteners will add more moisture.
A Sweet Ending and a New Beginning
Baking this Sweet Brown Bread is more than just following a recipe; it’s about creating moments of warmth, comfort, and deliciousness. The journey from simple ingredients to a fragrant, beautiful loaf is a rewarding one, culminating in the simple joy of sharing (or savoring solo!) a slice of homemade goodness.
Whether you’re a seasoned baker or just starting your bread-making adventures, this recipe is designed to be approachable and satisfying. The deep, rich flavor of molasses, balanced by a gentle sweetness and the wholesome character of whole wheat, makes this bread a versatile favorite.
I encourage you to embrace the process, enjoy the aromas that fill your kitchen, and don’t be afraid to experiment with the variations. May this Sweet Brown Bread recipe bring as much joy to your home as it has to mine. Happy baking!
Print
Sweet Brown Bread recipe
Ingredients
-
- Warm Water (105-115°F / 40-46°C): 1 ½ cups (360 ml) – crucial for activating the yeast.
-
- Active Dry Yeast: 2 ¼ teaspoons (1 standard packet, or 7g)
-
- Unsulphured Molasses: ½ cup (120 ml) – for that classic color and deep flavor.
-
- Brown Sugar, packed: ¼ cup (50g) – adds a touch more sweetness and moisture.
-
- Vegetable Oil (or melted unsalted butter): ¼ cup (60 ml) – for tenderness.
-
- Salt: 1 ½ teaspoons (9g) – enhances flavor and controls yeast activity.
-
- Whole Wheat Flour: 2 ½ cups (300g) – provides structure, fiber, and nutty flavor.
-
- All-Purpose Flour (Unbleached recommended): 2 to 2 ½ cups (240-300g), plus more for dusting – for a softer crumb. The exact amount may vary based on humidity.
-
- Optional: Rolled Oats or Coarse Cornmeal: For dusting the pan and topping the loaf for a rustic finish.
Instructions
1. Activate the Yeast (Proofing):
* In your large mixing bowl, combine the warm water and brown sugar. Sprinkle the active dry yeast over the top.
* Let it sit for 5-10 minutes, or until the mixture becomes foamy and bubbly. This indicates the yeast is active and ready. If it doesn’t foam, your yeast may be old, or the water might have been too hot or too cold; you’ll need to start over with fresh yeast.
2. Combine Wet Ingredients:
* Once the yeast is proofed, stir in the molasses, vegetable oil (or melted butter), and salt. Mix until well combined.
3. Add the Flours:
* Gradually add the whole wheat flour to the wet ingredients, mixing with a sturdy spoon or dough whisk until just combined.
* Begin adding the all-purpose flour, ½ cup at a time, mixing after each addition. Continue adding flour until a shaggy dough forms that pulls away from the sides of the bowl. You may not need all 2 ½ cups of all-purpose flour, or you might need a little more. The dough should be slightly sticky but manageable.
4. Knead the Dough:
* Turn the dough out onto a lightly floured surface.
* Knead for 8-10 minutes. To knead, fold the dough over itself, then push it away from you with the heel of your hand. Rotate the dough a quarter turn and repeat.
* The dough should become smooth, elastic, and less sticky. If it’s too sticky, add a tablespoon of all-purpose flour at a time. If it’s too dry, wet your hands slightly. A well-kneaded dough will spring back slowly when poked.
5. First Rise (Bulk Fermentation):
* Lightly oil the large mixing bowl (you can use the same one, just give it a quick wipe if needed).
* Place the kneaded dough into the bowl, turning it once to coat the entire surface with oil. This prevents a crust from forming.
* Cover the bowl tightly with plastic wrap or a clean, damp kitchen towel.
* Let the dough rise in a warm, draft-free place for 1 to 1 ½ hours, or until it has doubled in size. The ideal temperature is around 75-80°F (24-27°C).
6. Shape the Loaf:
* Gently punch down the risen dough to release the air.
* Turn the dough out onto a lightly floured surface.
* Gently press the dough into a rectangle, roughly the length of your loaf pan.
* Roll the rectangle up tightly, starting from one of the shorter ends, to form a log. Pinch the seam and the ends to seal.
7. Second Rise (Proofing in Pan):
* Grease your 9×5 inch loaf pan thoroughly with butter, shortening, or cooking spray. You can also dust it with rolled oats or coarse cornmeal for a rustic touch and to prevent sticking.
* Place the shaped loaf, seam-side down, into the prepared pan.
* Cover the pan loosely with lightly greased plastic wrap or a clean kitchen towel.
* Let the dough rise again in a warm, draft-free place for 45-60 minutes, or until it has risen about 1 inch above the rim of the pan.
8. Preheat Oven and Bake:
* About 20 minutes before the second rise is complete, preheat your oven to 375°F (190°C). Position an oven rack in the center.
* Once the dough has completed its second rise, you can optionally brush the top lightly with an egg wash (1 egg beaten with 1 tablespoon of water) for a shinier crust, or simply leave it plain. You can also sprinkle some rolled oats on top.
* Place the loaf pan in the preheated oven.
* Bake for 35-45 minutes. The bread is done when it’s a deep golden brown (or rich mahogany due to the molasses) and sounds hollow when tapped on the bottom. An instant-read thermometer inserted into the center should register 190-200°F (88-93°C).
* If the top of the bread starts to brown too quickly, you can loosely tent it with aluminum foil for the last 10-15 minutes of baking.
9. Cool the Bread:
* Immediately remove the bread from the loaf pan and transfer it to a wire cooling rack.
* Allow the bread to cool completely (at least 1-2 hours) before slicing. This is a crucial step! Slicing warm bread can result in a gummy texture as the structure hasn’t fully set.
Nutrition
- Serving Size: one normal portion
- Calories: 180-220
- Sugar: 8-10g
- Sodium: 200-250mg
- Fat: 3-5g
- Saturated Fat: 1g
- Carbohydrates: 35-40g
- Fiber: 35-40g
- Protein: 4-5g
- Cholesterol: 5mg


