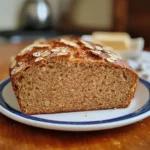
Ingredients
- Whole Wheat Flour: 3 ½ cups (approximately 420g) – The star of the show, providing nutty flavour, fibre, and structure. Ensure you’re using whole wheat flour, not white whole wheat or a blend, for that authentic rustic character. Spoon the flour into your measuring cup and level it off rather than scooping directly from the bag to avoid packing too much in.
- Active Dry Yeast: 2 ¼ teaspoons (1 standard packet, about 7g) – This is the leavening agent that makes your bread rise. Ensure your yeast is fresh and active. Check the expiration date.
- Warm Water: 1 ½ cups (355ml) – The water should be comfortably warm to the touch, around 105-115°F (40-46°C). Too hot, and it will kill the yeast; too cold, and it won’t activate properly. An instant-read thermometer is helpful here.
- Honey or Maple Syrup: 2 tablespoons (42g honey / 30ml maple syrup) – This provides a touch of sweetness to balance the whole wheat flavour and acts as food for the yeast, helping it become more active. Molasses can also be used for a deeper flavour, but start with 1 tablespoon as it’s stronger.
- Olive Oil: 2 tablespoons (30ml) – Adds moisture, tenderness, and a subtle flavour richness to the loaf. You can use another neutral oil like vegetable or canola oil if preferred. A little extra for greasing the bowl is also needed.
- Salt: 1 ½ teaspoons (9g) – Crucial for flavour development and controlling yeast activity. Don’t omit it! Fine sea salt or regular table salt works well. Coarse salt might not dissolve as evenly.
- Optional: Cornmeal or Semolina: For dusting the baking surface. This helps prevent sticking and adds a nice texture to the bottom crust. A light dusting of flour also works.
Having these ingredients measured out and ready before you start (a practice known as mise en place) makes the baking process smoother and more enjoyable. Remember that flour absorption can vary slightly depending on humidity and the specific brand of flour, so be prepared to adjust the water or flour by a teaspoon or two if needed during mixing.
Instructions
- Activate the Yeast (Proofing): In a large mixing bowl (or the bowl of your stand mixer), combine the warm water, honey (or maple syrup), and active dry yeast. Gently stir them together. Let the mixture sit for 5-10 minutes. You should see it become foamy or bubbly on the surface. This process, called proofing, confirms your yeast is alive and active. If it doesn’t foam, your yeast might be old or the water temperature was incorrect; discard it and start again with fresh yeast and properly tempered water. This step is vital for a good rise.
- Combine Wet and Dry Ingredients: Once the yeast is proofed and bubbly, add the olive oil and salt to the yeast mixture. Stir gently to combine. Now, add the whole wheat flour to the wet ingredients in the bowl. If using a stand mixer, fit it with the dough hook attachment. If mixing by hand, use a sturdy wooden spoon or your hands.
- Mix the Dough:
- By Stand Mixer: Start mixing on low speed until the flour is mostly incorporated, then increase the speed to medium-low. Continue mixing until a shaggy dough forms and starts to pull away from the sides of the bowl. This usually takes about 2-3 minutes.
- By Hand: Stir the flour into the wet ingredients with a wooden spoon until it becomes too difficult to stir. Then, turn the shaggy dough out onto a lightly floured surface. It will be sticky initially.
- Knead the Dough: Kneading develops the gluten network, which gives the bread its structure and chewy texture. This is arguably the most crucial part for achieving a good crumb.
- By Stand Mixer: Continue kneading with the dough hook on medium-low speed for 7-10 minutes. The dough should become smooth, elastic, and slightly tacky but manageable. If it seems overly sticky, add flour one tablespoon at a time. If it feels too dry and stiff, add warm water one teaspoon at a time.
- By Hand: Turn the dough out onto a lightly floured surface. Knead vigorously for 10-15 minutes. To knead, fold the dough over onto itself, then push it down and away from you with the heel of your hand. Rotate the dough a quarter turn and repeat. Continue this push-fold-turn motion. The dough will start sticky but will gradually become smoother and more elastic. You’re aiming for a dough that springs back slowly when you poke it. It should feel supple and alive. Resist adding too much extra flour, as this can make the loaf dense. A slightly tacky dough is often desirable with whole wheat. A good test is the “windowpane test”: gently stretch a small piece of dough. If you can stretch it thin enough to see light through it without tearing, the gluten is well-developed.
- First Rise (Bulk Fermentation): Lightly grease a large, clean bowl with a bit of olive oil or cooking spray. Form the kneaded dough into a smooth ball. Place the dough ball into the greased bowl and turn it over once to coat the entire surface lightly with oil. This prevents it from drying out. Cover the bowl tightly with plastic wrap or a damp kitchen towel. Place the bowl in a warm, draft-free spot. Good options include an oven with just the light turned on, near a warm stove (but not directly on it), or simply on the counter in a warm room (around 75-85°F or 24-29°C is ideal). Let the dough rise for 1 to 1.5 hours, or until it has doubled in size. The exact time will depend on the ambient temperature and yeast activity.
- Shape the Loaf: Once the dough has doubled, gently punch it down in the center to release the trapped gases. Turn the deflated dough out onto a very lightly floured surface. Gently press and stretch the dough into a rough rectangle, about 8×10 inches. Don’t aggressively degas it, just enough to manage. Starting from one of the shorter sides, tightly roll the dough up into a cylinder, pressing out any large air bubbles as you go. Pinch the seam closed firmly along the length of the roll. Tuck the ends under slightly and pinch them closed as well. You should now have a relatively smooth, oblong or round loaf shape (depending on your preference – oblong works well for slicing).
- Second Rise (Proofing): Prepare your baking surface. You can either:
- Place the shaped loaf directly onto a baking sheet lined with parchment paper and lightly dusted with cornmeal or semolina.
- Place it into a standard 9×5 inch loaf pan that has been lightly greased.
- Use a proofing basket (banneton) dusted generously with flour, placing the loaf seam-side up. (If using a banneton, you’ll invert it onto your baking sheet just before baking).
Cover the shaped loaf loosely with plastic wrap (lightly greased if it might touch the dough) or a dry kitchen towel. Let it rise again in a warm place for another 45-60 minutes, or until it has visibly puffed up and increased in size by about 50-75%. It won’t necessarily double this time. To check if it’s ready, gently poke the side of the loaf with a lightly floured finger. If the indentation springs back slowly, it’s ready to bake. If it springs back immediately, it needs more time. If it collapses, it may be over-proofed (bake immediately in this case, it might not rise much more in the oven).
- Preheat the Oven and Prepare for Baking: About 20-30 minutes before the second rise is complete, preheat your oven to 400°F (200°C). If you have a baking stone or steel, place it in the oven during preheating for a crispier bottom crust. Place a shallow metal pan (like an old broiler pan or cake tin) on the bottom rack of the oven. You’ll use this to create steam.
- Score the Loaf (Optional but Recommended): Just before baking, if you proofed the loaf on a baking sheet or in a pan (or after inverting from a banneton onto your sheet), make a few shallow slashes on the top of the loaf using a very sharp knife, a razor blade (lame), or even sharp kitchen shears. Make one long slash down the center (about ½ inch deep) or a few diagonal cuts. Scoring allows the steam inside the loaf to escape in a controlled way, preventing the crust from bursting unpredictably and giving the bread a final upward spring (oven spring).
- Bake the Bread: Carefully place the baking sheet (with the loaf) onto the center rack of the preheated oven (or directly onto the preheated baking stone/steel). Quickly and carefully pour about ½ cup of hot water into the shallow metal pan on the bottom rack. Immediately close the oven door to trap the steam. The steam helps create a beautiful, crispy crust. Bake for 30-40 minutes. The bread is done when it’s a deep golden brown, sounds hollow when tapped firmly on the bottom crust, and an instant-read thermometer inserted into the center registers between 195-205°F (90-96°C). The internal temperature check is the most reliable way to ensure it’s fully cooked. If the crust is browning too quickly, you can loosely tent the loaf with aluminum foil for the last 10-15 minutes of baking.
- Cool Completely: Immediately remove the baked loaf from the baking sheet or pan and transfer it to a wire cooling rack. This is crucial! Letting it cool on the rack allows air to circulate around the entire loaf, preventing the bottom crust from becoming soggy. Resist the urge to slice into it while it’s hot. The bread is still technically cooking internally as it cools, and slicing too soon can result in a gummy texture. Let it cool completely, or at least for 1-2 hours, before slicing and serving. This allows the structure to set and the flavours to fully develop.
Congratulations! You’ve baked a beautiful Rustic Whole Wheat Loaf. Enjoy the fruits (or grains!) of your labour.
Nutrition
- Serving Size: one normal portion
- Calories: 140-170 calories
- Sugar: 2-4g
- Sodium: 250-300mg
- Fat: 2-3g
- Carbohydrates: 25-30g
- Fiber: 3-4g
- Protein: 4-6g