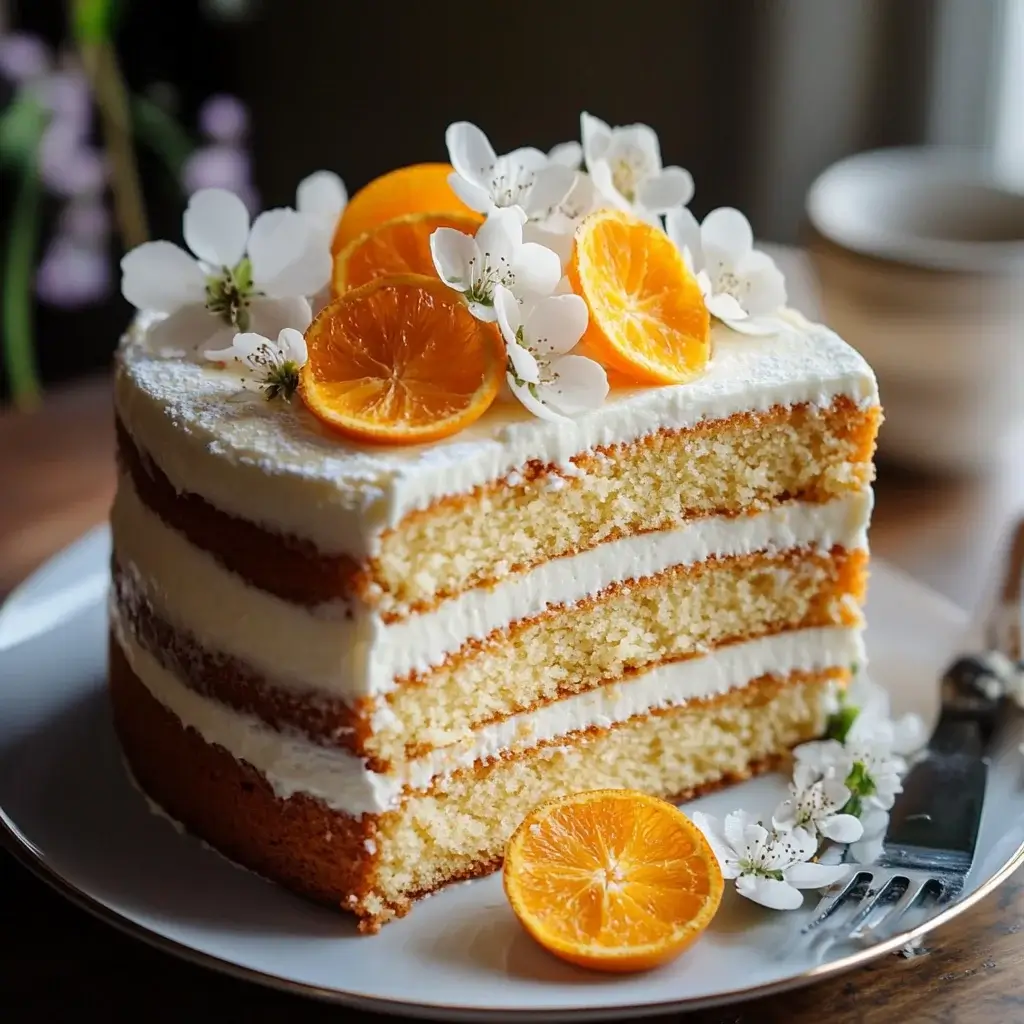
The first time I baked this Orange Blossom Layer Cake, it was for my sister’s spring garden party. I remember being slightly nervous; orange blossom water can be potent, and finding that perfect balance between delicately floral and overwhelmingly perfumed felt like a culinary tightrope walk. But the aroma filling my kitchen as the layers baked – a warm, sweet citrus scent intertwined with that distinct, almost mystical floral note – was instantly reassuring. When it came time to serve, nestled amongst blooming flowers on the dessert table, the cake looked ethereal. But the real magic happened with the first bite. A collective hush fell over the guests, followed by murmurs of delight. The cake was incredibly moist, the orange zest provided a familiar brightness, but it was the subtle whisper of orange blossom that truly captivated everyone. My brother-in-law, usually a staunch chocolate-only dessert person, even asked for a second slice! Since then, this cake has become my go-to for celebrations that call for something special, elegant, and just a little bit unexpected. It’s more than just a dessert; it’s an experience – light, fragrant, and reminiscent of sunshine and blooming groves. It never fails to impress, and the delicate flavour profile always sparks conversation.
Ingredients for the Perfect Orange Blossom Layer Cake
Crafting this exquisite cake requires quality ingredients. The star, of course, is the orange blossom water, but the supporting cast plays a crucial role in achieving the perfect texture and flavour balance. Precision in measurement, especially in baking, is key to replicating the delightful results time after time.
For the Orange Blossom Cake Layers:
- 3 cups (360g) Cake Flour: Cake flour has a lower protein content than all-purpose flour, resulting in a finer, more tender crumb. Spoon the flour into your measuring cup and level it off, rather than scooping directly from the bag, to avoid compaction and ensure accuracy. Sifting is highly recommended for maximum lightness.
- 1 tablespoon Baking Powder: This is our primary leavening agent, responsible for the cake’s rise and fluffy texture. Ensure your baking powder is fresh for optimal results (test by dropping a pinch into hot water – it should fizz vigorously).
- 1/2 teaspoon Salt: Salt doesn’t just add salinity; it enhances all the other flavours, balancing the sweetness and brightening the citrus and floral notes. Fine sea salt or regular table salt works well.
- 1 cup (226g) Unsalted Butter: Use good quality unsalted butter, softened to room temperature. This is crucial for the creaming process, which incorporates air into the batter for a light texture. Softened means it should yield slightly to gentle pressure but not be melted or greasy.
- 2 cups (400g) Granulated Sugar: Provides sweetness, moisture, and contributes to the tender structure and browning of the cake.
- 4 Large Eggs: Eggs add richness, structure, binding, and leavening. They should be at room temperature to incorporate more easily and fully into the batter, creating a better emulsion.
- 1 cup (240ml) Whole Milk: Provides moisture and richness. Buttermilk can also be substituted for a slightly tangier flavour and even more tender crumb. Ensure it’s at room temperature.
- 1/4 cup (60ml) Fresh Orange Juice: Adds a natural citrus tang and moisture, complementing the orange zest and blossom water. Freshly squeezed is always best for flavour.
- 2 tablespoons Orange Zest: Finely grated zest from about 2 large oranges. This packs a significant orange flavour punch without adding extra liquid. Zest only the outer orange layer, avoiding the bitter white pith.
- 1 teaspoon Vanilla Extract: Pure vanilla extract enhances the overall flavour profile, adding warmth and depth that complements both the orange and floral notes.
- 1 to 1.5 teaspoons Orange Blossom Water: This is the signature flavour. Start with 1 teaspoon and taste the batter if you’re unsure. Quality varies, and it can be potent. Add more cautiously if you desire a stronger floral presence. Ensure you are using food-grade orange blossom water (also known as orange flower water).
For the Orange Blossom Buttercream Frosting:
- 2 cups (452g) Unsalted Butter: Again, softened to room temperature for smooth, fluffy frosting.
- 4-5 cups (480-600g) Powdered Sugar: Also known as confectioners’ sugar or icing sugar. Sift it to remove any lumps for the smoothest possible frosting. The amount can be adjusted based on your desired sweetness and consistency.
- 1/4 cup (60ml) Heavy Cream or Whole Milk: Adds richness and helps achieve the right spreading consistency. Start with a smaller amount and add more as needed. Room temperature liquid incorporates better.
- 1 to 2 teaspoons Orange Blossom Water: Adjust based on preference and the potency of your specific brand. Remember, you can always add more, but you can’t take it out.
- 1 teaspoon Vanilla Extract: Complements the orange blossom and adds depth to the frosting flavour.
- Pinch of Salt: Crucial for balancing the intense sweetness of the powdered sugar.
- Optional: 1-2 tablespoons Orange Zest: For an extra layer of orange flavour and visual appeal within the frosting itself.
Optional Garnishes:
- Fresh Orange Slices or Twists
- Candied Orange Peel
- Edible Flowers (like pansies, violas, or organic rose petals – ensure they are food-safe)
- Fresh Mint Sprigs
- A light dusting of Powdered Sugar
Step-by-Step Instructions: Baking Your Orange Blossom Masterpiece
Baking this Orange Blossom Layer Cake is a process that rewards patience and attention to detail. Follow these steps closely for a truly memorable result. Remember the importance of mise en place – having all your ingredients measured and ready before you begin mixing.
1. Preparation is Key:
* Preheat your oven to 350°F (175°C).
* Grease and flour three 8-inch round cake pans. Alternatively, grease the pans, line the bottoms with parchment paper rounds, grease the parchment paper, and then flour the sides. This double-assurance helps guarantee the cakes release cleanly. Set the prepared pans aside.
2. Combine Dry Ingredients:
* In a medium bowl, whisk together the cake flour, baking powder, and salt. Whisking helps aerate the flour and distribute the leavening agent and salt evenly. Sifting these ingredients together is even better for a guaranteed light and airy crumb. Set aside.
3. Cream Butter and Sugar:
* In the large bowl of a stand mixer fitted with the paddle attachment, or using a hand mixer and a large bowl, beat the softened unsalted butter on medium-high speed until it’s smooth and creamy (about 1-2 minutes).
* Gradually add the granulated sugar while the mixer is on medium speed. Once all the sugar is added, increase the speed to medium-high and beat for a full 3-5 minutes. The mixture should become very pale, light, and fluffy. Don’t rush this step – creaming incorporates air, which is essential for the cake’s texture. Scrape down the sides and bottom of the bowl periodically to ensure even mixing.
4. Incorporate Eggs:
* Add the room temperature eggs one at a time, beating well (about 30 seconds) after each addition. Wait until each egg is fully incorporated before adding the next. If the mixture looks slightly curdled, don’t worry; it will come together when the dry ingredients are added. Scrape down the bowl again.
5. Add Flavourings:
* Beat in the vanilla extract, orange zest, and 1 teaspoon of orange blossom water until just combined. Give the batter a quick taste here if you’re considering adding the extra 1/2 teaspoon of orange blossom water – do it now if desired.
6. Combine Wet Ingredients:
* In a separate small bowl or liquid measuring cup, whisk together the room temperature whole milk and fresh orange juice.
7. Alternate Wet and Dry Ingredients:
* With the mixer on low speed, begin adding the dry ingredient mixture and the milk/orange juice mixture to the butter/sugar/egg mixture. Alternate between the two, starting and ending with the dry ingredients. A common sequence is: add one-third of the dry ingredients, mix until just combined. Add half of the wet ingredients, mix until just combined. Add another third of the dry ingredients, mix until just combined. Add the remaining half of the wet ingredients, mix until just combined. Finally, add the last third of the dry ingredients.
* Crucially: Mix only until each addition is just barely combined. Overmixing develops the gluten in the flour, which can lead to a tough or dense cake. Stop mixing as soon as you no longer see streaks of flour. A few final folds with a rubber spatula can ensure everything at the bottom is incorporated without overworking the batter.
8. Divide and Bake:
* Divide the batter evenly among the three prepared cake pans. Smooth the tops gently with an offset spatula or the back of a spoon.
* Bake in the preheated oven for 25-30 minutes, or until a wooden skewer or toothpick inserted into the center of the cakes comes out clean, or with a few moist crumbs attached (but no wet batter). The tops should spring back lightly when gently pressed. Baking times can vary slightly depending on your oven, so start checking around the 25-minute mark. If possible, rotate the pans halfway through baking for even browning.
9. Cool the Cakes:
* Once baked, carefully remove the pans from the oven and place them on a wire cooling rack. Let the cakes cool in their pans for 10-15 minutes. This allows them to set slightly, making them less likely to break when unmolded.
* After 10-15 minutes, run a thin knife or offset spatula around the edges of each pan to loosen the cakes. Invert the cakes carefully onto the wire rack, peel off the parchment paper (if used), and let them cool completely to room temperature. This can take 1-2 hours. Attempting to frost warm cakes will result in melted, messy frosting.
10. Make the Orange Blossom Buttercream:
* While the cakes are cooling, prepare the frosting. In the clean bowl of your stand mixer (or using a hand mixer), beat the softened unsalted butter on medium-high speed until very pale and fluffy (about 3-5 minutes).
* Turn the mixer speed down to low and gradually add the sifted powdered sugar, about one cup at a time, mixing until incorporated before adding the next. Once all the sugar seems mostly mixed in, scrape down the bowl.
* Add the vanilla extract, a pinch of salt, and 1 teaspoon of the orange blossom water. If using orange zest in the frosting, add it now.
* With the mixer on low, gradually drizzle in the heavy cream or milk, adding just enough until the frosting reaches your desired spreading consistency. You might not need the full 1/4 cup, or you may need slightly more.
* Once the liquid is incorporated, increase the mixer speed to medium-high and beat for another 2-3 minutes until the frosting is very light, smooth, and airy.
* Taste the frosting. Add more orange blossom water, 1/4 teaspoon at a time, if you want a more pronounced floral flavour. If it’s too thin, add a bit more sifted powdered sugar. If it’s too thick, add a tiny splash more cream or milk.
11. Assemble the Layer Cake:
* Ensure your cakes are completely cool. If the tops are domed, you may want to level them using a long serrated knife or a cake leveler for a more stable and professional-looking cake. (Save the scraps for snacking!)
* Place one cake layer, cut-side up (if leveled), onto your serving plate or cake stand. A dab of frosting underneath can help anchor it.
* Spread about 1 cup of frosting evenly over the first layer, right to the edges.
* Carefully place the second cake layer on top, cut-side down (or top-side up if not leveled). Gently press down to secure it.
* Spread another cup of frosting evenly over the second layer.
* Place the third cake layer on top, ideally cut-side down for a flat top surface.
* Crumb Coat (Highly Recommended): Apply a thin, even layer of frosting over the entire cake (top and sides). This layer traps any loose crumbs. Don’t worry about it looking perfect. Chill the cake in the refrigerator for 20-30 minutes to allow the crumb coat to firm up. This step makes applying the final layer of frosting much cleaner and easier.
12. Final Frosting and Decoration:
* Once the crumb coat is chilled and firm, apply the remaining frosting generously over the top and sides of the cake. Use an offset spatula or a bench scraper for a smooth finish, or create decorative swirls and textures with the back of a spoon or the tip of your spatula.
* Garnish as desired with fresh orange slices, candied peel, edible flowers, or mint sprigs just before serving.
13. Chill (Optional) & Serve:
* You can serve the cake immediately, or chill it for about 30 minutes to help the frosting set completely, making slicing cleaner. Let it sit at room temperature for about 15-20 minutes before serving if chilled for longer, as the flavour and texture are best when not ice-cold.
Nutritional Information (Estimated)
Please note that these values are estimates and can vary significantly based on the specific ingredients used (e.g., brand of butter, flour, sugar), the exact size of the slices, and any variations made to the recipe. This information is provided as a general guideline.
- Servings: 12-16 slices
- Calories per Serving (approximate, based on 14 slices): 650-750 kcal
This cake is an indulgent treat, rich in butter, sugar, and flour. Key contributors to the calorie count are the butter and sugar in both the cake and the frosting. While it contains some nutrients from eggs and milk, it’s best enjoyed in moderation as part of a balanced diet, typically reserved for special occasions.
Time Commitment: Planning Your Bake
Baking a layer cake is a rewarding process, but it does require a time investment. Planning ahead ensures a smooth and enjoyable experience.
- Preparation Time: 30-40 minutes (Measuring ingredients, preparing pans, mixing batter and frosting)
- Baking Time: 25-30 minutes
- Cooling Time: 1.5 – 2 hours (Crucial for assembly)
- Assembly & Frosting Time: 30 – 60 minutes (Depending on your experience and desired decoration complexity, includes crumb coat chilling time)
- Total Time: Approximately 3 to 4 hours (Allow for slightly longer if you are less experienced or working at a very leisurely pace).
While the active hands-on time is closer to 1.5-2 hours, the cooling period significantly extends the overall duration. You can break up the process: bake the layers one day, wrap them well, and frost the next day.
Serving Suggestions: Presenting Your Orange Blossom Cake
This elegant Orange Blossom Layer Cake deserves a presentation that matches its delicate flavour and beautiful appearance. Here are some ideas to elevate the serving experience:
- Occasions: This cake shines at spring and summer events:
- Easter celebrations
- Mother’s Day brunches
- Bridal showers
- Baby showers
- Garden parties
- Afternoon tea gatherings
- Elegant birthday parties
- Any occasion calling for a light, sophisticated dessert.
- Presentation:
- Cake Stand: Display the cake on a beautiful cake stand (glass, ceramic, or porcelain) to give it height and presence.
- Garnishes: Use the suggested garnishes thoughtfully. A few strategically placed edible flowers or a simple arrangement of orange twists can be stunning. Avoid overcrowding the top. A light dusting of powdered sugar just before serving adds a touch of snowy elegance.
- Slicing: Use a long, thin, sharp knife. Dip the knife in hot water and wipe it clean between each slice for the neatest cuts, especially through the layers of frosting.
- Pairings: Complement the cake’s delicate flavours:
- Beverages:
- Tea: Earl Grey (its bergamot notes harmonize beautifully), Chamomile, Mint tea, or a light Oolong.
- Coffee: A light or medium roast coffee.
- Wine: A slightly sweet sparkling wine like Prosecco or Moscato d’Asti, or a late-harvest Riesling.
- Other: Elderflower cordial or lemonade.
- Accompaniments:
- Fresh Berries: A small bowl of fresh raspberries, strawberries, or blueberries provides a lovely colour and flavour contrast.
- Whipped Cream: A dollop of lightly sweetened whipped cream offers a creamy counterpoint without competing with the orange blossom flavour.
- Fruit Coulis: A drizzle of raspberry or strawberry coulis around the plate adds visual appeal and a touch of tartness.
- Sorbet: A scoop of lemon or raspberry sorbet alongside offers a refreshing contrast.
- Beverages:
Baker’s Secrets: 5 Tips for Orange Blossom Cake Success
Achieving layer cake perfection involves a few key techniques. Keep these tips in mind for your best Orange Blossom Layer Cake yet:
- Room Temperature is Non-Negotiable: This is perhaps the most crucial tip for cake baking. Butter, eggs, and milk (or buttermilk/cream) must be at room temperature (around 68-70°F or 20-21°C). Room temperature ingredients emulsify better, creating a smoother batter that traps air more effectively. This leads to a lighter, fluffier cake with a more even crumb and better volume. Cold ingredients can cause the batter to curdle or become dense. Take them out of the fridge at least 1-2 hours before you plan to start mixing.
- Don’t Overmix the Batter: Once you start alternating the wet and dry ingredients, mix only until they are just combined. Overmixing develops the gluten in the flour, resulting in a cake that is tough, chewy, or dense instead of light and tender. Stop the mixer as soon as the streaks of flour disappear. It’s always better to undermix slightly and finish incorporating by hand with a spatula than to overmix.
- Measure Flour Accurately: How you measure flour significantly impacts the cake’s texture. Scooping the measuring cup directly into the flour bag compacts the flour, meaning you’ll likely use more than the recipe calls for, leading to a dry cake. Instead, use the “spoon and level” method: Fluff the flour in its container, gently spoon it into the measuring cup until it’s overflowing, then sweep the excess off with the straight edge of a knife or spatula. For ultimate accuracy, use a kitchen scale and weigh your flour (gram measurements are provided).
- Use Orange Blossom Water Judiciously & Choose Wisely: Orange Blossom Water (or Orange Flower Water) is potent and its intensity varies between brands. Start with the lower amount suggested in the recipe (1 teaspoon for the cake, 1 teaspoon for the frosting). You can always add a tiny bit more after tasting the batter or frosting, but you can’t remove it once it’s in. Ensure you’re buying food-grade water, often found in Middle Eastern grocery stores, specialty food shops, or online. Avoid products labelled as “extract” or “essence” unless you’re familiar with their concentration, as they can be much stronger.
- Embrace the Crumb Coat: Don’t skip the crumb coat step, especially if you want a professional-looking finish. Applying that initial thin layer of frosting traps all the loose crumbs. Chilling it briefly allows this layer to firm up, creating a smooth, clean surface for your final layer of frosting. This prevents crumbs from mixing into your beautiful final coat, ensuring a pristine look whether you’re aiming for smooth sides or decorative swirls.
Frequently Asked Questions (FAQ) About Orange Blossom Layer Cake
Here are answers to some common questions about baking and enjoying this delightful cake:
- Q: Can I make this recipe into cupcakes?
- A: Absolutely! This batter works beautifully for cupcakes. Line standard muffin tins with paper liners and fill them about two-thirds full. Baking time will be shorter, likely around 18-22 minutes at 350°F (175°C). Start checking for doneness (toothpick inserted comes out clean) around the 18-minute mark. This recipe should yield approximately 24-30 cupcakes. You can then frost them with the orange blossom buttercream.
- Q: Can I make the cake layers or the entire cake ahead of time?
- A: Yes, you can manage your time by preparing components in advance.
- Cake Layers: Bake the cake layers, let them cool completely, then wrap them tightly in plastic wrap (individually) and then in aluminum foil. They can be stored at room temperature for up to 2 days or frozen for up to 2 months. Thaw frozen layers overnight in the refrigerator while still wrapped.
- Frosting: The buttercream can be made ahead and stored in an airtight container in the refrigerator for up to a week or frozen for up to 3 months. Let it come to room temperature and then re-whip it with your mixer for a few minutes to restore its fluffy texture before using. You might need to add a splash of milk or cream if it seems too stiff.
- Assembled Cake: An assembled and frosted cake can usually be stored in an airtight cake carrier in the refrigerator for up to 3-4 days. However, for the best flavour and texture, let it sit at room temperature for at least 30-60 minutes before serving, as chilled cake can taste dry and the frosting will be hard.
- A: Yes, you can manage your time by preparing components in advance.
- Q: Where can I find Orange Blossom Water?
- A: Food-grade Orange Blossom Water (sometimes labelled Orange Flower Water) is typically found in a few places:
- International/Middle Eastern Aisles: Many larger supermarkets have an international foods section where you might find it.
- Specialty Food Stores: Stores focusing on gourmet or imported ingredients often carry it.
- Middle Eastern or Mediterranean Markets: These are excellent places to look.
- Online Retailers: Numerous online shops sell various brands. Look for reputable brands known for quality, often from Lebanon or France. Ensure it specifies “food grade.”
- A: Food-grade Orange Blossom Water (sometimes labelled Orange Flower Water) is typically found in a few places:
- Q: Can I substitute orange extract for orange blossom water?
- A: While you can, it’s important to understand they provide very different flavour profiles. Orange extract provides a concentrated citrus flavour, similar to orange zest or juice but more intense. Orange blossom water provides a delicate floral aroma and taste derived from the blossoms of the orange tree, not the fruit itself. Substituting extract will give you a lovely orange cake, but it won’t have the unique, ethereal floral notes that define an Orange Blossom Cake. If you must substitute, use orange extract sparingly and perhaps increase the orange zest to compensate for the missing complexity.
- Q: My frosting seems too thin/thick. How can I fix it?
- A: Buttercream consistency is easily adjustable:
- Too Thin: If your frosting is too runny (this can happen if the butter was too soft or too much liquid was added), the easiest fix is to gradually beat in more sifted powdered sugar, about 1/4 cup at a time, until it reaches the desired thickness. Chilling it briefly in the refrigerator (15-20 minutes) and then re-whipping can also help it firm up.
- Too Thick: If the frosting is too stiff to spread easily, add more liquid (heavy cream or milk) very slowly, just a teaspoon or two at a time, while the mixer is on low speed, until it becomes smooth and spreadable. Be careful not to add too much liquid too quickly.
- A: Buttercream consistency is easily adjustable:
This Orange Blossom Layer Cake is more than just a recipe; it’s an invitation to create something truly special. Its delicate balance of familiar citrus and enchanting floral notes makes it a standout dessert for any occasion demanding elegance and a touch of springtime magic. Enjoy the process, savour the results, and watch as your guests fall in love with its unique charm. Happy Baking!t
Print
Orange Blossom Layer Cake recipe
Ingredients
- 3 cups (360g) Cake Flour: Cake flour has a lower protein content than all-purpose flour, resulting in a finer, more tender crumb. Spoon the flour into your measuring cup and level it off, rather than scooping directly from the bag, to avoid compaction and ensure accuracy. Sifting is highly recommended for maximum lightness.
- 1 tablespoon Baking Powder: This is our primary leavening agent, responsible for the cake’s rise and fluffy texture. Ensure your baking powder is fresh for optimal results (test by dropping a pinch into hot water – it should fizz vigorously).
- 1/2 teaspoon Salt: Salt doesn’t just add salinity; it enhances all the other flavours, balancing the sweetness and brightening the citrus and floral notes. Fine sea salt or regular table salt works well.
- 1 cup (226g) Unsalted Butter: Use good quality unsalted butter, softened to room temperature. This is crucial for the creaming process, which incorporates air into the batter for a light texture. Softened means it should yield slightly to gentle pressure but not be melted or greasy.
- 2 cups (400g) Granulated Sugar: Provides sweetness, moisture, and contributes to the tender structure and browning of the cake.
- 4 Large Eggs: Eggs add richness, structure, binding, and leavening. They should be at room temperature to incorporate more easily and fully into the batter, creating a better emulsion.
- 1 cup (240ml) Whole Milk: Provides moisture and richness. Buttermilk can also be substituted for a slightly tangier flavour and even more tender crumb. Ensure it’s at room temperature.
- 1/4 cup (60ml) Fresh Orange Juice: Adds a natural citrus tang and moisture, complementing the orange zest and blossom water. Freshly squeezed is always best for flavour.
- 2 tablespoons Orange Zest: Finely grated zest from about 2 large oranges. This packs a significant orange flavour punch without adding extra liquid. Zest only the outer orange layer, avoiding the bitter white pith.
- 1 teaspoon Vanilla Extract: Pure vanilla extract enhances the overall flavour profile, adding warmth and depth that complements both the orange and floral notes.
- 1 to 1.5 teaspoons Orange Blossom Water: This is the signature flavour. Start with 1 teaspoon and taste the batter if you’re unsure. Quality varies, and it can be potent. Add more cautiously if you desire a stronger floral presence. Ensure you are using food-grade orange blossom water (also known as orange flower water).
For the Orange Blossom Buttercream Frosting:
- 2 cups (452g) Unsalted Butter: Again, softened to room temperature for smooth, fluffy frosting.
- 4–5 cups (480-600g) Powdered Sugar: Also known as confectioners’ sugar or icing sugar. Sift it to remove any lumps for the smoothest possible frosting. The amount can be adjusted based on your desired sweetness and consistency.
- 1/4 cup (60ml) Heavy Cream or Whole Milk: Adds richness and helps achieve the right spreading consistency. Start with a smaller amount and add more as needed. Room temperature liquid incorporates better.
- 1 to 2 teaspoons Orange Blossom Water: Adjust based on preference and the potency of your specific brand. Remember, you can always add more, but you can’t take it out.
- 1 teaspoon Vanilla Extract: Complements the orange blossom and adds depth to the frosting flavour.
- Pinch of Salt: Crucial for balancing the intense sweetness of the powdered sugar.
- Optional: 1-2 tablespoons Orange Zest: For an extra layer of orange flavour and visual appeal within the frosting itself.
Instructions
1. Preparation is Key:
* Preheat your oven to 350°F (175°C).
* Grease and flour three 8-inch round cake pans. Alternatively, grease the pans, line the bottoms with parchment paper rounds, grease the parchment paper, and then flour the sides. This double-assurance helps guarantee the cakes release cleanly. Set the prepared pans aside.
2. Combine Dry Ingredients:
* In a medium bowl, whisk together the cake flour, baking powder, and salt. Whisking helps aerate the flour and distribute the leavening agent and salt evenly. Sifting these ingredients together is even better for a guaranteed light and airy crumb. Set aside.
3. Cream Butter and Sugar:
* In the large bowl of a stand mixer fitted with the paddle attachment, or using a hand mixer and a large bowl, beat the softened unsalted butter on medium-high speed until it’s smooth and creamy (about 1-2 minutes).
* Gradually add the granulated sugar while the mixer is on medium speed. Once all the sugar is added, increase the speed to medium-high and beat for a full 3-5 minutes. The mixture should become very pale, light, and fluffy. Don’t rush this step – creaming incorporates air, which is essential for the cake’s texture. Scrape down the sides and bottom of the bowl periodically to ensure even mixing.
4. Incorporate Eggs:
* Add the room temperature eggs one at a time, beating well (about 30 seconds) after each addition. Wait until each egg is fully incorporated before adding the next. If the mixture looks slightly curdled, don’t worry; it will come together when the dry ingredients are added. Scrape down the bowl again.
5. Add Flavourings:
* Beat in the vanilla extract, orange zest, and 1 teaspoon of orange blossom water until just combined. Give the batter a quick taste here if you’re considering adding the extra 1/2 teaspoon of orange blossom water – do it now if desired.
6. Combine Wet Ingredients:
* In a separate small bowl or liquid measuring cup, whisk together the room temperature whole milk and fresh orange juice.
7. Alternate Wet and Dry Ingredients:
* With the mixer on low speed, begin adding the dry ingredient mixture and the milk/orange juice mixture to the butter/sugar/egg mixture. Alternate between the two, starting and ending with the dry ingredients. A common sequence is: add one-third of the dry ingredients, mix until just combined. Add half of the wet ingredients, mix until just combined. Add another third of the dry ingredients, mix until just combined. Add the remaining half of the wet ingredients, mix until just combined. Finally, add the last third of the dry ingredients.
* Crucially: Mix only until each addition is just barely combined. Overmixing develops the gluten in the flour, which can lead to a tough or dense cake. Stop mixing as soon as you no longer see streaks of flour. A few final folds with a rubber spatula can ensure everything at the bottom is incorporated without overworking the batter.
8. Divide and Bake:
* Divide the batter evenly among the three prepared cake pans. Smooth the tops gently with an offset spatula or the back of a spoon.
* Bake in the preheated oven for 25-30 minutes, or until a wooden skewer or toothpick inserted into the center of the cakes comes out clean, or with a few moist crumbs attached (but no wet batter). The tops should spring back lightly when gently pressed. Baking times can vary slightly depending on your oven, so start checking around the 25-minute mark. If possible, rotate the pans halfway through baking for even browning.
9. Cool the Cakes:
* Once baked, carefully remove the pans from the oven and place them on a wire cooling rack. Let the cakes cool in their pans for 10-15 minutes. This allows them to set slightly, making them less likely to break when unmolded.
* After 10-15 minutes, run a thin knife or offset spatula around the edges of each pan to loosen the cakes. Invert the cakes carefully onto the wire rack, peel off the parchment paper (if used), and let them cool completely to room temperature. This can take 1-2 hours. Attempting to frost warm cakes will result in melted, messy frosting.
10. Make the Orange Blossom Buttercream:
* While the cakes are cooling, prepare the frosting. In the clean bowl of your stand mixer (or using a hand mixer), beat the softened unsalted butter on medium-high speed until very pale and fluffy (about 3-5 minutes).
* Turn the mixer speed down to low and gradually add the sifted powdered sugar, about one cup at a time, mixing until incorporated before adding the next. Once all the sugar seems mostly mixed in, scrape down the bowl.
* Add the vanilla extract, a pinch of salt, and 1 teaspoon of the orange blossom water. If using orange zest in the frosting, add it now.
* With the mixer on low, gradually drizzle in the heavy cream or milk, adding just enough until the frosting reaches your desired spreading consistency. You might not need the full 1/4 cup, or you may need slightly more.
* Once the liquid is incorporated, increase the mixer speed to medium-high and beat for another 2-3 minutes until the frosting is very light, smooth, and airy.
* Taste the frosting. Add more orange blossom water, 1/4 teaspoon at a time, if you want a more pronounced floral flavour. If it’s too thin, add a bit more sifted powdered sugar. If it’s too thick, add a tiny splash more cream or milk.
11. Assemble the Layer Cake:
* Ensure your cakes are completely cool. If the tops are domed, you may want to level them using a long serrated knife or a cake leveler for a more stable and professional-looking cake. (Save the scraps for snacking!)
* Place one cake layer, cut-side up (if leveled), onto your serving plate or cake stand. A dab of frosting underneath can help anchor it.
* Spread about 1 cup of frosting evenly over the first layer, right to the edges.
* Carefully place the second cake layer on top, cut-side down (or top-side up if not leveled). Gently press down to secure it.
* Spread another cup of frosting evenly over the second layer.
* Place the third cake layer on top, ideally cut-side down for a flat top surface.
* Crumb Coat (Highly Recommended): Apply a thin, even layer of frosting over the entire cake (top and sides). This layer traps any loose crumbs. Don’t worry about it looking perfect. Chill the cake in the refrigerator for 20-30 minutes to allow the crumb coat to firm up. This step makes applying the final layer of frosting much cleaner and easier.
12. Final Frosting and Decoration:
* Once the crumb coat is chilled and firm, apply the remaining frosting generously over the top and sides of the cake. Use an offset spatula or a bench scraper for a smooth finish, or create decorative swirls and textures with the back of a spoon or the tip of your spatula.
* Garnish as desired with fresh orange slices, candied peel, edible flowers, or mint sprigs just before serving.
13. Chill (Optional) & Serve:
* You can serve the cake immediately, or chill it for about 30 minutes to help the frosting set completely, making slicing cleaner. Let it sit at room temperature for about 15-20 minutes before serving if chilled for longer, as the flavour and texture are best when not ice-cold.
Nutrition
- Serving Size: one normal portion
- Calories: 650-750