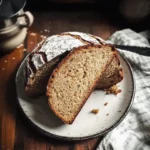
Ingredients
Scale
-
- 3 cups (360g) All-Purpose Flour: This provides structure and a lighter crumb. Unbleached is preferred.
-
- 1 ½ cups (180g) Whole Wheat Flour: Adds a nutty flavor, wholesome fiber, and contributes to the “brown bread” character.
-
- ¼ cup (50g) Rolled Oats (Optional, but recommended): Adds a lovely texture and slight chewiness. Quick oats can also be used.
-
- 2 teaspoons Instant Yeast (or Active Dry Yeast): If using active dry yeast, you may want to proof it in a little of the warm water with a pinch of sugar for 5-10 minutes until foamy.
-
- 1 ½ teaspoons Salt: Crucial for flavor and for controlling yeast activity. Use fine sea salt or kosher salt.
-
- ¼ cup (84g) Molasses or Dark Treacle: This is key for the characteristic color and slightly sweet, rich flavor of brown bread. You can substitute with dark corn syrup, maple syrup, or honey for a different flavor profile, though molasses is traditional for classic brown bread.
-
- 2 cups (480ml) Lukewarm Water: Approximately 105-115°F (40-46°C). Too hot, and it will kill the yeast; too cold, and the yeast won’t activate properly.
-
- 2 tablespoons Melted Butter or Neutral Oil (e.g., canola, vegetable): Adds richness and softness to the crumb.
-
- Extra flour for dusting: For handling the sticky dough.
-
- Cornmeal or extra oats for dusting the baking vessel (optional): Prevents sticking and adds a nice texture to the bottom crust.
Instructions
-
- Combine Dry Ingredients: In a large mixing bowl, whisk together the all-purpose flour, whole wheat flour, optional rolled oats, instant yeast, and salt. Ensure they are well combined. This even distribution is important for consistent results.
-
- Combine Wet Ingredients: In a separate smaller bowl or measuring cup, combine the lukewarm water, molasses (or chosen sweetener), and melted butter or oil. Stir until the molasses is mostly dissolved.
-
- Mix Dough: Pour the wet ingredients into the dry ingredients. Using a sturdy spatula or wooden spoon, mix until a shaggy, sticky dough forms. Ensure there are no dry patches of flour remaining. The dough will be quite wet and sticky – this is normal for no-knead bread. Do not be tempted to add much more flour at this stage.
-
- First Rise (Bulk Fermentation): Cover the bowl tightly with plastic wrap or a clean kitchen towel. Let the dough rise at room temperature (ideally around 70-75°F or 21-24°C) for 12 to 18 hours, or even up to 24 hours. The longer it rises, the more developed the flavor will be. The dough should at least double in size and become bubbly and web-like on the surface. If your room is warmer, the rise time might be shorter; if cooler, it might take longer.
-
- Shape the Loaf (Gently!): Lightly flour a clean work surface. Gently scrape the dough out of the bowl onto the floured surface. The dough will be very soft and sticky. With floured hands, gently fold the dough over itself a few times (like folding a letter) to form a rough ball or oval shape. Be gentle; you want to preserve as many of those precious air bubbles as possible.
-
- Second Rise (Proofing): Line a bowl (roughly the size of your intended loaf) with a clean kitchen towel and generously dust it with flour, cornmeal, or oats. Alternatively, you can use parchment paper. Carefully place the shaped dough, seam-side down (if you made a seam), into the prepared bowl/towel. If using parchment, place the dough seam-side up on the parchment and use the parchment to lift it into the bowl. Lightly dust the top of the dough with flour. Cover loosely with plastic wrap or another towel and let it rise for another 1 to 2 hours, or until it has increased in size by about 50% and doesn’t spring back immediately when gently poked.
-
- Preheat Oven and Dutch Oven: About 30-45 minutes before the second rise is complete, place a 4 to 6-quart Dutch oven (with its lid) into your oven. Preheat the oven to 450°F (230°C). The Dutch oven needs to be screaming hot to create that beautiful crust.
-
- Score and Bake: Once the oven and Dutch oven are fully preheated and the dough has finished its second rise, carefully remove the hot Dutch oven from the oven (use sturdy oven mitts!).
-
- If you proofed in a floured towel: Quickly and carefully invert the dough from the towel into the hot Dutch oven. It should land seam-side up.
-
- If you proofed on parchment: Lift the dough using the parchment paper and carefully lower it into the hot Dutch oven.
-
- Optional: Quickly score the top of the dough with a lame, sharp knife, or razor blade (about ½ inch deep). This allows steam to escape and controls where the bread expands.
-
- Score and Bake: Once the oven and Dutch oven are fully preheated and the dough has finished its second rise, carefully remove the hot Dutch oven from the oven (use sturdy oven mitts!).
-
- Bake Covered: Immediately place the lid back on the Dutch oven and return it to the hot oven. Bake for 30 minutes with the lid on. The lid traps steam, which is essential for a crispy crust and good oven spring.
-
- Bake Uncovered: After 30 minutes, carefully remove the lid (watch out for hot steam!). Continue baking for another 15-25 minutes, or until the crust is a deep golden brown and the internal temperature of the bread reaches 200-210°F (93-99°C) when checked with an instant-read thermometer.
-
- Cool Completely: Carefully remove the bread from the Dutch oven and place it on a wire rack to cool completely (at least 1-2 hours, preferably longer) before slicing. This is a crucial step! Slicing into hot bread can result in a gummy texture as the internal structure is still setting. The wait is hard, but worth it.
Nutrition
- Serving Size: one normal portion
- Calories: 180-220