


There are certain smells that instantly transport you to a place of comfort, warmth, and utter anticipation. For my family, the aroma of freshly baked bread tops that list, but when it’s this specific bread – the Cheddar Jalapeño Loaf – the excitement reaches a whole new level. I remember the first time I pulled this golden, cheese-studded beauty from the oven. The air filled with an intoxicating blend of tangy sharp cheddar, the subtle fruity heat of jalapeños, and that unmistakable, soul-soothing scent of yeast bread. My kids, usually glued to screens, were suddenly hovering in the kitchen, eyes wide. My husband, drawn by the smell, appeared asking, “Is it ready yet?” That first slice, still warm enough to melt butter instantly, was a revelation. The soft, slightly chewy crumb, punctuated by pockets of gooey melted cheese and surprising bursts of gentle spice… it was perfection. Since that day, this Cheddar Jalapeño Bread has become a staple for weekend brunches, a star alongside hearty chili dinners, and the most requested item for potlucks. It’s more than just bread; it’s a guaranteed crowd-pleaser, a conversation starter, and frankly, one of the most rewarding baking projects you can undertake. The simple magic of flour, water, yeast, cheese, and peppers transforms into something truly spectacular, and I’m thrilled to share exactly how you can bring this deliciousness into your own kitchen.
Why This Cheddar Jalapeño Bread Recipe is a Must-Try
Before we dive into the nuts and bolts (or rather, the flour and yeast), let’s talk about why this particular Cheddar Jalapeño Bread recipe deserves a prime spot in your baking repertoire. It’s not just another bread recipe; it’s an experience.
- Irresistible Flavor Combination: This is the star of the show. The sharp, tangy bite of good quality cheddar cheese melds beautifully with the bright, slightly grassy, and gently warming spice of jalapeños. It’s a savory symphony that hits all the right notes – cheesy, spicy, salty, and deeply satisfying. It’s familiar enough to be comforting but exciting enough to feel special.
- Incredible Texture: We’re aiming for perfection here: a soft, slightly springy crumb that’s tender and moist, contrasted by a beautifully golden, slightly chewy crust. The pockets of melted cheese add gooey richness, while the diced jalapeños provide little bursts of texture and flavor. It’s substantial without being heavy.
- Visually Stunning: Let’s be honest, this bread looks impressive. The golden-brown crust speckled with visible pieces of jalapeño and oozing pockets of cheddar cheese is incredibly appetizing. Bringing this loaf to the table guarantees appreciative murmurs. It looks rustic, homemade, and utterly delicious.
- Surprisingly Achievable: While yeast bread can seem intimidating, this recipe is designed to be accessible even for relatively new bakers. The steps are straightforward, and the dough is fairly forgiving. We’ll walk through each stage clearly, demystifying the process of kneading, rising, and baking. The reward far outweighs the effort involved.
- Incredibly Versatile: As mentioned, this bread isn’t just for slicing and slathering with butter (though that’s highly recommended!). Its robust flavor profile makes it a fantastic companion to countless dishes. Think soups, stews, chili, salads, sandwiches, or even just enjoyed on its own as a hearty snack. We’ll explore serving suggestions in detail later.
- The Joy of Homemade: There’s a unique satisfaction that comes from creating something delicious from scratch, especially bread. The process itself can be therapeutic – the kneading, the patient waiting for the rise, the anticipation as it bakes. And the end result? Far superior in taste, texture, and quality to most store-bought alternatives, free from preservatives and made with love (and cheese!).
This Cheddar Jalapeño Bread isn’t just food; it’s comfort, it’s celebration, it’s a delicious project waiting to happen.
Cheddar Jalapeño Bread: Ingredients
Gathering the right ingredients is the first step towards baking success. Quality matters, especially with simpler recipes where each component shines. Here’s what you’ll need:
- Warm Water (105°F – 115°F / 40°C – 46°C): 1 ½ cups (360ml). The temperature is crucial! Too cold, and the yeast won’t activate properly. Too hot, and you’ll kill the yeast. Use a thermometer if you’re unsure – it should feel comfortably warm, like a baby’s bath.
- Active Dry Yeast: 2 ¼ teaspoons (7g) – equivalent to one standard packet. Ensure your yeast is fresh and not expired for the best rise. If using instant yeast, you can typically skip the initial proofing step and mix it directly with the dry ingredients, though proofing active dry yeast gives you confidence it’s working.
- Granulated Sugar: 1 tablespoon (12g). This provides food for the yeast, helping it activate and enhancing the bread’s flavor and browning.
- All-Purpose Flour: 3 ½ to 4 cups (440g – 500g), plus more for dusting. Start with 3 ½ cups; you may need a bit more depending on humidity and your specific flour. All-purpose flour provides a good balance of tenderness and structure. You can substitute bread flour for a chewier texture, but you might need slightly less flour overall.
- Salt: 1 ½ teaspoons (9g). Salt is essential for flavor balance and also helps control yeast activity and strengthen gluten structure. Don’t skip it! Use fine sea salt or regular table salt.
- Unsalted Butter: ¼ cup (4 tablespoons or 57g), melted and slightly cooled. Butter adds richness, flavor, and tenderness to the crumb. Melting it ensures even distribution. Let it cool slightly so it doesn’t cook the yeast or eggs (if using variations with eggs).
- Sharp Cheddar Cheese: 1 ½ cups (about 6 oz or 170g), shredded or cubed. Sharp or extra-sharp cheddar provides the best flavor punch against the bread and jalapeños. Shredding it yourself from a block generally yields better melting results than pre-shredded cheese (which often contains anti-caking agents). Cubing gives distinct pockets of cheese. You can use a mix! Reserve a little for sprinkling on top if desired.
- Jalapeños: 2-3 medium fresh jalapeños, finely diced. This equates to roughly ½ to ¾ cup diced. Adjust the amount based on your heat preference. Crucially, decide if you want to include the seeds and membranes – this is where most of the heat resides. Remove them for milder spice, leave some or all in for more kick. You can also use pickled jalapeños (pat them very dry first!), which offer a tangier, slightly less intense heat. Wear gloves when handling fresh jalapeños to avoid skin irritation.
Optional:
- Egg Wash (for crust): 1 large egg beaten with 1 tablespoon of water or milk. Brushing this on before baking gives a shinier, deeper golden crust.
- Coarse Sea Salt: For sprinkling on top before baking, adds texture and flavor pops.
Having everything measured and ready (mise en place) makes the baking process smoother and more enjoyable.
Step-by-Step Instructions for Baking Cheddar Jalapeño Bread
Follow these detailed steps carefully for a perfect loaf. Remember that bread making is part science, part art – slight variations in temperature, humidity, and ingredients can affect times, so learn to read your dough.
Step 1: Activate the Yeast (Proofing)
- In a large mixing bowl (or the bowl of your stand mixer), combine the warm water, granulated sugar, and active dry yeast.
- Give it a gentle stir.
- Let the mixture stand for 5-10 minutes. You should see it become foamy or bubbly on the surface. This indicates the yeast is alive and active.
- If the mixture doesn’t foam: Your yeast might be old, or the water temperature was off. Discard the mixture and start again with fresh yeast and properly temperatured water. This step is crucial for active dry yeast. (If using instant yeast, you can often mix it with the flour and salt, then add the warm water and melted butter).
Step 2: Combine Ingredients & Form the Dough
- Once the yeast is foamy, add the melted (and slightly cooled) butter to the bowl.
- Add the salt and 3 ½ cups (440g) of the all-purpose flour.
- Using a Stand Mixer: Attach the dough hook. Mix on low speed until the ingredients start to come together into a shaggy dough.
- Mixing by Hand: Use a sturdy wooden spoon or spatula to mix the ingredients until a shaggy dough forms. It will be sticky initially.
Step 3: Knead the Dough
- Kneading develops the gluten, which gives the bread its structure and chewy texture.
- Using a Stand Mixer: Increase the speed to medium-low. Knead the dough for 7-10 minutes. The dough should become smooth, elastic, and pull away from the sides of the bowl. If the dough seems excessively sticky after a few minutes, add more flour, 1 tablespoon at a time, until it’s manageable but still slightly tacky. Avoid adding too much flour, as this can make the bread dense.
- Kneading by Hand: Turn the shaggy dough out onto a lightly floured surface. Knead by hand for 10-15 minutes. To knead, fold the dough over onto itself, then push it down and away from you with the heel of your hand. Rotate the dough a quarter turn and repeat. Continue this fold-push-turn motion. The dough will start sticky but will become smoother and more elastic as you work. Add minimal flour to the surface only as needed to prevent sticking. The dough is ready when it’s smooth, elastic, and springs back slowly when poked gently. You should be able to stretch a small piece thin enough to see light through it without it tearing immediately (the “windowpane test”).
Step 4: First Rise (Bulk Fermentation)
- Lightly grease a large, clean bowl with oil or cooking spray.
- Shape the kneaded dough into a smooth ball. Place the dough ball into the greased bowl, turning it once to coat the entire surface lightly with oil. This prevents it from drying out.
- Cover the bowl tightly with plastic wrap or a clean kitchen towel.
- Place the bowl in a warm, draft-free spot to rise. Ideal temperature is around 75°F – 85°F (24°C – 29°C). (A slightly warmed oven – turned off! – or on top of the refrigerator can work).
- Let the dough rise for 1 to 1.5 hours, or until it has doubled in size. The exact time will depend on the ambient temperature and yeast activity. To check if it’s ready, gently poke two fingers into the dough – if the indentation remains or springs back very slowly, it’s ready.
Step 5: Incorporate Cheese & Jalapeños and Shape the Loaf
- Once doubled, gently punch down the center of the dough to release the trapped gases.
- Turn the dough out onto a lightly floured surface.
- Gently press or roll the dough into a rectangle, roughly 9×12 inches (or sized appropriately for your loaf pan).
- Sprinkle about two-thirds of the shredded/cubed cheddar cheese and two-thirds of the diced jalapeños evenly over the surface of the rectangle, leaving a small border along one long edge.
- Starting from the long edge opposite the clean border, tightly roll the dough up into a log, like a jelly roll. Pinch the seam firmly to seal it. Pinch the ends closed as well.
- You can either place this log seam-side down into a lightly greased 9×5 inch loaf pan OR shape it into a freeform oval or round loaf (boule) and place it on a baking sheet lined with parchment paper.
- Optional: Sprinkle the remaining cheese and jalapeños over the top of the loaf for a more decorated crust.
Step 6: Second Rise (Proofing)
- Cover the shaped loaf loosely with greased plastic wrap or a clean kitchen towel. Don’t cover too tightly, as it needs room to expand.
- Let the loaf rise again in a warm, draft-free place for 45 minutes to 1 hour, or until it has puffed up noticeably and looks airy. It may not fully double this time, but it should increase in size by about 50-75%. Don’t overproof, as this can lead to a collapsed loaf during baking. A gentle poke should leave a slight indentation that slowly springs back.
Step 7: Prepare for Baking & Bake
- About 20-30 minutes before the second rise is complete, preheat your oven to 375°F (190°C). Position an oven rack in the center.
- Optional Egg Wash: If desired, gently brush the top of the risen loaf with the prepared egg wash (1 egg beaten with 1 tbsp water/milk). This enhances browning and shine. Be gentle so you don’t deflate the loaf. Sprinkle with coarse salt now if using.
- Optional Scoring: If making a freeform loaf, you can make a few shallow slashes (about ¼ to ½ inch deep) across the top with a very sharp knife or baker’s lame just before baking. This allows steam to escape in a controlled way and can create an attractive pattern. It’s less necessary for a loaf baked in a pan.
- Carefully place the loaf pan or baking sheet into the preheated oven.
- Bake for 35 to 45 minutes. The bread should be beautifully golden brown on top and sound hollow when tapped gently on the bottom (carefully remove from pan to test if needed).
- The most accurate way to check for doneness is with an instant-read thermometer: Inserted into the center of the loaf (avoiding large cheese pockets), it should register between 190°F and 200°F (88°C – 93°C).
- If the crust is browning too quickly before the center is cooked, you can loosely tent the loaf with aluminum foil for the remaining baking time.
Step 8: Cool Completely
- Immediately remove the bread from the loaf pan (if used) and transfer it to a wire cooling rack.
- This step is crucial! Let the bread cool completely, or at least for 1-2 hours, before slicing. Hot bread is still setting its structure internally. Slicing too soon can result in a gummy texture and may cause the loaf to collapse slightly. Resist the temptation! The wait will be worth it.
Step 9: Slice and Enjoy!
- Once cooled, use a serrated bread knife to slice the Cheddar Jalapeño Bread. Serve as desired (ideas below!).
Nutrition Facts (Estimated)
Please note that these values are estimates and can vary significantly based on the specific ingredients used (especially the type and amount of cheese), portion size, and any variations made.
- Servings: This recipe typically makes one standard 9×5 inch loaf, yielding about 12-14 slices.
- Calories Per Serving (Approximate): 220 – 280 calories per slice (based on 12 slices per loaf).
This estimate assumes using all-purpose flour, sharp cheddar, and the specified amounts of butter and sugar. Using different flours, lower-fat cheese, or adjusting quantities will alter the nutritional profile. Consider this a general guideline.
Preparation Time
Understanding the time commitment helps plan your baking day:
- Active Preparation Time: 25-35 minutes (Mixing, kneading, shaping)
- First Rise: 1 hour – 1.5 hours
- Second Rise: 45 minutes – 1 hour
- Baking Time: 35 – 45 minutes
- Cooling Time: 1 – 2 hours (Essential!)
- Total Time: Approximately 3 hours 45 minutes to 5 hours 50 minutes (much of this is inactive rising and cooling time)
Remember that rising times are heavily influenced by ambient temperature. Warmer kitchens mean faster rises, cooler kitchens mean slower rises.
How to Serve Your Homemade Cheddar Jalapeño Bread
This savory bread is incredibly versatile! Here are some fantastic ways to enjoy it:
- Simply Warm with Butter: The classic. Slice the bread (thick or thin, your choice!), lightly warm it if desired, and slather it with good quality salted butter. Let the butter melt into the nooks and crannies. Pure bliss.
- Alongside Soups and Stews: This bread was made for dipping! Its robust flavor and sturdy texture hold up beautifully.
- Pair it with hearty Chili con Carne or White Chicken Chili.
- Serve alongside creamy Tomato Soup or Broccoli Cheddar Soup.
- Enjoy with rustic Beef Stew or Vegetable Soup.
- The Ultimate Grilled Cheese: Elevate your grilled cheese game! Use thick slices of this bread, add extra cheese (perhaps Monterey Jack or Provolone alongside more cheddar), maybe some bacon or sliced tomato, and grill until golden and gooey.
- Savory French Toast: Dip thick slices in a savory egg mixture (eggs, milk, pinch of salt, pepper, maybe some paprika or onion powder) and pan-fry until golden. Top with a fried egg, avocado, or crumbled bacon.
- Sandwich Superstar: Build amazing sandwiches!
- Turkey & Avocado: Layers of sliced turkey, creamy avocado, lettuce, tomato, and maybe a chipotle mayo.
- Ham & Cheese Melt: Simple but effective with this flavorful bread.
- BLT Boost: Adds a cheesy, spicy kick to the classic Bacon, Lettuce, and Tomato.
- Veggie Delight: Hummus, roasted red peppers, spinach, cucumber, and feta cheese.
- Breakfast Toast: Toast slices and top with:
- Scrambled or fried eggs.
- Smashed avocado with a sprinkle of chili flakes.
- Cream cheese and everything bagel seasoning.
- Appetizer Base: Slice thinly, toast until crisp (like crostini), and top with:
- Cream cheese and pepper jelly.
- Guacamole or salsa.
- Smoked salmon and dill cream cheese.
- Bruschetta topping (diced tomatoes, basil, garlic, olive oil).
- Flavorful Croutons: Cube stale bread, toss with olive oil and seasonings (garlic powder, onion powder, paprika), and bake until crispy. Perfect for salads (especially Caesar or taco salads) or topping soups.
- With a Cheese Board: Include slices alongside other cheeses, cured meats, fruits, and nuts for a sophisticated appetizer spread.
Additional Tips for Baking Success
Mastering bread takes practice, but these tips can help you nail your Cheddar Jalapeño loaf:
- Control the Spice Level: Jalapeño heat varies! For guaranteed mildness, meticulously remove all seeds and the white membranes (ribs) inside the peppers – that’s where most capsaicin (the heat compound) resides. Wear gloves! For more heat, leave some seeds/membranes in. Taste a tiny piece of your jalapeño beforehand if unsure. You can also substitute with milder peppers like poblanos (roasted and peeled first) or even canned green chilies (well-drained) for flavor without much heat, or amp it up with serrano peppers if you dare!
- Cheese Choices & Distribution: While sharp cheddar is classic, feel free to experiment! Pepper Jack adds extra spice, Colby Jack melts beautifully, Gruyere adds nutty depth, or use a blend. For best results, shred your own cheese from a block – pre-shredded often has additives that hinder smooth melting. To avoid giant cheese caverns, you can either shred finely or cut the cheese into small (¼-inch) cubes. Distribute evenly during shaping, but don’t worry if some pokes through – it creates lovely crispy bits on the crust.
- Achieve the Perfect Rise: Yeast thrives in warmth. If your kitchen is cool, create a proofing box: place the covered dough bowl in your oven (TURNED OFF!) with the oven light on, or place a pan of steaming hot water on the rack below the dough. Ensure your yeast is fresh (check expiration date, proof active dry yeast). Don’t rush the rises; proper fermentation develops flavor and texture. However, don’t overproof (especially the second rise), as the gluten structure can weaken, leading to a collapsed loaf.
- Customize Your Crust: For a soft crust, brush the loaf with melted butter immediately after removing it from the oven. For a chewier, crispier crust, place a shallow pan (like a cast iron skillet or broiler pan) on the bottom oven rack while preheating. Just before placing the bread in, carefully pour ½ cup of hot water into the hot pan to create steam (be cautious of the steam burst!). For a shiny, deep golden crust, use the egg wash described in the instructions.
- Proper Storage for Lasting Freshness: Homemade bread lacks preservatives, so it’s best enjoyed within 2-3 days. Store completely cooled bread in a bread box or a loosely sealed paper bag at room temperature for the best crust texture. Avoid storing in plastic bags at room temperature, as this traps moisture and can make the crust soggy quickly (and encourage mold). For longer storage (up to 3 months), wrap the completely cooled loaf tightly in plastic wrap, then place it inside a freezer-safe bag or wrap again in foil. Thaw overnight at room temperature or gently reheat slices from frozen.
Frequently Asked Questions (FAQ)
Here are answers to common questions about baking Cheddar Jalapeño Bread:
Q1: Can I use pickled jalapeños instead of fresh?
A: Absolutely! Pickled jalapeños offer a different flavor profile – tangier, slightly less vegetal, and often a bit milder than fresh ones depending on the pickling brine. They work very well in this bread. The most important step if using pickled jalapeños is to drain them thoroughly and pat them very dry with paper towels before dicing and adding them to the dough. Excess moisture can make the dough too wet and affect the bread’s texture. Use roughly the same amount (½ to ¾ cup diced) as you would fresh.
Q2: My dough didn’t rise much. What went wrong?
A: Several factors can inhibit rising:
* Yeast Issues: The yeast might be old/expired, or it could have been killed by water that was too hot (over 115°F/46°C). Always check the expiration date and use warm, not hot, water. Proofing active dry yeast first confirms it’s active.
* Temperature: The rising environment might be too cold. Yeast activity slows significantly in cool temperatures. Find a warm, draft-free spot (see Tip #3 above).
* Too Much Salt/Sugar: While necessary, excessive amounts of salt or sugar can hinder or kill yeast. Ensure you measured accurately.
* Not Enough Kneading: Insufficient kneading means poor gluten development, which can’t effectively trap the gases produced by the yeast.
* Dough Too Dry/Stiff: If too much flour was added, the dough might be too stiff for the yeast to expand easily.
Q3: Can I prepare the dough ahead of time?
A: Yes! This recipe adapts well to a cold ferment (retarding). After kneading (Step 3), place the dough in the lightly oiled bowl, cover tightly, and refrigerate for 8-24 hours (or even up to 48 hours for more flavor development). This slow, cold rise develops deeper flavors. When ready to proceed, remove the dough from the fridge, let it sit at room temperature for about 30-60 minutes to take the chill off slightly, then gently punch it down and proceed with shaping (Step 5), the second rise (which might take a bit longer after refrigeration), and baking.
Q4: Can I make this recipe in a bread machine?
A: Generally, yes, though results may vary slightly from the oven-baked version. Follow your bread machine’s instructions for adding wet and dry ingredients (usually liquids first, then dry, with yeast last). Use the basic or white bread setting appropriate for a 1.5 or 2 lb loaf. Add the cheese and jalapeños during the mix-in cycle (usually signaled by beeps near the end of the kneading cycle) or knead them in briefly by hand after the machine’s kneading cycle is complete, then return the dough to the machine for rising and baking. The crust texture might be different than oven-baked.
Q5: How can I be absolutely sure the bread is baked through?
A: While visual cues (golden brown crust) and sound (hollow tap) are good indicators, they aren’t foolproof. The most reliable method is using an instant-read digital thermometer. Insert the thermometer probe into the thickest part of the loaf, avoiding any large pockets of cheese or hitting the bottom of the pan. For enriched breads like this one, the internal temperature should register between 190°F and 200°F (88°C – 93°C). If it’s below this range, return it to the oven for a few more minutes and check again. This guarantees a perfectly cooked crumb, avoiding any unwelcome gumminess in the center.
There you have it – everything you need to bake a stunning and delicious loaf of Cheddar Jalapeño Bread. Embrace the process, enjoy the incredible aromas that fill your kitchen, and prepare for rave reviews! Happy Baking!
Print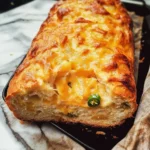
Cheddar Jalapeño Bread recipe
Ingredients
- Warm Water (105°F – 115°F / 40°C – 46°C): 1 ½ cups (360ml). The temperature is crucial! Too cold, and the yeast won’t activate properly. Too hot, and you’ll kill the yeast. Use a thermometer if you’re unsure – it should feel comfortably warm, like a baby’s bath.
- Active Dry Yeast: 2 ¼ teaspoons (7g) – equivalent to one standard packet. Ensure your yeast is fresh and not expired for the best rise. If using instant yeast, you can typically skip the initial proofing step and mix it directly with the dry ingredients, though proofing active dry yeast gives you confidence it’s working.
- Granulated Sugar: 1 tablespoon (12g). This provides food for the yeast, helping it activate and enhancing the bread’s flavor and browning.
- All-Purpose Flour: 3 ½ to 4 cups (440g – 500g), plus more for dusting. Start with 3 ½ cups; you may need a bit more depending on humidity and your specific flour. All-purpose flour provides a good balance of tenderness and structure. You can substitute bread flour for a chewier texture, but you might need slightly less flour overall.
- Salt: 1 ½ teaspoons (9g). Salt is essential for flavor balance and also helps control yeast activity and strengthen gluten structure. Don’t skip it! Use fine sea salt or regular table salt.
- Unsalted Butter: ¼ cup (4 tablespoons or 57g), melted and slightly cooled. Butter adds richness, flavor, and tenderness to the crumb. Melting it ensures even distribution. Let it cool slightly so it doesn’t cook the yeast or eggs (if using variations with eggs).
- Sharp Cheddar Cheese: 1 ½ cups (about 6 oz or 170g), shredded or cubed. Sharp or extra-sharp cheddar provides the best flavor punch against the bread and jalapeños. Shredding it yourself from a block generally yields better melting results than pre-shredded cheese (which often contains anti-caking agents). Cubing gives distinct pockets of cheese. You can use a mix! Reserve a little for sprinkling on top if desired.
- Jalapeños: 2-3 medium fresh jalapeños, finely diced. This equates to roughly ½ to ¾ cup diced. Adjust the amount based on your heat preference. Crucially, decide if you want to include the seeds and membranes – this is where most of the heat resides. Remove them for milder spice, leave some or all in for more kick. You can also use pickled jalapeños (pat them very dry first!), which offer a tangier, slightly less intense heat. Wear gloves when handling fresh jalapeños to avoid skin irritation.
Optional:
- Egg Wash (for crust): 1 large egg beaten with 1 tablespoon of water or milk. Brushing this on before baking gives a shinier, deeper golden crust.
- Coarse Sea Salt: For sprinkling on top before baking, adds texture and flavor pops.
Having everything measured and ready (mise en place) makes the baking process smoother and more enjoyable.
Instructions
Step 1: Activate the Yeast (Proofing)
- In a large mixing bowl (or the bowl of your stand mixer), combine the warm water, granulated sugar, and active dry yeast.
- Give it a gentle stir.
- Let the mixture stand for 5-10 minutes. You should see it become foamy or bubbly on the surface. This indicates the yeast is alive and active.
- If the mixture doesn’t foam: Your yeast might be old, or the water temperature was off. Discard the mixture and start again with fresh yeast and properly temperatured water. This step is crucial for active dry yeast. (If using instant yeast, you can often mix it with the flour and salt, then add the warm water and melted butter).
Step 2: Combine Ingredients & Form the Dough
- Once the yeast is foamy, add the melted (and slightly cooled) butter to the bowl.
- Add the salt and 3 ½ cups (440g) of the all-purpose flour.
- Using a Stand Mixer: Attach the dough hook. Mix on low speed until the ingredients start to come together into a shaggy dough.
- Mixing by Hand: Use a sturdy wooden spoon or spatula to mix the ingredients until a shaggy dough forms. It will be sticky initially.
Step 3: Knead the Dough
- Kneading develops the gluten, which gives the bread its structure and chewy texture.
- Using a Stand Mixer: Increase the speed to medium-low. Knead the dough for 7-10 minutes. The dough should become smooth, elastic, and pull away from the sides of the bowl. If the dough seems excessively sticky after a few minutes, add more flour, 1 tablespoon at a time, until it’s manageable but still slightly tacky. Avoid adding too much flour, as this can make the bread dense.
- Kneading by Hand: Turn the shaggy dough out onto a lightly floured surface. Knead by hand for 10-15 minutes. To knead, fold the dough over onto itself, then push it down and away from you with the heel of your hand. Rotate the dough a quarter turn and repeat. Continue this fold-push-turn motion. The dough will start sticky but will become smoother and more elastic as you work. Add minimal flour to the surface only as needed to prevent sticking. The dough is ready when it’s smooth, elastic, and springs back slowly when poked gently. You should be able to stretch a small piece thin enough to see light through it without it tearing immediately (the “windowpane test”).
Step 4: First Rise (Bulk Fermentation)
- Lightly grease a large, clean bowl with oil or cooking spray.
- Shape the kneaded dough into a smooth ball. Place the dough ball into the greased bowl, turning it once to coat the entire surface lightly with oil. This prevents it from drying out.
- Cover the bowl tightly with plastic wrap or a clean kitchen towel.
- Place the bowl in a warm, draft-free spot to rise. Ideal temperature is around 75°F – 85°F (24°C – 29°C). (A slightly warmed oven – turned off! – or on top of the refrigerator can work).
- Let the dough rise for 1 to 1.5 hours, or until it has doubled in size. The exact time will depend on the ambient temperature and yeast activity. To check if it’s ready, gently poke two fingers into the dough – if the indentation remains or springs back very slowly, it’s ready.
Step 5: Incorporate Cheese & Jalapeños and Shape the Loaf
- Once doubled, gently punch down the center of the dough to release the trapped gases.
- Turn the dough out onto a lightly floured surface.
- Gently press or roll the dough into a rectangle, roughly 9×12 inches (or sized appropriately for your loaf pan).
- Sprinkle about two-thirds of the shredded/cubed cheddar cheese and two-thirds of the diced jalapeños evenly over the surface of the rectangle, leaving a small border along one long edge.
- Starting from the long edge opposite the clean border, tightly roll the dough up into a log, like a jelly roll. Pinch the seam firmly to seal it. Pinch the ends closed as well.
- You can either place this log seam-side down into a lightly greased 9×5 inch loaf pan OR shape it into a freeform oval or round loaf (boule) and place it on a baking sheet lined with parchment paper.
- Optional: Sprinkle the remaining cheese and jalapeños over the top of the loaf for a more decorated crust.
Step 6: Second Rise (Proofing)
- Cover the shaped loaf loosely with greased plastic wrap or a clean kitchen towel. Don’t cover too tightly, as it needs room to expand.
- Let the loaf rise again in a warm, draft-free place for 45 minutes to 1 hour, or until it has puffed up noticeably and looks airy. It may not fully double this time, but it should increase in size by about 50-75%. Don’t overproof, as this can lead to a collapsed loaf during baking. A gentle poke should leave a slight indentation that slowly springs back.
Step 7: Prepare for Baking & Bake
- About 20-30 minutes before the second rise is complete, preheat your oven to 375°F (190°C). Position an oven rack in the center.
- Optional Egg Wash: If desired, gently brush the top of the risen loaf with the prepared egg wash (1 egg beaten with 1 tbsp water/milk). This enhances browning and shine. Be gentle so you don’t deflate the loaf. Sprinkle with coarse salt now if using.
- Optional Scoring: If making a freeform loaf, you can make a few shallow slashes (about ¼ to ½ inch deep) across the top with a very sharp knife or baker’s lame just before baking. This allows steam to escape in a controlled way and can create an attractive pattern. It’s less necessary for a loaf baked in a pan.
- Carefully place the loaf pan or baking sheet into the preheated oven.
- Bake for 35 to 45 minutes. The bread should be beautifully golden brown on top and sound hollow when tapped gently on the bottom (carefully remove from pan to test if needed).
- The most accurate way to check for doneness is with an instant-read thermometer: Inserted into the center of the loaf (avoiding large cheese pockets), it should register between 190°F and 200°F (88°C – 93°C).
- If the crust is browning too quickly before the center is cooked, you can loosely tent the loaf with aluminum foil for the remaining baking time.
Step 8: Cool Completely
- Immediately remove the bread from the loaf pan (if used) and transfer it to a wire cooling rack.
- This step is crucial! Let the bread cool completely, or at least for 1-2 hours, before slicing. Hot bread is still setting its structure internally. Slicing too soon can result in a gummy texture and may cause the loaf to collapse slightly. Resist the temptation! The wait will be worth it.
Step 9: Slice and Enjoy!
- Once cooled, use a serrated bread knife to slice the Cheddar Jalapeño Bread. Serve as desired (ideas below!).
Nutrition
- Serving Size: one normal portion
- Calories: 220 – 280 calories


