

I still remember the weekend I first perfected this recipe. The sun was shining, the grill was sizzling, and the family was gathered, appetites ready. I’d been on a quest for the ultimate homemade burger – something beyond the standard patty and slice of cheese. I wanted depth, complexity, and that wow factor. The breakthrough came with the balsamic caramelized onions. Slow-cooked until meltingly tender and deeply sweet, then hit with that tangy balsamic richness, they transformed the burger. Paired with crispy, salty bacon and a perfectly juicy beef patty, it was burger nirvana. The silence around the picnic table, broken only by appreciative murmurs and satisfied sighs, told me everything I needed to know. This wasn’t just a burger; it was the burger. Since then, these Bacon Burgers with Balsamic Caramelized Onions have become a legendary staple for our family gatherings, cookouts, and even special weeknight dinners. It’s the recipe everyone asks for, the one that guarantees happy taste buds and empty plates. Prepare yourself, because this isn’t just dinner; it’s an experience.
Unveiling the Star Components: Why This Burger Wins
Before we dive into the specifics, let’s talk about what makes this Bacon Burger with Balsamic Caramelized Onions recipe truly exceptional. It’s a symphony of flavors and textures meticulously layered to create a gourmet experience right in your own kitchen or backyard.
- The Savory Foundation: The Bacon Burger Patty: We’re not just topping a burger with bacon; we’re potentially integrating that smoky goodness right into the heart of the patty (though keeping it separate and crispy on top is the classic, and equally delicious, approach detailed below). The choice of ground beef, typically an 80/20 blend, ensures a patty that’s rich, flavorful, and supremely juicy. The fat content is key here – it renders during cooking, basting the meat from within and creating that quintessential burger satisfaction. Seasoned simply but perfectly, the patty is the robust canvas upon which we paint our masterpiece.
- The Crown Jewel: Balsamic Caramelized Onions: This is where the magic truly happens. Regular caramelized onions are fantastic, but adding balsamic vinegar elevates them to another stratosphere. The slow cooking process breaks down the onions’ natural sugars, creating a deep, complex sweetness. The balsamic vinegar cuts through that richness with its characteristic tang and adds notes of fig and molasses. They become jammy, intensely flavorful, and utterly addictive – the perfect counterpoint to the salty bacon and savory beef.
- The Crispy Counterpart: Perfectly Cooked Bacon: No bacon burger is complete without bacon that shatters with satisfying crispness. We’re aiming for bacon that’s rendered its fat effectively, leaving behind pure, unadulterated crispy perfection. Its salty, smoky profile is a classic pairing with beef, but alongside the sweet and tangy onions, it creates a flavor trifecta that’s simply unbeatable.
- The Supporting Cast: Buns, Cheese, and Beyond: While the beef, bacon, and onions are the stars, the supporting elements are crucial. A sturdy yet soft bun (like brioche or a good potato roll), toasted to perfection, provides the necessary structure without becoming soggy. The choice of cheese adds another layer of creamy, melty indulgence – think Provolone, Gruyère, sharp Cheddar, or even tangy Blue Cheese for the adventurous.
This combination isn’t accidental; it’s a deliberate construction of complementary and contrasting elements. Sweet, savory, salty, tangy, smoky, juicy, crispy, soft – it all comes together in every single bite.
Gather Your Arsenal: Ingredients You’ll Need
Precision is key in recreating culinary magic. Here are the exact amounts you’ll need to assemble four spectacular Bacon Burgers with Balsamic Caramelized Onions:
For the Balsamic Caramelized Onions:
- Large Yellow Onions: 2 (about 1.5 lbs total), thinly sliced pole-to-pole
- Unsalted Butter: 2 tablespoons
- Olive Oil: 1 tablespoon
- Salt: 1/2 teaspoon (plus more to taste)
- Brown Sugar: 1 teaspoon (optional, enhances caramelization)
- Balsamic Vinegar: 2-3 tablespoons (good quality recommended)
- Water or Beef Broth: 2 tablespoons (if needed for deglazing)
- Fresh Thyme Sprigs: 2-3 (optional, adds herbaceous note)
For the Bacon:
- Thick-Cut Bacon: 8 slices (or more, we don’t judge!)
For the Burger Patties:
- Ground Beef (80/20 chuck recommended): 1.5 lbs
- Worcestershire Sauce: 1 teaspoon (optional, adds umami depth)
- Garlic Powder: 1/2 teaspoon
- Onion Powder: 1/2 teaspoon
- Kosher Salt: 1 teaspoon
- Freshly Ground Black Pepper: 1/2 teaspoon
For Assembling the Burgers:
- Burger Buns: 4 (Brioche, potato rolls, or your favorite sturdy bun)
- Cheese Slices: 4-8 (Provolone, Gruyère, Sharp Cheddar, Swiss, or Blue Cheese recommended)
- Butter or Olive Oil: For toasting the buns (optional)
- Lettuce, Tomato, Pickles: Optional, for serving
Ingredient Spotlight & Why They Matter:
- Yellow Onions: They have a good balance of sugar and sulfur compounds, making them ideal for caramelizing – developing sweetness without becoming overly pungent. Slicing pole-to-pole helps them hold their shape better during the long cooking process compared to slicing crosswise into rings.
- 80/20 Ground Chuck: The “80/20” refers to the lean-to-fat ratio. 20% fat is the sweet spot for burgers, providing ample flavor and moisture. Chuck comes from the shoulder and has a great beefy taste.
- Thick-Cut Bacon: It holds up better during cooking and provides a more substantial bite compared to regular thin-cut bacon.
- Good Quality Balsamic Vinegar: It doesn’t have to be aged for 25 years, but avoid the very cheap, watery versions. A decent Modena balsamic will have more complex flavor and syrupy consistency when reduced.
- Brioche or Potato Buns: These buns tend to be soft yet sturdy enough to hold the juicy burger and toppings without disintegrating. Toasting them adds texture and a barrier against sogginess.
Step-by-Step Guide: Crafting Your Gourmet Burger Masterpiece
Follow these instructions carefully for burger perfection. Patience, especially with the onions, is your greatest ally!
Step 1: Conquer the Caramelized Onions (Allow ~45-60 minutes)
- Prep the Onions: Peel the onions, trim the ends, and slice them thinly pole-to-pole (from root end to stem end), about 1/8 to 1/4 inch thick.
- Start the Sauté: In a large, heavy-bottomed skillet or Dutch oven, melt the butter and olive oil over medium-low heat. Don’t let the butter brown yet.
- Add Onions and Seasoning: Add the sliced onions to the skillet. It might look like a mountain, but they will cook down significantly. Stir gently to coat them with the fat. Sprinkle with 1/2 teaspoon of salt and the optional teaspoon of brown sugar. If using, add the fresh thyme sprigs.
- The Slow Cook: Reduce the heat to low. Cook the onions slowly, stirring occasionally (every 5-10 minutes) for at least 40-50 minutes. The key is low and slow. Don’t rush this process. The onions should soften, become translucent, and gradually turn a deep golden brown. If they start sticking or burning, add a tablespoon of water or beef broth to deglaze the pan (scrape up the browned bits) and lower the heat slightly.
- Balsamic Finish: Once the onions are deeply caramelized, jammy, and sweet, remove the thyme sprigs (if used). Increase the heat slightly to medium-low. Pour in the balsamic vinegar. Stir constantly, scraping the bottom of the pan, for 1-2 minutes until the vinegar has reduced and coats the onions in a glossy glaze.
- Taste and Adjust: Taste the onions. Add a pinch more salt or a tiny bit more balsamic vinegar if needed to achieve your desired balance of sweet and tangy. Remove from heat and set aside. These can be made ahead and gently reheated.
Step 2: Achieve Bacon Nirvana (While Onions Cook or After)
- Choose Your Method: You can cook bacon in a skillet on the stovetop, on a sheet pan in the oven (recommended for even cooking and less mess), or even on the grill (use a grill pan or be careful of flare-ups).
- Oven Method (Recommended): Preheat your oven to 400°F (200°C). Line a large baking sheet with parchment paper or aluminum foil. Arrange the bacon slices in a single layer, ensuring they don’t overlap too much. Bake for 15-25 minutes, depending on thickness and desired crispiness. Watch closely towards the end. No flipping required!
- Skillet Method: Place bacon in a cold skillet in a single layer. Cook over medium heat, turning occasionally, until crispy (about 10-15 minutes).
- Drain: Once cooked to your liking, transfer the bacon slices to a plate lined with paper towels to drain excess grease. Reserve some bacon fat for cooking burgers if desired!
Step 3: Form the Perfect Patties
- Combine Gently: In a large bowl, gently combine the ground beef, Worcestershire sauce (if using), garlic powder, onion powder, 1 teaspoon kosher salt, and 1/2 teaspoon black pepper. Be careful not to overmix! Overworking the meat leads to tough burgers. Mix just until the seasonings are distributed.
- Divide and Shape: Divide the meat mixture into 4 equal portions (about 6 oz each). Gently form each portion into a patty, about 3/4 to 1 inch thick. Make them slightly wider than your buns, as they will shrink during cooking.
- The Dimple Trick: Press a slight indentation (a “dimple”) into the center of each patty with your thumb. This helps prevent the burgers from puffing up into meatballs as they cook, ensuring a flatter surface for toppings.
- Chill (Optional but Recommended): If time allows, place the formed patties on a plate, cover, and chill in the refrigerator for about 15-30 minutes. This helps them hold their shape better during cooking.
Step 4: Cook the Burgers to Perfection
- Preheat Your Surface:
- Grill: Preheat your grill to medium-high heat. Clean the grates well.
- Stovetop: Heat a large cast-iron skillet or heavy-bottomed pan over medium-high heat. Add a teaspoon of reserved bacon fat or a neutral oil (like canola or vegetable oil) if needed – though the 80/20 beef often renders enough fat on its own.
- Sear the Patties: Place the patties on the hot grill or skillet (dimple-side up first). Cook for 3-5 minutes per side for medium-rare, adjusting time based on thickness and desired doneness. Crucially: Resist the urge to press down on the burgers with your spatula! This squeezes out the flavorful juices.
- Cheese It Up: During the last minute or two of cooking, top each patty with 1-2 slices of your chosen cheese. If grilling, you can close the lid to help melt the cheese. If using a skillet, you can cover the pan loosely or add a tiny splash of water to the side of the pan and cover quickly to create steam.
- Check Doneness (Optional): For precise results, use an instant-read thermometer:
- 130-135°F (54-57°C) for Medium-Rare
- 140-145°F (60-63°C) for Medium
- 150-155°F (66-68°C) for Medium-Well
- 160°F+ (71°C+) for Well-Done (USDA recommended minimum for ground beef)
- Rest the Burgers: Transfer the cooked patties to a clean plate or cutting board. Tent loosely with foil and let them rest for 5 minutes. This allows the juices to redistribute throughout the meat, resulting in a more tender and flavorful burger.
Step 5: Toast the Buns and Assemble
- Toast: While the burgers rest, lightly butter the cut sides of your buns or brush them with olive oil. Toast them on the grill, in the skillet used for the burgers (wipe out excess grease first if needed), or under the broiler until golden brown and slightly crisp. Watch carefully to prevent burning.
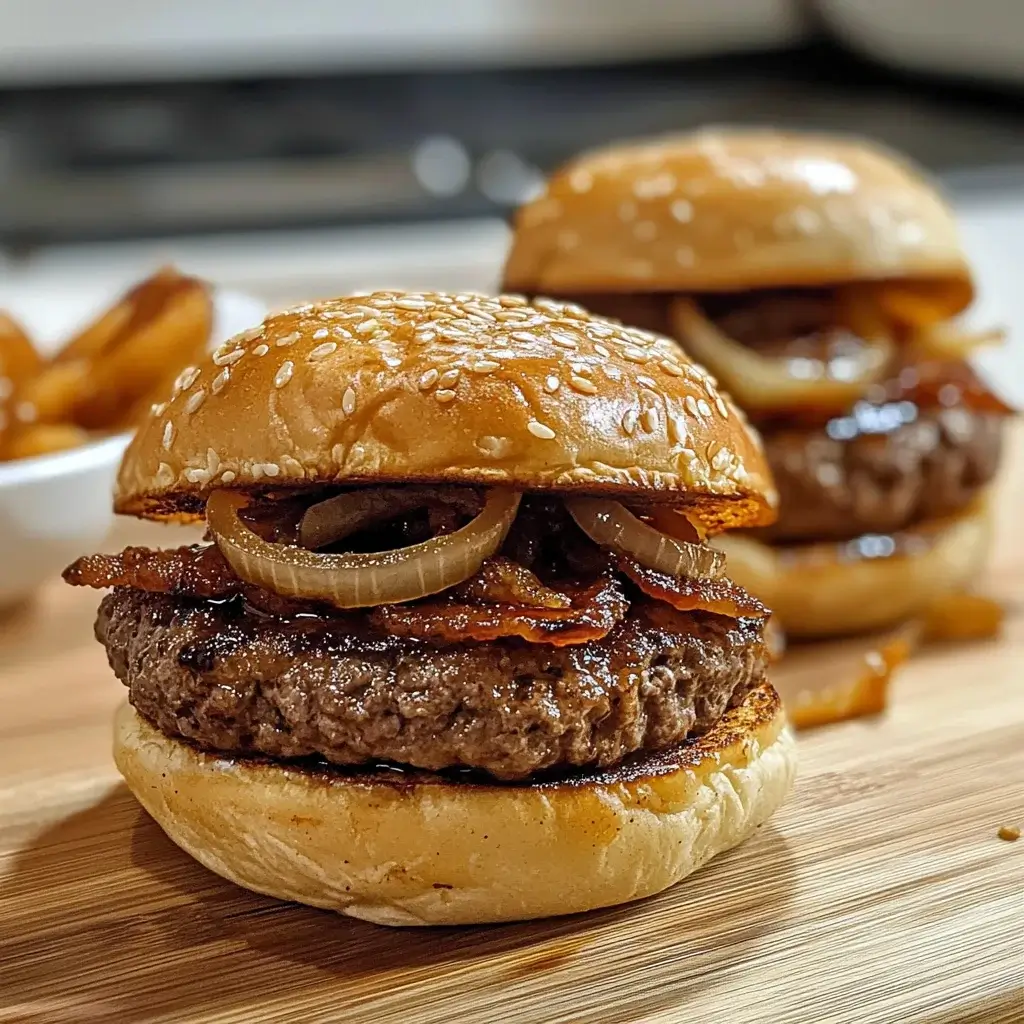
- Build Your Burger: Now for the grand assembly! There’s no single right way, but here’s a suggested order for maximum flavor and structural integrity:
- Bottom Bun
- (Optional: Lettuce, tomato, or a smear of mayo/aioli)
- Cheesy Burger Patty
- A generous pile of Balsamic Caramelized Onions
- 2 slices of Crispy Bacon (broken in half to fit better if needed)
- Top Bun
Nutrition Facts (Estimated)
- Servings: 4 Burgers
- Calories Per Serving: Approximately 850-1050 kcal
Disclaimer: Nutritional information is an estimate only and will vary significantly based on factors such as the specific brand and type of ingredients used (especially ground beef fat percentage, bacon thickness, bun type, cheese type and amount), and exact portion sizes. The range provided accounts for variations in cheese, bun size, and potential use of optional ingredients. This is a decadent burger; enjoy it as part of a balanced diet.
Time Commitment: Planning Your Burger Feast
Understanding the time involved helps plan your cooking process:
- Preparation Time: 25-30 minutes (slicing onions, forming patties, prepping bacon if oven-baking)
- Cook Time (Onions): 45-60 minutes
- Cook Time (Bacon): 15-25 minutes (can overlap with onion cooking)
- Cook Time (Burgers): 8-12 minutes (plus 5 minutes resting)
- Assembly Time: 5 minutes
- Total Time: Approximately 1 hour 20 minutes to 1 hour 45 minutes (much of this is passive cooking time for the onions)
Pro-Tip: Make the Balsamic Caramelized Onions a day or two ahead to save significant time on burger night! Simply store them in an airtight container in the refrigerator and gently reheat before serving.
How to Serve Your Bacon Burgers with Balsamic Caramelized Onions
These burgers are stars, but the right accompaniments elevate the entire meal. Here are some serving suggestions:
- Classic Sides:
- Crispy French Fries: Shoestring, steak-cut, or sweet potato fries are classic pairings. Serve with ketchup, aioli, or malt vinegar.
- Onion Rings: Double down on the onion goodness with crispy battered onion rings.
- Potato Salad: A creamy or vinaigrette-based potato salad offers a cool counterpoint.
- Coleslaw: A tangy, crunchy slaw (vinegar or creamy style) cuts through the richness of the burger.
- Lighter Options:
- Simple Green Salad: A salad with a light vinaigrette (perhaps a balsamic vinaigrette to echo the onions) provides freshness. Think mixed greens, cucumber, and cherry tomatoes.
- Grilled Vegetables: Corn on the cob, asparagus, zucchini, or bell peppers cooked on the grill alongside the burgers.
- Fruit Salad: A refreshing end or side, especially in warmer weather.
- Condiments & Extras:
- Garlic Aioli: Adds a creamy, garlicky punch.
- Dijon Mustard: Provides a sharp, tangy kick.
- Pickled Red Onions: Offer a bright, acidic contrast if you want even more onion complexity.
- Sliced Avocado: Adds creaminess and healthy fats.
- Beverage Pairings:
- Craft Beer: IPAs (cut through richness), Amber Ales (complement caramel notes), or Stouts/Porters (match smoky, roasted flavors).
- Red Wine: Medium-bodied reds like Merlot, Zinfandel, or even a Côtes du Rhône can stand up to the burger’s flavors.
- Bourbon or Whiskey: A classic pairing with beef and bacon.
- Iced Tea or Lemonade: Refreshing non-alcoholic options.
Presentation: Serve immediately while hot and juicy. Placing the burgers on wooden boards or nice plates with the sides arranged neatly adds to the gourmet feel.
Additional Tips for Burger Brilliance
Take your Bacon Burgers with Balsamic Caramelized Onions from great to unforgettable with these pro tips:
- Source High-Quality Beef: It truly makes a difference. Look for freshly ground 80/20 chuck from a reputable butcher if possible. The flavor and texture are superior to pre-packaged, compressed ground beef. Avoid using leaner blends (like 90/10) unless you’re intentionally aiming for a drier burger, as fat equals flavor and moisture here.
- Embrace the Onion Patience: Do not rush caramelizing the onions. Low heat and time are non-negotiable for developing that deep, sweet flavor. Trying to speed it up with higher heat will likely scorch them, creating bitter notes instead of sweet ones. Think of it as a low-simmer meditation. Put on some music, relax, and stir occasionally.
- Render Bacon Fat Properly: Whether using the oven or skillet, ensure the bacon fat has rendered out completely for maximum crispiness. Don’t discard all that flavorful rendered fat! Use a teaspoon or two to cook the burgers or toast the buns for an extra layer of smoky flavor.
- Hands Off the Patties (While Cooking): Form the patties gently, place them on the heat, and flip them once. Resist the urge to constantly move them or press down with a spatula. Pressing squeezes out the juices, leading to a dry burger. Let the heat do its work to create a beautiful crust.
- Don’t Skip the Rest: Resting the cooked burgers for 5 minutes before serving is crucial. It allows the muscle fibers to relax and the juices, which migrated to the center during cooking, to redistribute throughout the patty. Biting into a rested burger means more juice in your mouth, less on your plate.
Frequently Asked Questions (FAQ)
Here are answers to common questions about making these incredible burgers:
- Q: Can I make the Balsamic Caramelized Onions ahead of time?
- A: Absolutely! This is highly recommended to save time. Cook the onions as directed, let them cool completely, and store them in an airtight container in the refrigerator for up to 4-5 days. Gently reheat them in a saucepan over low heat or in the microwave before assembling the burgers. Their flavor often deepens overnight.
- Q: What’s the best cheese to use for these burgers?
- A: This depends on personal preference! Provolone offers a mild, creamy melt that complements without overpowering. Gruyère adds nutty, complex notes that pair beautifully with the onions. Sharp Cheddar provides a classic tangy bite. Swiss is another nutty option. For a bold flavor explosion, try Blue Cheese (like Gorgonzola or Stilton) – its pungent tanginess is incredible against the sweet onions and salty bacon.
- Q: Can I substitute turkey or chicken for the ground beef?
- A: Yes, you can use ground turkey or chicken, but be mindful that they are much leaner. You may want to add a binder (like a panade made from bread and milk) or some extra fat (like finely minced bacon or olive oil mixed into the meat) to keep them moist. Cook ground poultry to an internal temperature of 165°F (74°C). The flavor profile will be different but still delicious with the bacon and balsamic onions. A high-quality veggie burger patty could also work well with these toppings.
- Q: Is grilling or pan-frying better for these burgers?
- A: Both methods yield fantastic results, offering slightly different characteristics. Grilling imparts a smoky char flavor that’s hard to beat, especially for outdoor cooking. Pan-frying, particularly in a cast-iron skillet, allows you to develop an amazing all-over crust (thanks to the Maillard reaction) and makes it easy to baste the burgers with their own rendered fat or the reserved bacon fat. Choose based on your preference and available equipment.
- Q: How can I make this recipe slightly healthier?
- A: While inherently indulgent, you can make some adjustments. Use leaner ground beef (like 90/10 or 93/7), but be aware the burger will be less juicy. Opt for center-cut bacon or turkey bacon, which are typically lower in fat. Choose a whole wheat bun. Use less cheese or a lower-fat variety. Load up on fresh veggie toppings like lettuce and tomato. Reduce the amount of butter used for the onions (though some fat is needed for caramelization). Portion control is also key – perhaps make slightly smaller patties.
There you have it – everything you need to know to create the ultimate Bacon Burger with Balsamic Caramelized Onions. It takes a little time and care, particularly with those glorious onions, but the payoff is a burger experience that rivals any restaurant. Fire up the grill or the stove, gather your ingredients, and prepare for burger bliss! Your friends and family will thank you.
Print
Turkey Bacon Burgers with Balsamic Caramelized Onions recipe
Ingredients
For the Balsamic Caramelized Onions:
- Large Yellow Onions: 2 (about 1.5 lbs total), thinly sliced pole-to-pole
- Unsalted Butter: 2 tablespoons
- Olive Oil: 1 tablespoon
- Salt: 1/2 teaspoon (plus more to taste)
- Brown Sugar: 1 teaspoon (optional, enhances caramelization)
- Balsamic Vinegar: 2-3 tablespoons (good quality recommended)
- Water or Beef Broth: 2 tablespoons (if needed for deglazing)
- Fresh Thyme Sprigs: 2-3 (optional, adds herbaceous note)
For the Bacon:
- Thick-Cut Bacon: 8 slices (or more, we don’t judge!)
For the Burger Patties:
- Ground Beef (80/20 chuck recommended): 1.5 lbs
- Worcestershire Sauce: 1 teaspoon (optional, adds umami depth)
- Garlic Powder: 1/2 teaspoon
- Onion Powder: 1/2 teaspoon
- Kosher Salt: 1 teaspoon
- Freshly Ground Black Pepper: 1/2 teaspoon
For Assembling the Burgers:
- Burger Buns: 4 (Brioche, potato rolls, or your favorite sturdy bun)
- Cheese Slices: 4-8 (Provolone, Gruyère, Sharp Cheddar, Swiss, or Blue Cheese recommended)
- Butter or Olive Oil: For toasting the buns (optional)
- Lettuce, Tomato, Pickles: Optional, for serving
Instructions
Step 1: Conquer the Caramelized Onions (Allow ~45-60 minutes)
- Prep the Onions: Peel the onions, trim the ends, and slice them thinly pole-to-pole (from root end to stem end), about 1/8 to 1/4 inch thick.
- Start the Sauté: In a large, heavy-bottomed skillet or Dutch oven, melt the butter and olive oil over medium-low heat. Don’t let the butter brown yet.
- Add Onions and Seasoning: Add the sliced onions to the skillet. It might look like a mountain, but they will cook down significantly. Stir gently to coat them with the fat. Sprinkle with 1/2 teaspoon of salt and the optional teaspoon of brown sugar. If using, add the fresh thyme sprigs.
- The Slow Cook: Reduce the heat to low. Cook the onions slowly, stirring occasionally (every 5-10 minutes) for at least 40-50 minutes. The key is low and slow. Don’t rush this process. The onions should soften, become translucent, and gradually turn a deep golden brown. If they start sticking or burning, add a tablespoon of water or beef broth to deglaze the pan (scrape up the browned bits) and lower the heat slightly.
- Balsamic Finish: Once the onions are deeply caramelized, jammy, and sweet, remove the thyme sprigs (if used). Increase the heat slightly to medium-low. Pour in the balsamic vinegar. Stir constantly, scraping the bottom of the pan, for 1-2 minutes until the vinegar has reduced and coats the onions in a glossy glaze.
- Taste and Adjust: Taste the onions. Add a pinch more salt or a tiny bit more balsamic vinegar if needed to achieve your desired balance of sweet and tangy. Remove from heat and set aside. These can be made ahead and gently reheated.
Step 2: Achieve Bacon Nirvana (While Onions Cook or After)
- Choose Your Method: You can cook bacon in a skillet on the stovetop, on a sheet pan in the oven (recommended for even cooking and less mess), or even on the grill (use a grill pan or be careful of flare-ups).
- Oven Method (Recommended): Preheat your oven to 400°F (200°C). Line a large baking sheet with parchment paper or aluminum foil. Arrange the bacon slices in a single layer, ensuring they don’t overlap too much. Bake for 15-25 minutes, depending on thickness and desired crispiness. Watch closely towards the end. No flipping required!
- Skillet Method: Place bacon in a cold skillet in a single layer. Cook over medium heat, turning occasionally, until crispy (about 10-15 minutes).
- Drain: Once cooked to your liking, transfer the bacon slices to a plate lined with paper towels to drain excess grease. Reserve some bacon fat for cooking burgers if desired!
Step 3: Form the Perfect Patties
- Combine Gently: In a large bowl, gently combine the ground beef, Worcestershire sauce (if using), garlic powder, onion powder, 1 teaspoon kosher salt, and 1/2 teaspoon black pepper. Be careful not to overmix! Overworking the meat leads to tough burgers. Mix just until the seasonings are distributed.
- Divide and Shape: Divide the meat mixture into 4 equal portions (about 6 oz each). Gently form each portion into a patty, about 3/4 to 1 inch thick. Make them slightly wider than your buns, as they will shrink during cooking.
- The Dimple Trick: Press a slight indentation (a “dimple”) into the center of each patty with your thumb. This helps prevent the burgers from puffing up into meatballs as they cook, ensuring a flatter surface for toppings.
- Chill (Optional but Recommended): If time allows, place the formed patties on a plate, cover, and chill in the refrigerator for about 15-30 minutes. This helps them hold their shape better during cooking.
Step 4: Cook the Burgers to Perfection
- Preheat Your Surface:
- Grill: Preheat your grill to medium-high heat. Clean the grates well.
- Stovetop: Heat a large cast-iron skillet or heavy-bottomed pan over medium-high heat. Add a teaspoon of reserved bacon fat or a neutral oil (like canola or vegetable oil) if needed – though the 80/20 beef often renders enough fat on its own.
- Sear the Patties: Place the patties on the hot grill or skillet (dimple-side up first). Cook for 3-5 minutes per side for medium-rare, adjusting time based on thickness and desired doneness. Crucially: Resist the urge to press down on the burgers with your spatula! This squeezes out the flavorful juices.
- Cheese It Up: During the last minute or two of cooking, top each patty with 1-2 slices of your chosen cheese. If grilling, you can close the lid to help melt the cheese. If using a skillet, you can cover the pan loosely or add a tiny splash of water to the side of the pan and cover quickly to create steam.
- Check Doneness (Optional): For precise results, use an instant-read thermometer:
- 130-135°F (54-57°C) for Medium-Rare
- 140-145°F (60-63°C) for Medium
- 150-155°F (66-68°C) for Medium-Well
- 160°F+ (71°C+) for Well-Done (USDA recommended minimum for ground beef)
- Rest the Burgers: Transfer the cooked patties to a clean plate or cutting board. Tent loosely with foil and let them rest for 5 minutes. This allows the juices to redistribute throughout the meat, resulting in a more tender and flavorful burger.
Step 5: Toast the Buns and Assemble
- Toast: While the burgers rest, lightly butter the cut sides of your buns or brush them with olive oil. Toast them on the grill, in the skillet used for the burgers (wipe out excess grease first if needed), or under the broiler until golden brown and slightly crisp. Watch carefully to prevent burning.
- Build Your Burger: Now for the grand assembly! There’s no single right way, but here’s a suggested order for maximum flavor and structural integrity:
- Bottom Bun
- (Optional: Lettuce, tomato, or a smear of mayo/aioli)
- Cheesy Burger Patty
- A generous pile of Balsamic Caramelized Onions
- 2 slices of Crispy Bacon (broken in half to fit better if needed)
- Top Bun
Nutrition
- Serving Size: one normal portion
- Calories: 850-1050


