

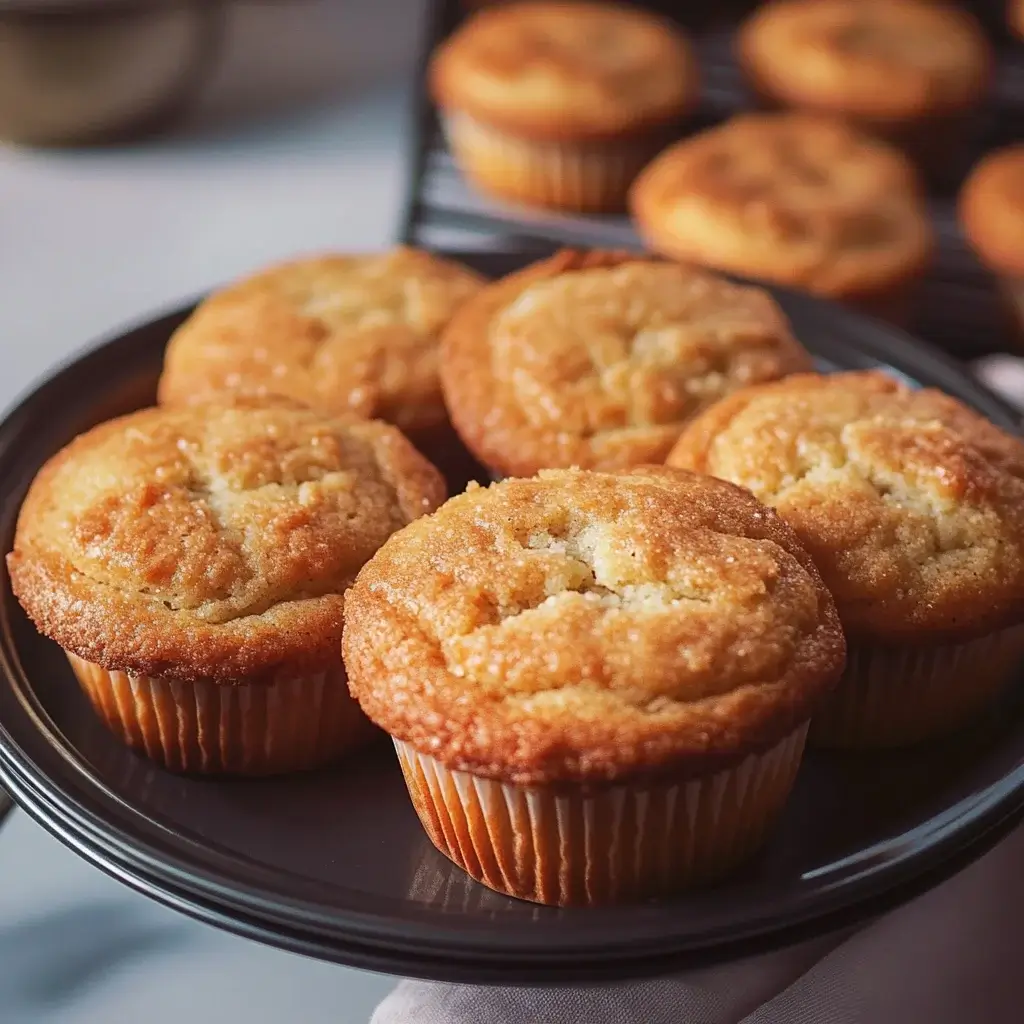
I still remember the first time I hesitantly added sourdough discard to a sweet bake. Would it be weird? Overpoweringly tangy? My family, accustomed to my usual baking experiments, eyed the innocent-looking vanilla cupcakes with a mixture of curiosity and slight trepidation. But the results? Absolutely phenomenal. These Sourdough Vanilla Cupcakes weren’t just good; they were revelatory. The sourdough discard, far from making them taste sour, imparted an incredible moistness and a tender, delicate crumb that regular vanilla cupcakes often lack. There’s a subtle, almost imperceptible background note – a depth of flavour – that elevates them beyond the ordinary. They became an instant hit, requested for birthdays, potlucks, and just because. They manage to be familiar and comforting, yet intriguingly different. If you’re looking for a way to use up that bubbly discard and create a truly memorable treat, this recipe is your golden ticket.
Why Sourdough in Cupcakes? The Magic Explained
Before we dive into the mixing bowls, let’s talk about why adding sourdough discard to cupcakes is such a fantastic idea. For many home bakers who maintain a sourdough starter, the discard – the portion removed before feeding – can feel like a wasteful byproduct. But this discard is liquid gold! It’s packed with wild yeasts and beneficial bacteria, along with flour and water, and it brings unique properties to baked goods, even sweet ones like cupcakes.
1. Unparalleled Moisture: This is perhaps the most significant benefit. The acidity in the sourdough discard helps to tenderize the gluten structure in the flour. This results in a cupcake that is exceptionally moist and stays that way for longer than many traditional recipes. Forget dry, crumbly cupcakes; these are melt-in-your-mouth tender. The discard contributes liquid and pre-hydrated flour, enhancing the overall hydration of the batter without making it runny.
2. Tender Crumb: Related to the moisture, the tenderizing effect of the acid also contributes to a remarkably soft and delicate crumb structure. The cupcakes feel light and airy, yet substantial enough to hold up to frosting. The acidity works similarly to buttermilk or yogurt in other cake recipes, breaking down some of the proteins for a softer texture.
3. Subtle Depth of Flavour: Worried about sour cupcakes? Don’t be! When used in the right proportions and balanced with sugar and vanilla, the sourdough discard doesn’t impart a strong sour taste. Instead, it adds a subtle complexity, a background tang that enhances the sweetness and the vanilla notes. It makes the flavour profile more interesting and less one-dimensionally sweet. The intensity of this tang can vary depending on how mature and acidic your discard is, but in this recipe, it’s designed to be a supporting player, not the star.
4. Utilizing Discard & Reducing Waste: This is a practical and sustainable advantage. Instead of tossing that discard, you’re incorporating it into something delicious. It feels good to find creative and tasty uses for every part of the sourdough process. Many bakers feed their starters daily or weekly, leading to a significant amount of discard over time. Recipes like this provide a perfect outlet.
5. Leavening Boost (Minor): While the primary leavening in this recipe comes from baking soda and baking powder, the wild yeasts present in the discard can contribute a tiny bit to the rise, especially if your discard is relatively active. More importantly, the acidity of the discard reacts powerfully with the baking soda (an alkaline ingredient), creating carbon dioxide bubbles that give the cupcakes a fantastic lift during baking. This chemical reaction is crucial for achieving a light, fluffy texture.
In essence, sourdough discard isn’t just an add-in; it’s a transformative ingredient that elevates a simple vanilla cupcake into something truly special, improving texture, moisture, and flavour complexity while providing a fantastic way to reduce kitchen waste.
Gather Your Ingredients: Sourdough Vanilla Cupcake Essentials
Precision is key in baking, so gather and measure your ingredients carefully before you begin. Using room temperature ingredients (especially butter, eggs, milk, and discard) is crucial for proper emulsification and a smooth batter.
For the Sourdough Vanilla Cupcakes (Makes approx. 12-15 cupcakes):
- All-Purpose Flour: 1 ½ cups (approx. 180g) – Spooned and leveled, not scooped.
- Granulated Sugar: 1 cup (approx. 200g)
- Baking Powder: 1 ½ teaspoons
- Baking Soda: ½ teaspoon
- Salt: ½ teaspoon
- Unsalted Butter: ½ cup (1 stick or 113g) – Softened to room temperature. It should yield slightly when pressed but not be greasy or melted.
- Eggs: 2 large – At room temperature.
- Sourdough Starter Discard: ½ cup (approx. 120g) – Unfed, bubbly or flat discard works fine. Room temperature is best.
- Milk: ¼ cup (approx. 60ml) – Whole milk recommended for richness, but low-fat or plant-based milk (like almond or soy) can work. Room temperature.
- Vanilla Extract: 2 teaspoons – Use pure vanilla extract for the best flavour.
Ingredient Notes:
- Flour: Standard all-purpose flour provides the right structure. Avoid bread flour (too strong) or cake flour (potentially too delicate, though it can be experimented with for an even finer crumb – you might need to adjust liquid slightly). Measuring by weight (grams) is always more accurate than by volume (cups).
- Butter: Unsalted butter allows you to control the salt level. Ensure it’s properly softened for effective creaming with the sugar.
- Sourdough Discard: The “tang” level can vary. If your discard is very mature and acidic, the flavour might be slightly more noticeable. If it’s relatively fresh, it will be milder. Both work beautifully texture-wise. Ensure it’s at room temperature so it incorporates smoothly.
- Milk: Room temperature milk blends better into the batter, preventing the butter from re-hardening.
- Vanilla: Don’t skimp here! Good quality vanilla is essential for that classic flavour. Vanilla bean paste can also be used for extra specks and flavour intensity (use an equivalent amount).
Step-by-Step Instructions: Baking Your Sourdough Masterpieces
Follow these steps carefully for perfectly baked, moist, and delicious sourdough vanilla cupcakes.
Preparation:
- Preheat & Prepare: Preheat your oven to 350°F (175°C). Line a standard 12-cup muffin tin with paper liners. If you have extra batter, prepare a few cups in a second tin. This recipe might yield slightly more than 12 depending on how full you fill the cups.
- Room Temperature Ingredients: Ensure your butter, eggs, sourdough discard, and milk are all at room temperature. This is critical for a smooth, well-emulsified batter. You can warm eggs quickly by placing them in a bowl of warm (not hot) water for 5-10 minutes. Butter can be softened by cutting it into cubes and letting it sit out for 30-60 minutes, depending on room temperature.
Mixing the Batter:
- Dry Ingredients: In a medium bowl, whisk together the all-purpose flour, baking powder, baking soda, and salt. Whisking helps distribute the leaveners evenly and aerates the flour. Set aside.
- Cream Butter and Sugar: In the large bowl of a stand mixer fitted with the paddle attachment, or using a hand mixer and a large bowl, beat the softened unsalted butter on medium speed until smooth and creamy (about 1 minute). Add the granulated sugar and continue beating on medium-high speed for a full 3-5 minutes. The mixture should become pale, light, and fluffy. This step incorporates air, which contributes to the cupcakes’ lift and texture. Scrape down the sides and bottom of the bowl occasionally.
- Add Eggs: Add the room temperature eggs one at a time, beating well (about 30-60 seconds) after each addition until fully incorporated. Don’t rush this step; ensure each egg is fully mixed in before adding the next. Scrape down the bowl again.
- Incorporate Vanilla: Beat in the pure vanilla extract until just combined.
- Combine Wet Ingredients (Separate): In a separate small bowl or liquid measuring cup, whisk together the room temperature sourdough discard and the room temperature milk until relatively smooth. Some small lumps from the discard are okay.
- Alternate Wet and Dry: Reduce the mixer speed to low. Add the dry ingredients (from step 3) in three additions, alternating with the wet ingredients (from step 7) in two additions, beginning and ending with the dry ingredients.
- Add ⅓ of the dry ingredients. Mix on low until just combined (a few streaks of flour remaining are fine).
- Add ½ of the wet ingredients (sourdough/milk mixture). Mix on low until just combined.
- Add another ⅓ of the dry ingredients. Mix on low until just combined.
- Add the remaining ½ of the wet ingredients. Mix on low until just combined.
- Add the final ⅓ of the dry ingredients. Mix on low only until the last streaks of flour disappear.
- Do Not Overmix: Overmixing develops the gluten in the flour, which can lead to tough or dense cupcakes. Stop mixing as soon as the ingredients are incorporated. It’s okay if the batter looks slightly lumpy from the discard. You can give it a final gentle fold with a spatula to ensure everything at the bottom is mixed in.
Filling and Baking:
- Fill Cupcake Liners: Divide the batter evenly among the prepared cupcake liners. Fill each liner about two-thirds full. Using an ice cream scoop (a standard size often holds the perfect amount) helps ensure evenly sized cupcakes. Overfilling can cause the cupcakes to spill over or develop tough edges.
- Bake: Place the muffin tin in the preheated oven. Bake for 18-22 minutes, or until the tops are lightly golden brown and a wooden skewer or toothpick inserted into the center of a cupcake comes out clean (or with a few moist crumbs attached, but no wet batter). Baking times can vary slightly depending on your oven. Start checking around the 18-minute mark.
- Cooling: Once baked, carefully remove the muffin tin from the oven and place it on a wire cooling rack. Let the cupcakes cool in the tin for 5-10 minutes. This allows them to set slightly.
- Complete Cooling: After 5-10 minutes, carefully remove the cupcakes from the tin and place them directly onto the wire cooling rack to cool completely. This prevents the bottoms from getting soggy. Ensure they are fully cool before frosting (at least 1 hour, often longer), otherwise, the frosting will melt.
The Perfect Frosting: A Creamy Vanilla Bean Buttercream
While the sourdough cupcakes are cooling, you can prepare a classic, delicious frosting. This American-style buttercream is simple and pairs perfectly.
Buttercream Ingredients:
- Unsalted Butter: 1 cup (2 sticks or 227g) – Softened to room temperature, but slightly cooler than the butter used for the cupcakes (around 65-70°F or 18-21°C is ideal).
- Powdered Sugar: 4 cups (approx. 480-500g) – Sifted to remove lumps.
- Heavy Cream or Milk: 2-4 tablespoons – Use heavy cream for the richest frosting, but milk works too. Add gradually to reach desired consistency.
- Vanilla Extract: 1 ½ teaspoons – Or Vanilla Bean Paste for extra flavour and specks.
- Salt: Pinch (approx. ⅛ teaspoon) – Balances the sweetness.
Buttercream Instructions:
- Beat Butter: In the bowl of a stand mixer with the paddle attachment (or using a hand mixer), beat the softened butter on medium speed for 2-3 minutes until very pale, smooth, and creamy.
- Add Sugar Gradually: With the mixer on low speed, gradually add the sifted powdered sugar, about one cup at a time, mixing until just combined after each addition. The mixture will look dry and crumbly initially.
- Add Liquids & Whip: Once all the sugar is incorporated, add the vanilla extract, the pinch of salt, and 2 tablespoons of the heavy cream or milk. Increase the mixer speed to medium-high and beat for 3-5 minutes until the frosting is light, fluffy, and smooth. Scrape down the sides of the bowl periodically.
- Adjust Consistency: If the frosting is too stiff, add more cream or milk, one teaspoon at a time, beating well after each addition until you reach your desired spreading or piping consistency. If it’s too thin, add a little more sifted powdered sugar.
- Frost: Once the cupcakes are completely cool, frost them as desired. You can spread the frosting with an offset spatula for a rustic look or use a piping bag fitted with your favourite tip (like a star tip or round tip) for more decorative swirls.
Nutritional Information (Approximate)
Estimating nutritional information can be tricky due to variations in ingredients (like the specific composition of sourdough discard or milk fat content). These are rough estimates per unfrosted cupcake, assuming the recipe yields 14 cupcakes. Frosting will add significant calories, sugar, and fat.
- Servings: Approximately 14 cupcakes
- Calories per serving (unfrosted): Roughly 180-220 kcal
Disclaimer: This is an estimate only. Actual nutritional values will vary based on specific ingredients used, final yield, and portion size. The added frosting will substantially increase these values.
Time Commitment: Planning Your Bake
Understanding the time involved helps plan your baking session effectively.
- Preparation Time: 20-25 minutes (Gathering ingredients, mixing batter, filling liners)
- Baking Time: 18-22 minutes
- Cooling Time: 1 – 1.5 hours (Essential before frosting)
- Frosting Preparation: 10-15 minutes
- Frosting/Decorating Time: 10-20 minutes (Depending on complexity)
Total Time (approximate): 2 hours to 2 hours 45 minutes (including cooling time)
Serving Suggestions: Elevating Your Sourdough Vanilla Cupcakes
These versatile cupcakes are delicious on their own but can be dressed up for any occasion. Here are some serving ideas:
- Classic Swirl: Pipe a generous swirl of the vanilla bean buttercream using a large star tip (like a Wilton 1M).
- Sprinkle Fun: Add colourful sprinkles immediately after frosting for birthdays or celebrations. Use seasonal sprinkles for holidays (red and green for Christmas, pastels for Easter).
- Fresh Fruit Garnish: Top the frosted cupcakes with a fresh berry, like a raspberry, blueberry, or sliced strawberry, for a touch of freshness and colour.
- Chocolate Drizzle: Melt some dark or white chocolate and drizzle it over the frosted cupcakes for an elegant touch.
- Toasted Coconut: Sprinkle toasted shredded coconut over the frosting for added texture and nutty flavour.
- Edible Flowers: For a sophisticated, garden-party feel, garnish with small, clean edible flowers like pansies or violas.
- Themed Decorations: Use fondant cut-outs, themed cupcake toppers, or candy decorations to match a party theme.
- Simple Dusting: If you prefer less sweetness, skip the buttercream and give the cooled cupcakes a simple dusting of powdered sugar.
- Serve with Coffee or Tea: They make a perfect accompaniment to an afternoon coffee or tea break.
- Pair with Ice Cream: Serve a slightly warmed cupcake alongside a scoop of vanilla bean or strawberry ice cream for a decadent dessert.
Baker’s Wisdom: Additional Tips for Sourdough Cupcake Success
Achieve sourdough cupcake perfection with these extra pointers:
- Measure Flour Correctly: How you measure flour significantly impacts the outcome. Spoon the flour lightly into your measuring cup and level it off with a straight edge. Scooping directly from the bag compacts the flour, leading to too much flour in the recipe and potentially dry cupcakes. Using a kitchen scale for grams is the most accurate method.
- Room Temperature is Non-Negotiable: We mentioned it before, but it bears repeating. Cold ingredients don’t emulsify properly. Cold butter won’t cream well with sugar, cold eggs can cause the batter to curdle, and cold liquids can shock the butter. Take the time to let things sit out – it makes a huge difference to the final texture.
- Don’t Overmix the Batter: This is the most common culprit for tough cupcakes. Mix the dry and wet ingredients only until they are just combined. A few lumps are perfectly fine, especially with the sourdough discard. Overmixing develops gluten, the protein network in flour, making the cupcakes chewy instead of tender.
- Discard Activity Matters (Subtly): While both active (bubbly) and inactive (flat) discard work from a chemical/moisture perspective, a very recently fed, active discard might provide a tiny bit more lift and a slightly less tangy flavour. A more mature, acidic discard will contribute more tang and react more vigorously with the baking soda. Both are delicious – experiment to see what you prefer!
- Proper Storage: Store cooled, unfrosted cupcakes in an airtight container at room temperature for up to 2 days. If frosted with buttercream (especially if it contains mostly butter), they can also be stored at room temperature for 1-2 days (unless your kitchen is very warm). For longer storage, refrigerate frosted cupcakes in an airtight container for up to 4-5 days, but let them come to room temperature before serving for best texture (refrigeration can dry them out slightly). They also freeze well (see FAQ).
Frequently Asked Questions (FAQ) About Sourdough Vanilla Cupcakes
Here are answers to some common questions about making these delightful treats:
- Q: Can you actually taste the sourdough in these cupcakes?
- A: It’s very subtle! Most people won’t identify it specifically as “sourdough.” Instead, they’ll notice the cupcakes are exceptionally moist and tender, with a slight, pleasant background complexity that balances the sweetness. It’s not a pronounced sour flavour like in sourdough bread. The vanilla and sugar are still the dominant flavours. The intensity can vary slightly based on how acidic your discard is.
- Q: What kind of sourdough discard should I use? Active or unfed? Hydration level?
- A: This recipe is quite forgiving. You can use discard that is bubbly and recently fed, or discard that has been sitting in the fridge for a week (unfed). Both will contribute moisture and acidity. The recipe assumes a standard 100% hydration starter (equal parts flour and water by weight), which is most common. If your starter is significantly stiffer or more liquid, it might slightly affect the batter consistency, but usually, it’s still fine for discard recipes like this. Room temperature discard incorporates best.
- Q: My cupcakes sank in the middle. What went wrong?
- A: Sinking centers can happen for a few reasons:
- Underbaking: The internal structure didn’t set fully. Ensure a toothpick comes out clean.
- Overmixing: Too much air was incorporated, or gluten was overdeveloped, causing it to rise rapidly and then collapse.
- Too Much Leavening: Double-check your baking powder/soda measurements. Expired leaveners can also sometimes cause issues.
- Oven Temperature Fluctuations: Opening the oven door too early or too often can cause the temperature to drop, leading to collapse. Ensure your oven is accurately calibrated.
- A: Sinking centers can happen for a few reasons:
- Q: How should I store leftover Sourdough Vanilla Cupcakes?
- A: Store cooled cupcakes in an airtight container.
- Unfrosted: At room temperature for 2-3 days.
- Frosted (Buttercream): At room temperature for 1-2 days (if your kitchen isn’t too hot). Refrigerate for longer storage (up to 5 days), but allow them to return to room temperature before serving for best texture and flavour. Cream cheese frosting requires refrigeration.
- A: Store cooled cupcakes in an airtight container.
- Q: Can I freeze these cupcakes?
- A: Yes! They freeze beautifully.
- Unfrosted: Cool completely. Wrap individually in plastic wrap, then place in a freezer-safe bag or container. Freeze for up to 3 months. Thaw overnight in the refrigerator or on the counter for a few hours.
- Frosted: Flash-freeze the frosted cupcakes uncovered on a baking sheet until the frosting is solid (about 1 hour). Then, wrap individually in plastic wrap and place in a freezer container. Thaw overnight in the refrigerator. Let sit at room temperature briefly before serving.
- A: Yes! They freeze beautifully.
Troubleshooting Common Sourdough Cupcake Issues
Even with a great recipe, sometimes things don’t go exactly as planned. Here’s how to tackle common issues:
- Issue: Cupcakes are Dry
- Possible Causes: Overbaking; measuring flour incorrectly (too much flour); oven running too hot.
- Solutions: Start checking for doneness slightly earlier next time. Use the spoon-and-level method or weigh your flour. Check your oven temperature with an oven thermometer. Ensure ingredients like milk and discard provide adequate moisture.
- Issue: Cupcakes are Tough or Dense
- Possible Cause: Overmixing the batter after adding flour.
- Solution: Mix only until the flour streaks disappear. It’s better to undermix slightly than overmix. Gentle folding with a spatula at the end can ensure incorporation without overworking the gluten.
- Issue: Cupcakes are Flat / Didn’t Rise Much
- Possible Causes: Expired baking powder or baking soda; under-creaming butter and sugar; overmixed batter (can sometimes hinder rise); oven not hot enough initially.
- Solutions: Check the dates on your leaveners (test baking soda by adding vinegar, it should bubble vigorously; test baking powder by adding hot water, it should bubble). Ensure you cream the butter and sugar until light and fluffy. Avoid overmixing. Preheat your oven fully.
- Issue: Cupcake Tops Cracked Excessively
- Possible Causes: Oven temperature too high, causing the exterior to set before the interior finishes rising; too much leavening.
- Solutions: Verify your oven temperature. Double-check leavening agent measurements. While some cracking is normal, excessive cracking might indicate too high a heat.
- Issue: Batter Curdled After Adding Eggs
- Possible Cause: Eggs were too cold, causing the cold liquid to solidify bits of the warm butterfat.
- Solution: Ensure eggs are truly at room temperature. Add them one at a time and beat well after each. While a slightly curdled batter often bakes up fine, preventing it leads to the best texture. If it happens, proceed – it often smooths out when dry ingredients are added.
Variations and Customizations
This recipe is a wonderful base. Feel free to get creative!
- Lemon Sourdough Cupcakes: Add 1-2 tablespoons of fresh lemon zest to the butter and sugar mixture. Replace 1-2 tablespoons of the milk with fresh lemon juice. Consider a lemon cream cheese frosting.
- Chocolate Chip Sourdough Cupcakes: Gently fold in ½ to ¾ cup of mini chocolate chips into the batter just before filling the liners.
- Almond Extract: Replace ½ teaspoon of the vanilla extract with ¼ teaspoon of almond extract for a different flavour profile.
- Different Frostings: Try cream cheese frosting, chocolate buttercream, Ermine frosting (cooked flour frosting), or even a simple glaze.
- Spiced Sourdough Cupcakes: Add ½ teaspoon of cinnamon and ¼ teaspoon of nutmeg to the dry ingredients for a warm-spiced version, perfect for autumn.
- Brown Butter: Brown the butter first (let it cool slightly before creaming with sugar) for a nutty depth of flavour. You may need to add an extra tablespoon of milk to compensate for moisture loss during browning.
Conclusion: Your New Favorite Cupcake?
Baking with sourdough discard opens up a world of flavour and texture possibilities, and these Sourdough Vanilla Cupcakes are a perfect example. They strike a beautiful balance between the familiar comfort of a classic vanilla cupcake and the unique qualities imparted by the sourdough – that incredible moistness, the tender crumb, and the subtle complexity that keeps you coming back for another bite.
Whether you’re a seasoned sourdough baker looking for discard recipes or simply curious about incorporating sourdough into sweets, this recipe is a rewarding endeavour. It transforms a potential waste product into the star ingredient of a truly memorable dessert. They are simple enough for a weeknight treat yet special enough for celebrations. Don’t be intimidated by the sourdough aspect; embrace the magic it brings to the texture and taste. Give them a try – you might just discover your new favourite vanilla cupcake recipe! Happy Baking!
Print
Sourdough Vanilla Cupcakes recipe
Ingredients
For the Sourdough Vanilla Cupcakes (Makes approx. 12-15 cupcakes):
- All-Purpose Flour: 1 ½ cups (approx. 180g) – Spooned and leveled, not scooped.
- Granulated Sugar: 1 cup (approx. 200g)
- Baking Powder: 1 ½ teaspoons
- Baking Soda: ½ teaspoon
- Salt: ½ teaspoon
- Unsalted Butter: ½ cup (1 stick or 113g) – Softened to room temperature. It should yield slightly when pressed but not be greasy or melted.
- Eggs: 2 large – At room temperature.
- Sourdough Starter Discard: ½ cup (approx. 120g) – Unfed, bubbly or flat discard works fine. Room temperature is best.
- Milk: ¼ cup (approx. 60ml) – Whole milk recommended for richness, but low-fat or plant-based milk (like almond or soy) can work. Room temperature.
- Vanilla Extract: 2 teaspoons – Use pure vanilla extract for the best flavour.
Instructions
- Preheat & Prepare: Preheat your oven to 350°F (175°C). Line a standard 12-cup muffin tin with paper liners. If you have extra batter, prepare a few cups in a second tin. This recipe might yield slightly more than 12 depending on how full you fill the cups.
- Room Temperature Ingredients: Ensure your butter, eggs, sourdough discard, and milk are all at room temperature. This is critical for a smooth, well-emulsified batter. You can warm eggs quickly by placing them in a bowl of warm (not hot) water for 5-10 minutes. Butter can be softened by cutting it into cubes and letting it sit out for 30-60 minutes, depending on room temperature.
Mixing the Batter:
- Dry Ingredients: In a medium bowl, whisk together the all-purpose flour, baking powder, baking soda, and salt. Whisking helps distribute the leaveners evenly and aerates the flour. Set aside.
- Cream Butter and Sugar: In the large bowl of a stand mixer fitted with the paddle attachment, or using a hand mixer and a large bowl, beat the softened unsalted butter on medium speed until smooth and creamy (about 1 minute). Add the granulated sugar and continue beating on medium-high speed for a full 3-5 minutes. The mixture should become pale, light, and fluffy. This step incorporates air, which contributes to the cupcakes’ lift and texture. Scrape down the sides and bottom of the bowl occasionally.
- Add Eggs: Add the room temperature eggs one at a time, beating well (about 30-60 seconds) after each addition until fully incorporated. Don’t rush this step; ensure each egg is fully mixed in before adding the next. Scrape down the bowl again.
- Incorporate Vanilla: Beat in the pure vanilla extract until just combined.
- Combine Wet Ingredients (Separate): In a separate small bowl or liquid measuring cup, whisk together the room temperature sourdough discard and the room temperature milk until relatively smooth. Some small lumps from the discard are okay.
- Alternate Wet and Dry: Reduce the mixer speed to low. Add the dry ingredients (from step 3) in three additions, alternating with the wet ingredients (from step 7) in two additions, beginning and ending with the dry ingredients.
- Add ⅓ of the dry ingredients. Mix on low until just combined (a few streaks of flour remaining are fine).
- Add ½ of the wet ingredients (sourdough/milk mixture). Mix on low until just combined.
- Add another ⅓ of the dry ingredients. Mix on low until just combined.
- Add the remaining ½ of the wet ingredients. Mix on low until just combined.
- Add the final ⅓ of the dry ingredients. Mix on low only until the last streaks of flour disappear.
- Do Not Overmix: Overmixing develops the gluten in the flour, which can lead to tough or dense cupcakes. Stop mixing as soon as the ingredients are incorporated. It’s okay if the batter looks slightly lumpy from the discard. You can give it a final gentle fold with a spatula to ensure everything at the bottom is mixed in.
Filling and Baking:
- Fill Cupcake Liners: Divide the batter evenly among the prepared cupcake liners. Fill each liner about two-thirds full. Using an ice cream scoop (a standard size often holds the perfect amount) helps ensure evenly sized cupcakes. Overfilling can cause the cupcakes to spill over or develop tough edges.
- Bake: Place the muffin tin in the preheated oven. Bake for 18-22 minutes, or until the tops are lightly golden brown and a wooden skewer or toothpick inserted into the center of a cupcake comes out clean (or with a few moist crumbs attached, but no wet batter). Baking times can vary slightly depending on your oven. Start checking around the 18-minute mark.
- Cooling: Once baked, carefully remove the muffin tin from the oven and place it on a wire cooling rack. Let the cupcakes cool in the tin for 5-10 minutes. This allows them to set slightly.
- Complete Cooling: After 5-10 minutes, carefully remove the cupcakes from the tin and place them directly onto the wire cooling rack to cool completely. This prevents the bottoms from getting soggy. Ensure they are fully cool before frosting (at least 1 hour, often longer), otherwise, the frosting will melt.
Nutrition
- Serving Size: one normal portion
- Calories: 180-220


