

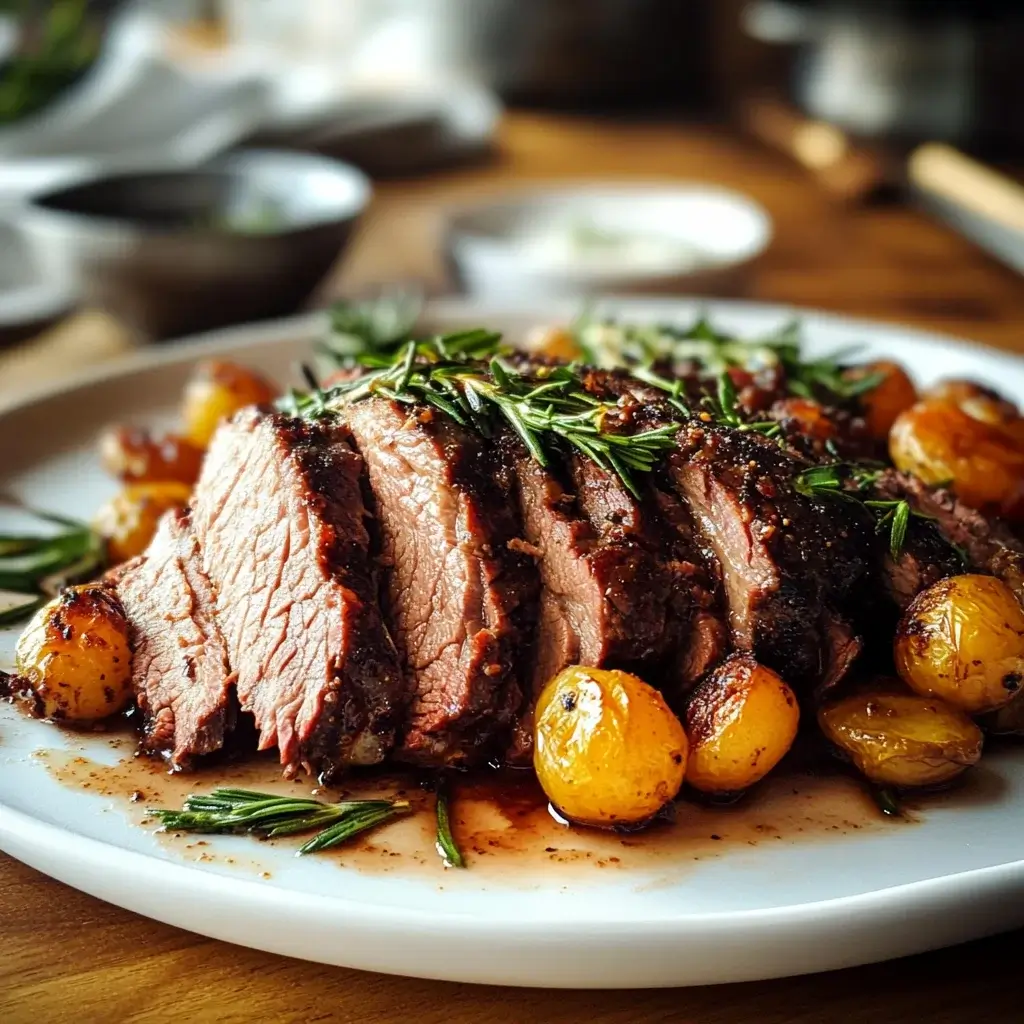
The aroma alone is enough to transport you to a cozy Sunday dinner, even before you’ve taken the first bite. For years, I’ve been on a quest for the perfect beef brisket recipe, one that delivers that melt-in-your-mouth tenderness and deep, smoky flavor without requiring a professional smoker or all-day babysitting. After countless attempts, tweaks, and taste tests with my family (who, I must say, are very enthusiastic taste testers!), this slow-roasted beef brisket recipe has emerged as the undisputed champion. The hushed reverence around the dinner table as everyone savors each forkful, the satisfied sighs, and the inevitable requests for seconds (and thirds!) are proof enough. This isn’t just a meal; it’s an experience, a celebration of simple ingredients transformed into something truly extraordinary through the magic of low and slow cooking. Prepare yourself to be amazed by how easily you can create restaurant-quality brisket in your own oven – get ready for brisket bliss!
Ingredients
To embark on this culinary journey to brisket perfection, you’ll need a few key ingredients. The quality of the beef is paramount, so choose wisely. Beyond that, we’re focusing on simple, robust flavors that complement the rich beef without overpowering it. Here’s what you’ll need to gather:
For the Beef Brisket:
- 3-4 pounds Beef Brisket, Point Cut or Flat Cut (or a combination): The star of the show! For this slow-roasting method, either the point cut (also known as the deckle – fattier and more flavorful) or the flat cut (leaner and more uniform) will work beautifully. You can even use a combination for the best of both worlds. Look for a brisket with good marbling, which is the intramuscular fat that renders down during cooking, resulting in tender, juicy meat. A brisket in the 3-4 pound range is ideal for feeding a family or a small gathering and will fit comfortably in most roasting pans.
- 2 tablespoons Olive Oil or Beef Tallow: For searing the brisket (optional but highly recommended) and adding richness. Olive oil is a readily available healthy option, while beef tallow (rendered beef fat) will impart an even deeper, beefier flavor and enhance browning. If you have tallow on hand, it’s a fantastic choice, otherwise, olive oil works perfectly well.
- 1 large Yellow Onion, roughly chopped: Forms the aromatic base for braising and adds sweetness as it caramelizes. Yellow onions are versatile and hold up well during long cooking times. Rough chopping is sufficient as they will mostly dissolve into the braising liquid during the slow roasting process.
- 4-5 cloves Garlic, minced: Garlic is essential for depth of flavor. Freshly minced garlic is always best for its pungent aroma and taste. Adjust the amount to your preference – if you love garlic, feel free to add a clove or two more.
- 1 cup Beef Broth or Stock: Provides moisture for braising and enhances the beefy flavor. Opt for low-sodium broth or stock to control the salt level in your final dish. Homemade beef stock will elevate the flavor even further if you have it available.
- 1/2 cup Dry Red Wine (optional, but recommended): Adds complexity and acidity to the braising liquid, helping to tenderize the meat and create a richer sauce. A robust red wine like Cabernet Sauvignon, Merlot, or a red blend works well. If you prefer not to use wine, simply substitute with more beef broth.
- 2 tablespoons Worcestershire Sauce: Umami booster! Worcestershire sauce adds depth and savory notes that complement the beef beautifully. It’s a key ingredient in many brisket recipes for a reason.
- 1 tablespoon Apple Cider Vinegar or Balsamic Vinegar: A touch of acidity is crucial to balance the richness of the brisket and cut through the fat. Apple cider vinegar offers a slightly tangy and fruity note, while balsamic vinegar provides a sweeter, more complex acidity. Choose your preference or use what you have on hand.
- Fresh Thyme and Rosemary sprigs (optional): Aromatic herbs to infuse the brisket with subtle earthy notes. Fresh herbs are preferable for their brighter flavor, but you can substitute with dried herbs if needed (about 1 teaspoon each of dried thyme and rosemary).
For the Dry Rub:
- 2 tablespoons Kosher Salt: Essential for seasoning the brisket and drawing out moisture, which helps create a flavorful crust. Kosher salt is preferred for its larger crystals, which distribute more evenly.
- 2 tablespoons Black Peppercorns, freshly cracked or coarsely ground: Provides a bold, peppery bite. Freshly cracked or coarsely ground black pepper delivers a much more intense flavor than pre-ground pepper.
- 1 tablespoon Smoked Paprika: Adds a smoky depth that mimics the flavor of smoked brisket, even when oven-roasted. Smoked paprika is a game-changer for achieving that classic brisket taste.
- 1 tablespoon Garlic Powder: Enhances the garlic flavor and adds another layer of savory notes to the rub.
- 1 tablespoon Onion Powder: Complements the fresh onion and adds a subtle sweetness to the rub.
- 1 tablespoon Brown Sugar (light or dark): Adds a touch of sweetness to balance the savory flavors and helps with caramelization during cooking. Light or dark brown sugar both work well, with dark brown sugar providing a slightly richer molasses flavor.
- 1 teaspoon Chili Powder: Provides a mild warmth and depth of flavor. Use a good quality chili powder for the best results.
- 1 teaspoon Dried Mustard Powder: Adds a tangy, subtle heat and enhances the savory notes in the rub.
- 1/2 teaspoon Cayenne Pepper (optional, for a touch of heat): If you like a little kick, a pinch of cayenne pepper adds a pleasant warmth without making the brisket overly spicy. Omit if you prefer a milder flavor.
Instructions
Now for the fun part – bringing all these delicious ingredients together to create our slow-roasted masterpiece! Follow these step-by-step instructions for brisket success:
Step 1: Preparing the Brisket – The Foundation of Flavor
Before we even think about cooking, proper brisket preparation is key. Start by taking your brisket out of the refrigerator about 1-2 hours before you plan to start cooking. This allows the brisket to come closer to room temperature, which promotes more even cooking. Pat the brisket dry thoroughly with paper towels. Removing excess moisture on the surface is crucial for achieving a good sear (if you choose to sear) and for the dry rub to adhere properly. Trim the brisket if necessary. Brisket often comes with a thick fat cap. While some fat is desirable for flavor and moisture, excessive fat can prevent the rub from penetrating the meat and may not fully render during cooking. You want to trim the fat cap down to about ¼ inch thickness. This leaves enough fat for flavor and moisture while allowing the rub to directly season the meat. Use a sharp knife to carefully trim away the excess fat, being careful not to cut into the meat itself.
Step 2: Crafting the Dry Rub – Your Flavor Powerhouse
The dry rub is where we build layers of flavor that will penetrate the brisket as it slow roasts. In a small bowl, combine all the dry rub ingredients: kosher salt, black pepper, smoked paprika, garlic powder, onion powder, brown sugar, chili powder, dried mustard powder, and cayenne pepper (if using). Mix everything together thoroughly until well combined. Taste a tiny pinch of the rub – it should be a balanced blend of savory, smoky, slightly sweet, and perhaps a touch of heat. Adjust the seasonings to your liking. If you prefer more smokiness, add a bit more smoked paprika. For more heat, increase the cayenne pepper. For a sweeter rub, add a little more brown sugar. This is your chance to customize the flavor profile to your taste.
Step 3: Seasoning the Brisket – The Flavor Infusion
Now it’s time to generously coat the brisket with our flavorful dry rub. Place the brisket on a large cutting board or in a large baking dish. Using your hands, liberally apply the dry rub all over the brisket, ensuring you cover every nook and cranny, including the sides and bottom. Massage the rub into the meat, pressing it gently to help it adhere. Don’t be shy – use all of the rub. The amount might seem like a lot, but brisket is a large cut of meat, and it needs ample seasoning to penetrate and flavor it throughout. Once the brisket is fully coated, wrap it tightly in plastic wrap or place it in a resealable plastic bag. Refrigerate the seasoned brisket for at least 4 hours, or preferably overnight, and up to 24 hours. This resting time allows the salt to penetrate the meat, tenderizing it and drawing out moisture, which will then be reabsorbed, resulting in a more flavorful and juicy brisket. The longer it rests, the deeper the flavor will develop.
Step 4: Searing the Brisket (Optional but Highly Recommended) – Building Layers of Depth
Searing the brisket before slow roasting is an optional step, but it adds a significant layer of flavor and enhances the overall texture. Searing creates a beautiful brown crust on the surface of the brisket through the Maillard reaction, which is a chemical reaction between amino acids and reducing sugars that produces complex flavors and aromas. Heat olive oil or beef tallow in a large, heavy-bottomed Dutch oven or oven-safe skillet over medium-high heat until it’s shimmering hot. Carefully place the brisket in the hot pan and sear it on all sides, including the top and bottom, for about 2-3 minutes per side, or until deeply browned. Avoid overcrowding the pan; if your brisket is too large to sear in one go, cut it in half or sear it in batches. The goal is to develop a rich, brown crust on all surfaces. Once seared, remove the brisket from the pan and set it aside.
Step 5: Slow Roasting the Brisket – The Magic of Low and Slow
Preheat your oven to a low temperature of 275°F (135°C). This low and slow cooking method is the key to incredibly tender brisket. In the same Dutch oven or skillet you used for searing (or a large roasting pan), add the chopped onions and sauté over medium heat until softened and lightly caramelized, about 5-7 minutes. Add the minced garlic and cook for another minute until fragrant, being careful not to burn the garlic. Pour in the beef broth and red wine (if using), Worcestershire sauce, and apple cider vinegar or balsamic vinegar. Bring the liquid to a simmer, scraping up any browned bits from the bottom of the pan – these browned bits are packed with flavor and will enrich the braising liquid. Place the seared brisket (fat side up, if using point cut) into the braising liquid. Add fresh thyme and rosemary sprigs (if using) to the pan, nestling them around the brisket. The liquid should come about halfway up the sides of the brisket. If needed, add a little more beef broth to reach this level.
Step 6: Braising for Tenderness – Achieving Melt-in-Your-Mouth Perfection
Cover the Dutch oven or roasting pan tightly with a lid or heavy-duty aluminum foil. Ensuring a tight seal is crucial for braising, as it traps steam and moisture, which helps to tenderize the brisket and prevent it from drying out. Place the covered pan in the preheated oven and slow roast for 6-8 hours, or until the brisket is fork-tender. The exact cooking time will depend on the size and thickness of your brisket and your oven temperature. Check for doneness after about 6 hours. To test for tenderness, gently insert a fork into the thickest part of the brisket. It should slide in easily with very little resistance, like butter. If it’s still tough, continue to cook for another hour or two, checking periodically. During the slow roasting process, you can baste the brisket with the braising liquid every couple of hours to keep it moist and flavorful. Carefully remove the lid or foil and spoon some of the liquid over the top of the brisket.
Step 7: Resting the Brisket – The Crucial Final Step
Once the brisket is fork-tender, remove the Dutch oven from the oven. Carefully remove the brisket from the braising liquid and place it on a cutting board. Tent it loosely with aluminum foil and let it rest for at least 30 minutes, or even up to an hour. Resting is absolutely essential for a juicy and tender brisket. During resting, the muscle fibers relax, and the juices redistribute throughout the meat, resulting in a more flavorful and moist final product. While the brisket is resting, you can skim off any excess fat from the surface of the braising liquid in the Dutch oven. You can also strain the braising liquid through a fine-mesh sieve to remove the onions and garlic if you prefer a smoother sauce. Simmer the braising liquid over medium heat to reduce it slightly and concentrate the flavors, creating a delicious sauce to serve with the brisket.
Step 8: Slicing and Serving – The Grand Finale
After the brisket has rested, it’s time to slice and serve. The key to slicing brisket properly is to slice against the grain. Look closely at the brisket to identify the direction of the muscle fibers (the grain). Slice perpendicular to the grain, in slices about ¼ inch thick. Slicing against the grain shortens the muscle fibers, making the brisket incredibly tender and easy to chew. If you slice with the grain, the brisket will be tougher and stringy. Arrange the sliced brisket on a serving platter. Spoon the reduced braising sauce over the brisket or serve it on the side. Garnish with fresh parsley or chopped chives, if desired. Serve immediately and prepare for rave reviews!
Nutrition Facts
This slow-roasted beef brisket recipe is not only incredibly flavorful but also provides a good source of protein and essential nutrients. Keep in mind that nutritional values can vary based on the specific cut of brisket used, the amount of fat trimmed, and the portion size.
Servings:
This recipe typically yields approximately 8-10 servings, depending on portion sizes. It’s perfect for a family dinner or a small gathering.
Calories per Serving (Estimated):
Per serving (estimated, based on a 3.5-pound brisket, trimmed, and divided into 10 servings):
- Calories: Approximately 450-600 calories
- Protein: Around 40-50 grams
- Fat: Around 25-40 grams (depending on trim and cut)
- Carbohydrates: Approximately 5-10 grams (primarily from vegetables and brown sugar in the rub)
Important Note: These are estimates. For precise nutritional information, you can use online nutrition calculators and input the specific ingredients and quantities you use. Brisket is a rich and flavorful dish, so enjoy it in moderation as part of a balanced diet.
Preparation Time
While the cooking time for slow-roasted brisket is lengthy, the active preparation time is surprisingly minimal. Here’s a breakdown:
Prep Time:
- Active Prep: Approximately 30-45 minutes (includes trimming brisket, making the rub, seasoning the brisket, chopping vegetables, and searing – if searing).
- Marinating Time: 4 hours minimum, preferably overnight (up to 24 hours) in the refrigerator. This is mostly hands-off time.
Cook Time:
- Slow Roasting: 6-8 hours in the oven at 275°F (135°C), or until fork-tender.
Total Time:
- Total Time (excluding marinating): Approximately 7-9 hours.
- Total Time (including overnight marinating): 19-33 hours (depending on marinating time).
Planning Tip: Brisket is an excellent dish to prepare on a weekend or a day when you have time to let it slow roast. The long cooking time is mostly hands-off, allowing you to attend to other tasks while the oven works its magic.
How to Serve
Slow-roasted beef brisket is incredibly versatile and pairs beautifully with a variety of side dishes and accompaniments. Here are some serving suggestions to create a complete and satisfying meal:
Classic Sides:
- Creamy Mashed Potatoes: The ultimate comfort food pairing! The rich, tender brisket and creamy mashed potatoes are a match made in culinary heaven.
- Coleslaw: A tangy and crunchy coleslaw provides a refreshing contrast to the richness of the brisket. Vinegar-based or creamy coleslaw both work well.
- Mac and Cheese: Another classic comfort food side that complements brisket perfectly. Choose a cheesy, creamy mac and cheese for a truly indulgent meal.
- Cornbread: Slightly sweet and crumbly cornbread is ideal for soaking up the delicious braising sauce from the brisket.
- Roasted Vegetables: Hearty roasted vegetables like carrots, potatoes, Brussels sprouts, or green beans add color, nutrition, and flavor to the meal. Roast them alongside the brisket for easy cooking.
- Green Salad: A simple green salad with a light vinaigrette provides a fresh and palate-cleansing contrast to the richness of the brisket.
Sauces and Toppings:
- Reduced Braising Sauce: The braising liquid from the brisket, reduced and strained, makes a fantastic natural sauce to spoon over the sliced brisket.
- BBQ Sauce: For a more traditional BBQ flavor, serve your favorite BBQ sauce alongside the brisket. Choose a smoky, tangy, or sweet BBQ sauce depending on your preference.
- Horseradish Cream Sauce: A creamy horseradish sauce adds a zesty kick that cuts through the richness of the brisket.
- Pickled Onions or Jalapeños: Pickled onions or jalapeños provide a tangy and spicy contrast to the savory brisket.
Serving Suggestions:
- Family-Style Dinner: Serve the sliced brisket platter-style, surrounded by your chosen side dishes, allowing everyone to help themselves.
- Brisket Sandwiches: Leftover brisket makes incredible sandwiches! Pile sliced brisket onto toasted buns with your favorite toppings like coleslaw, pickles, and BBQ sauce.
- Brisket Tacos or Burritos: Shredded brisket is fantastic in tacos or burritos. Combine it with your favorite taco toppings like salsa, guacamole, sour cream, and cilantro.
- Brisket Bowls: Create hearty and flavorful bowls with brisket as the star, served over rice, quinoa, or mashed potatoes, with roasted vegetables and your choice of sauce.
Additional Tips for Perfect Slow-Roasted Brisket
Achieving brisket perfection is within your reach with a few extra tips and tricks. Here are five additional tips to ensure your slow-roasted beef brisket is a resounding success:
Tip 1: Choose the Right Cut of Brisket – Know Your Meat
Understanding the different cuts of brisket is crucial for selecting the best one for slow roasting. Brisket is typically sold as either the point cut (deckle) or the flat cut (navel). The point cut is fattier, more marbled, and generally more flavorful, but it can also be less uniform in shape and may require more trimming. The flat cut is leaner, more uniform, and easier to slice, but it can be drier if not cooked properly. For slow roasting, either cut works well, or you can even use a whole packer brisket, which includes both the point and flat cuts. If using a whole packer brisket, you may need to adjust the cooking time accordingly. Look for a brisket with good marbling throughout the meat, regardless of the cut. Marbling is the intramuscular fat that renders down during cooking, contributing to tenderness and flavor.
Tip 2: Don’t Skimp on the Rub – Flavor from the Outside In
The dry rub is the first layer of flavor that penetrates the brisket, so don’t be shy with it! Generously coat the brisket with the rub, ensuring every surface is covered. Massage it in well to help it adhere. Allow ample marinating time (at least 4 hours, preferably overnight) for the flavors to meld and penetrate the meat. Experiment with your rub recipe to find your perfect flavor profile. You can adjust the spices to your liking – add more smoked paprika for smokiness, chili powder for warmth, or brown sugar for sweetness. Consider adding other spices like cumin, coriander, or coffee grounds for unique flavor variations.
Tip 3: Low and Slow is Key – Patience Pays Off
Slow roasting at a low temperature is the secret to incredibly tender brisket. Resist the temptation to increase the oven temperature to speed up the cooking process. High heat will cause the brisket to become tough and dry. The low temperature of 275°F (135°C) allows the collagen in the brisket to break down slowly and render into gelatin, resulting in melt-in-your-mouth tenderness. Be patient and allow the brisket to cook for the full recommended time, or even longer if needed, until it is fork-tender. Use a meat thermometer to monitor the internal temperature of the brisket, but rely more on the fork-tenderness test for doneness. The internal temperature should be around 200-205°F (93-96°C) when fully cooked, but tenderness is the most important indicator.
Tip 4: Rest is Essential – Don’t Skip This Step
Resting the brisket after cooking is just as crucial as the slow roasting itself. Allow the brisket to rest for at least 30 minutes, or even up to an hour, tented loosely with foil. During resting, the muscle fibers relax, and the juices redistribute throughout the meat, resulting in a more tender, juicy, and flavorful brisket. If you slice the brisket immediately after removing it from the oven, the juices will rush out, leaving you with drier meat. Resting allows the juices to be reabsorbed, ensuring maximum moisture and tenderness in every slice.
Tip 5: Slice Against the Grain – The Secret to Tenderness
Slicing brisket against the grain is paramount for achieving optimal tenderness. Identify the direction of the muscle fibers (the grain) before slicing. Slice perpendicular to the grain, in slices about ¼ inch thick. Slicing against the grain shortens the muscle fibers, making the brisket incredibly tender and easy to chew. If you slice with the grain, the brisket will be tougher and stringy, even if it’s perfectly cooked. Take your time and slice carefully, ensuring you are slicing against the grain for the most tender and enjoyable brisket experience.
Frequently Asked Questions (FAQ) About Slow-Roasted Beef Brisket
Got questions about slow-roasted beef brisket? You’re not alone! Here are answers to some frequently asked questions to help you master this delicious dish:
Q1: What is the best cut of brisket to use for slow roasting?
A: Both the point cut and flat cut of brisket are excellent for slow roasting. The point cut is fattier and more flavorful, while the flat cut is leaner and more uniform. For beginners, the flat cut might be easier to handle and slice. However, for maximum flavor and tenderness, many brisket enthusiasts prefer the point cut or a whole packer brisket (which includes both cuts). Ultimately, the best cut depends on your preference for flavor versus leanness and your comfort level with trimming and slicing. No matter which cut you choose, ensure it has good marbling for the best results.
Q2: How long does it take to slow roast a brisket?
A: The slow roasting time for brisket typically ranges from 6 to 8 hours at 275°F (135°C), but it can vary depending on the size and thickness of the brisket, and your oven temperature. The most important factor is tenderness, not time. Start checking for doneness after about 6 hours. The brisket is done when a fork easily slides into the thickest part with minimal resistance, like butter. If it’s still tough, continue to cook for another hour or two, checking periodically. Use a meat thermometer as a guide, aiming for an internal temperature of around 200-205°F (93-96°C), but prioritize tenderness over temperature readings.
Q3: How do I know when my brisket is done?
A: The best way to determine if your brisket is done is by checking for fork-tenderness. Gently insert a fork into the thickest part of the brisket. If it slides in easily with very little resistance, like butter, then the brisket is done. It should feel incredibly tender and almost falling apart. While a meat thermometer can be helpful, don’t rely solely on temperature readings. Brisket can sometimes reach the target temperature but still be tough. Focus on achieving that melt-in-your-mouth tenderness through the fork test. If the fork meets resistance, it needs to cook longer.
Q4: Can I make brisket ahead of time?
A: Yes, brisket is an excellent make-ahead dish! In fact, many argue that brisket is even better the next day. Once the brisket is cooked and rested, allow it to cool slightly, then wrap it tightly in foil or place it in an airtight container and refrigerate it. You can refrigerate cooked brisket for up to 3-4 days. To reheat, you can gently warm the sliced brisket in the oven (covered with foil and a little braising liquid or beef broth to prevent drying out) at 250°F (120°C) until heated through, or you can reheat it in a skillet or microwave. Reheating brisket the next day allows the flavors to meld even further, often resulting in an even more delicious and tender final product.
Q5: What can I do with leftover brisket?
A: Leftover brisket is a treasure trove of culinary possibilities! Beyond reheating and enjoying it as is, here are some delicious ways to use leftover brisket:
- Brisket Sandwiches: As mentioned earlier, brisket sandwiches are a classic and delicious way to use leftovers.
- Brisket Tacos or Burritos: Shredded brisket is perfect for tacos, burritos, or quesadillas.
- Brisket Chili: Add cubed or shredded brisket to your favorite chili recipe for a hearty and flavorful upgrade.
- Brisket Hash: Make a delicious breakfast or brunch hash by combining diced brisket with potatoes, onions, and peppers.
- Brisket Mac and Cheese: Stir shredded brisket into mac and cheese for a decadent and satisfying comfort food dish.
- Brisket Shepherd’s Pie: Use shredded brisket as the meat base for a flavorful shepherd’s pie.
- Brisket Fried Rice: Add diced brisket to fried rice for a protein-packed and flavorful meal.
With a little patience and these tips, you’ll be well on your way to creating slow-roasted beef brisket that will impress your family and friends every time. Enjoy the journey and the delicious results!
Print
Slow-Roasted Beef Brisket recipe
Ingredients
For the Beef Brisket:
-
- 3–4 pounds Beef Brisket, Point Cut or Flat Cut (or a combination): The star of the show! For this slow-roasting method, either the point cut (also known as the deckle – fattier and more flavorful) or the flat cut (leaner and more uniform) will work beautifully. You can even use a combination for the best of both worlds. Look for a brisket with good marbling, which is the intramuscular fat that renders down during cooking, resulting in tender, juicy meat. A brisket in the 3-4 pound range is ideal for feeding a family or a small gathering and will fit comfortably in most roasting pans.
-
- 2 tablespoons Olive Oil or Beef Tallow: For searing the brisket (optional but highly recommended) and adding richness. Olive oil is a readily available healthy option, while beef tallow (rendered beef fat) will impart an even deeper, beefier flavor and enhance browning. If you have tallow on hand, it’s a fantastic choice, otherwise, olive oil works perfectly well.
-
- 1 large Yellow Onion, roughly chopped: Forms the aromatic base for braising and adds sweetness as it caramelizes. Yellow onions are versatile and hold up well during long cooking times. Rough chopping is sufficient as they will mostly dissolve into the braising liquid during the slow roasting process.
-
- 4–5 cloves Garlic, minced: Garlic is essential for depth of flavor. Freshly minced garlic is always best for its pungent aroma and taste. Adjust the amount to your preference – if you love garlic, feel free to add a clove or two more.
-
- 1 cup Beef Broth or Stock: Provides moisture for braising and enhances the beefy flavor. Opt for low-sodium broth or stock to control the salt level in your final dish. Homemade beef stock will elevate the flavor even further if you have it available.
-
- 1/2 cup Dry Red Wine (optional, but recommended): Adds complexity and acidity to the braising liquid, helping to tenderize the meat and create a richer sauce. A robust red wine like Cabernet Sauvignon, Merlot, or a red blend works well. If you prefer not to use wine, simply substitute with more beef broth.
-
- 2 tablespoons Worcestershire Sauce: Umami booster! Worcestershire sauce adds depth and savory notes that complement the beef beautifully. It’s a key ingredient in many brisket recipes for a reason.
-
- 1 tablespoon Apple Cider Vinegar or Balsamic Vinegar: A touch of acidity is crucial to balance the richness of the brisket and cut through the fat. Apple cider vinegar offers a slightly tangy and fruity note, while balsamic vinegar provides a sweeter, more complex acidity. Choose your preference or use what you have on hand.
-
- Fresh Thyme and Rosemary sprigs (optional): Aromatic herbs to infuse the brisket with subtle earthy notes. Fresh herbs are preferable for their brighter flavor, but you can substitute with dried herbs if needed (about 1 teaspoon each of dried thyme and rosemary).
For the Dry Rub:
-
- 2 tablespoons Kosher Salt: Essential for seasoning the brisket and drawing out moisture, which helps create a flavorful crust. Kosher salt is preferred for its larger crystals, which distribute more evenly.
-
- 2 tablespoons Black Peppercorns, freshly cracked or coarsely ground: Provides a bold, peppery bite. Freshly cracked or coarsely ground black pepper delivers a much more intense flavor than pre-ground pepper.
-
- 1 tablespoon Smoked Paprika: Adds a smoky depth that mimics the flavor of smoked brisket, even when oven-roasted. Smoked paprika is a game-changer for achieving that classic brisket taste.
-
- 1 tablespoon Garlic Powder: Enhances the garlic flavor and adds another layer of savory notes to the rub.
-
- 1 tablespoon Onion Powder: Complements the fresh onion and adds a subtle sweetness to the rub.
-
- 1 tablespoon Brown Sugar (light or dark): Adds a touch of sweetness to balance the savory flavors and helps with caramelization during cooking. Light or dark brown sugar both work well, with dark brown sugar providing a slightly richer molasses flavor.
-
- 1 teaspoon Chili Powder: Provides a mild warmth and depth of flavor. Use a good quality chili powder for the best results.
-
- 1 teaspoon Dried Mustard Powder: Adds a tangy, subtle heat and enhances the savory notes in the rub.
-
- 1/2 teaspoon Cayenne Pepper (optional, for a touch of heat): If you like a little kick, a pinch of cayenne pepper adds a pleasant warmth without making the brisket overly spicy. Omit if you prefer a milder flavor.
Instructions
Before we even think about cooking, proper brisket preparation is key. Start by taking your brisket out of the refrigerator about 1-2 hours before you plan to start cooking. This allows the brisket to come closer to room temperature, which promotes more even cooking. Pat the brisket dry thoroughly with paper towels. Removing excess moisture on the surface is crucial for achieving a good sear (if you choose to sear) and for the dry rub to adhere properly. Trim the brisket if necessary. Brisket often comes with a thick fat cap. While some fat is desirable for flavor and moisture, excessive fat can prevent the rub from penetrating the meat and may not fully render during cooking. You want to trim the fat cap down to about ¼ inch thickness. This leaves enough fat for flavor and moisture while allowing the rub to directly season the meat. Use a sharp knife to carefully trim away the excess fat, being careful not to cut into the meat itself.
The dry rub is where we build layers of flavor that will penetrate the brisket as it slow roasts. In a small bowl, combine all the dry rub ingredients: kosher salt, black pepper, smoked paprika, garlic powder, onion powder, brown sugar, chili powder, dried mustard powder, and cayenne pepper (if using). Mix everything together thoroughly until well combined. Taste a tiny pinch of the rub – it should be a balanced blend of savory, smoky, slightly sweet, and perhaps a touch of heat. Adjust the seasonings to your liking. If you prefer more smokiness, add a bit more smoked paprika. For more heat, increase the cayenne pepper. For a sweeter rub, add a little more brown sugar. This is your chance to customize the flavor profile to your taste.
Now it’s time to generously coat the brisket with our flavorful dry rub. Place the brisket on a large cutting board or in a large baking dish. Using your hands, liberally apply the dry rub all over the brisket, ensuring you cover every nook and cranny, including the sides and bottom. Massage the rub into the meat, pressing it gently to help it adhere. Don’t be shy – use all of the rub. The amount might seem like a lot, but brisket is a large cut of meat, and it needs ample seasoning to penetrate and flavor it throughout. Once the brisket is fully coated, wrap it tightly in plastic wrap or place it in a resealable plastic bag. Refrigerate the seasoned brisket for at least 4 hours, or preferably overnight, and up to 24 hours. This resting time allows the salt to penetrate the meat, tenderizing it and drawing out moisture, which will then be reabsorbed, resulting in a more flavorful and juicy brisket. The longer it rests, the deeper the flavor will develop.
Searing the brisket before slow roasting is an optional step, but it adds a significant layer of flavor and enhances the overall texture. Searing creates a beautiful brown crust on the surface of the brisket through the Maillard reaction, which is a chemical reaction between amino acids and reducing sugars that produces complex flavors and aromas. Heat olive oil or beef tallow in a large, heavy-bottomed Dutch oven or oven-safe skillet over medium-high heat until it’s shimmering hot. Carefully place the brisket in the hot pan and sear it on all sides, including the top and bottom, for about 2-3 minutes per side, or until deeply browned. Avoid overcrowding the pan; if your brisket is too large to sear in one go, cut it in half or sear it in batches. The goal is to develop a rich, brown crust on all surfaces. Once seared, remove the brisket from the pan and set it aside.
Preheat your oven to a low temperature of 275°F (135°C). This low and slow cooking method is the key to incredibly tender brisket. In the same Dutch oven or skillet you used for searing (or a large roasting pan), add the chopped onions and sauté over medium heat until softened and lightly caramelized, about 5-7 minutes. Add the minced garlic and cook for another minute until fragrant, being careful not to burn the garlic. Pour in the beef broth and red wine (if using), Worcestershire sauce, and apple cider vinegar or balsamic vinegar. Bring the liquid to a simmer, scraping up any browned bits from the bottom of the pan – these browned bits are packed with flavor and will enrich the braising liquid. Place the seared brisket (fat side up, if using point cut) into the braising liquid. Add fresh thyme and rosemary sprigs (if using) to the pan, nestling them around the brisket. The liquid should come about halfway up the sides of the brisket. If needed, add a little more beef broth to reach this level.
Cover the Dutch oven or roasting pan tightly with a lid or heavy-duty aluminum foil. Ensuring a tight seal is crucial for braising, as it traps steam and moisture, which helps to tenderize the brisket and prevent it from drying out. Place the covered pan in the preheated oven and slow roast for 6-8 hours, or until the brisket is fork-tender. The exact cooking time will depend on the size and thickness of your brisket and your oven temperature. Check for doneness after about 6 hours. To test for tenderness, gently insert a fork into the thickest part of the brisket. It should slide in easily with very little resistance, like butter. If it’s still tough, continue to cook for another hour or two, checking periodically. During the slow roasting process, you can baste the brisket with the braising liquid every couple of hours to keep it moist and flavorful. Carefully remove the lid or foil and spoon some of the liquid over the top of the brisket.
Once the brisket is fork-tender, remove the Dutch oven from the oven. Carefully remove the brisket from the braising liquid and place it on a cutting board. Tent it loosely with aluminum foil and let it rest for at least 30 minutes, or even up to an hour. Resting is absolutely essential for a juicy and tender brisket. During resting, the muscle fibers relax, and the juices redistribute throughout the meat, resulting in a more flavorful and moist final product. While the brisket is resting, you can skim off any excess fat from the surface of the braising liquid in the Dutch oven. You can also strain the braising liquid through a fine-mesh sieve to remove the onions and garlic if you prefer a smoother sauce. Simmer the braising liquid over medium heat to reduce it slightly and concentrate the flavors, creating a delicious sauce to serve with the brisket.
After the brisket has rested, it’s time to slice and serve. The key to slicing brisket properly is to slice against the grain. Look closely at the brisket to identify the direction of the muscle fibers (the grain). Slice perpendicular to the grain, in slices about ¼ inch thick. Slicing against the grain shortens the muscle fibers, making the brisket incredibly tender and easy to chew. If you slice with the grain, the brisket will be tougher and stringy. Arrange the sliced brisket on a serving platter. Spoon the reduced braising sauce over the brisket or serve it on the side. Garnish with fresh parsley or chopped chives, if desired. Serve immediately and prepare for rave reviews!
Nutrition
- Serving Size: one normal portion
- Calories: 450-600
- Fat: 25-40 grams
- Carbohydrates: 5-10 grams
- Protein: 40-50 grams


