


The first time I attempted to make seared tuna steaks at home, I was a bundle of nerves. I’d always associated it with fancy restaurant menus and assumed it required some arcane culinary skill. But armed with a beautiful piece of Ahi tuna and a desire for that melt-in-your-mouth, rare center and perfectly crusted exterior, I took the plunge. The sizzle as the tuna hit the hot pan was instantly gratifying, and the aroma that filled my kitchen was intoxicating – a delicate oceanic scent mingled with toasted sesame. When I sliced into it, revealing that stunning ruby red interior, I felt like a professional chef! My family was equally impressed; the “oohs” and “aahs” were audible. It was tender, flavourful, and so much better than I had dared to hope. Now, seared tuna is a regular in our meal rotation, a quick, healthy, and utterly delicious way to elevate a weeknight dinner or impress guests.
The Allure of Perfectly Seared Tuna: A Culinary Delight
Seared tuna, often featuring Ahi (Yellowfin or Bigeye) tuna, is a dish celebrated for its delightful contrast of textures and temperatures. The exterior is beautifully browned and often crusted with seasonings like sesame seeds or peppercorns, offering a savory, slightly crisp bite. This gives way to a cool, tender, and almost buttery interior that is typically served rare to medium-rare, showcasing the high quality of the fish. This method of cooking highlights the tuna’s natural flavour and luxurious texture, similar to how it’s enjoyed in sashimi or sushi.
The key to perfect seared tuna lies in a few critical elements: sourcing high-quality, sushi-grade fish, achieving a very hot pan for a quick sear, and resisting the urge to overcook. When done right, it’s a remarkably quick-cooking protein, making it an excellent option for a sophisticated yet speedy meal. It’s not just about taste; it’s an experience – the visual appeal of the vibrant pink center against the dark crust is as satisfying as its flavour.
Choosing Your Tuna: The Foundation for a Stellar Sear
The single most important factor in a successful seared tuna dish is the quality of the tuna itself. Since the inside will be served rare or medium-rare, it’s crucial to use sushi-grade or sashimi-grade tuna.
- What is Sushi-Grade/Sashimi-Grade? This isn’t an officially regulated term by the FDA, but it generally implies that the fish supplier deems it safe to be consumed raw or lightly cooked. This often means it has been flash-frozen at extremely low temperatures shortly after being caught to kill any potential parasites. Always buy from a reputable fishmonger or a trusted source. Inform them you intend to sear it rare.
- Types of Tuna Suitable for Searing:
- Ahi Tuna: This is the most common type used. “Ahi” is a Hawaiian term that encompasses two species:
- Yellowfin Tuna: Has a milder flavour and a firmer texture. Its flesh ranges from pink to deep red. This is a very popular and excellent choice.
- Bigeye Tuna: Has a higher fat content, richer flavour, and a slightly softer, more buttery texture. Its flesh is typically a deeper red. Often preferred for sashimi.
- Bluefin Tuna: Highly prized, especially the fatty belly (toro), it’s the most luxurious and expensive. It has a very rich flavour and tender texture. If your budget allows, it’s an exceptional treat.
- Albacore Tuna: Lighter in color (whitish-pink) and has a milder flavour and firmer texture than Ahi or Bluefin. While it can be seared, it’s often canned as “white tuna.” For the classic seared tuna experience, Ahi or Bluefin are preferred.
- Ahi Tuna: This is the most common type used. “Ahi” is a Hawaiian term that encompasses two species:
- What to Look For:
- Color: The flesh should be vibrant, clear, and translucent, not dull, discolored, or opaque. Deep red or bright pink are good signs. Avoid tuna with brown spots or a rainbow sheen (which can indicate it’s not fresh).
- Smell: It should smell fresh and clean, like the ocean. It should not have a strong “fishy” odor, ammonia smell, or any off-putting scent.
- Texture: The flesh should look firm and moist, not mushy or slimy.
- Cut: Look for steaks that are at least 1 to 1.5 inches thick. This thickness allows you to get a good sear on the outside while keeping the inside rare. Thinner steaks will cook through too quickly.
- Fresh vs. Frozen: High-quality, properly flash-frozen tuna can be just as good, if not better and safer, than “fresh” tuna that has had a long journey to your market. If using frozen, thaw it slowly in the refrigerator overnight.
The Art of the Sear: Temperature, Fat, and Timing
Achieving that perfect crust and rare interior is all about a very hot pan and very short cooking time.
- High Heat is Crucial: You need to get your pan screaming hot. This allows the exterior of the tuna to develop a beautiful crust quickly without overcooking the delicate interior.
- The Right Pan:
- Cast Iron Skillet: This is the gold standard. Cast iron retains heat incredibly well and distributes it evenly, ensuring a consistent, deep sear.
- Heavy-Bottomed Stainless Steel Skillet: A good quality, heavy stainless steel pan can also work well.
- Non-Stick Pans: Generally not recommended for achieving a very high-heat sear, as high temperatures can damage the non-stick coating and they often don’t retain heat as well as cast iron or heavy stainless steel.
- The Right Oil (Fat): You need an oil with a high smoke point, as you’ll be cooking at high temperatures.
- Good choices: Avocado oil, grapeseed oil, canola oil, peanut oil, or clarified butter (ghee).
- Avoid: Extra virgin olive oil has a lower smoke point and can burn and impart a bitter taste at high searing temperatures. Regular olive oil is slightly better but still not ideal.
- Don’t Crowd the Pan: Sear the tuna steaks in batches if necessary. Overcrowding the pan will lower its temperature, causing the tuna to steam rather than sear, and you won’t get that desirable crust.
- Timing is Everything: We’re talking minutes, sometimes even seconds, per side, depending on the thickness of the tuna and your desired level of doneness. It cooks very quickly.
Simple Marinade & Seasoning for Maximum Flavor
While high-quality tuna is delicious on its own, a simple marinade or seasoning blend can elevate it. The key is to enhance, not overpower, the natural flavour of the fish.
- Classic Asian-Inspired Marinade (Optional):
- Soy sauce (or tamari for gluten-free)
- Sesame oil (toasted)
- Fresh ginger, grated
- Fresh garlic, minced
- A touch of rice vinegar or lime juice
- A hint of honey or mirin for sweetness (optional)
A short marinating time (15-30 minutes) is usually sufficient. Don’t marinate for too long, especially with acidic ingredients, as it can start to “cook” the fish (like ceviche) and alter its texture.
- Simple Dry Seasoning (Very Common & Effective):
- Kosher salt and freshly cracked black pepper.
- Sesame seeds (white, black, or a mix) for a classic crust.
- Sometimes a blend of spices like paprika, garlic powder, or onion powder.
- Crushed Szechuan peppercorns or Togarashi (Japanese seven-spice blend) for a bit of heat and complexity.
For this recipe, we’ll focus on a popular and effective method using a sesame seed crust with simple seasonings.
Ingredients for Perfect Seared Tuna Steaks
This recipe serves 2 people generously, or 4 as a smaller portion or appetizer.
- 2 sushi-grade Ahi tuna steaks, each about 6-8 ounces and 1 to 1.5 inches thick
- 2 tablespoons soy sauce (or tamari for gluten-free)
- 1 teaspoon toasted sesame oil
- 1/2 teaspoon grated fresh ginger (optional)
- 1/4 cup mixed black and white sesame seeds (or just one type)
- 1/2 teaspoon kosher salt (or to taste, reduce if your soy sauce is very salty)
- 1/4 teaspoon freshly ground black pepper
- 1-2 tablespoons high smoke point oil (e.g., avocado oil, grapeseed oil, or canola oil)
For Garnish & Serving (Optional):
- Thinly sliced green onions (scallions)
- Pickled ginger
- Wasabi paste
- Extra soy sauce or a ponzu dipping sauce
Step-by-Step Guide to Seared Tuna Perfection
Follow these steps for a restaurant-quality seared tuna steak every time.
- Prepare the Tuna:
- If your tuna steaks were frozen, ensure they are fully thawed in the refrigerator.
- Gently pat the tuna steaks completely dry with paper towels. This is crucial for achieving a good sear; excess moisture will cause the tuna to steam.
- Brief “Marinade” (Flavor Base):
- In a shallow dish or a resealable bag, combine the soy sauce, toasted sesame oil, and grated fresh ginger (if using).
- Add the tuna steaks and turn to coat them evenly. Let them sit for just 10-15 minutes at room temperature. Don’t marinate for too long. If you prefer not to use a liquid marinade, you can skip this and just lightly brush the steaks with sesame oil before applying the dry seasoning.
- Prepare the Seed Crust:
- On a plate or shallow dish, combine the black and white sesame seeds, kosher salt, and freshly ground black pepper. Mix them well.
- Coat the Tuna:
- Remove the tuna steaks from the soy sauce mixture, letting any excess drip off. (If you skipped the liquid marinade and brushed with oil, proceed directly).
- Press each side and the edges of the tuna steaks firmly into the sesame seed mixture, ensuring they are well-coated.
- Heat the Pan:
- Place a cast iron skillet or other heavy-bottomed skillet over high heat. Let the pan get extremely hot – this might take 3-5 minutes. You’ll know it’s ready when a drop of water evaporates almost instantly.
- Add Oil and Sear:
- Once the pan is screaming hot, add the high smoke point oil. It should shimmer almost immediately.
- Carefully place the sesame-crusted tuna steaks in the hot pan. You should hear a satisfying sizzle. Do not overcrowd the pan; cook in batches if necessary.
- Sear for the desired doneness (for 1 to 1.5-inch thick steaks):
- Rare (cool, red center): 45 seconds to 1 minute per side. The edges will be cooked, but the very center will be raw.
- Medium-Rare (warm, pink center): 1.5 to 2 minutes per side. This is the most popular doneness.
- Medium (mostly cooked through, slightly pink center): 2 to 3 minutes per side. (Be cautious, as tuna can dry out quickly if overcooked).
- Use tongs to also briefly sear the edges of the tuna steaks (about 15-20 seconds per edge) if desired, for an all-around crust.
- Rest the Tuna:
- Immediately remove the seared tuna steaks from the pan and transfer them to a clean cutting board.
- Let them rest for 5-10 minutes before slicing. This allows the juices to redistribute, ensuring a more tender and flavourful result. Do not cover them tightly, as this can steam the crust. A loose tent of foil is okay if you’re worried about them cooling too much.
- Slice and Serve:
- Using a very sharp knife, slice the tuna steaks against the grain into 1/4 to 1/2-inch thick pieces. You should see a beautiful contrast between the seared crust and the pink/red interior.
- Arrange the slices on plates and serve immediately.
Nutritional Snapshot: A Healthy Indulgence
- Servings: This recipe serves 2 as a main course.
- Calories per serving (approximate, for a 6-ounce steak): Around 350-450 calories.
Please note: Nutritional information is an estimate and can vary based on the exact size of the tuna steak, the amount of oil used, and specific marinade ingredients.
- Tuna: An excellent source of high-quality lean protein. It’s rich in omega-3 fatty acids (EPA and DHA), which are beneficial for heart and brain health. It also provides significant amounts of vitamin D, vitamin B12, selenium, and niacin.
- Sesame Seeds: Add healthy fats, fiber, protein, and minerals like calcium, magnesium, and iron.
- Soy Sauce: Adds sodium, so be mindful if you are on a sodium-restricted diet. Opt for low-sodium versions if preferred.
Seared tuna is a very healthy and nutrient-dense meal choice, especially when paired with vegetables or whole grains.
Timing is Key: Preparation and Cooking Time
Seared tuna is impressively fast to prepare and cook.
- Preparation Time (including brief marinating): 20-25 minutes
- Patting dry tuna: 2 minutes
- Mixing marinade & marinating: 10-15 minutes
- Preparing seed crust & coating tuna: 5 minutes
- Pan Heating Time: 3-5 minutes
- Cooking Time (Searing): 2-5 minutes (depending on desired doneness and thickness)
- Resting Time: 5-10 minutes
Total Estimated Time from Start to Finish (including resting): Approximately 30-45 minutes.
This makes it a fantastic option for a quick weeknight meal that feels gourmet or an impressive appetizer that doesn’t require hours of work.
Mastering the Presentation: How to Serve Seared Tuna
Seared tuna’s visual appeal makes it a star on any plate. Here are some ways to serve it:
- Simple & Elegant:
- Serve slices fanned out on a plate.
- Garnish with thinly sliced green onions, a sprinkle of extra sesame seeds, or microgreens.
- Offer dipping sauces on the side:
- Classic Soy-Ginger: Soy sauce mixed with grated ginger, a touch of rice vinegar, and perhaps a drop of sesame oil.
- Wasabi Mayo: Mayonnaise mixed with wasabi paste to taste.
- Ponzu Sauce: A citrus-based soy sauce.
- Sriracha Aioli: Mayonnaise mixed with sriracha and a squeeze of lime.
- With a Side Salad:
- Serve alongside a fresh Asian-inspired slaw (cabbage, carrots, cilantro, rice vinegar dressing).
- Pair with a simple green salad with a light vinaigrette.
- A seaweed salad is a classic accompaniment.
- Over Rice or Noodles:
- Serve slices over a bed of steamed sushi rice or brown rice.
- Place on top of chilled soba noodles or udon noodles tossed with a light dressing.
- In a Tuna Nicoise Salad (Modern Twist):
- Replace traditional canned tuna with slices of freshly seared tuna.
- As a “Deconstructed” Sushi Bowl or Poke Bowl Element:
- Serve with sushi rice, avocado, cucumber, edamame, pickled ginger, and your favourite sauces.
- Tuna Tataki Style:
- Slice thinly and arrange artfully, then drizzle with ponzu sauce and garnish with grated daikon radish and green onions.
- Appetizer Skewers:
- Cut the seared tuna into cubes after resting, then thread onto small skewers, perhaps with a piece of pickled ginger or a small cube of avocado.
Plating Tips:
- Use contrasting plate colors (e.g., white or dark plates) to make the tuna pop.
- Fan the slices out slightly to showcase the beautiful interior.
- A little drizzle of sauce around or under the tuna can add visual appeal.
Pro-Tips for Searing Tuna Like a Chef
Unlock your inner culinary artist with these five expert tips:
- Sushi-Grade is Non-Negotiable (and Pat it DRY!): This is paramount for safety and flavour when serving tuna rare. And remember, a dry surface is essential for a good crust. Moisture will steam the fish.
- Get That Pan SCALDING Hot: Don’t be shy with the heat. A properly preheated, very hot pan is the secret to a quick sear that crusts the outside without overcooking the inside. Cast iron is your best friend here.
- Don’t Overcrowd the Pan: Cook tuna steaks one or two at a time, depending on your pan size. Overcrowding lowers the pan temperature, leading to uneven cooking and a steamed, rather than seared, exterior.
- Resist the Urge to Overcook: Tuna goes from perfectly rare to disappointingly dry and chalky in a very short amount of time. Err on the side of undercooking; you can always sear it for a few more seconds if needed, but you can’t undo overcooking.
- Rest Before Slicing: Just like steak, tuna benefits from a short rest after searing. This allows the juices to redistribute, resulting in a more tender and flavourful slice. Slice against the grain with a very sharp knife for the cleanest cuts.
Seared Tuna Q&A: Your Burning Questions Answered
Here are answers to some common questions about searing tuna:
- Q: What happens if I accidentally overcook my tuna steak?
- A: Overcooked tuna becomes dry, firm, and somewhat chalky, losing its delicate, buttery texture. While it’s still edible, it won’t have that desirable rare center. If it’s slightly overcooked, you can try flaking it and using it in a tuna salad (though it will be different from canned tuna salad) or a pasta dish where a sauce can add moisture. The best prevention is to watch it closely and use a timer.
- Q: Can I use frozen tuna steaks? How should I thaw them?
- A: Yes, high-quality flash-frozen tuna can be excellent, and is often what’s available as “sushi-grade.” Thaw it slowly and completely in the refrigerator overnight (for at least 8-12 hours, or up to 24 hours). Avoid thawing at room temperature or in warm water, as this can promote bacterial growth and affect texture. Once thawed, pat it very dry.
- Q: How can I be sure the tuna I’m buying is truly “sushi-grade”?
- A: Since “sushi-grade” isn’t an officially regulated term, your best bet is to buy from a reputable fishmonger you trust. Ask them directly if it’s safe for raw consumption or light searing. Look for signs of freshness (vibrant color, no fishy smell, firm texture) and inquire about how it was handled and frozen (flash-freezing to kill parasites is key).
- Q: What is the ideal internal temperature for seared tuna?
- A: For a rare center, you’re looking for an internal temperature of about 115°F (46°C). For medium-rare, aim for 125°F (52°C). Use an instant-read thermometer inserted into the thickest part if you’re unsure. However, many cooks go by time and visual cues (the color of the center when sliced).
- Q: How should I store and use leftover seared tuna?
- A: Store leftover seared tuna in an airtight container in the refrigerator for up to 1-2 days. It’s best enjoyed cold or at room temperature, as reheating can easily overcook it further. Use leftovers sliced in salads, poke bowls, or cold noodle dishes. Avoid microwaving.
Seared tuna is a truly special dish that transforms a simple piece of fish into a culinary masterpiece with minimal effort. Enjoy the process and the delicious, healthy results!
Print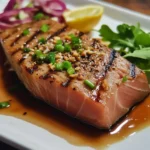
Seared Tuna Steak recipe
Ingredients
-
- 2 sushi-grade Ahi tuna steaks, each about 6–8 ounces and 1 to 1.5 inches thick
-
- 2 tablespoons soy sauce (or tamari for gluten-free)
-
- 1 teaspoon toasted sesame oil
-
- 1/2 teaspoon grated fresh ginger (optional)
-
- 1/4 cup mixed black and white sesame seeds (or just one type)
-
- 1/2 teaspoon kosher salt (or to taste, reduce if your soy sauce is very salty)
-
- 1/4 teaspoon freshly ground black pepper
-
- 1–2 tablespoons high smoke point oil (e.g., avocado oil, grapeseed oil, or canola oil)
For Garnish & Serving (Optional):
-
- Thinly sliced green onions (scallions)
-
- Pickled ginger
-
- Wasabi paste
-
- Extra soy sauce or a ponzu dipping sauce
Instructions
-
- Prepare the Tuna:
-
- If your tuna steaks were frozen, ensure they are fully thawed in the refrigerator.
-
- Gently pat the tuna steaks completely dry with paper towels. This is crucial for achieving a good sear; excess moisture will cause the tuna to steam.
-
- Prepare the Tuna:
-
- Brief “Marinade” (Flavor Base):
-
- In a shallow dish or a resealable bag, combine the soy sauce, toasted sesame oil, and grated fresh ginger (if using).
-
- Add the tuna steaks and turn to coat them evenly. Let them sit for just 10-15 minutes at room temperature. Don’t marinate for too long. If you prefer not to use a liquid marinade, you can skip this and just lightly brush the steaks with sesame oil before applying the dry seasoning.
-
- Brief “Marinade” (Flavor Base):
-
- Prepare the Seed Crust:
-
- On a plate or shallow dish, combine the black and white sesame seeds, kosher salt, and freshly ground black pepper. Mix them well.
-
- Prepare the Seed Crust:
-
- Coat the Tuna:
-
- Remove the tuna steaks from the soy sauce mixture, letting any excess drip off. (If you skipped the liquid marinade and brushed with oil, proceed directly).
-
- Press each side and the edges of the tuna steaks firmly into the sesame seed mixture, ensuring they are well-coated.
-
- Coat the Tuna:
-
- Heat the Pan:
-
- Place a cast iron skillet or other heavy-bottomed skillet over high heat. Let the pan get extremely hot – this might take 3-5 minutes. You’ll know it’s ready when a drop of water evaporates almost instantly.
-
- Heat the Pan:
-
- Add Oil and Sear:
-
- Once the pan is screaming hot, add the high smoke point oil. It should shimmer almost immediately.
-
- Carefully place the sesame-crusted tuna steaks in the hot pan. You should hear a satisfying sizzle. Do not overcrowd the pan; cook in batches if necessary.
-
- Sear for the desired doneness (for 1 to 1.5-inch thick steaks):
-
- Rare (cool, red center): 45 seconds to 1 minute per side. The edges will be cooked, but the very center will be raw.
-
- Medium-Rare (warm, pink center): 1.5 to 2 minutes per side. This is the most popular doneness.
-
- Medium (mostly cooked through, slightly pink center): 2 to 3 minutes per side. (Be cautious, as tuna can dry out quickly if overcooked).
-
- Sear for the desired doneness (for 1 to 1.5-inch thick steaks):
-
- Use tongs to also briefly sear the edges of the tuna steaks (about 15-20 seconds per edge) if desired, for an all-around crust.
-
- Add Oil and Sear:
-
- Rest the Tuna:
-
- Immediately remove the seared tuna steaks from the pan and transfer them to a clean cutting board.
-
- Let them rest for 5-10 minutes before slicing. This allows the juices to redistribute, ensuring a more tender and flavourful result. Do not cover them tightly, as this can steam the crust. A loose tent of foil is okay if you’re worried about them cooling too much.
-
- Rest the Tuna:
-
- Slice and Serve:
-
- Using a very sharp knife, slice the tuna steaks against the grain into 1/4 to 1/2-inch thick pieces. You should see a beautiful contrast between the seared crust and the pink/red interior.
-
- Arrange the slices on plates and serve immediately.
-
- Slice and Serve:
Nutrition
- Serving Size: one normal portion
- Calories: 350-450


