

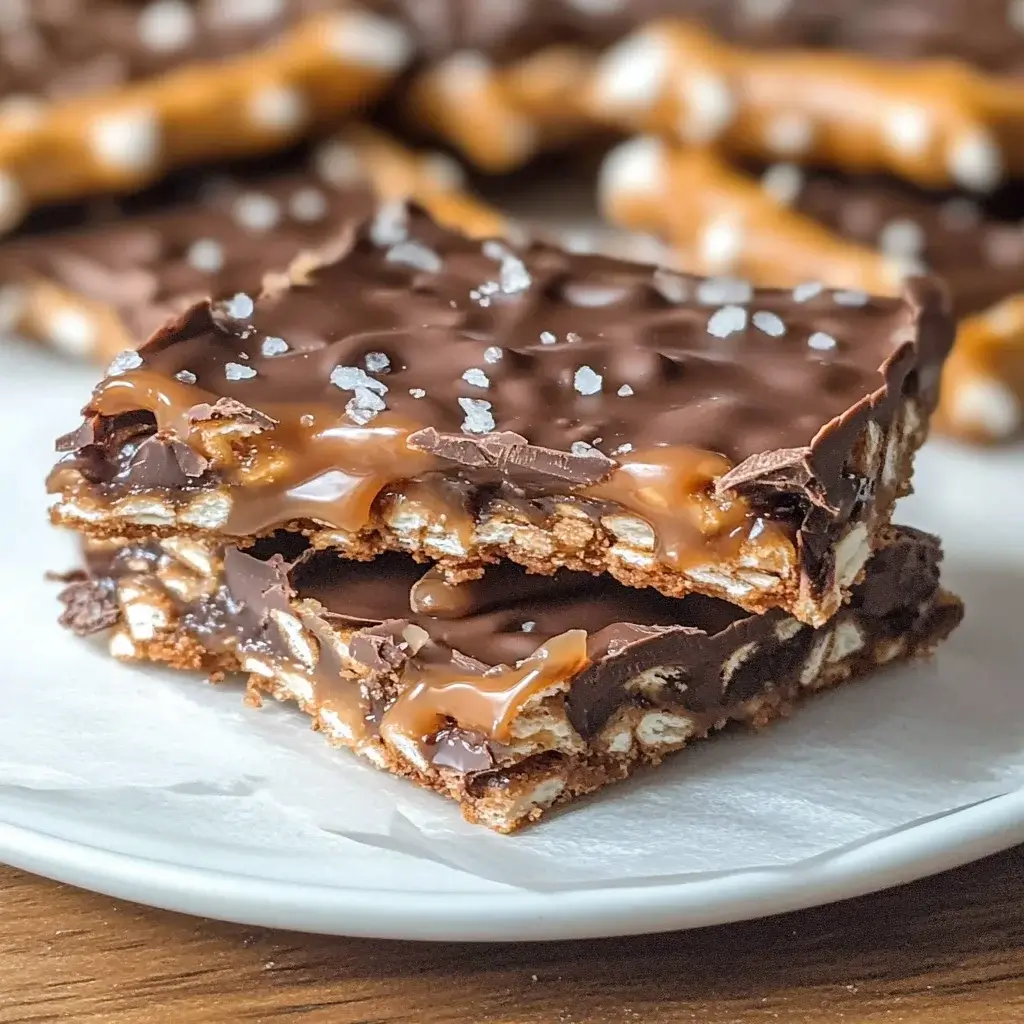
Okay, buckle up, because these Salted Chocolate and Caramel Pretzel Bars are not just a treat; they’re an experience. I first stumbled upon the concept when looking for something that hit all the right notes – sweet, salty, crunchy, chewy – for a bake sale. I tinkered with a few ideas, but nothing quite clicked until I landed on this combination. The first batch I made? Let’s just say it barely made it to the sale. My family descended upon them like a pack of wonderfully sweet-toothed wolves. My son, who usually claims he “doesn’t like caramel much,” was caught red-handed sneaking seconds (and thirds!). The beauty of these bars lies in their layered complexity, which, surprisingly, isn’t complicated to achieve. The salty, crunchy pretzel base, the gooey, rich caramel, and the decadent chocolate topping, all kissed with a sprinkle of flaky sea salt – it’s a textural and flavor masterpiece. They’ve become my go-to for potlucks, gifts, or just a “because it’s Tuesday” indulgence. Prepare for these to disappear fast!
The Ultimate Salted Chocolate and Caramel Pretzel Bars: A Symphony of Sweet & Salty
These bars are a celebration of contrasts. The crisp, salty pretzel base provides the perfect counterpoint to the soft, luscious homemade caramel. This is then enrobed in a smooth, rich chocolate layer, and finally, a delicate sprinkle of flaky sea salt enhances all the flavors, making each bite an explosion of sweet, salty, chewy, and crunchy goodness. They look impressive, taste even better, and are destined to become a new favorite.
Ingredients: The Delicious Components for Your Masterpiece
Precision is key for baking perfection. Here’s what you’ll need to assemble these irresistible bars:
- For the Salty Pretzel Base:
- 2 1/2 cups (about 200-220g) finely crushed pretzels (use salted mini twists or sticks, crushed into small pieces and crumbs – a food processor works well)
- 1/2 cup (113g) unsalted butter, melted
- 1/4 cup (50g) granulated sugar
- For the Luscious Caramel Layer:
- 1 cup (226g) unsalted butter (2 sticks)
- 1 cup (200g) granulated sugar
- 1 cup (240g) packed light brown sugar
- 1 cup (240ml) light corn syrup
- 1 can (14 ounces / 396g) sweetened condensed milk
- 1/2 teaspoon salt
- 1 teaspoon pure vanilla extract
- For the Rich Chocolate Topping:
- 2 cups (about 12 ounces / 340g) good-quality semi-sweet chocolate chips or chopped chocolate (use a brand you enjoy eating on its own)
- 1 tablespoon coconut oil or vegetable shortening (optional, for a smoother, glossier finish)
- For Garnish (Highly Recommended!):
- 1-2 teaspoons flaky sea salt (like Maldon or fleur de sel)
A Note on Ingredients:
- Pretzels: Standard salted mini pretzels or pretzel sticks work best. You want them finely crushed but with some small pieces still intact for texture. A food processor is ideal for this, but a zip-top bag and a rolling pin also work.
- Butter: Unsalted butter is preferred for both the base and caramel, as it allows you to control the overall saltiness. If you only have salted butter, you can use it but might want to slightly reduce the added salt in the caramel.
- Sugars: The combination of granulated and brown sugar in the caramel contributes to its rich flavor and perfect texture.
- Corn Syrup: Light corn syrup is crucial for preventing the caramel from crystallizing and helps achieve that smooth, chewy texture.
- Sweetened Condensed Milk: This is the magic ingredient for a foolproof, creamy caramel. Do not substitute with evaporated milk.
- Chocolate: Use good quality semi-sweet chocolate. Milk chocolate can be used if you prefer a sweeter bar, or dark chocolate (60-70% cacao) for a more intense flavor. Chocolate chips are convenient, but chopped chocolate bars often melt more smoothly.
- Flaky Sea Salt: This is not your average table salt. The large, delicate flakes provide a burst of saltiness and a lovely visual appeal. It truly elevates the bars.
Step-by-Step Instructions: Crafting Your Irresistible Bars
Making these bars involves a few distinct stages, but each is straightforward. Read through all instructions before you begin.
Part 1: Preparing the Salty Pretzel Base
- Preheat & Prep Pan: Preheat your oven to 350°F (175°C). Line a 9×13 inch baking pan with parchment paper, leaving an overhang on two opposite sides. This overhang will act as “handles” to easily lift the bars out later. Lightly grease the parchment paper and any exposed parts of the pan.
- Crush Pretzels: If you haven’t already, crush your pretzels. You want a mix of fine crumbs and some small, pea-sized pieces for texture. Measure out 2 1/2 cups of the crushed pretzels.
- Combine Base Ingredients: In a medium bowl, combine the crushed pretzels, melted unsalted butter, and granulated sugar. Stir with a fork or spatula until the pretzel crumbs are evenly moistened.
- Press into Pan: Transfer the pretzel mixture to your prepared baking pan. Press it down firmly and evenly into the bottom of the pan to create a compact base. You can use the bottom of a measuring cup or your hands for this.
- Bake Base: Bake the pretzel base for 10-12 minutes, or until it’s lightly golden and fragrant. Remove from the oven and set aside to cool slightly while you prepare the caramel layer.
Part 2: Making the Luscious Caramel Layer
This step requires your full attention to prevent the caramel from scorching.
- Combine Caramel Ingredients (Except Vanilla): In a medium to large heavy-bottomed saucepan (at least 3-quart capacity, as the mixture will bubble up), combine the 1 cup of unsalted butter, granulated sugar, light brown sugar, light corn syrup, sweetened condensed milk, and 1/2 teaspoon of salt.
- Melt and Stir: Place the saucepan over medium heat. Stir constantly with a heat-resistant spatula or wooden spoon, ensuring you scrape the bottom of the pan, until the butter is melted and the sugars are dissolved.
- Bring to a Boil: Continue to cook, stirring constantly, until the mixture comes to a rolling boil.
- Cook to Temperature (Candy Thermometer Method): Once boiling, attach a candy thermometer to the side of the saucepan, making sure the tip is submerged in the caramel but not touching the bottom of the pan. Continue to cook, stirring frequently to prevent scorching, until the caramel reaches 240-245°F (115-118°C). This is the firm-ball stage and will result in a chewy but not overly hard caramel. This can take 10-15 minutes, or sometimes longer, depending on your stove. Patience is key.
- No Candy Thermometer? If you don’t have a candy thermometer, you can do a cold water test. After about 10-12 minutes of boiling, drop a small spoonful of caramel into a glass of very cold water. It should form a firm ball that holds its shape but is still pliable. Alternatively, cook for about 12-15 minutes after it reaches a rolling boil, stirring very frequently, until it deepens in color to a rich amber and thickens noticeably. This method is less precise, so a thermometer is highly recommended for consistent results.
- Add Vanilla: Once the caramel reaches the correct temperature (or consistency), immediately remove the saucepan from the heat. Carefully stir in the 1 teaspoon of pure vanilla extract. The mixture will bubble vigorously, so be cautious.
- Pour Over Base: Quickly and carefully pour the hot caramel evenly over the slightly cooled pretzel base in the pan. Use your spatula to spread it out if necessary, working quickly as it will start to set.
- Cool Caramel Layer: Let the caramel layer cool and set at room temperature for at least 1-2 hours, or until firm to the touch. You can speed this up by placing it in the refrigerator for about 30-45 minutes once it’s no longer piping hot. The caramel needs to be mostly set before adding the chocolate layer.
Part 3: Creating the Rich Chocolate Topping & Assembling
- Melt Chocolate: Once the caramel layer is firm, prepare the chocolate topping. You can melt the chocolate in a double boiler or in the microwave.
- Double Boiler Method: Place the semi-sweet chocolate chips (and optional coconut oil/shortening) in a heatproof bowl set over a saucepan of simmering water. Ensure the bottom of the bowl doesn’t touch the water. Stir frequently until the chocolate is melted and smooth.
- Microwave Method: Place the chocolate chips (and optional coconut oil/shortening) in a microwave-safe bowl. Microwave in 20-30 second intervals, stirring well after each interval, until the chocolate is almost completely melted. Remove and stir until completely smooth. Be careful not to overheat, as chocolate can seize.
- Spread Chocolate: Pour the melted chocolate over the set caramel layer. Use an offset spatula or the back of a spoon to spread it into an even layer, covering the caramel completely.
- Sprinkle with Sea Salt: While the chocolate is still wet and glossy, sprinkle the flaky sea salt evenly over the top.
- Chill to Set: Place the pan in the refrigerator for at least 1-2 hours, or until the chocolate is completely firm. This chilling time is crucial for clean cutting.
Part 4: Cutting and Storing
- Lift and Cut: Once the chocolate is fully set, use the parchment paper overhangs to lift the entire slab of bars out of the pan and onto a cutting board.
- Warm Knife Technique: For the cleanest cuts, run a large sharp knife under hot water, then wipe it dry. Make your first cut. Wipe the knife clean, re-warm under hot water, dry, and make the next cut. Repeat this process for each cut. This prevents the chocolate from cracking too much and the caramel from sticking.
- Portion: Cut the slab into squares or bars of your desired size. A 4×6 grid (24 bars) or a 5×7 grid (35 smaller bars) often works well for a 9×13 pan.
- Store: Store the Salted Chocolate and Caramel Pretzel Bars in an airtight container at room temperature for up to 5 days, or in the refrigerator for up to 2 weeks. If stacking, place parchment paper between layers to prevent sticking. They are delicious at room temperature (chewier caramel) or chilled (firmer caramel).
Nutritional Snapshot: An Indulgent Treat
These bars are undeniably an indulgence, packed with deliciousness. The nutritional information is an approximation and will vary based on specific brands of ingredients used and the final size of your bars.
- Servings: This recipe makes approximately 24-35 bars, depending on how you cut them.
- Calories per serving (approximate, based on 30 bars): 180-250 calories per bar.
Enjoy these as a special treat. Their richness means a small bar is often perfectly satisfying!
Time Investment: Planning Your Bar-Making Session
While not overly complex, these bars do require some dedicated time, mostly for cooking the caramel and for chilling.
- Active Preparation Time:
- Pretzel Base: 10-15 minutes (crushing, mixing, pressing) + 10-12 minutes baking.
- Caramel Layer: 20-30 minutes (active cooking and stirring).
- Chocolate Topping & Assembly: 10-15 minutes.
- Total Active Time: Approximately 50 minutes to 1 hour 10 minutes.
- Chilling/Setting Time:
- Caramel Layer Cooling: 1-2 hours at room temperature (or 30-45 mins refrigerated).
- Final Chilling (Chocolate Set): Minimum 1-2 hours in the refrigerator.
- Total Time (including chilling): Approximately 3.5 to 5.5 hours. For best results and easier cutting, allowing ample chilling time is recommended. You can easily make the base and caramel one day, and finish with chocolate and cutting the next.
How to Serve: Presenting Your Salty-Sweet Masterpieces
These bars are quite versatile and always a hit!
- As a Standalone Treat:
- Perfect with a cup of coffee, tea, or a cold glass of milk.
- Arrange them artfully on a platter for parties or gatherings.
- For Bake Sales & Potlucks:
- Cut into uniform squares or rectangles.
- Consider wrapping individual bars in cellophane or placing them in festive paper liners for easy handling and a professional look.
- Gifting:
- Place a selection of bars in a decorative tin or box, layered with parchment paper. They make a wonderful homemade gift for holidays, birthdays, or as a thank-you.
- Dessert Enhancement:
- Serve a bar alongside a scoop of vanilla bean ice cream. The contrast of cold ice cream with the chewy, salty-sweet bar is divine.
- Crumble a bar over ice cream or yogurt for an instant decadent topping.
- Presentation Tips:
- Always use that final sprinkle of flaky sea salt – it makes them look as good as they taste.
- If you’re feeling extra fancy, a very light drizzle of white chocolate over the set dark chocolate topping can add visual appeal before sprinkling with salt.
- For parties, consider cutting them into smaller, bite-sized pieces so guests can easily sample them.
Pro Tips for Pretzel Bar Perfection: Elevate Your Creation
- Invest in a Candy Thermometer: For the caramel layer, a candy thermometer is your best friend. It takes the guesswork out of achieving the perfect chewy texture. Cooking the caramel to the precise temperature (240-245°F / 115-118°C) ensures it’s firm enough to hold its shape but still delightfully gooey.
- Don’t Rush the Chill: Patience during the chilling stages is crucial. Letting the caramel layer cool and set properly before adding the chocolate prevents them from mixing. Thoroughly chilling the finished bars before cutting makes for much cleaner, neater slices and prevents the layers from squishing.
- Parchment Paper is Key: Lining your baking pan with parchment paper, with an overhang, is a game-changer. It allows you to easily lift the entire slab of bars out of the pan for cutting, preventing damage to the bars and making cleanup much easier.
- Quality Chocolate Matters: Since the chocolate topping is a prominent flavor, use a good-quality chocolate that you enjoy eating on its own. Whether you choose semi-sweet, milk, or dark, a better quality chocolate will result in a smoother melt and a richer taste. Adding a touch of coconut oil or shortening helps create a glossier, more professional-looking finish.
- The Hot Knife Trick for Cutting: Don’t skip the step of warming your knife in hot water and wiping it dry between cuts. This simple trick makes a huge difference in getting clean, sharp edges on your bars, especially when cutting through the firm chocolate and chewy caramel. It prevents the chocolate from cracking excessively and the caramel from dragging.
Frequently Asked Questions (FAQ) About Salted Chocolate Caramel Pretzel Bars
Q1: Can I use store-bought caramel sauce instead of making it from scratch?
A1: While homemade caramel offers the best texture and flavor for these bars (firm yet chewy), you could potentially use very thick, store-bought caramels (like the individually wrapped squares, melted down). Standard caramel sauce that comes in a jar is usually too thin and won’t set properly, resulting in a messy bar. If using melted caramel squares, you might need about 1.5 to 2 bags (11oz each), melted gently. The texture will likely be different from the recipe as written.
Q2: What kind of pretzels work best? Can I use pretzel rods?
A2: Mini salted pretzel twists or thin pretzel sticks are generally preferred because they crush easily into a good mix of crumbs and small pieces for the base. You can use pretzel rods, but you’ll need to crush them very thoroughly. The key is to have a consistent texture for the base. Ensure they are salted pretzels to get that essential sweet-salty contrast.
Q3: How should I store these bars, and how long do they last?
A3: Store the bars in an airtight container. They can be kept at room temperature for up to 5 days or in the refrigerator for up to 2 weeks. If stacking, place parchment paper between the layers to prevent them from sticking together. They are delicious either chilled (firmer caramel) or at room temperature (chewier caramel).
Q4: Can I freeze Salted Chocolate and Caramel Pretzel Bars?
A4: Yes, these bars freeze quite well! Once cut, wrap them individually in plastic wrap and then place them in a freezer-safe bag or container. They can be frozen for up to 2-3 months. Thaw them in the refrigerator or at room temperature before serving. The pretzel base might soften slightly upon thawing, but they will still be delicious.
Q5: Can I make variations to this recipe, like adding nuts or using different chocolate?
A5: Absolutely! This recipe is a great base for customization:
* Nuts: Stir 1/2 to 1 cup of chopped pecans, walnuts, or peanuts into the caramel before pouring it over the pretzel base, or sprinkle them on top of the caramel before adding the chocolate.
* Chocolate Type: Feel free to use milk chocolate for a sweeter bar, dark chocolate (60-70% cacao) for a more intense flavor, or even white chocolate for a different profile. A swirl of two types of chocolate can also look beautiful.
* Other Add-ins: Consider adding a layer of mini M&Ms or Reese’s Pieces on top of the caramel before the chocolate layer for extra crunch and flavor. You could also try adding a teaspoon of espresso powder to the chocolate for a mocha twist.
Enjoy creating and, more importantly, devouring these incredibly satisfying Salted Chocolate and Caramel Pretzel Bars! They are a true testament to how simple ingredients can combine to make something utterly extraordinary.
Print
Salted Chocolate and Caramel Pretzel Bars Recipe
Ingredients
-
- For the Salty Pretzel Base:
-
- 2 1/2 cups (about 200-220g) finely crushed pretzels (use salted mini twists or sticks, crushed into small pieces and crumbs – a food processor works well)
-
- 1/2 cup (113g) unsalted butter, melted
-
- 1/4 cup (50g) granulated sugar
-
- For the Salty Pretzel Base:
-
- For the Luscious Caramel Layer:
-
- 1 cup (226g) unsalted butter (2 sticks)
-
- 1 cup (200g) granulated sugar
-
- 1 cup (240g) packed light brown sugar
-
- 1 cup (240ml) light corn syrup
-
- 1 can (14 ounces / 396g) sweetened condensed milk
-
- 1/2 teaspoon salt
-
- 1 teaspoon pure vanilla extract
-
- For the Luscious Caramel Layer:
-
- For the Rich Chocolate Topping:
-
- 2 cups (about 12 ounces / 340g) good-quality semi-sweet chocolate chips or chopped chocolate (use a brand you enjoy eating on its own)
-
- 1 tablespoon coconut oil or vegetable shortening (optional, for a smoother, glossier finish)
-
- For the Rich Chocolate Topping:
-
- For Garnish (Highly Recommended!):
-
- 1–2 teaspoons flaky sea salt (like Maldon or fleur de sel)
-
- For Garnish (Highly Recommended!):
Instructions
Part 1: Preparing the Salty Pretzel Base
-
- Preheat & Prep Pan: Preheat your oven to 350°F (175°C). Line a 9×13 inch baking pan with parchment paper, leaving an overhang on two opposite sides. This overhang will act as “handles” to easily lift the bars out later. Lightly grease the parchment paper and any exposed parts of the pan.
-
- Crush Pretzels: If you haven’t already, crush your pretzels. You want a mix of fine crumbs and some small, pea-sized pieces for texture. Measure out 2 1/2 cups of the crushed pretzels.
-
- Combine Base Ingredients: In a medium bowl, combine the crushed pretzels, melted unsalted butter, and granulated sugar. Stir with a fork or spatula until the pretzel crumbs are evenly moistened.
-
- Press into Pan: Transfer the pretzel mixture to your prepared baking pan. Press it down firmly and evenly into the bottom of the pan to create a compact base. You can use the bottom of a measuring cup or your hands for this.
-
- Bake Base: Bake the pretzel base for 10-12 minutes, or until it’s lightly golden and fragrant. Remove from the oven and set aside to cool slightly while you prepare the caramel layer.
Part 2: Making the Luscious Caramel Layer
This step requires your full attention to prevent the caramel from scorching.
-
- Combine Caramel Ingredients (Except Vanilla): In a medium to large heavy-bottomed saucepan (at least 3-quart capacity, as the mixture will bubble up), combine the 1 cup of unsalted butter, granulated sugar, light brown sugar, light corn syrup, sweetened condensed milk, and 1/2 teaspoon of salt.
-
- Melt and Stir: Place the saucepan over medium heat. Stir constantly with a heat-resistant spatula or wooden spoon, ensuring you scrape the bottom of the pan, until the butter is melted and the sugars are dissolved.
-
- Bring to a Boil: Continue to cook, stirring constantly, until the mixture comes to a rolling boil.
-
- Cook to Temperature (Candy Thermometer Method): Once boiling, attach a candy thermometer to the side of the saucepan, making sure the tip is submerged in the caramel but not touching the bottom of the pan. Continue to cook, stirring frequently to prevent scorching, until the caramel reaches 240-245°F (115-118°C). This is the firm-ball stage and will result in a chewy but not overly hard caramel. This can take 10-15 minutes, or sometimes longer, depending on your stove. Patience is key.
-
- No Candy Thermometer? If you don’t have a candy thermometer, you can do a cold water test. After about 10-12 minutes of boiling, drop a small spoonful of caramel into a glass of very cold water. It should form a firm ball that holds its shape but is still pliable. Alternatively, cook for about 12-15 minutes after it reaches a rolling boil, stirring very frequently, until it deepens in color to a rich amber and thickens noticeably. This method is less precise, so a thermometer is highly recommended for consistent results.
-
- Cook to Temperature (Candy Thermometer Method): Once boiling, attach a candy thermometer to the side of the saucepan, making sure the tip is submerged in the caramel but not touching the bottom of the pan. Continue to cook, stirring frequently to prevent scorching, until the caramel reaches 240-245°F (115-118°C). This is the firm-ball stage and will result in a chewy but not overly hard caramel. This can take 10-15 minutes, or sometimes longer, depending on your stove. Patience is key.
-
- Add Vanilla: Once the caramel reaches the correct temperature (or consistency), immediately remove the saucepan from the heat. Carefully stir in the 1 teaspoon of pure vanilla extract. The mixture will bubble vigorously, so be cautious.
-
- Pour Over Base: Quickly and carefully pour the hot caramel evenly over the slightly cooled pretzel base in the pan. Use your spatula to spread it out if necessary, working quickly as it will start to set.
-
- Cool Caramel Layer: Let the caramel layer cool and set at room temperature for at least 1-2 hours, or until firm to the touch. You can speed this up by placing it in the refrigerator for about 30-45 minutes once it’s no longer piping hot. The caramel needs to be mostly set before adding the chocolate layer.
Part 3: Creating the Rich Chocolate Topping & Assembling
-
- Melt Chocolate: Once the caramel layer is firm, prepare the chocolate topping. You can melt the chocolate in a double boiler or in the microwave.
-
- Double Boiler Method: Place the semi-sweet chocolate chips (and optional coconut oil/shortening) in a heatproof bowl set over a saucepan of simmering water. Ensure the bottom of the bowl doesn’t touch the water. Stir frequently until the chocolate is melted and smooth.
-
- Microwave Method: Place the chocolate chips (and optional coconut oil/shortening) in a microwave-safe bowl. Microwave in 20-30 second intervals, stirring well after each interval, until the chocolate is almost completely melted. Remove and stir until completely smooth. Be careful not to overheat, as chocolate can seize.
-
- Melt Chocolate: Once the caramel layer is firm, prepare the chocolate topping. You can melt the chocolate in a double boiler or in the microwave.
-
- Spread Chocolate: Pour the melted chocolate over the set caramel layer. Use an offset spatula or the back of a spoon to spread it into an even layer, covering the caramel completely.
-
- Sprinkle with Sea Salt: While the chocolate is still wet and glossy, sprinkle the flaky sea salt evenly over the top.
-
- Chill to Set: Place the pan in the refrigerator for at least 1-2 hours, or until the chocolate is completely firm. This chilling time is crucial for clean cutting.
Part 4: Cutting and Storing
-
- Lift and Cut: Once the chocolate is fully set, use the parchment paper overhangs to lift the entire slab of bars out of the pan and onto a cutting board.
-
- Warm Knife Technique: For the cleanest cuts, run a large sharp knife under hot water, then wipe it dry. Make your first cut. Wipe the knife clean, re-warm under hot water, dry, and make the next cut. Repeat this process for each cut. This prevents the chocolate from cracking too much and the caramel from sticking.
-
- Portion: Cut the slab into squares or bars of your desired size. A 4×6 grid (24 bars) or a 5×7 grid (35 smaller bars) often works well for a 9×13 pan.
-
- Store: Store the Salted Chocolate and Caramel Pretzel Bars in an airtight container at room temperature for up to 5 days, or in the refrigerator for up to 2 weeks. If stacking, place parchment paper between layers to prevent sticking. They are delicious at room temperature (chewier caramel) or chilled (firmer caramel).
Nutrition
- Serving Size: one normal portion
- Calories: 180-250