

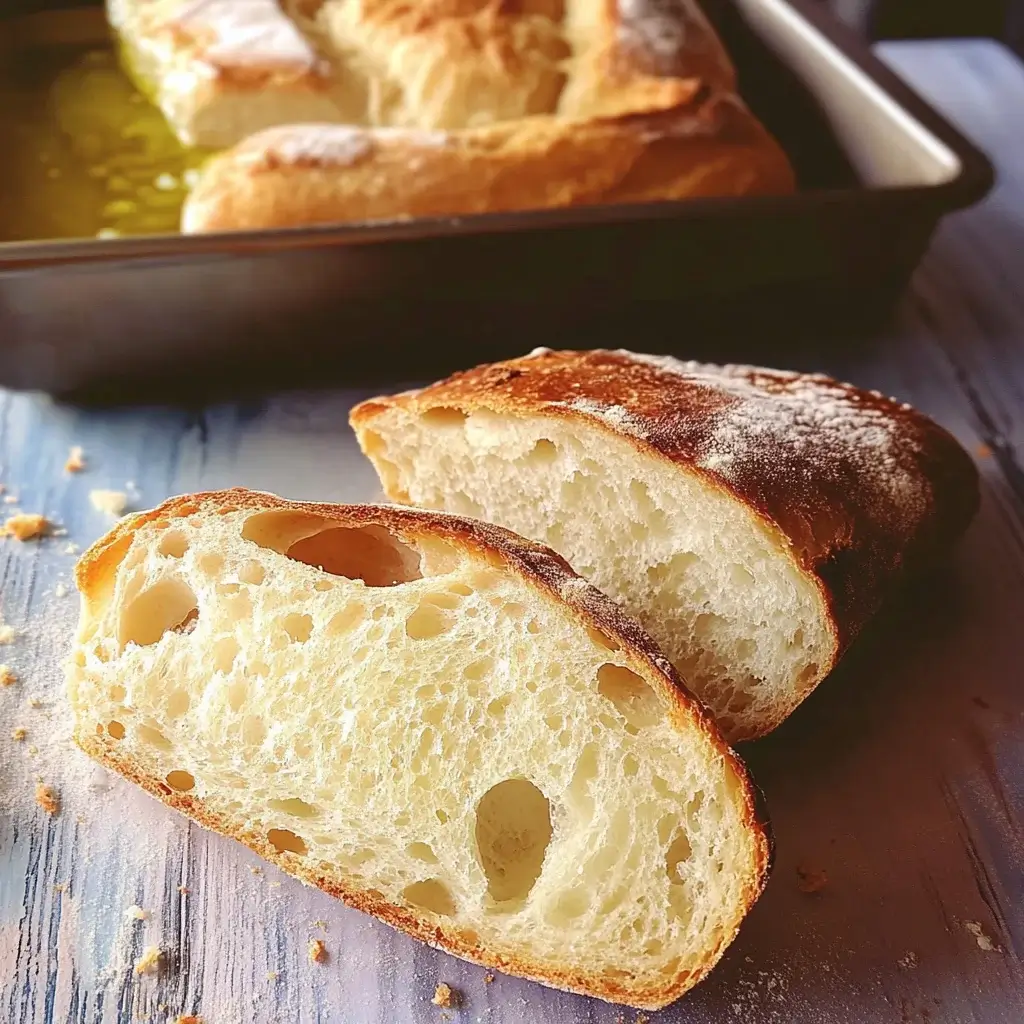
There’s something truly magical about the aroma of freshly baked bread wafting through your home. It’s a scent that evokes feelings of warmth, comfort, and home. For me, that magic intensifies tenfold when it’s the scent of this Rustic Italian Crusty Bread. My family, particularly my notoriously picky son, devours this loaf faster than I can pull it out of the oven. The incredibly crisp crust that shatters with each bite, giving way to a soft, airy, and slightly chewy interior – it’s simply irresistible. This isn’t just bread; it’s an experience. It’s the kind of bread that elevates a simple weeknight dinner into something special, the perfect companion to a hearty bowl of soup, or simply divine on its own with a drizzle of good olive oil. Trust me, once you bake this Rustic Italian Crusty Bread, store-bought loaves will never quite measure up again. This recipe is straightforward, forgiving, and delivers bakery-quality results right from your own kitchen. Get ready to embark on a baking journey that will fill your home with incredible smells and your table with even more incredible bread.
Ingredients
The beauty of rustic Italian crusty bread lies in its simplicity. You don’t need a pantry full of exotic ingredients to create a loaf that rivals those from artisan bakeries. In fact, you likely already have most, if not all, of what you need to get started. However, understanding the role each ingredient plays is key to achieving that perfect crust and airy crumb. Let’s break down each component:
- Bread Flour (500g or approximately 4 cups): Bread flour is the star of the show here. It’s higher in protein than all-purpose flour, typically containing around 12-14% protein. This higher protein content is crucial because it develops more gluten when mixed with water and kneaded. Gluten is what gives bread its structure, elasticity, and that wonderful chewiness we crave in a crusty loaf. Using bread flour will result in a bread with a stronger, more developed gluten network, leading to a better rise, a chewier texture, and a more robust crust. While you can technically use all-purpose flour in a pinch, the results won’t be quite the same. The crust might be slightly less crisp, and the interior might be a bit denser. For the authentic rustic Italian crusty bread experience, bread flour is highly recommended. If you’re looking to experiment further, consider using a high-quality Italian “00” bread flour, which is finely milled and known for producing exceptional pizza dough and bread with a delicate yet strong structure.
- Water (350ml or approximately 1 ½ cups, lukewarm): Water is not just a liquid ingredient; it’s essential for gluten development and yeast activation. Lukewarm water, ideally between 90-105°F (32-40°C), is the perfect temperature to awaken your yeast and get it working its magic. Water that’s too hot can kill the yeast, while water that’s too cold will slow down its activity significantly, leading to a sluggish rise. Using filtered water is preferable, as chlorine in tap water can sometimes inhibit yeast activity. The hydration level, or the ratio of water to flour, is also critical in rustic bread making. This recipe uses a hydration level of around 70%, which is considered a medium-high hydration. Higher hydration doughs tend to produce breads with more open crumbs and airier textures, characteristic of rustic Italian loaves.
- Active Dry Yeast (7g or 2 ¼ teaspoons, or 1 packet): Yeast is the leavening agent that makes our bread rise. Active dry yeast needs to be rehydrated in lukewarm water before being added to the flour. This “proofing” step ensures that the yeast is alive and active. You’ll know your yeast is good if it foams up slightly after being mixed with warm water and a pinch of sugar (optional, but it helps speed up the activation). Alternatively, you can use instant yeast (also known as rapid-rise yeast), which can be added directly to the dry ingredients without needing to be proofed beforehand. If using instant yeast, you’ll use the same amount (7g or 2 ¼ teaspoons). The type of yeast you use affects the rising time, but both active dry and instant yeast will work beautifully in this recipe. Make sure your yeast is fresh; expired yeast will not work effectively and will result in a flat, dense loaf.
- Salt (10g or 2 teaspoons): Salt is often underestimated in baking, but it plays a crucial role in flavor development and gluten structure. Salt controls yeast activity, slowing it down just enough to allow for a longer, more flavorful fermentation. It also tightens the gluten strands, making the dough stronger and more elastic. Without salt, bread would taste bland and the texture would be less desirable. Use fine sea salt or kosher salt for this recipe. Avoid iodized table salt if possible, as some bakers believe it can impart a slightly metallic taste. The amount of salt in this recipe is balanced to enhance the flavor without inhibiting the yeast too much. Don’t be tempted to reduce the salt content significantly, as it’s essential for both taste and texture.
- Olive Oil (1 tablespoon, optional but recommended): While not strictly traditional in all rustic Italian bread recipes, a tablespoon of good quality olive oil adds a subtle richness and flavor to the bread. It also contributes to a slightly softer crumb and a more golden crust. Extra virgin olive oil is a great choice, but a good quality regular olive oil will also work well. If you prefer a more purely traditional loaf, you can omit the olive oil, but I find it enhances the overall flavor and texture of the bread.
Instructions
Now that we’ve gathered our ingredients and understand their roles, let’s dive into the step-by-step instructions for creating this incredible Rustic Italian Crusty Bread. Don’t be intimidated; while baking bread requires some time and patience, this recipe is surprisingly straightforward, even for beginner bakers.
Step 1: Activate the Yeast (If Using Active Dry Yeast)
If you are using active dry yeast, this step is crucial. In a small bowl, combine the lukewarm water (from the ingredient list) with the active dry yeast. Give it a gentle stir and let it sit for 5-10 minutes. You should see the yeast become foamy or bubbly on top, indicating that it is active and ready to use. If the yeast doesn’t foam, it might be expired or inactive, and you’ll need to start with fresh yeast. If you are using instant yeast, you can skip this step and add the yeast directly to the dry ingredients in the next step.
Step 2: Combine Dry Ingredients
In a large mixing bowl, whisk together the bread flour and salt. Make sure the salt is evenly distributed throughout the flour. This is important because salt can inhibit yeast activity if it comes into direct contact with it in concentrated form. Creating a homogenous mixture of flour and salt ensures even gluten development and flavor distribution.
Step 3: Add Wet Ingredients and Form a Shaggy Dough
Pour the activated yeast mixture (or instant yeast directly if using) and the olive oil (if using) into the bowl with the dry ingredients. Using a spatula or your hands, mix the ingredients together until just combined. You’re aiming for a shaggy dough – it will be quite sticky and not perfectly smooth at this stage. Don’t overmix; just ensure all the flour is hydrated. This initial mix is simply to bring the ingredients together; the real dough development comes with kneading and fermentation.
Step 4: First Rise (Bulk Fermentation)
Cover the bowl tightly with plastic wrap or a damp kitchen towel. Place the bowl in a warm place, free from drafts. A slightly warm oven (turned off!) or a warm spot in your kitchen works well. Let the dough rise for 1-1.5 hours, or until it has roughly doubled in size. This first rise, also known as bulk fermentation, is crucial for flavor development. During this time, the yeast is consuming sugars in the flour and producing carbon dioxide and other flavor compounds that contribute to the complexity of the bread. The dough will become puffy and airy.
Step 5: Punch Down and Shape the Dough
Gently punch down the dough to deflate it and release the trapped air. Turn the dough out onto a lightly floured surface. Gently shape the dough into a round or oblong loaf. For a rustic look, you can simply fold the dough over itself a few times to create some tension on the surface. Avoid over-handling the dough at this stage, as you want to preserve the airiness created during fermentation.
Step 6: Second Rise (Proofing)
Line a baking sheet with parchment paper or a silicone baking mat. Place the shaped loaf on the prepared baking sheet. Lightly dust the top of the loaf with flour. Cover loosely with plastic wrap or a damp kitchen towel and let it rise again for another 45-60 minutes, or until it has noticeably puffed up but not quite doubled. This second rise, called proofing, allows the dough to relax and become even more airy before baking. Gently press the dough; it should spring back slowly, leaving a slight indentation. If it springs back immediately, it needs more proofing time. If it deflates easily, it’s over-proofed.
Step 7: Preheat Oven and Prepare for Baking
Preheat your oven to 450°F (232°C) with a baking stone or pizza stone inside if you have one. Placing the loaf on a preheated baking stone will help create a crispier bottom crust. If you don’t have a baking stone, a regular baking sheet will work just fine. To create steam in the oven, which is essential for a crusty crust, you have a few options:
- Steam Tray: Place an oven-safe dish (like a cast iron skillet or a metal baking pan) on the bottom rack of your oven while it preheats. Just before you put the bread in, carefully pour about 1 cup of hot water into the hot dish. This will create a burst of steam.
- Ice Cubes: Alternatively, you can toss a handful of ice cubes onto the bottom of the oven right after you place the bread inside. Be careful of the steam!
Step 8: Score the Dough (Optional but Recommended)
Using a sharp knife or a lame (a special bread scoring tool), make a few slashes on the top of the loaf. Scoring allows the bread to expand properly in the oven and prevents it from bursting randomly. For a rustic look, you can make a simple single slash down the center or a few diagonal slashes.
Step 9: Bake the Bread
Carefully place the baking sheet with the loaf into the preheated oven. Bake for 25-30 minutes, or until the crust is deeply golden brown and the internal temperature reaches 200-210°F (93-99°C). You can check the internal temperature using an instant-read thermometer inserted into the center of the loaf. The bread should sound hollow when tapped on the bottom.
Step 10: Cool Completely
Once baked, remove the bread from the oven and transfer it to a wire rack to cool completely. Resist the temptation to slice into it while it’s still hot! Allowing the bread to cool completely is crucial for the internal structure to set and for the best flavor and texture to develop. The crust will also crisp up further as it cools. Cooling completely usually takes at least an hour, but patience is key.
Nutrition Facts (Approximate)
Please note that the following nutritional information is an estimate and can vary based on factors such as ingredient variations and serving size. This is based on a recipe yielding approximately 12 servings.
- Servings: Approximately 12 slices
- Calories per serving (1 slice): Approximately 150-200 calories
Approximate Macronutrients per Serving:
- Carbohydrates: 30-35g
- Protein: 5-7g
- Fat: 1-2g (primarily from olive oil, if used)
Important Note: These are approximate values. For precise nutritional information, you would need to use a nutrition calculator and input the exact ingredients and quantities used. This bread is primarily a source of carbohydrates, with some protein and minimal fat. It’s a whole food made with simple ingredients, making it a healthier choice compared to many processed breads.
Preparation Time
Understanding the timeline for making this Rustic Italian Crusty Bread is helpful for planning your baking session. The total preparation time includes both active time (time you spend actively working with the dough) and inactive time (rising/proofing time).
- Active Time: Approximately 30-40 minutes (includes mixing, kneading/folding (minimal kneading in this recipe), shaping, and scoring)
- Inactive Time (Rising/Proofing): Approximately 2-2.5 hours (First rise: 1-1.5 hours, Second rise: 45-60 minutes)
- Baking Time: 25-30 minutes
- Cooling Time: 1-2 hours (recommended for optimal texture)
Total Time (from start to finish): Approximately 4-5 hours (mostly inactive time)
While the total time may seem long, remember that most of it is hands-off time while the dough is rising. The actual active work involved is relatively minimal, making this recipe very manageable even for busy bakers. You can easily fit the rising stages into your day while you’re doing other things around the house.
How to Serve Rustic Italian Crusty Bread
The versatility of Rustic Italian Crusty Bread is one of its greatest charms. Its robust flavor and satisfying texture make it a perfect partner for a wide range of dishes and occasions. Here are some delicious ways to serve and enjoy your freshly baked loaf:
- With Olive Oil and Balsamic Vinegar: This is perhaps the simplest and most classic way to appreciate the bread’s flavor. Slice the bread into thick pieces, drizzle with high-quality extra virgin olive oil, and a touch of balsamic vinegar. The combination of the crusty bread, fruity olive oil, and tangy balsamic is simply divine.
- Alongside Soups and Stews: Rustic bread is the perfect accompaniment to hearty soups and stews. Its sturdy texture is ideal for soaking up flavorful broths and sauces. Serve it with:
- Minestrone Soup: A classic Italian vegetable soup.
- Tuscan White Bean Soup: A creamy and comforting soup.
- Hearty Beef Stew: For a more substantial meal.
- French Onion Soup: The crusty bread is perfect for dipping in the rich broth and enjoying with the melted cheese.
- As Part of a Charcuterie Board: Include slices of rustic bread on your charcuterie or cheese board. It provides a neutral base that complements the rich flavors of cheeses, cured meats, olives, and other antipasto items.
- Bruschetta: Toast slices of the bread lightly, then rub with garlic and top with chopped tomatoes, basil, olive oil, and a sprinkle of salt and pepper. Bruschetta is a classic Italian appetizer that showcases the bread beautifully.
- Sandwiches and Paninis: While perhaps not ideal for delicate sandwiches, this crusty bread is fantastic for robust sandwiches and paninis. Its sturdy structure can hold up to generous fillings. Try it with:
- Italian Cold Cuts: Salami, prosciutto, mortadella, provolone cheese, and roasted red peppers.
- Grilled Vegetables and Pesto: For a vegetarian option.
- Roast Beef or Turkey: For heartier sandwiches.
- Garlic Bread: Slice the bread lengthwise or into thick slices, spread generously with garlic butter (butter, minced garlic, parsley), and bake or broil until golden and bubbly. Rustic garlic bread is a crowd-pleaser.
- Breadcrumbs: When the bread starts to get a little stale (though it rarely lasts long!), don’t throw it away! Turn it into delicious homemade breadcrumbs. Simply tear the bread into pieces and pulse in a food processor until you reach your desired crumb consistency. Use fresh breadcrumbs for toppings, stuffings, or to coat chicken or fish.
- Croutons: Cube the bread, toss with olive oil, herbs, and spices, and bake until crispy to make flavorful homemade croutons for salads or soups.
- Breakfast Toast: Even though it’s crusty, this bread can be toasted and enjoyed for breakfast with butter and jam, avocado, or ricotta cheese and honey.
Additional Tips for Baking the Perfect Rustic Italian Crusty Bread
Baking bread is a rewarding experience, and with a few extra tips in mind, you can consistently achieve bakery-quality results with this Rustic Italian Crusty Bread recipe.
- Hydration is Key, but Dough Can Be Sticky: This recipe uses a higher hydration dough, which is what contributes to the open crumb and airy texture. However, higher hydration doughs can be stickier and a little more challenging to handle. Don’t be tempted to add more flour during the mixing and kneading stages unless the dough is truly unmanageable. A slightly sticky dough is normal and desirable. Use wet hands or a dough scraper when handling the dough to prevent it from sticking to your fingers and work surface.
- Don’t Over-Knead (Minimal Kneading is Best): Unlike some bread recipes that require extensive kneading, this rustic bread benefits from minimal kneading. Over-kneading can actually make the dough tough and result in a denser loaf. In this recipe, simply mixing until the ingredients are combined and then allowing for bulk fermentation (the first rise) develops the gluten structure beautifully. If you prefer to knead, a short kneading time of 5-7 minutes is sufficient. Alternatively, you can use the “stretch and fold” technique during the first rise, which involves gently stretching and folding the dough over itself a few times every 30 minutes to develop strength without vigorous kneading.
- Proofing Environment Matters: A warm, draft-free environment is crucial for successful proofing (both the first and second rise). Ideal temperatures for proofing are around 75-80°F (24-27°C). If your kitchen is cold, you can create a warmer environment by:
- Using your oven: Preheat your oven to the lowest setting for just a few minutes, then turn it off. Place the covered bowl of dough in the slightly warm oven. Make sure the oven is not too hot, or it will cook the dough.
- Using a proofing box (DIY): Fill a microwave-safe bowl with water and microwave it until boiling. Place the bowl of hot water and the covered bowl of dough in the microwave (turned off!). The steam from the hot water will create a warm, humid environment.
- Warm spot in the kitchen: Place the bowl in a warm corner of your kitchen, away from drafts, such as near a radiator (but not directly on it).
- Steam is Your Secret Weapon for Crust: Achieving that signature crusty crust relies heavily on steam during the initial baking phase. The steam keeps the surface of the dough moist for longer, allowing it to expand fully before the crust sets. Using a steam tray or ice cubes as described in the instructions is essential. Remove the steam source during the last 10-15 minutes of baking to allow the crust to fully dry out and become crispy.
- Cool Completely Before Slicing (Patience Pays Off): It’s incredibly tempting to slice into a warm loaf of freshly baked bread, but resist the urge! Allowing the bread to cool completely on a wire rack is crucial for the internal structure to set properly and for the best texture to develop. Slicing into hot bread can result in a gummy or doughy interior. Cooling also allows the flavors to fully meld and deepen. Patience is a virtue in bread baking, and it will be rewarded with a perfectly textured and flavorful loaf.
Frequently Asked Questions (FAQ)
Here are some common questions that bakers often have when making Rustic Italian Crusty Bread:
Q1: My dough is too sticky to handle. What should I do?
A: Rustic bread dough is meant to be somewhat sticky due to its high hydration. Resist the urge to add too much extra flour, as this can make the bread dense. Instead, use wet hands or a dough scraper when handling the dough. Lightly flour your work surface and your hands as needed, but use flour sparingly. As you gain experience, you’ll become more comfortable working with stickier doughs.
Q2: My bread didn’t rise enough. What went wrong?
A: There are several reasons why your bread might not have risen sufficiently:
* Yeast issues: Make sure your yeast is fresh and active. Expired yeast or yeast that hasn’t been stored properly may not work effectively. If using active dry yeast, ensure it foams when proofed in warm water.
* Water temperature: Water that’s too hot can kill the yeast, while water that’s too cold will slow down its activity. Lukewarm water (90-105°F or 32-40°C) is ideal.
* Proofing environment: The dough needs a warm, draft-free environment to rise properly. A cold kitchen can significantly slow down the rising process. Ensure you are proofing in a warm place as recommended in the tips.
* Insufficient rising time: Be patient! Rising times are estimates and can vary depending on room temperature and yeast activity. Allow the dough to rise until it has doubled in size for the first rise and noticeably puffed for the second rise, even if it takes a little longer than the recipe suggests.
Q3: My crust isn’t as crusty as I’d like. How can I make it crispier?
A: Achieving a truly crusty crust requires a combination of factors:
* Steam: Steam in the oven during the initial baking phase is crucial for a crisp crust. Use a steam tray or ice cubes as described in the instructions.
* Baking temperature: Baking at a high temperature (450°F/232°C) helps create a good crust.
* Baking time: Bake the bread until it’s deeply golden brown. Don’t underbake it, as underbaked bread will have a softer crust.
* Cooling: Allow the bread to cool completely on a wire rack. The crust will crisp up further as it cools.
* Baking stone: Using a baking stone or pizza stone helps create a crispier bottom crust by providing even heat and absorbing moisture.
Q4: How should I store leftover Rustic Italian Crusty Bread?
A: Rustic bread is best enjoyed fresh, but leftovers can be stored properly to maintain quality for a day or two:
* Room temperature: Store leftover bread at room temperature in a paper bag or loosely wrapped in parchment paper. Avoid storing it in plastic bags, as this can trap moisture and make the crust soft.
* Freezing: For longer storage, slice the bread and freeze it in freezer-safe bags or containers. Thaw at room temperature or toast directly from frozen. Frozen bread is best used for toast, sandwiches, or breadcrumbs.
Q5: Can I add herbs or other flavors to this recipe?
A: Absolutely! This rustic bread recipe is a fantastic base for customization. You can easily add herbs, spices, or other flavorings to create variations. Consider adding:
* Rosemary and garlic: Add 1-2 tablespoons of chopped fresh rosemary and 1-2 cloves of minced garlic to the dough during the mixing stage.
* Olive and herb: Add ½ cup of chopped Kalamata olives and 1 tablespoon of mixed Italian herbs (oregano, basil, thyme) to the dough.
* Cheese: Add ½ cup of grated Parmesan or Pecorino Romano cheese to the dough for a cheesy variation.
* Seeds: Add ¼ cup of seeds like sesame seeds, poppy seeds, or sunflower seeds for added texture and flavor.
* Spices: Add a pinch of red pepper flakes for a subtle kick, or a teaspoon of fennel seeds for a more Italian flavor profile.
Experiment and find your favorite variations to make this Rustic Italian Crusty Bread your own signature bake!
Print
Rustic Italian Crusty Bread Recipe
Ingredients
-
- Bread Flour (500g or approximately 4 cups): Bread flour is the star of the show here. It’s higher in protein than all-purpose flour, typically containing around 12-14% protein. This higher protein content is crucial because it develops more gluten when mixed with water and kneaded. Gluten is what gives bread its structure, elasticity, and that wonderful chewiness we crave in a crusty loaf. Using bread flour will result in a bread with a stronger, more developed gluten network, leading to a better rise, a chewier texture, and a more robust crust. While you can technically use all-purpose flour in a pinch, the results won’t be quite the same. The crust might be slightly less crisp, and the interior might be a bit denser. For the authentic rustic Italian crusty bread experience, bread flour is highly recommended. If you’re looking to experiment further, consider using a high-quality Italian “00” bread flour, which is finely milled and known for producing exceptional pizza dough and bread with a delicate yet strong structure.
-
- Water (350ml or approximately 1 ½ cups, lukewarm): Water is not just a liquid ingredient; it’s essential for gluten development and yeast activation. Lukewarm water, ideally between 90-105°F (32-40°C), is the perfect temperature to awaken your yeast and get it working its magic. Water that’s too hot can kill the yeast, while water that’s too cold will slow down its activity significantly, leading to a sluggish rise. Using filtered water is preferable, as chlorine in tap water can sometimes inhibit yeast activity. The hydration level, or the ratio of water to flour, is also critical in rustic bread making. This recipe uses a hydration level of around 70%, which is considered a medium-high hydration. Higher hydration doughs tend to produce breads with more open crumbs and airier textures, characteristic of rustic Italian loaves.
-
- Active Dry Yeast (7g or 2 ¼ teaspoons, or 1 packet): Yeast is the leavening agent that makes our bread rise. Active dry yeast needs to be rehydrated in lukewarm water before being added to the flour. This “proofing” step ensures that the yeast is alive and active. You’ll know your yeast is good if it foams up slightly after being mixed with warm water and a pinch of sugar (optional, but it helps speed up the activation). Alternatively, you can use instant yeast (also known as rapid-rise yeast), which can be added directly to the dry ingredients without needing to be proofed beforehand. If using instant yeast, you’ll use the same amount (7g or 2 ¼ teaspoons). The type of yeast you use affects the rising time, but both active dry and instant yeast will work beautifully in this recipe. Make sure your yeast is fresh; expired yeast will not work effectively and will result in a flat, dense loaf.
-
- Salt (10g or 2 teaspoons): Salt is often underestimated in baking, but it plays a crucial role in flavor development and gluten structure. Salt controls yeast activity, slowing it down just enough to allow for a longer, more flavorful fermentation. It also tightens the gluten strands, making the dough stronger and more elastic. Without salt, bread would taste bland and the texture would be less desirable. Use fine sea salt or kosher salt for this recipe. Avoid iodized table salt if possible, as some bakers believe it can impart a slightly metallic taste. The amount of salt in this recipe is balanced to enhance the flavor without inhibiting the yeast too much. Don’t be tempted to reduce the salt content significantly, as it’s essential for both taste and texture.
-
- Olive Oil (1 tablespoon, optional but recommended): While not strictly traditional in all rustic Italian bread recipes, a tablespoon of good quality olive oil adds a subtle richness and flavor to the bread. It also contributes to a slightly softer crumb and a more golden crust. Extra virgin olive oil is a great choice, but a good quality regular olive oil will also work well. If you prefer a more purely traditional loaf, you can omit the olive oil, but I find it enhances the overall flavor and texture of the bread.
Instructions
Step 1: Activate the Yeast (If Using Active Dry Yeast)
If you are using active dry yeast, this step is crucial. In a small bowl, combine the lukewarm water (from the ingredient list) with the active dry yeast. Give it a gentle stir and let it sit for 5-10 minutes. You should see the yeast become foamy or bubbly on top, indicating that it is active and ready to use. If the yeast doesn’t foam, it might be expired or inactive, and you’ll need to start with fresh yeast. If you are using instant yeast, you can skip this step and add the yeast directly to the dry ingredients in the next step.
Step 2: Combine Dry Ingredients
In a large mixing bowl, whisk together the bread flour and salt. Make sure the salt is evenly distributed throughout the flour. This is important because salt can inhibit yeast activity if it comes into direct contact with it in concentrated form. Creating a homogenous mixture of flour and salt ensures even gluten development and flavor distribution.
Step 3: Add Wet Ingredients and Form a Shaggy Dough
Pour the activated yeast mixture (or instant yeast directly if using) and the olive oil (if using) into the bowl with the dry ingredients. Using a spatula or your hands, mix the ingredients together until just combined. You’re aiming for a shaggy dough – it will be quite sticky and not perfectly smooth at this stage. Don’t overmix; just ensure all the flour is hydrated. This initial mix is simply to bring the ingredients together; the real dough development comes with kneading and fermentation.
Step 4: First Rise (Bulk Fermentation)
Cover the bowl tightly with plastic wrap or a damp kitchen towel. Place the bowl in a warm place, free from drafts. A slightly warm oven (turned off!) or a warm spot in your kitchen works well. Let the dough rise for 1-1.5 hours, or until it has roughly doubled in size. This first rise, also known as bulk fermentation, is crucial for flavor development. During this time, the yeast is consuming sugars in the flour and producing carbon dioxide and other flavor compounds that contribute to the complexity of the bread. The dough will become puffy and airy.
Step 5: Punch Down and Shape the Dough
Gently punch down the dough to deflate it and release the trapped air. Turn the dough out onto a lightly floured surface. Gently shape the dough into a round or oblong loaf. For a rustic look, you can simply fold the dough over itself a few times to create some tension on the surface. Avoid over-handling the dough at this stage, as you want to preserve the airiness created during fermentation.
Step 6: Second Rise (Proofing)
Line a baking sheet with parchment paper or a silicone baking mat. Place the shaped loaf on the prepared baking sheet. Lightly dust the top of the loaf with flour. Cover loosely with plastic wrap or a damp kitchen towel and let it rise again for another 45-60 minutes, or until it has noticeably puffed up but not quite doubled. This second rise, called proofing, allows the dough to relax and become even more airy before baking. Gently press the dough; it should spring back slowly, leaving a slight indentation. If it springs back immediately, it needs more proofing time. If it deflates easily, it’s over-proofed.
Step 7: Preheat Oven and Prepare for Baking
Preheat your oven to 450°F (232°C) with a baking stone or pizza stone inside if you have one. Placing the loaf on a preheated baking stone will help create a crispier bottom crust. If you don’t have a baking stone, a regular baking sheet will work just fine. To create steam in the oven, which is essential for a crusty crust, you have a few options:
-
- Steam Tray: Place an oven-safe dish (like a cast iron skillet or a metal baking pan) on the bottom rack of your oven while it preheats. Just before you put the bread in, carefully pour about 1 cup of hot water into the hot dish. This will create a burst of steam.
-
- Ice Cubes: Alternatively, you can toss a handful of ice cubes onto the bottom of the oven right after you place the bread inside. Be careful of the steam!
Step 8: Score the Dough (Optional but Recommended)
Using a sharp knife or a lame (a special bread scoring tool), make a few slashes on the top of the loaf. Scoring allows the bread to expand properly in the oven and prevents it from bursting randomly. For a rustic look, you can make a simple single slash down the center or a few diagonal slashes.
Step 9: Bake the Bread
Carefully place the baking sheet with the loaf into the preheated oven. Bake for 25-30 minutes, or until the crust is deeply golden brown and the internal temperature reaches 200-210°F (93-99°C). You can check the internal temperature using an instant-read thermometer inserted into the center of the loaf. The bread should sound hollow when tapped on the bottom.
Step 10: Cool Completely
Once baked, remove the bread from the oven and transfer it to a wire rack to cool completely. Resist the temptation to slice into it while it’s still hot! Allowing the bread to cool completely is crucial for the internal structure to set and for the best flavor and texture to develop. The crust will also crisp up further as it cools. Cooling completely usually takes at least an ho
Nutrition
- Serving Size: one normal portion
- Calories: 150-200
- Fat: 1-2g
- Carbohydrates: 30-35g
- Protein: 5-7g


