


Oh, Carmelitas! Just the name itself conjures up images of gooey caramel, rich chocolate, and a buttery, oaty crust that crumbles perfectly with each bite. I vividly remember the first time I encountered these bars. It was at a school bake sale, and amidst a sea of familiar brownies and cookies, these golden, caramel-laced squares stood out. I bought one, then promptly went back for three more to take home. My family devoured them in what felt like minutes, and the requests for “those amazing caramel oat bars” started immediately. I hunted down a recipe, and after a few tweaks to make it truly “quick and easy” without sacrificing any of the deliciousness, it became an absolute staple in our household. They are my go-to for potlucks (where they vanish in record time), for a comforting weeknight treat, or even as a “thinking of you” gift for friends. The beauty of this recipe is its simplicity, yielding such an incredibly decadent result that people always assume they’re far more complicated to make. They are, simply put, a little square of heaven.
The Irresistible Charm of Quick and Easy Carmelitas
Carmelitas are a beloved bar cookie that perfectly balances a trifecta of textures and flavors: a buttery, slightly crisp oatmeal cookie base and crumble topping, a luscious layer of molten caramel, and generous pockets of melted chocolate chips. They are the epitome of comforting, indulgent dessert bars, offering a delightful chewiness from the oats, a deep sweetness from the caramel, and the satisfying richness of chocolate.
What makes “Quick and Easy Carmelitas” so appealing? It’s the promise of achieving this multi-layered, complex-tasting treat without spending hours in the kitchen. Traditional caramel-making can be finicky, and some bar recipes involve multiple, time-consuming steps. This streamlined version, however, leverages smart shortcuts – often using store-bought caramels or a quick condensed milk caramel – and a simple press-in crust that doubles as the topping, drastically reducing both effort and active prep time.
These bars aren’t just about taste; they’re about the experience. The aroma that fills your kitchen as they bake – a warm blend of oats, butter, and caramelizing sugar – is intoxicating. The visual appeal of the golden-brown topping giving way to a glimpse of molten caramel and chocolate is undeniably tempting. And the first bite? It’s a moment of pure, unadulterated bliss. Whether you’re a seasoned baker looking for a reliable crowd-pleaser or a novice wanting to impress with minimal fuss, this Quick and Easy Carmelitas recipe is your golden ticket.
Why This “Quick and Easy Carmelitas” Recipe Will Become Your Go-To Treat
In a world filled with countless dessert options, a recipe truly has to shine to earn a permanent spot in your baking rotation. This Quick and Easy Carmelitas recipe does exactly that, and here’s why it’s destined to become your new favorite:
- Unbeatable Flavor Combination: The holy trinity of buttery oats, gooey caramel, and rich chocolate is a classic for a reason. It’s a harmonious blend that appeals to nearly every palate, offering sweet, salty (if your butter is salted), and rich notes all in one bite.
- Textural Paradise: Carmelitas are a masterclass in texture. You get the slight crispness of the oat crust edges, the satisfying chewiness of the main crust and topping, the incredibly smooth and gooey caramel layer, and the soft, melted chocolate. It’s a party for your mouth!
- Genuinely Quick and Easy: True to its name, this recipe is designed for simplicity. The crust and topping come from the same mixture, minimizing steps. The caramel layer is often simplified using pre-made caramels or a quick stovetop method. From start to oven, you’re looking at minimal active time.
- Pantry-Friendly Ingredients: Most of the ingredients required for Carmelitas are likely already in your pantry or are easily accessible: flour, oats, brown sugar, butter, chocolate chips, and caramels (or condensed milk). No specialty items are needed.
- Foolproof Results: This is a very forgiving recipe. Even if your layers aren’t perfectly even or your crumble topping is a bit rustic, the end result is almost always delicious. It’s hard to go wrong when these core ingredients are involved.
- Crowd-Pleasing Power: Take a pan of these to any gathering – a potluck, office party, family get-together, or bake sale – and watch them disappear. They are consistently one of the first things to go, and you’ll invariably be asked for the recipe.
- Perfect for Any Occasion: Whether you need a quick dessert for unexpected guests, a comforting treat after a long day, a special something for a holiday, or a bake-ahead item for an event, Carmelitas fit the bill perfectly.
- Customizable: While delicious as is, you can easily add your own spin with a sprinkle of sea salt on top, a handful of chopped pecans or walnuts in the crust, or by using different types of chocolate chips (milk, dark, semi-sweet, or even butterscotch).
This Quick and Easy Carmelitas recipe delivers maximum deliciousness with minimum fuss, making it an indispensable treat for any baker.
Ingredients for Your Delicious Carmelitas Adventure
To embark on your journey to ooey-gooey Carmelita perfection, you’ll need these readily available ingredients:
For the Oatmeal Crust and Topping:
- 1 cup (125g) all-purpose flour
- 1 cup (90g) old-fashioned rolled oats (not instant or quick-cooking, as rolled oats provide better texture)
- ¾ cup (165g) packed light brown sugar
- ½ teaspoon baking soda
- ¼ teaspoon salt (if using unsalted butter; omit if using salted butter)
- ¾ cup (170g or 1 ½ sticks) unsalted butter, melted
For the Caramel Chocolate Filling:
- 1 bag (11-14 ounces / approx. 310-395g) individually wrapped soft caramels: (like Kraft caramels, about 40-50 caramels depending on brand and size). Unwrapped.
- ¼ cup (60ml) heavy cream or evaporated milk: This helps the caramels melt smoothly.
- 1 cup (170g) semi-sweet chocolate chips: You can also use milk chocolate or dark chocolate chips, or a mix.
- (Optional) ½ cup chopped pecans or walnuts: For added crunch and nutty flavor in the filling or crust.
- (Optional) 1 teaspoon flaky sea salt: For sprinkling on top of the caramel or finished bars for a sweet and salty contrast.
A Note on Ingredients:
- Oats: Old-fashioned rolled oats are recommended for their chewy texture. Quick oats can sometimes result in a pastier texture.
- Caramels: Using store-bought unwrapped caramels is the key to the “quick and easy” aspect of this recipe. Ensure they are soft, chewy caramels, not hard candy.
- Butter: Melted butter binds the crust ingredients together easily. You can use salted butter; if so, you might want to omit the additional salt in the crust.
- Chocolate Chips: Standard semi-sweet chocolate chips are classic, but feel free to experiment with your favorite type of chocolate.
Gather these components, and you’re just a few simple steps away from a pan of irresistible Carmelitas!
Step-by-Step Instructions for Perfect Carmelitas Every Time
Follow these easy steps to create a batch of heavenly Carmelitas. The key to success is in the layering and, most importantly, allowing them to cool completely before cutting!
Phase 1: Prepare the Pan and Oatmeal Crust Base
- Preheat Oven and Prepare Pan: Preheat your oven to 350°F (175°C). Grease an 8×8 inch or 9×9 inch square baking pan. For easier removal and cleanup, line the pan with parchment paper, leaving an overhang on two opposite sides to act as “handles.” Grease the parchment paper as well.
- Combine Dry Crust Ingredients: In a medium to large mixing bowl, whisk together the all-purpose flour, old-fashioned rolled oats, packed light brown sugar, baking soda, and salt (if using).
- Add Melted Butter: Pour the melted butter over the dry ingredients. Stir with a fork or your fingertips until the mixture is well combined and forms coarse crumbs. It should be uniformly moistened.
- Press Crust Base: Take slightly more than half (about ⅔) of the oatmeal crumb mixture and press it firmly and evenly into the bottom of your prepared baking pan. Use the bottom of a glass or a measuring cup to help create a compact, level base. Set the remaining crumb mixture aside for the topping.
- Par-Bake the Crust (Optional but Recommended for Crispier Base): Bake the crust base for 10 minutes. This step helps create a slightly firmer base that holds up better to the caramel. If you’re short on time, you can skip this, but the base might be a bit softer.
Phase 2: Create and Add the Caramel Chocolate Layer
- Melt the Caramels: While the crust is par-baking (or if you skipped it, while you prepare this), unwrap the caramels and place them in a microwave-safe bowl along with the heavy cream (or evaporated milk).
- Microwave Method: Microwave on high in 30-second intervals, stirring well after each interval, until the caramels are completely melted and the mixture is smooth. This usually takes 1.5 to 2.5 minutes total. Be careful not to overheat.
- Stovetop Method: Alternatively, combine caramels and cream in a small saucepan over low heat. Stir constantly until melted and smooth.
- Pour Caramel Over Crust: Once the caramel is smooth, carefully pour it evenly over the (par-baked, if you did that step, or unbaked) crust base in the pan. Spread it gently with a spatula if needed to cover the entire surface.
- Sprinkle Chocolate Chips: Immediately sprinkle the chocolate chips evenly over the hot caramel layer. If you’re using nuts, you can sprinkle them on now as well.
Phase 3: Add Topping and Bake
- Add Remaining Crumb Topping: Take the reserved oatmeal crumb mixture and crumble it evenly over the chocolate chip and caramel layer. Gently pat it down very slightly, but don’t press too hard – you want a nice, crumbly topping.
- Bake: Transfer the pan to the preheated oven. Bake for 18-25 minutes (for an 8×8 pan, a 9×9 pan might take slightly less time). The topping should be golden brown, and the caramel around the edges should be bubbly. The center might still look a little soft, which is okay. Be careful not to overbake, as this can make the caramel hard once cooled.
Phase 4: Cooling (The Most Crucial Step!)
- Cool Completely: This is THE most important step for successful Carmelitas. Remove the pan from the oven and place it on a wire rack to cool completely to room temperature. This will take at least 2-3 hours.
- Chill for Easier Cutting (Highly Recommended): Once cooled to room temperature, cover the pan with plastic wrap and transfer it to the refrigerator for at least another 1-2 hours, or even overnight. Chilling solidifies the caramel and chocolate, making the bars much easier to cut into neat squares without becoming a gooey mess.
- Cut and Serve: Once thoroughly chilled, use the parchment paper overhangs to lift the entire block of Carmelitas out of the pan and onto a cutting board. Cut into squares using a large, sharp knife. If the caramel is very firm, you might let them sit at room temperature for 15-20 minutes before cutting, or run your knife under hot water and dry it between cuts for cleaner slices.
Enjoy your perfectly gooey, chewy, and delicious homemade Carmelitas!
Nutrition Facts (Approximate)
- Servings: This recipe typically yields 16 small squares (if cut 4×4 in an 8×8 or 9×9 pan) or 9-12 larger bars.
- Calories per serving (approximate for 1 of 16 squares): A single small square of Carmelitas can range from 200 to 280 calories.
Disclaimer:
The nutritional information provided is an estimate and can vary significantly based on several factors, including:
- The specific brands of caramels, chocolate chips, butter, and oats used.
- The exact amount of heavy cream or evaporated milk used.
- The final size of the cut bars.
- Optional additions like nuts.
Carmelitas are an indulgent treat, rich in sugar and fat. They are best enjoyed in moderation as part of a balanced diet. For more precise nutritional information, you can use online recipe nutrition calculators and input the specific brands and quantities of ingredients you use.
Preparation and Baking Time: Swift and Satisfying
Understanding the time commitment helps plan your baking. Here’s a breakdown for these Quick and Easy Carmelitas:
- Active Preparation Time: Approximately 15-20 minutes.
- This includes preparing the pan, mixing the crust/topping, unwrapping caramels (the most “labor-intensive” part!), and assembling the layers.
- Par-Baking Time (Optional): 10 minutes.
- Baking Time: Approximately 18-25 minutes.
- Cooling Time (Absolutely Essential):
- Room Temperature Cooling: Minimum 2-3 hours.
- Refrigerator Chilling (for cutting): Minimum 1-2 hours (or overnight).
- Total Time (from start to being ready to cut, including minimum cooling): Approximately 3 hours 45 minutes to 5 hours 45 minutes. If chilling overnight, it will be longer.
Planning Tip: Due to the crucial and lengthy cooling/chilling time required for the caramel to set properly, Carmelitas are an excellent dessert to make a day ahead or early in the day if you plan to serve them in the evening. Don’t rush the cooling – patience is key to perfect, sliceable bars!
How to Serve Your Heavenly Carmelitas
Carmelitas are delightful on their own, but here are some ways to serve and enjoy them:
- As Is, At Room Temperature or Slightly Chilled: Once cooled and cut, they are perfect straight up. Some prefer them slightly chilled for a firmer caramel, while others like them at room temperature for maximum gooiness.
- Cut into Neat Squares:
- For the cleanest cuts, ensure the bars are thoroughly chilled.
- Use a large, sharp knife. Wiping the knife with a damp cloth or running it under hot water and drying it between cuts can help prevent sticking.
- Perfect Portions:
- For a crowd or bake sale, cut into 16 smaller squares (4×4 grid).
- For a more indulgent serving, cut into 9 larger squares (3×3 grid) or 12 rectangles.
- Ideal Occasions for Serving:
- Potlucks and Picnics: They travel well (once fully set and cut) and are always a hit.
- Bake Sales: Their visual appeal and deliciousness make them fast sellers.
- After-School Treat: A special surprise for the kids.
- Casual Get-Togethers: Perfect with coffee or tea.
- Holiday Dessert Trays: A welcome addition alongside cookies and other confections.
- Comfort Food Cravings: Sometimes, you just need a Carmelita!
- Pairings:
- Beverages:
- A cold glass of milk.
- A hot cup of coffee or tea.
- A latte or cappuccino.
- With a Little Extra:
- A scoop of vanilla ice cream: Serve a slightly warmed Carmelita bar (microwave for 10-15 seconds) with vanilla ice cream for an incredibly decadent dessert. The contrast of warm gooey caramel and cold ice cream is divine.
- A dollop of unsweetened whipped cream: To balance the sweetness.
- Beverages:
- Presentation:
- Arrange on a simple platter.
- For gifting, place individual squares in cupcake liners within a treat box.
However you choose to serve them, these Quick and Easy Carmelitas are sure to bring smiles and satisfy sweet cravings.
Additional Tips for Carmelita Perfection
Unlock the full potential of your Carmelitas with these five handy tips:
- Embrace the Parchment Paper Sling: Lining your baking pan with parchment paper, leaving an overhang on two sides, is a game-changer. It allows you to lift the entire cooled block of Carmelitas out of the pan easily, making cutting neat squares on a flat surface much simpler and cleanup a breeze.
- Do NOT Rush the Cooling/Chilling Process: This tip cannot be overstressed. Carmelitas are famously gooey. If you try to cut them while still warm or even just at room temperature without sufficient chilling, you’ll likely end up with a delicious but messy puddle. Thorough cooling at room temperature followed by a good chill in the refrigerator is essential for the caramel to set firmly enough for clean slicing. Patience here pays off tenfold.
- Quality Caramels Make a Difference: While store-bought caramels are key for ease, opt for a brand known for good flavor and melting quality. Soft, chewy caramels work best. Avoid hard caramel candies. If your caramels seem very stiff, adding an extra tablespoon of heavy cream when melting can help achieve a smoother, gooier consistency.
- Don’t Overbake: Overbaking is the enemy of gooey caramel. It can cause the caramel to become too hard and chewy once cooled, rather than soft and luscious. Bake just until the topping is golden brown and the edges are bubbly. The center might still look a little underdone, but it will continue to set as it cools.
- Customize with Add-Ins or Toppings:
- Nuts: Incorporate ½ cup of chopped pecans or walnuts into the oatmeal crumb mixture or sprinkle them over the caramel layer with the chocolate chips for added crunch and flavor.
- Sea Salt: A light sprinkle of flaky sea salt over the caramel layer before adding the topping, or over the finished bars once cooled, beautifully enhances the sweetness of the caramel and chocolate.
- Different Chips: Experiment with milk chocolate, dark chocolate, white chocolate, or even butterscotch or peanut butter chips for a different flavor profile.
By keeping these tips in mind, you’ll consistently produce irresistible Carmelitas that are perfectly textured and incredibly delicious.
Frequently Asked Questions (FAQ) about Carmelitas
Here are answers to some common questions you might have about making these Quick and Easy Carmelitas:
- Q: Can I use homemade caramel sauce instead of melted caramels?
- A: Yes, you can, but it will alter the “quick and easy” nature of the recipe and potentially the final texture. If using homemade caramel, ensure it’s a thick caramel sauce that sets up well when cooled. A thin caramel sauce might make the bars too soggy or prevent them from setting properly. You’ll need about 1 to 1 ¼ cups of thick caramel sauce.
- Q: Why are my Carmelitas too gooey to cut even after cooling?
- A: This is almost always due to insufficient cooling and chilling. They need several hours at room temperature and then a good stint in the refrigerator to firm up. Other less common reasons could be:
- Underbaking: If not baked long enough, the structure might not be set.
- Too much liquid with caramels: If you added significantly more cream than called for when melting caramels.
- Very hot/humid environment: This can make setting more challenging. Ensure they are chilled thoroughly in the fridge.
- A: This is almost always due to insufficient cooling and chilling. They need several hours at room temperature and then a good stint in the refrigerator to firm up. Other less common reasons could be:
- Q: Can I use quick-cooking oats instead of old-fashioned rolled oats?
- A: It’s not ideal. Old-fashioned rolled oats provide a chewier, more distinct texture in the crust and topping. Quick-cooking oats are more processed and finer, which can result in a pastier or denser texture. If it’s all you have, they might work in a pinch, but the texture will be different. Do not use instant oats.
- Q: How should I store leftover Carmelitas?
- A: Store leftover Carmelitas in an airtight container. They can be kept at room temperature for 2-3 days or in the refrigerator for up to 5-7 days. If storing in the fridge, they will be firmer; you might want to let them sit at room temperature for 15-20 minutes before serving if you prefer a gooier caramel. They can also be frozen for up to 3 months (thaw in the refrigerator or at room temperature).
- Q: Can I double this recipe?
- A: Yes, you can easily double this recipe and bake it in a 9×13 inch baking pan. The baking time might need to be adjusted slightly – start checking around the 20-25 minute mark. Ensure the larger pan of bars is also cooled and chilled thoroughly before attempting to cut.
These answers should help you navigate any queries as you bake up a batch of these irresistible treats!
Beyond the Recipe: The Simple Joy of Homemade Carmelitas
There’s a special kind of magic in creating something truly delicious with your own hands, especially when the process is as straightforward and rewarding as this Quick and Easy Carmelitas recipe. These bars are more than just a sweet treat; they are a testament to the fact that you don’t need complicated techniques or obscure ingredients to produce something utterly delightful and impressive.
The joy begins with the simple act of mixing the oaty crumbs, the anticipation as the caramels melt into a luscious pool, and the satisfaction of sprinkling those chocolate chips. The aroma that wafts through your home as they bake is a comforting hug in itself. But the real reward comes when you finally take that first bite – the perfect symphony of textures and flavors that makes you close your eyes in contentment.
Sharing these Carmelitas amplifies that joy. Watching friends, family, or colleagues savor them, often with surprised delight at how good they are, is incredibly fulfilling. They become a conversation starter, a comfort bringer, and a creator of sweet memories.
So, whether you’re baking for a special occasion, a casual get-together, or simply to treat yourself, embrace the simplicity and the sheer deliciousness of these Quick and Easy Carmelitas. They are a little pan of happiness, waiting to be made and shared. Happy baking!
Print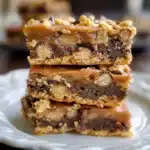
Quick and Easy Carmelitas recipe
Ingredients
To embark on your journey to ooey-gooey Carmelita perfection, you’ll need these readily available ingredients:
For the Oatmeal Crust and Topping:
-
- 1 cup (125g) all-purpose flour
-
- 1 cup (90g) old-fashioned rolled oats (not instant or quick-cooking, as rolled oats provide better texture)
-
- ¾ cup (165g) packed light brown sugar
-
- ½ teaspoon baking soda
-
- ¼ teaspoon salt (if using unsalted butter; omit if using salted butter)
-
- ¾ cup (170g or 1 ½ sticks) unsalted butter, melted
For the Caramel Chocolate Filling:
-
- 1 bag (11-14 ounces / approx. 310-395g) individually wrapped soft caramels: (like Kraft caramels, about 40–50 caramels depending on brand and size). Unwrapped.
-
- ¼ cup (60ml) heavy cream or evaporated milk: This helps the caramels melt smoothly.
-
- 1 cup (170g) semi-sweet chocolate chips: You can also use milk chocolate or dark chocolate chips, or a mix.
-
- (Optional) ½ cup chopped pecans or walnuts: For added crunch and nutty flavor in the filling or crust.
-
- (Optional) 1 teaspoon flaky sea salt: For sprinkling on top of the caramel or finished bars for a sweet and salty contrast.
Instructions
Phase 1: Prepare the Pan and Oatmeal Crust Base
-
- Preheat Oven and Prepare Pan: Preheat your oven to 350°F (175°C). Grease an 8×8 inch or 9×9 inch square baking pan. For easier removal and cleanup, line the pan with parchment paper, leaving an overhang on two opposite sides to act as “handles.” Grease the parchment paper as well.
-
- Combine Dry Crust Ingredients: In a medium to large mixing bowl, whisk together the all-purpose flour, old-fashioned rolled oats, packed light brown sugar, baking soda, and salt (if using).
-
- Add Melted Butter: Pour the melted butter over the dry ingredients. Stir with a fork or your fingertips until the mixture is well combined and forms coarse crumbs. It should be uniformly moistened.
-
- Press Crust Base: Take slightly more than half (about ⅔) of the oatmeal crumb mixture and press it firmly and evenly into the bottom of your prepared baking pan. Use the bottom of a glass or a measuring cup to help create a compact, level base. Set the remaining crumb mixture aside for the topping.
-
- Par-Bake the Crust (Optional but Recommended for Crispier Base): Bake the crust base for 10 minutes. This step helps create a slightly firmer base that holds up better to the caramel. If you’re short on time, you can skip this, but the base might be a bit softer.
Phase 2: Create and Add the Caramel Chocolate Layer
-
- Melt the Caramels: While the crust is par-baking (or if you skipped it, while you prepare this), unwrap the caramels and place them in a microwave-safe bowl along with the heavy cream (or evaporated milk).
-
- Microwave Method: Microwave on high in 30-second intervals, stirring well after each interval, until the caramels are completely melted and the mixture is smooth. This usually takes 1.5 to 2.5 minutes total. Be careful not to overheat.
-
- Stovetop Method: Alternatively, combine caramels and cream in a small saucepan over low heat. Stir constantly until melted and smooth.
-
- Melt the Caramels: While the crust is par-baking (or if you skipped it, while you prepare this), unwrap the caramels and place them in a microwave-safe bowl along with the heavy cream (or evaporated milk).
-
- Pour Caramel Over Crust: Once the caramel is smooth, carefully pour it evenly over the (par-baked, if you did that step, or unbaked) crust base in the pan. Spread it gently with a spatula if needed to cover the entire surface.
-
- Sprinkle Chocolate Chips: Immediately sprinkle the chocolate chips evenly over the hot caramel layer. If you’re using nuts, you can sprinkle them on now as well.
Phase 3: Add Topping and Bake
-
- Add Remaining Crumb Topping: Take the reserved oatmeal crumb mixture and crumble it evenly over the chocolate chip and caramel layer. Gently pat it down very slightly, but don’t press too hard – you want a nice, crumbly topping.
-
- Bake: Transfer the pan to the preheated oven. Bake for 18-25 minutes (for an 8×8 pan, a 9×9 pan might take slightly less time). The topping should be golden brown, and the caramel around the edges should be bubbly. The center might still look a little soft, which is okay. Be careful not to overbake, as this can make the caramel hard once cooled.
Phase 4: Cooling (The Most Crucial Step!)
-
- Cool Completely: This is THE most important step for successful Carmelitas. Remove the pan from the oven and place it on a wire rack to cool completely to room temperature. This will take at least 2-3 hours.
-
- Chill for Easier Cutting (Highly Recommended): Once cooled to room temperature, cover the pan with plastic wrap and transfer it to the refrigerator for at least another 1-2 hours, or even overnight. Chilling solidifies the caramel and chocolate, making the bars much easier to cut into neat squares without becoming a gooey mess.
-
- Cut and Serve: Once thoroughly chilled, use the parchment paper overhangs to lift the entire block of Carmelitas out of the pan and onto a cutting board. Cut into squares using a large, sharp knife. If the caramel is very firm, you might let them sit at room temperature for 15-20 minutes before cutting, or run your knife under hot water and dry it between cuts for cleaner slices.
Nutrition
- Serving Size: one normal portion
- Calories: 200 to 280


