


Pita pocket sandwiches have been an absolute lifesaver in our household for years. Whether it’s a frantic weekday morning trying to pack school lunches that won’t come back uneaten, a quick and healthy work-from-home lunch for myself, or even a casual, build-your-own spread for a weekend gathering, pitas are always a winner. I love their versatility – the sheer endlessness of filling combinations means they never get boring. My kids, notorious for their picky phases, actually get excited about pita pockets because they can customize their own, stuffing them with exactly what they like (and I can sneak in a few extra veggies!). There’s something inherently fun about a pocket you can fill with deliciousness, and they’re often less messy than traditional sandwiches, especially for little hands. From a simple hummus and veggie combo to a hearty chicken salad or spicy falafel, pita pockets are a canvas for culinary creativity, and a reliably delicious one at that.
Ingredients for Delicious Pita Pocket Sandwiches
The beauty of pita pockets lies in their adaptability. This list provides a foundation and popular options, but feel free to get creative! This will generally make 4-6 pita pocket sandwiches, depending on pita size and how generously you stuff them.
- The Pitas:
- 4-6 large Pita Breads (whole wheat or white, preferably with a good pocket)
- Protein Powerhouses (Choose 1-2, or combine):
- 1.5 cups Cooked Chicken (shredded, diced – rotisserie chicken is a great shortcut)
- 1 can (15 oz) Chickpeas, rinsed and drained (for mashing into a chickpea salad or using whole)
- 1 can (5 oz) Tuna, drained (for tuna salad)
- 4-6 Falafel Balls, cooked (store-bought or homemade)
- 8 oz Deli Meat, sliced (turkey, ham, roast beef)
- 1 block (8 oz) Halloumi Cheese, sliced and pan-fried or grilled
- 1 cup Cooked Lentils (seasoned)
- Hard-boiled Eggs, sliced or chopped
- Fresh & Crunchy Vegetables:
- 1 cup Lettuce, shredded (Romaine, iceberg, butter lettuce)
- 1 cup Baby Spinach leaves
- 1 large Tomato, diced or sliced
- 1/2 Cucumber, thinly sliced or diced
- 1/2 Red Onion, thinly sliced (optional, for a sharper bite)
- 1 Bell Pepper (any color), thinly sliced or diced
- 1/2 cup Shredded Carrots
- 1/4 cup Olives, sliced (Kalamata, black, or green)
- Pickled vegetables (banana peppers, jalapeños, gherkins)
- Flavorful Spreads & Sauces:
- 1/2 cup Hummus (classic, roasted red pepper, garlic – any variety)
- 1/2 cup Tzatziki Sauce
- Mayonnaise (plain, aioli, or flavored)
- Mustard (Dijon, honey mustard, yellow)
- Tahini Sauce (especially good with falafel)
- Pesto
- Guacamole or Sliced Avocado
- Your favorite vinaigrette or light dressing
- Cheese (Optional):
- 1/2 cup Feta Cheese, crumbled
- Sliced Cheddar, Provolone, Swiss, or Monterey Jack
- Seasonings (To taste):
- Salt
- Black Pepper
- Dried Oregano
- Lemon Juice
- Fresh Herbs (parsley, dill, cilantro)
Step-by-Step Pita Pocket Sandwich Instructions
Assembling pita pockets is more of an art than a science, but here’s a general guide:
- Prepare Your Pitas:
- Gently warm the pita breads. This makes them more pliable and less likely to tear when you open them. You can do this in a few ways:
- Microwave: Wrap in a slightly damp paper towel and microwave for 15-20 seconds.
- Oven/Toaster Oven: Wrap in foil and warm at 300°F (150°C) for 5-7 minutes.
- Toaster: Lightly toast, but be careful not to make them too crispy or they’ll crack.
- Skillet: Warm briefly in a dry skillet over medium heat, about 30 seconds per side.
- Once warmed, carefully cut off about one-third to one-half of the pita’s edge to create an opening, or cut the pita in half to form two pockets. Gently pry open the pocket with your fingers or a knife.
- Gently warm the pita breads. This makes them more pliable and less likely to tear when you open them. You can do this in a few ways:
- Prepare Your Fillings:
- Proteins: If using chicken, shred or dice it. If making tuna or chickpea salad, prepare it in a separate bowl by mashing the tuna/chickpeas and mixing with mayo, seasonings, and finely diced celery or onion if desired. Cook falafel according to package directions or your recipe. Pan-fry or grill halloumi slices until golden brown.
- Vegetables: Wash and chop/slice all your chosen vegetables.
- Sauces: Have your sauces and spreads ready. If making a specific sauce like tahini dressing, prepare it now.
- Assemble the Pita Pockets:
- Spread First (Optional but Recommended): Spread a thin layer of your chosen sauce (hummus, tzatziki, mayo) on the inside walls of the pita pocket. This not only adds flavor but can also create a slight barrier to prevent sogginess from juicier ingredients.
- Layer in Your Protein: Add your chosen protein(s). Don’t overstuff at this stage, as you need room for veggies.
- Add the Veggies: Layer in your selection of fresh vegetables. Start with larger, flatter items like lettuce leaves if you want another moisture barrier.
- Add Cheese (if using): Sprinkle in feta or add slices of other cheeses.
- Drizzle More Sauce (Optional): Add another drizzle of sauce or dressing over the fillings if desired.
- Season: A little salt and pepper, or a squeeze of lemon juice, can brighten the flavors.
- Serve Immediately: Pita pockets are best enjoyed fresh when the pita is soft and the fillings are crisp.
Nutrition Facts (Approximate)
- Servings: This guide helps prepare 4-6 pita pocket sandwiches.
- Calories per serving: Highly variable, ranging from 250-550 calories per pita pocket.
Please note: The nutritional content of pita pocket sandwiches varies dramatically based on the type of pita bread used (whole wheat vs. white, size), the protein chosen (lean chicken vs. fried falafel or cheese-heavy options), the amount and type of sauce, and the quantity of fillings.
A pita pocket filled with lean protein like grilled chicken or chickpeas, plenty of fresh vegetables, and a light sauce like hummus or tzatziki can be a very healthy and balanced meal, rich in protein, fiber, vitamins, and minerals.
Preparation and Assembly Time
- Preparation Time: 15-25 minutes (This includes chopping vegetables, preparing simple salads like tuna or chickpea, and warming pitas. If your protein needs cooking from scratch, this time will increase.)
- Assembly Time: 2-3 minutes per pita.
Total Time: Approximately 20-30 minutes for a batch, assuming proteins are pre-cooked or quick-cooking.
Pita pockets are celebrated for their quick assembly, making them ideal for fast lunches or dinners.
How to Serve Your Delicious Pita Pocket Sandwiches
Pita pockets are wonderfully versatile in how they can be presented and enjoyed. Here are some ideas:
- Classic Lunchbox Staple:
- Wrap individually in parchment paper, beeswax wraps, or foil for an easy-to-transport lunch.
- Pack sauces separately if worried about sogginess, to be added just before eating.
- Light Dinner Option:
- Serve alongside a simple side salad or a cup of soup.
- Pair with a bowl of fruit or some vegetable sticks with dip (more hummus!).
- “Build-Your-Own” Pita Bar: This is fantastic for families or casual gatherings.
- Set out bowls of warmed pitas.
- Arrange all the prepared proteins, chopped vegetables, cheeses, and sauces in separate bowls or on a large platter.
- Let everyone create their own custom pita pocket. This is especially great for kids and accommodating dietary preferences.
- Appetizer Style:
- Use mini pitas or cut regular pitas into smaller, bite-sized pockets.
- Fill with simpler, less messy combinations.
- Themed Pockets:
- Greek: Grilled chicken or falafel, tzatziki, feta, tomatoes, cucumbers, red onion, Kalamata olives.
- Mediterranean Veggie: Hummus, roasted red peppers, artichoke hearts, spinach, feta, cucumbers.
- Classic Deli: Turkey or ham, cheddar or Swiss cheese, lettuce, tomato, mayo/mustard.
- Spicy Falafel: Falafel, tahini sauce, chopped tomatoes and cucumbers (Israeli salad style), pickled turnips, hot sauce.
- Accompaniments:
- Potato chips (baked for a healthier option)
- Pretzel sticks
- A side of tabbouleh or couscous salad
- A refreshing lemonade or iced tea
Additional Tips for Pita Pocket Perfection
- Choose Quality Pitas: Look for pitas that are soft and fresh. Older, drier pitas are more prone to cracking and tearing when you try to open or stuff them. Some brands are specifically made to have better pockets than others.
- Warm Pitas for Pliability: As mentioned in the instructions, gently warming your pitas makes a huge difference. They become softer, more flexible, and the pocket is easier to open without ripping the bread. Don’t overheat or they’ll become crisp.
- Don’t Overstuff: It’s tempting to load up your pita, but overfilling is the number one cause of tearing and messy eating. Add fillings in layers and be mindful of the pita’s capacity. It’s better to have a slightly less stuffed pita that holds together.
- Strategic Layering to Prevent Sogginess: If packing for later, be mindful of moisture.
- Use a lettuce leaf as a barrier between wet ingredients (like tomatoes or sauces) and the pita bread.
- Spread a thicker sauce like hummus on the inside of the pita to act as a sealant.
- Pack very wet ingredients (e.g., heavily dressed salads) or extra sauce separately and add just before eating.
- Get Creative and Prep Ahead:
- Don’t be afraid to experiment with different filling combinations. Leftovers are fantastic in pitas!
- You can chop most vegetables and prepare protein fillings (like chicken salad or cooking chicken) a day or two in advance and store them in airtight containers in the fridge. This makes assembly super quick.
Frequently Asked Questions (FAQ) about Pita Pocket Sandwiches
- Q: How do I keep my pita bread from tearing when I try to open the pocket?
- A: The most important step is to gently warm the pita bread (microwave, oven, or skillet). This makes it more pliable. When cutting, don’t cut too large an opening initially. Use your fingers or a butter knife to gently separate the layers to form the pocket. Avoid pitas that feel dry or brittle.
- Q: Can I make pita pocket sandwiches ahead of time for lunches?
- A: Yes, but with a few caveats to prevent sogginess. It’s best to assemble them no more than a few hours in advance. For longer storage (e.g., packing the night before for next day’s lunch), it’s highly recommended to pack the fillings and sauces separately from the pita. Assemble just before eating. If assembling ahead, use strategic layering (lettuce barrier, hummus spread) as mentioned in the tips.
- Q: What’s the best way to warm pita bread for pockets?
- A: Several methods work well:
- Microwave: Fastest. Wrap 1-2 pitas in a barely damp paper towel, microwave for 15-20 seconds.
- Oven/Toaster Oven: Wrap in foil, heat at 300-350°F (150-175°C) for 5-7 minutes until soft and warm.
- Dry Skillet: Heat over medium for about 30 seconds per side.
- Toaster (slots): Use a light setting. Best for pitas you want slightly crisp, but can make them harder to open if over-toasted.
- A: Several methods work well:
- Q: Are pita pocket sandwiches a healthy lunch option?
- A: They absolutely can be! Choose whole wheat pitas for added fiber. Load them with lean proteins (grilled chicken, chickpeas, tuna in water, lentils), plenty of fresh vegetables for vitamins and crunch, and use healthier sauces like hummus, tzatziki, or a light vinaigrette. Portion control with high-calorie ingredients like cheese and creamy dressings is key to keeping them healthy.
- Q: Are there good gluten-free alternatives to traditional pita bread for pockets?
- A: Yes, the market for gluten-free breads has expanded. You can find gluten-free pita breads in many larger supermarkets or specialty health food stores. Their texture and pocket-forming ability can vary, so you might need to try a few brands. Alternatively, large lettuce leaves (like romaine or butter lettuce) can be used as “wraps” for a naturally gluten-free, low-carb option, though they won’t form a true “pocket.”
Pita pocket sandwiches are a testament to the fact that quick and easy meals can also be exciting, delicious, and nutritious. Enjoy experimenting with your favorite combinations!
Print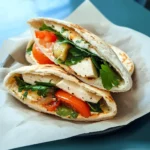
Pita Pocket Sandwiches Recipe
Ingredients
-
- The Pitas:
-
- 4–6 large Pita Breads (whole wheat or white, preferably with a good pocket)
-
- The Pitas:
-
- Protein Powerhouses (Choose 1-2, or combine):
-
- 1.5 cups Cooked Chicken (shredded, diced – rotisserie chicken is a great shortcut)
-
- 1 can (15 oz) Chickpeas, rinsed and drained (for mashing into a chickpea salad or using whole)
-
- 1 can (5 oz) Tuna, drained (for tuna salad)
-
- 4–6 Falafel Balls, cooked (store-bought or homemade)
-
- 8 oz Deli Meat, sliced (turkey, ham, roast beef)
-
- 1 block (8 oz) Halloumi Cheese, sliced and pan-fried or grilled
-
- 1 cup Cooked Lentils (seasoned)
-
- Hard-boiled Eggs, sliced or chopped
-
- Protein Powerhouses (Choose 1-2, or combine):
-
- Fresh & Crunchy Vegetables:
-
- 1 cup Lettuce, shredded (Romaine, iceberg, butter lettuce)
-
- 1 cup Baby Spinach leaves
-
- 1 large Tomato, diced or sliced
-
- 1/2 Cucumber, thinly sliced or diced
-
- 1/2 Red Onion, thinly sliced (optional, for a sharper bite)
-
- 1 Bell Pepper (any color), thinly sliced or diced
-
- 1/2 cup Shredded Carrots
-
- 1/4 cup Olives, sliced (Kalamata, black, or green)
-
- Pickled vegetables (banana peppers, jalapeños, gherkins)
-
- Fresh & Crunchy Vegetables:
-
- Flavorful Spreads & Sauces:
-
- 1/2 cup Hummus (classic, roasted red pepper, garlic – any variety)
-
- 1/2 cup Tzatziki Sauce
-
- Mayonnaise (plain, aioli, or flavored)
-
- Mustard (Dijon, honey mustard, yellow)
-
- Tahini Sauce (especially good with falafel)
-
- Pesto
-
- Guacamole or Sliced Avocado
-
- Your favorite vinaigrette or light dressing
-
- Flavorful Spreads & Sauces:
-
- Cheese (Optional):
-
- 1/2 cup Feta Cheese, crumbled
-
- Sliced Cheddar, Provolone, Swiss, or Monterey Jack
-
- Cheese (Optional):
-
- Seasonings (To taste):
-
- Salt
-
- Black Pepper
-
- Dried Oregano
-
- Lemon Juice
-
- Fresh Herbs (parsley, dill, cilantro)
-
- Seasonings (To taste):
Instructions
-
- Prepare Your Pitas:
-
- Gently warm the pita breads. This makes them more pliable and less likely to tear when you open them. You can do this in a few ways:
-
- Microwave: Wrap in a slightly damp paper towel and microwave for 15-20 seconds.
-
- Oven/Toaster Oven: Wrap in foil and warm at 300°F (150°C) for 5-7 minutes.
-
- Toaster: Lightly toast, but be careful not to make them too crispy or they’ll crack.
-
- Skillet: Warm briefly in a dry skillet over medium heat, about 30 seconds per side.
-
- Gently warm the pita breads. This makes them more pliable and less likely to tear when you open them. You can do this in a few ways:
-
- Once warmed, carefully cut off about one-third to one-half of the pita’s edge to create an opening, or cut the pita in half to form two pockets. Gently pry open the pocket with your fingers or a knife.
-
- Prepare Your Pitas:
-
- Prepare Your Fillings:
-
- Proteins: If using chicken, shred or dice it. If making tuna or chickpea salad, prepare it in a separate bowl by mashing the tuna/chickpeas and mixing with mayo, seasonings, and finely diced celery or onion if desired. Cook falafel according to package directions or your recipe. Pan-fry or grill halloumi slices until golden brown.
-
- Vegetables: Wash and chop/slice all your chosen vegetables.
-
- Sauces: Have your sauces and spreads ready. If making a specific sauce like tahini dressing, prepare it now.
-
- Prepare Your Fillings:
-
- Assemble the Pita Pockets:
-
- Spread First (Optional but Recommended): Spread a thin layer of your chosen sauce (hummus, tzatziki, mayo) on the inside walls of the pita pocket. This not only adds flavor but can also create a slight barrier to prevent sogginess from juicier ingredients.
-
- Layer in Your Protein: Add your chosen protein(s). Don’t overstuff at this stage, as you need room for veggies.
-
- Add the Veggies: Layer in your selection of fresh vegetables. Start with larger, flatter items like lettuce leaves if you want another moisture barrier.
-
- Add Cheese (if using): Sprinkle in feta or add slices of other cheeses.
-
- Drizzle More Sauce (Optional): Add another drizzle of sauce or dressing over the fillings if desired.
-
- Season: A little salt and pepper, or a squeeze of lemon juice, can brighten the flavors.
-
- Assemble the Pita Pockets:
-
- Serve Immediately: Pita pockets are best enjoyed fresh when the pita is soft and the fillings are crisp.
Nutrition
- Serving Size: one normal portion
- Calories: 250-550


