

Honestly, some flavor combinations are just destined to be together, and peanut butter and chocolate sit right at the top of that list for me. I remember the first time I decided to tackle creating the ultimate peanut butter chocolate cake. It was for my son’s birthday, a notorious peanut butter fanatic. The pressure was on! I’d tried recipes before, some too dry, some where the peanut butter frosting was overwhelmingly sweet, others where the chocolate cake itself felt like an afterthought. This time, I was determined. I tinkered, combined elements I loved from different sources, and focused on achieving two things: a deeply flavorful, incredibly moist chocolate cake and a peanut butter frosting that was creamy, rich, but perfectly balanced – undeniably peanut butter, but not cloying. The aroma filling the kitchen as the cakes baked was intoxicating – that deep cocoa scent mingling with the comforting roastiness of peanuts. When it came time to frost, watching that silky peanut butter frosting glide onto the dark chocolate layers was pure satisfaction. The real test, though? The party. Seeing the kids’ eyes light up, the adults reaching for seconds (and thirds!), and my son declaring it the “best cake EVER”… well, that was it. This recipe became the one. It’s decadent, yes, but in the most satisfying way imaginable. It’s the cake requested for celebrations, the one brought to potlucks that disappears first, the ultimate comfort bake when only pure indulgence will do. It strikes that perfect chord between rich chocolate intensity and smooth, salty-sweet peanut butter bliss. This isn’t just a peanut butter chocolate cake recipe; for our family, it’s the peanut butter chocolate cake recipe, and I’m so excited to share it with you.
Complete Ingredients
This recipe yields a two-layer 9-inch round cake. Ensure all refrigerated ingredients are brought to room temperature for best results.
For the Moist Chocolate Cake:
- 2 cups (250g) All-Purpose Flour, spooned and leveled
- 2 cups (400g) Granulated Sugar
- ¾ cup (65g) Unsweetened Cocoa Powder (natural, not Dutch-processed)
- 2 teaspoons Baking Soda
- 1 teaspoon Baking Powder
- 1 teaspoon Salt
- 1 cup (240ml) Buttermilk (or 1 cup milk + 1 tablespoon white vinegar or lemon juice, let sit for 5 minutes)
- ½ cup (120ml) Vegetable Oil (or other neutral oil like canola)
- 2 large Eggs, room temperature
- 1 teaspoon Vanilla Extract
- 1 cup (240ml) Hot Water or Hot Brewed Coffee (enhances chocolate flavor)
For the Creamy Peanut Butter Frosting:
- 1 cup (226g) Unsalted Butter, softened to room temperature
- 1 ½ cups (385g) Creamy Peanut Butter (standard commercial brand like Jif or Skippy recommended for stability; avoid natural peanut butter where oil separates)
- 4 cups (480g) Powdered Sugar (Confectioners’ Sugar), sifted
- ½ cup (120ml) Whole Milk or Heavy Cream, room temperature
- 1 teaspoon Vanilla Extract
- ¼ teaspoon Salt (or more, to taste, depending on peanut butter saltiness)
Optional Garnish:
- Chopped Peanut Butter Cups
- Chopped Roasted Peanuts
- Chocolate Ganache Drizzle (4 oz chopped semi-sweet chocolate + 4 oz heavy cream, heated gently and stirred until smooth)
- Chocolate Shavings or Sprinkles
Instructions
Follow these steps carefully for the perfect peanut butter chocolate cake experience.
Make the Chocolate Cake Layers:
- Preheat & Prep: Preheat your oven to 350°F (175°C). Grease and flour two 9-inch round cake pans. For extra insurance against sticking, line the bottoms with parchment paper circles, then grease and flour the parchment and sides.
- Combine Dry Ingredients: In a large mixing bowl, whisk together the flour, granulated sugar, unsweetened cocoa powder, baking soda, baking powder, and salt. Ensure there are no clumps, especially from the cocoa powder. Whisking well aerates the mixture and combines everything evenly.
- Combine Wet Ingredients: In a separate medium bowl, whisk together the buttermilk, vegetable oil, large eggs (lightly beaten beforehand is helpful), and vanilla extract until well combined.
- Combine Wet and Dry: Pour the wet ingredients into the bowl with the dry ingredients. Using a stand mixer with a paddle attachment on low speed, or a handheld electric mixer on low, mix until just combined. Scrape down the sides and bottom of the bowl to ensure everything is incorporated. Be careful not to overmix at this stage; mix only until the flour streaks disappear. Overmixing develops gluten, leading to a tougher cake.
- Add Hot Liquid: Carefully pour the hot water or hot brewed coffee into the batter. The batter will be very thin – this is normal and is key to a moist cake! Mix on low speed for about 30-60 seconds, just until the hot liquid is fully incorporated. Scrape the bowl again. The thin batter allows the chemical leaveners (baking soda and powder) to work efficiently and creates steam during baking, contributing to the moist crumb.
- Divide Batter: Pour the thin batter evenly between the two prepared cake pans. You can use a kitchen scale to ensure equal amounts for even baking.
- Bake: Place the pans in the preheated oven. Bake for 30-35 minutes, or until a wooden skewer or toothpick inserted into the center of the cakes comes out clean or with a few moist crumbs attached (not wet batter). Baking times can vary depending on your oven, so start checking around the 30-minute mark.
- Cool Cakes: Once baked, remove the cake pans from the oven and place them on a wire cooling rack. Let the cakes cool in the pans for 15-20 minutes. This allows the cakes to set slightly and prevents them from breaking when you invert them.
- Invert and Cool Completely: Carefully run a thin knife or offset spatula around the edges of the cakes to loosen them from the pans. Invert the cakes onto the wire cooling rack, peel off the parchment paper liners (if used), and let them cool completely to room temperature before frosting. This can take 2-3 hours. Attempting to frost warm cakes will result in melted, messy frosting.
Make the Peanut Butter Frosting:
- Cream Butter and Peanut Butter: In a large bowl using a stand mixer with the paddle attachment or a handheld electric mixer, beat the softened unsalted butter and creamy peanut butter together on medium-high speed until light, fluffy, and well combined. This usually takes about 3-4 minutes. Scrape down the sides and bottom of the bowl frequently. This step incorporates air, making the frosting light.
- Add Powdered Sugar Gradually: Turn the mixer speed down to low. Gradually add the sifted powdered sugar, about one cup at a time, alternating with splashes of the room temperature milk or heavy cream. Start and end with powdered sugar. Mix on low speed until just incorporated after each addition to avoid a sugar explosion.
- Add Flavor and Salt: Once all the sugar and milk/cream are incorporated, add the vanilla extract and salt.
- Whip the Frosting: Increase the mixer speed to medium-high and beat for another 3-5 minutes until the frosting is very light, smooth, and creamy. Scrape the bowl occasionally. If the frosting seems too thick, add more milk or cream, one tablespoon at a time, until it reaches your desired spreading consistency. If it seems too thin, add a bit more sifted powdered sugar, a few tablespoons at a time. Taste and add more salt if desired for a sharper peanut butter flavor contrast.
Assemble the Cake:
- Level Cakes (Optional but Recommended): If your cake layers have domed tops, use a long serrated knife to carefully level them. This creates a stable base for stacking and a more professional look. (Save the scraps for snacking!)
- First Layer: Place one cooled chocolate cake layer onto your serving plate or cake stand. You can place strips of parchment paper under the edges of the cake to keep the plate clean while frosting; just slide them out gently when finished.
- Frost the Middle: Scoop about 1 to 1.5 cups of peanut butter frosting onto the center of the first cake layer. Using an offset spatula, spread the frosting evenly out towards the edges.
- Add Second Layer: Carefully place the second chocolate cake layer on top of the frosting, ensuring it’s centered. If you leveled the cakes, place this layer top-side down for a perfectly flat top surface. Gently press down to secure it.
- Crumb Coat (Optional but Recommended): Apply a thin layer of peanut butter frosting all over the top and sides of the cake. This layer traps any loose crumbs, preventing them from mixing into the final frosting layer. Use just enough frosting to cover the cake thinly. Chill the crumb-coated cake in the refrigerator for about 20-30 minutes to firm up the frosting.
- Final Frosting: Apply the remaining peanut butter frosting generously over the top and sides of the chilled cake. Use your offset spatula to create smooth sides or decorative swirls. An icing smoother or bench scraper can help achieve very smooth sides.
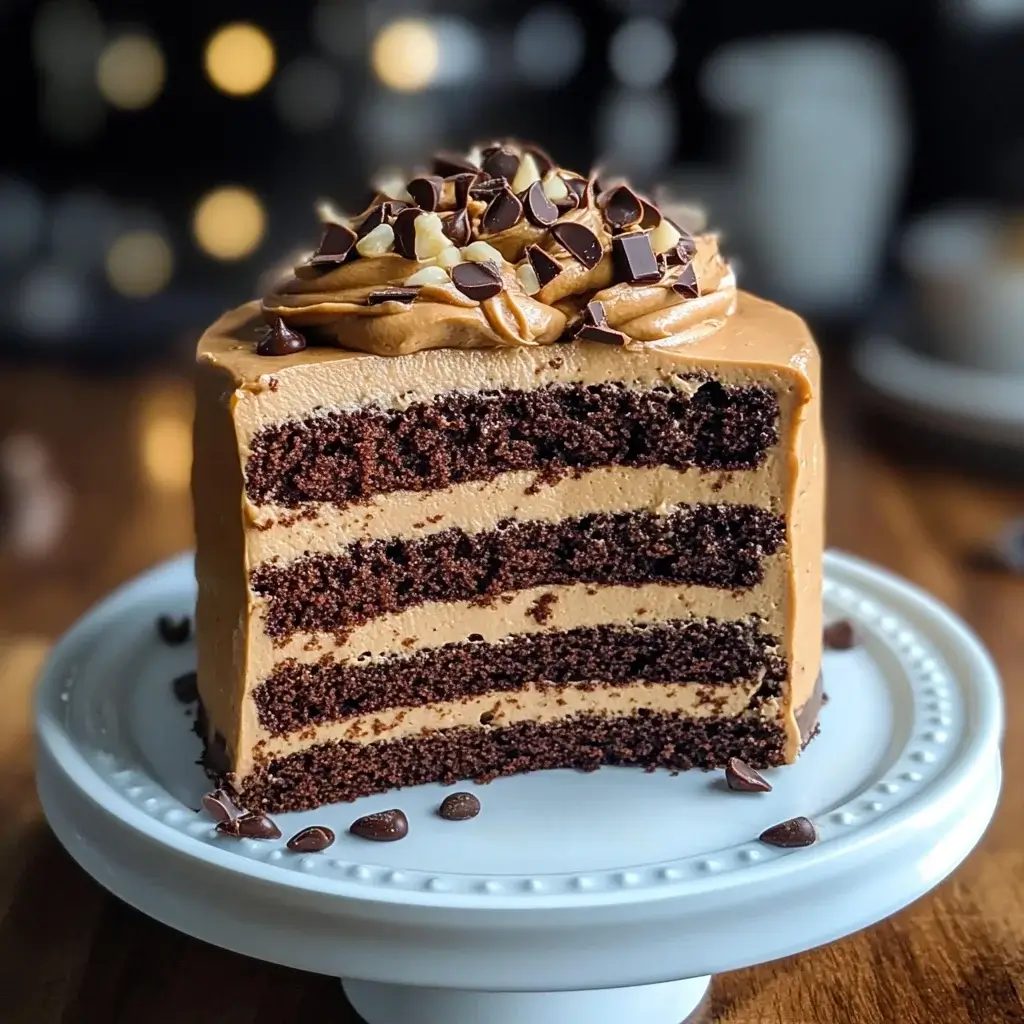
- Garnish (Optional): If desired, decorate the cake immediately after frosting. Press chopped peanut butter cups or roasted peanuts around the base or sprinkle them on top. Drizzle with chocolate ganache (let it cool slightly first so it doesn’t melt the frosting). Add chocolate shavings or sprinkles.
- Chill Briefly (Optional): You can chill the finished cake for about 15-30 minutes to help the frosting set before slicing, making cleaner cuts.
Nutrition Facts
- Servings: This recipe typically yields 12-16 servings, depending on slice size.
- Calories per Serving (Approximate): Depending on the exact ingredients used, slice size, and garnishes, each serving can range from approximately 550 to 750 calories.
Disclaimer: The provided nutrition information is an estimate only, calculated using standard ingredient databases. Actual nutritional values may vary based on specific ingredients, brands, portion sizes, and optional additions.
Preparation Time
- Prep Time: 30-40 minutes (Mixing cake batter, making frosting)
- Cook Time: 30-35 minutes (Baking the cake layers)
- Cooling Time: 2-3 hours (Essential for proper frosting)
- Assembly Time: 20-30 minutes (Including crumb coat and chilling)
- Total Time: Approximately 3.5 – 4.5 hours (including cooling)
How to Serve
Serving this Peanut Butter Chocolate Cake correctly enhances the entire experience. Here are some suggestions:
- Temperature is Key: This cake is best served at room temperature. The chocolate cake is most tender, and the peanut butter frosting is creamiest and most flavorful when not chilled. If storing in the refrigerator, allow slices to sit out for at least 30-60 minutes before serving.
- Perfect Pairings: Elevate your slice with these accompaniments:
- Glass of Cold Milk: The classic choice, cutting through the richness perfectly.
- Scoop of Ice Cream: Vanilla bean or chocolate ice cream are fantastic complements. Coffee or even a salted caramel ice cream would also be delicious.
- Hot Coffee or Espresso: The bitterness of coffee beautifully balances the sweetness of the cake.
- Whipped Cream: A dollop of lightly sweetened fresh whipped cream adds a lovely lightness.
- Presentation Matters:
- Use a cake stand to showcase the beautiful layers and frosting.
- Serve on dessert plates that complement the cake’s colors.
- Use a sharp, thin knife for clean slices. Wiping the knife clean between cuts (possibly running it under hot water and drying it) helps achieve neat slices, especially after chilling briefly.
- Occasions: This cake is a showstopper perfect for:
- Birthdays: Especially for peanut butter and chocolate lovers!
- Holidays: A decadent dessert for Thanksgiving, Christmas, or Easter gatherings.
- Potlucks & Parties: Guaranteed to be a crowd-pleaser.
- Special Celebrations: Anniversaries, promotions, or just because!
- Comfort Food Cravings: Sometimes, you just need an indulgent slice of homemade cake.
- Garnish Power: Even a simple garnish adds appeal:
- A light dusting of cocoa powder or powdered sugar just before serving.
- A drizzle of melted peanut butter or chocolate sauce over each slice.
- Placing a mini peanut butter cup alongside each slice.
Additional Tips
Unlock the full potential of your Peanut Butter Chocolate Cake with these five essential tips:
- Room Temperature Ingredients are Crucial: This isn’t just a suggestion; it’s vital for texture. Room temperature eggs, buttermilk, and butter emulsify better into the batter and frosting. Cold ingredients don’t combine as smoothly, which can lead to a dense cake or lumpy frosting. Take eggs and butter out at least an hour before you start. You can gently warm buttermilk if needed (don’t make it hot).
- Measure Flour Correctly: How you measure flour significantly impacts your cake’s texture. Do not scoop the measuring cup directly into the flour bag – this compacts the flour, resulting in too much flour and a dry cake. Instead, use the “spoon and level” method: Fluff the flour in its container with a spoon, gently spoon it into the measuring cup until overflowing, then sweep the excess off with the straight edge of a knife. Using a kitchen scale for grams (as provided in the ingredient list) is the most accurate method.
- Don’t Overmix the Cake Batter: Mix the cake batter just until the ingredients are combined, especially after adding the flour. Overmixing develops the gluten in the flour, leading to a tough, dense, or rubbery cake instead of a tender, moist crumb. Mix on low speed and stop as soon as you no longer see streaks of flour or the hot liquid is incorporated.
- Cool Cakes Completely Before Frosting: Patience is key here! Warm cake layers will melt your beautiful peanut butter frosting, creating a sliding, messy disaster. Ensure the cakes are completely cool to the touch (not even slightly warm in the center) before you begin assembly. This can take several hours on a wire rack. Rushing this step is a common mistake that compromises the final result.
- Achieve Perfect Frosting Consistency: Peanut butter frosting consistency can vary based on the brand of peanut butter, the temperature of your ingredients, and even humidity. Don’t be afraid to adjust it. If the frosting is too stiff to spread easily, beat in more room temperature milk or cream, one tablespoon at a time, until it reaches a smooth, spreadable texture. If it’s too thin or runny, beat in more sifted powdered sugar, a few tablespoons at a time, until it thickens up. Remember it will firm up slightly when chilled.
Frequently Asked Questions (FAQ)
Q1: How should I store leftover Peanut Butter Chocolate Cake?
A: Store leftover cake in an airtight container to prevent it from drying out. It can be kept at room temperature for up to 2-3 days if your kitchen isn’t too warm. If your house is warm or you want it to last longer, store it in the refrigerator for up to 5 days. Remember to let refrigerated cake slices sit at room temperature for 30-60 minutes before serving for the best taste and texture. The frosting acts as a good barrier, helping to keep the cake moist.
Q2: Can I freeze this Peanut Butter Chocolate Cake?
A: Yes, this cake freezes well! You can freeze individual slices or the whole frosted cake.
- For slices: Wrap each slice tightly in plastic wrap, then place them in a freezer-safe bag or container.
- For the whole cake: Chill the frosted cake in the refrigerator for about an hour until the frosting is firm. Then, wrap the entire cake tightly in several layers of plastic wrap, followed by a layer of aluminum foil.
Frozen cake lasts for up to 2-3 months. Thaw slices at room temperature for a couple of hours, or thaw the whole cake overnight in the refrigerator before bringing it to room temperature to serve.
Q3: Can I make parts of this cake ahead of time?
A: Absolutely! This can make assembly day much easier.
- Cake Layers: Bake the chocolate cake layers up to 2 days in advance. Once completely cooled, wrap them tightly in plastic wrap and store them at room temperature. You can also freeze the wrapped layers for up to a month; thaw overnight in the refrigerator before frosting.
- Peanut Butter Frosting: Make the frosting up to 3-4 days ahead. Store it in an airtight container in the refrigerator. Before using, let it sit at room temperature for about an hour to soften, then re-whip it with your mixer for a few minutes to restore its light and fluffy texture. You might need to add a splash of milk if it’s too stiff.
Q4: Can I use natural peanut butter or different types of cocoa powder?
A:
- Peanut Butter: It’s strongly recommended to use standard creamy peanut butter (like Jif, Skippy, or Peter Pan) for the frosting. Natural peanut butter, where the oil separates, can make the frosting oily, grainy, or unstable. If you must use natural peanut butter, ensure it’s extremely well-stirred and homogenous, and be prepared that the texture might be different. For the cake itself (if adding PB to the cake, which this recipe doesn’t), natural PB is usually fine.
- Cocoa Powder: This recipe calls for natural unsweetened cocoa powder (like Hershey’s). It reacts with the baking soda for leavening. Dutch-processed cocoa powder has been alkalized, giving it a darker color and smoother flavor, but it won’t react with baking soda in the same way. While you can sometimes substitute Dutch-processed cocoa, it might slightly alter the texture and rise. For best results with this specific recipe, stick to natural cocoa powder.
Q5: My chocolate cake turned out dry. What went wrong?
A: Dry chocolate cake is often due to a few common issues:
- Incorrect Flour Measurement: As mentioned in the tips, scooping flour directly from the bag compacts it, leading to too much flour. Use the spoon and level method or weigh your flour.
- Overbaking: Even a few extra minutes in the oven can dry out a cake. Start checking for doneness at the lower end of the baking time range. The cake is done when a toothpick inserted into the center comes out clean or with moist crumbs, not wet batter. Remember cakes continue to cook slightly from residual heat after being removed from the oven.
- Oven Temperature Issues: Ensure your oven is accurately calibrated. An oven running hotter than the set temperature will bake the cake too quickly and dry it out. An oven thermometer can help verify accuracy.
- Substitutions: Making significant substitutions (like using only egg whites, reducing fat drastically) can affect the moisture level. Stick closely to the recipe for guaranteed moist results. The oil and buttermilk in this recipe are key moisture contributors.

Peanut Butter Chocolate Cake recipe
Ingredients
For the Moist Chocolate Cake:
- 2 cups (250g) All-Purpose Flour, spooned and leveled
- 2 cups (400g) Granulated Sugar
- ¾ cup (65g) Unsweetened Cocoa Powder (natural, not Dutch-processed)
- 2 teaspoons Baking Soda
- 1 teaspoon Baking Powder
- 1 teaspoon Salt
- 1 cup (240ml) Buttermilk (or 1 cup milk + 1 tablespoon white vinegar or lemon juice, let sit for 5 minutes)
- ½ cup (120ml) Vegetable Oil (or other neutral oil like canola)
- 2 large Eggs, room temperature
- 1 teaspoon Vanilla Extract
- 1 cup (240ml) Hot Water or Hot Brewed Coffee (enhances chocolate flavor)
For the Creamy Peanut Butter Frosting:
- 1 cup (226g) Unsalted Butter, softened to room temperature
- 1 ½ cups (385g) Creamy Peanut Butter (standard commercial brand like Jif or Skippy recommended for stability; avoid natural peanut butter where oil separates)
- 4 cups (480g) Powdered Sugar (Confectioners’ Sugar), sifted
- ½ cup (120ml) Whole Milk or Heavy Cream, room temperature
- 1 teaspoon Vanilla Extract
- ¼ teaspoon Salt (or more, to taste, depending on peanut butter saltiness)
Optional Garnish:
- Chopped Peanut Butter Cups
- Chopped Roasted Peanuts
- Chocolate Ganache Drizzle (4 oz chopped semi-sweet chocolate + 4 oz heavy cream, heated gently and stirred until smooth)
- Chocolate Shavings or Sprinkles
Instructions
- Preheat & Prep: Preheat your oven to 350°F (175°C). Grease and flour two 9-inch round cake pans. For extra insurance against sticking, line the bottoms with parchment paper circles, then grease and flour the parchment and sides.
- Combine Dry Ingredients: In a large mixing bowl, whisk together the flour, granulated sugar, unsweetened cocoa powder, baking soda, baking powder, and salt. Ensure there are no clumps, especially from the cocoa powder. Whisking well aerates the mixture and combines everything evenly.
- Combine Wet Ingredients: In a separate medium bowl, whisk together the buttermilk, vegetable oil, large eggs (lightly beaten beforehand is helpful), and vanilla extract until well combined.
- Combine Wet and Dry: Pour the wet ingredients into the bowl with the dry ingredients. Using a stand mixer with a paddle attachment on low speed, or a handheld electric mixer on low, mix until just combined. Scrape down the sides and bottom of the bowl to ensure everything is incorporated. Be careful not to overmix at this stage; mix only until the flour streaks disappear. Overmixing develops gluten, leading to a tougher cake.
- Add Hot Liquid: Carefully pour the hot water or hot brewed coffee into the batter. The batter will be very thin – this is normal and is key to a moist cake! Mix on low speed for about 30-60 seconds, just until the hot liquid is fully incorporated. Scrape the bowl again. The thin batter allows the chemical leaveners (baking soda and powder) to work efficiently and creates steam during baking, contributing to the moist crumb.
- Divide Batter: Pour the thin batter evenly between the two prepared cake pans. You can use a kitchen scale to ensure equal amounts for even baking.
- Bake: Place the pans in the preheated oven. Bake for 30-35 minutes, or until a wooden skewer or toothpick inserted into the center of the cakes comes out clean or with a few moist crumbs attached (not wet batter). Baking times can vary depending on your oven, so start checking around the 30-minute mark.
- Cool Cakes: Once baked, remove the cake pans from the oven and place them on a wire cooling rack. Let the cakes cool in the pans for 15-20 minutes. This allows the cakes to set slightly and prevents them from breaking when you invert them.
- Invert and Cool Completely: Carefully run a thin knife or offset spatula around the edges of the cakes to loosen them from the pans. Invert the cakes onto the wire cooling rack, peel off the parchment paper liners (if used), and let them cool completely to room temperature before frosting. This can take 2-3 hours. Attempting to frost warm cakes will result in melted, messy frosting.
Make the Peanut Butter Frosting:
- Cream Butter and Peanut Butter: In a large bowl using a stand mixer with the paddle attachment or a handheld electric mixer, beat the softened unsalted butter and creamy peanut butter together on medium-high speed until light, fluffy, and well combined. This usually takes about 3-4 minutes. Scrape down the sides and bottom of the bowl frequently. This step incorporates air, making the frosting light.
- Add Powdered Sugar Gradually: Turn the mixer speed down to low. Gradually add the sifted powdered sugar, about one cup at a time, alternating with splashes of the room temperature milk or heavy cream. Start and end with powdered sugar. Mix on low speed until just incorporated after each addition to avoid a sugar explosion.
- Add Flavor and Salt: Once all the sugar and milk/cream are incorporated, add the vanilla extract and salt.
- Whip the Frosting: Increase the mixer speed to medium-high and beat for another 3-5 minutes until the frosting is very light, smooth, and creamy. Scrape the bowl occasionally. If the frosting seems too thick, add more milk or cream, one tablespoon at a time, until it reaches your desired spreading consistency. If it seems too thin, add a bit more sifted powdered sugar, a few tablespoons at a time. Taste and add more salt if desired for a sharper peanut butter flavor contrast.
Assemble the Cake:
- Level Cakes (Optional but Recommended): If your cake layers have domed tops, use a long serrated knife to carefully level them. This creates a stable base for stacking and a more professional look. (Save the scraps for snacking!)
- First Layer: Place one cooled chocolate cake layer onto your serving plate or cake stand. You can place strips of parchment paper under the edges of the cake to keep the plate clean while frosting; just slide them out gently when finished.
- Frost the Middle: Scoop about 1 to 1.5 cups of peanut butter frosting onto the center of the first cake layer. Using an offset spatula, spread the frosting evenly out towards the edges.
- Add Second Layer: Carefully place the second chocolate cake layer on top of the frosting, ensuring it’s centered. If you leveled the cakes, place this layer top-side down for a perfectly flat top surface. Gently press down to secure it.
- Crumb Coat (Optional but Recommended): Apply a thin layer of peanut butter frosting all over the top and sides of the cake. This layer traps any loose crumbs, preventing them from mixing into the final frosting layer. Use just enough frosting to cover the cake thinly. Chill the crumb-coated cake in the refrigerator for about 20-30 minutes to firm up the frosting.
- Final Frosting: Apply the remaining peanut butter frosting generously over the top and sides of the chilled cake. Use your offset spatula to create smooth sides or decorative swirls. An icing smoother or bench scraper can help achieve very smooth sides.
- Garnish (Optional): If desired, decorate the cake immediately after frosting. Press chopped peanut butter cups or roasted peanuts around the base or sprinkle them on top. Drizzle with chocolate ganache (let it cool slightly first so it doesn’t melt the frosting). Add chocolate shavings or sprinkles.
- Chill Briefly (Optional): You can chill the finished cake for about 15-30 minutes to help the frosting set before slicing, making cleaner cuts.
Nutrition
- Serving Size: one normal portion
- Calories: 550 to 750


