


This isn’t just any Oreo Ice Cream Cake recipe; it’s THE one that has brought pure, unadulterated joy to countless birthdays, summer barbecues, and “just because” moments in my home. The first time I made it, I was looking for an easy yet impressive dessert that wouldn’t require me to turn on the oven during a sweltering summer day. The simplicity of an Oreo crust, layers of creamy ice cream, and a cloud of whipped topping studded with more Oreos seemed almost too good to be true. But when I unveiled it, the collective gasp of delight from my family was proof enough. The kids’ eyes lit up like Christmas morning, and even my usually reserved husband couldn’t hide his excitement. That first slice – the satisfying crunch of the buttery Oreo crust, the cold, creamy ice cream melting on the tongue, the light sweetness of the whipped topping, and those irresistible cookie chunks throughout – was absolute perfection. It’s the kind of dessert that disappears in record time, with everyone angling for the piece with the most Oreos. It has since become a non-negotiable request for celebrations, a testament to its crowd-pleasing power.
The Ultimate No-Bake Oreo Ice Cream Cake Delight
Oreo Ice Cream Cake is a universally beloved dessert that combines the iconic crunch and flavor of Oreo cookies with the creamy, dreamy goodness of ice cream. It’s a masterpiece of textures and tastes, a no-bake wonder that’s surprisingly easy to assemble yet delivers a showstopping presentation. Perfect for birthdays, holidays, or any occasion that calls for a truly special treat, this recipe will guide you to creating an Oreo Ice Cream Cake that will have everyone asking for the recipe.
Why This Oreo Ice Cream Cake Recipe is a Winner
In a world of countless dessert options, this particular Oreo Ice Cream Cake recipe consistently comes out on top for several compelling reasons:
- Ultimate Ease and Simplicity: This is predominantly a no-bake recipe (unless you choose to make homemade fudge sauce, which is optional). It’s about assembling delicious components, making it accessible even for beginner bakers or those short on time.
- Iconic Flavor Combination: Oreos and ice cream are a match made in dessert heaven. This cake capitalizes on that classic pairing, delivering a taste that is both nostalgic and incredibly satisfying.
- Crowd-Pleasing Power: It’s rare to find someone who doesn’t love Oreos or ice cream. This cake is a guaranteed hit with both kids and adults, making it a go-to for any gathering.
- Textural Perfection: The contrast between the crunchy Oreo crust, the smooth, cold ice cream, the soft whipped topping, and the delightful chunks of cookies scattered throughout is simply divine. Every bite is an adventure.
- Customizable: While classic Cookies ‘n Cream ice cream is a natural fit, you can easily customize this cake with your favorite ice cream flavors. Vanilla, chocolate, mint chocolate chip, or even coffee ice cream can create delicious variations.
- Visually Appealing: With its distinct layers and generous Oreo garnish, this ice cream cake looks impressive and inviting, making it a fantastic centerpiece for your dessert table.
- Make-Ahead Marvel: Ice cream cakes, by their nature, need to be made ahead, which frees you up on the day of your event. Store it in the freezer, and it’s ready whenever you are.
This recipe isn’t just about making a cake; it’s about creating moments of pure joy and indulgence with minimal fuss.
Gathering Your Ingredients: The Oreo Dream Team
For the best Oreo Ice Cream Cake, quality ingredients are key. Here’s what you’ll need:
For the Oreo Cookie Crust:
- 36-40 regular Oreo cookies (about 1 standard 14.3 oz package), whole, including filling
- 6 tablespoons (85g) unsalted butter, melted
For the Ice Cream Layers:
- 1.5 quarts (6 cups) Cookies ‘n Cream ice cream, slightly softened
- (Optional) 1.5 quarts (6 cups) of a contrasting or complementary ice cream flavor like vanilla, chocolate, or even chocolate chip cookie dough ice cream, slightly softened
For the Fudge Layer (Optional but Highly Recommended):
- 1 cup (240ml) store-bought hot fudge sauce, warmed slightly to a pourable consistency
- Or for homemade:
- 1/2 cup (120ml) heavy cream
- 1/4 cup (50g) granulated sugar
- 1/4 cup (25g) unsweetened cocoa powder
- 1/4 cup (45g) dark chocolate chips or chopped dark chocolate
- 2 tablespoons unsalted butter
- 1/2 teaspoon vanilla extract
- Pinch of salt
- Or for homemade:
For the Whipped Topping & Garnish:
- 1 1/2 cups (360ml) cold heavy whipping cream
- 1/4 cup (30g) powdered sugar
- 1 teaspoon vanilla extract
- 8-12 Oreo cookies, roughly chopped or broken, for garnish
- (Optional) Extra chocolate sprinkles or mini chocolate chips
Equipment:
- 9-inch springform pan
- Food processor (or a zip-top bag and rolling pin for crushing Oreos)
- Offset spatula or the back of a spoon
Step-by-Step Instructions: Assembling Your Frozen Masterpiece
Follow these detailed steps to create your perfect Oreo Ice Cream Cake. Remember that working quickly with ice cream is important!
Phase 1: Prepare the Pan and Oreo Crust
- Prepare the Pan: Lightly grease the bottom and sides of a 9-inch springform pan. You can also line the bottom with a circle of parchment paper for even easier removal, if desired.
- Crush the Oreos: Place the 36-40 whole Oreo cookies (filling and all) into the bowl of a food processor. Pulse until they are fine crumbs. Alternatively, place the cookies in a large, heavy-duty zip-top bag, seal it, and crush them with a rolling pin until fine.
- Combine Crust Ingredients: Transfer the Oreo crumbs to a medium bowl. Pour the 6 tablespoons of melted unsalted butter over the crumbs. Stir with a fork until all the crumbs are moistened and resemble wet sand.
- Press Crust into Pan: Pour the buttery Oreo crumb mixture into the prepared springform pan. Press the crumbs firmly and evenly onto the bottom of the pan and about 1-1.5 inches up the sides. Use the bottom of a glass or a measuring cup to help pack it tightly.
- Freeze Crust: Place the pan with the crust into the freezer for at least 30 minutes to firm up. This prevents the ice cream from making the crust soggy.
Phase 2: Add the Ice Cream Layers
Important Note: Soften your ice cream slightly before starting this step. Let it sit at room temperature for about 10-15 minutes, or until it’s spreadable but not melted. Work quickly to prevent it from melting too much.
- First Ice Cream Layer: Remove the chilled crust from the freezer. Scoop the 1.5 quarts of slightly softened Cookies ‘n Cream ice cream (or your first chosen flavor) onto the crust. Working quickly, use an offset spatula or the back of a spoon to spread the ice cream into an even layer.
- Freeze First Layer: Cover the pan loosely with plastic wrap and return it to the freezer for at least 1-2 hours, or until the ice cream layer is firm. This prevents the layers from mixing.
Phase 3: Add the Fudge Layer (Optional)
- Prepare Fudge Sauce:
- If using store-bought: Warm the hot fudge sauce slightly until it’s pourable but not hot (you don’t want to melt the ice cream).
- If making homemade: In a small saucepan, whisk together heavy cream, sugar, and cocoa powder. Bring to a simmer over medium heat, whisking constantly. Cook for 1-2 minutes. Remove from heat, add chocolate chips, butter, vanilla, and salt. Whisk until smooth. Let it cool to lukewarm or room temperature before using.
- Spread Fudge Layer: Remove the cake from the freezer. Pour the cooled (but still pourable) fudge sauce over the firm ice cream layer. Gently spread it into an even layer using an offset spatula.
- Freeze Fudge Layer: Return the cake to the freezer for another 30-60 minutes, or until the fudge layer is set and no longer tacky.
Phase 4: Add the Second Ice Cream Layer (If Using)
- If Using a Second Flavor: If you opted for a second ice cream flavor, remove the cake from the freezer. Scoop your slightly softened second ice cream flavor over the set fudge layer (or directly onto the first ice cream layer if skipping fudge). Spread it evenly.
- Freeze Again: Cover and return the cake to the freezer for at least 2-3 hours, or until this layer is also firm. If this is your final ice cream layer before the topping, ensure it freezes solid, preferably for 4 hours or overnight, before proceeding to the topping.
Phase 5: Prepare and Add Whipped Topping
- Whip the Cream: In a large, chilled mixing bowl, combine the 1 1/2 cups cold heavy whipping cream, 1/4 cup powdered sugar, and 1 teaspoon vanilla extract. Using an electric mixer (stand mixer with whisk attachment or hand mixer), beat on medium-high speed until stiff peaks form. Be careful not to overbeat, or it will turn into butter.
- Top the Cake: Remove the firmly frozen ice cream cake from the freezer. Spread the whipped cream evenly over the top ice cream layer. You can create decorative swirls with your spatula if desired.
- Garnish: Sprinkle the 8-12 roughly chopped or broken Oreo cookies generously over the whipped cream. Add chocolate sprinkles or mini chocolate chips if using.
Phase 6: Final Freeze
- Freeze Solid: Cover the cake loosely with plastic wrap (try not to let it touch the topping too much – you can insert toothpicks to create a tent if needed) and return it to the freezer for at least 4-6 hours, or preferably overnight, until completely firm and solid. This ensures it slices cleanly.
Nutritional Snapshot: Understanding Your Treat
Oreo Ice Cream Cake is a rich and decadent dessert. Here’s an approximate nutritional overview:
- Servings: This recipe typically yields 10-12 generous servings.
- Calories per serving (approximate): A single serving (based on 1/12th of the cake, including a fudge layer and two ice cream layers) can range from 450 to 650 calories.
This estimate can vary significantly based on:
- The specific brands and types of Oreos and ice cream used (low-fat versions will be lower).
- Whether you include the fudge layer and its ingredients.
- The exact serving size.
It’s a treat meant for indulgence!
Time Commitment: Planning Your Frozen Fun
While the active preparation time is relatively short, ice cream cakes require significant freezing time.
- Active Preparation Time:
- Oreo Crust: 10-15 minutes
- Layering Ice Cream & Fudge (each layer): 5-10 minutes per layer
- Whipped Topping: 5-7 minutes
- Total Active Time: Approximately 30-45 minutes (spread out)
- Inactive Freezing Time:
- Crust: At least 30 minutes
- First Ice Cream Layer: 1-2 hours
- Fudge Layer (if using): 30-60 minutes
- Second Ice Cream Layer (if using): 2-3 hours
- Final Freeze (after topping): At least 4-6 hours, preferably overnight (8+ hours)
- Total Estimated Time (from start to ready-to-serve): Minimum 8-12 hours, but best if allowed to freeze overnight.
This makes it an ideal make-ahead dessert.
How to Serve: Presenting Your Oreo Ice Cream Cake
Serving this frozen beauty is the best part!
- Thaw Slightly Before Serving: Remove the cake from the freezer about 5-10 minutes before you plan to serve it. This allows it to soften just enough for easier slicing without melting.
- Release from Springform Pan: Carefully run a thin knife around the edge of the cake to loosen it from the sides of the springform pan before releasing the spring.
- Slicing:
- Use a long, sharp knife.
- For the cleanest slices, dip the knife in hot water and wipe it dry between each cut. This helps it glide through the frozen layers smoothly.
- Plating:
- Serve slices on chilled dessert plates if possible, to slow down melting.
- Optional Extra Garnishes (at serving time):
- A drizzle of extra chocolate syrup or hot fudge sauce over each slice.
- A dollop of additional whipped cream.
- A whole Oreo cookie perched on top of each slice.
- Perfect Occasions:
- Birthdays (a fantastic alternative to traditional cake)
- Summer parties and BBQs
- Potlucks
- Any celebration calling for a fun, crowd-pleasing dessert
- Pairings:
- A glass of cold milk is the ultimate Oreo companion.
- A cup of coffee or espresso for the adults.
Pro Tips for Oreo Ice Cream Cake Success (5 Tips)
- Soften Ice Cream Correctly: The key is “softened,” not “melted.” Ice cream should be easy to spread but still frozen enough to hold its shape. If it melts too much, it will refreeze with an icy texture. Let it sit on the counter for 10-15 minutes.
- Work Quickly and Freeze Between Layers: This is the golden rule of ice cream cakes. Work efficiently when spreading ice cream layers and ensure each layer (crust, ice cream, fudge) is sufficiently frozen before adding the next. This prevents layers from blending and ensures a clean presentation.
- Use a Springform Pan: A springform pan is highly recommended. Its removable sides make it much easier to unmold the delicate ice cream cake without damaging it.
- Don’t Skimp on Oreos: Oreos are the star! Use the full amount for the crust and be generous with the garnish. The more Oreo crunch and flavor, the better. Consider using Double Stuf Oreos for an even richer crust if you’re a true fanatic.
- Pack the Crust Firmly: A well-packed Oreo crust is essential for a sturdy base that won’t crumble when sliced. Use the bottom of a glass or measuring cup to press it down very firmly on the bottom and up the sides of the pan.
Frequently Asked Questions (FAQ) About Oreo Ice Cream Cake
Q1: Can I use different flavors of ice cream?
A: Absolutely! While Cookies ‘n Cream is classic, feel free to get creative. Vanilla, chocolate, mint chocolate chip, coffee, peanut butter cup, or even strawberry ice cream would be delicious. You can use one flavor or layer two complementary flavors.
Q2: How long does the Oreo Ice Cream Cake need to freeze before serving?
A: For the best results and cleanest slices, the cake needs to freeze solid. After final assembly and topping, it should freeze for at least 4-6 hours, but overnight (8+ hours) is ideal. This ensures all layers are thoroughly frozen and set.
Q3: How do I store leftover Oreo Ice Cream Cake?
A: Leftover Oreo Ice Cream Cake should be stored in the freezer. Wrap it tightly in plastic wrap, then in aluminum foil, or place it in an airtight freezer-safe container to prevent freezer burn. It will keep well for up to 1-2 weeks, though the texture is best within the first few days.
Q4: Can I make this without a springform pan?
A: It’s possible, but more challenging. You could line a regular 9-inch round cake pan or a 9×9 inch square pan with plastic wrap, leaving a generous overhang. Assemble the cake as directed. To serve, use the plastic wrap overhang to lift the cake out of the pan. It might not look as neat as with a springform pan.
Q5: Can I make a smaller or larger version of this cake?
A: Yes, you can adjust the recipe. For a smaller cake (e.g., in an 8-inch pan), reduce the ingredient quantities proportionally. For a larger cake (e.g., in a 10-inch springform or a 9×13 inch pan for a sheet-style cake), increase the quantities. Baking/freezing times might need slight adjustments. For a 9×13 pan, you’ll likely need to nearly double the crust and ice cream quantities.
Storing Your Frozen Delight: Keeping it Perfect
Proper storage is crucial to maintain the quality of your Oreo Ice Cream Cake:
- Freezer is a Must: This is an ice cream cake, so it must be stored in the freezer at all times when not being served.
- Wrap Well: To prevent freezer burn and absorption of freezer odors, wrap the cake tightly.
- If still in the springform pan (before removing the ring for serving later), cover loosely with plastic wrap.
- After slicing, wrap individual slices in plastic wrap and then place them in a freezer bag or airtight container.
- If storing a larger leftover portion, place it in an airtight freezer-safe container or wrap it very well in plastic wrap followed by a layer of aluminum foil.
- Duration: For the best taste and texture, enjoy your Oreo Ice Cream Cake within 1-2 weeks of making it. While it can technically last longer if very well wrapped, the quality (especially of the whipped topping and Oreos) may decline over time, with Oreos potentially becoming less crunchy.
Conclusion: Your Go-To Crowd-Pleasing Dessert
This Oreo Ice Cream Cake recipe is more than just a dessert; it’s a celebration waiting to happen. With its irresistible combination of crunchy Oreo cookies, creamy ice cream, luscious fudge, and fluffy whipped topping, it’s a guaranteed showstopper that requires minimal effort for maximum impact. The joy of making it is matched only by the delight of watching your friends and family savor every single bite. So, clear some space in your freezer, gather your ingredients, and get ready to create a frozen masterpiece that will become your new go-to for any occasion that calls for something truly special and undeniably delicious. Happy (no) baking!
Print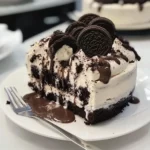
Oreo Ice Cream Cake recipe
Ingredients
For the Oreo Cookie Crust:
-
- 36–40 regular Oreo cookies (about 1 standard 14.3 oz package), whole, including filling
-
- 6 tablespoons (85g) unsalted butter, melted
For the Ice Cream Layers:
-
- 1.5 quarts (6 cups) Cookies ‘n Cream ice cream, slightly softened
-
- (Optional) 1.5 quarts (6 cups) of a contrasting or complementary ice cream flavor like vanilla, chocolate, or even chocolate chip cookie dough ice cream, slightly softened
For the Fudge Layer (Optional but Highly Recommended):
-
- 1 cup (240ml) store-bought hot fudge sauce, warmed slightly to a pourable consistency
-
- Or for homemade:
-
- 1/2 cup (120ml) heavy cream
-
- 1/4 cup (50g) granulated sugar
-
- 1/4 cup (25g) unsweetened cocoa powder
-
- 1/4 cup (45g) dark chocolate chips or chopped dark chocolate
-
- 2 tablespoons unsalted butter
-
- 1/2 teaspoon vanilla extract
-
- Pinch of salt
-
- Or for homemade:
-
- 1 cup (240ml) store-bought hot fudge sauce, warmed slightly to a pourable consistency
For the Whipped Topping & Garnish:
-
- 1 1/2 cups (360ml) cold heavy whipping cream
-
- 1/4 cup (30g) powdered sugar
-
- 1 teaspoon vanilla extract
-
- 8–12 Oreo cookies, roughly chopped or broken, for garnish
-
- (Optional) Extra chocolate sprinkles or mini chocolate chips
Instructions
Phase 1: Prepare the Pan and Oreo Crust
-
- Prepare the Pan: Lightly grease the bottom and sides of a 9-inch springform pan. You can also line the bottom with a circle of parchment paper for even easier removal, if desired.
-
- Crush the Oreos: Place the 36-40 whole Oreo cookies (filling and all) into the bowl of a food processor. Pulse until they are fine crumbs. Alternatively, place the cookies in a large, heavy-duty zip-top bag, seal it, and crush them with a rolling pin until fine.
-
- Combine Crust Ingredients: Transfer the Oreo crumbs to a medium bowl. Pour the 6 tablespoons of melted unsalted butter over the crumbs. Stir with a fork until all the crumbs are moistened and resemble wet sand.
-
- Press Crust into Pan: Pour the buttery Oreo crumb mixture into the prepared springform pan. Press the crumbs firmly and evenly onto the bottom of the pan and about 1-1.5 inches up the sides. Use the bottom of a glass or a measuring cup to help pack it tightly.
-
- Freeze Crust: Place the pan with the crust into the freezer for at least 30 minutes to firm up. This prevents the ice cream from making the crust soggy.
Phase 2: Add the Ice Cream Layers
Important Note: Soften your ice cream slightly before starting this step. Let it sit at room temperature for about 10-15 minutes, or until it’s spreadable but not melted. Work quickly to prevent it from melting too much.
-
- First Ice Cream Layer: Remove the chilled crust from the freezer. Scoop the 1.5 quarts of slightly softened Cookies ‘n Cream ice cream (or your first chosen flavor) onto the crust. Working quickly, use an offset spatula or the back of a spoon to spread the ice cream into an even layer.
-
- Freeze First Layer: Cover the pan loosely with plastic wrap and return it to the freezer for at least 1-2 hours, or until the ice cream layer is firm. This prevents the layers from mixing.
Phase 3: Add the Fudge Layer (Optional)
-
- Prepare Fudge Sauce:
-
- If using store-bought: Warm the hot fudge sauce slightly until it’s pourable but not hot (you don’t want to melt the ice cream).
-
- If making homemade: In a small saucepan, whisk together heavy cream, sugar, and cocoa powder. Bring to a simmer over medium heat, whisking constantly. Cook for 1-2 minutes. Remove from heat, add chocolate chips, butter, vanilla, and salt. Whisk until smooth. Let it cool to lukewarm or room temperature before using.
-
- Prepare Fudge Sauce:
-
- Spread Fudge Layer: Remove the cake from the freezer. Pour the cooled (but still pourable) fudge sauce over the firm ice cream layer. Gently spread it into an even layer using an offset spatula.
-
- Freeze Fudge Layer: Return the cake to the freezer for another 30-60 minutes, or until the fudge layer is set and no longer tacky.
Phase 4: Add the Second Ice Cream Layer (If Using)
-
- If Using a Second Flavor: If you opted for a second ice cream flavor, remove the cake from the freezer. Scoop your slightly softened second ice cream flavor over the set fudge layer (or directly onto the first ice cream layer if skipping fudge). Spread it evenly.
-
- Freeze Again: Cover and return the cake to the freezer for at least 2-3 hours, or until this layer is also firm. If this is your final ice cream layer before the topping, ensure it freezes solid, preferably for 4 hours or overnight, before proceeding to the topping.
Phase 5: Prepare and Add Whipped Topping
-
- Whip the Cream: In a large, chilled mixing bowl, combine the 1 1/2 cups cold heavy whipping cream, 1/4 cup powdered sugar, and 1 teaspoon vanilla extract. Using an electric mixer (stand mixer with whisk attachment or hand mixer), beat on medium-high speed until stiff peaks form. Be careful not to overbeat, or it will turn into butter.
-
- Top the Cake: Remove the firmly frozen ice cream cake from the freezer. Spread the whipped cream evenly over the top ice cream layer. You can create decorative swirls with your spatula if desired.
-
- Garnish: Sprinkle the 8-12 roughly chopped or broken Oreo cookies generously over the whipped cream. Add chocolate sprinkles or mini chocolate chips if using.
Phase 6: Final Freeze
-
- Freeze Solid: Cover the cake loosely with plastic wrap (try not to let it touch the topping too much – you can insert toothpicks to create a tent if needed) and return it to the freezer for at least 4-6 hours, or preferably overnight, until completely firm and solid. This ensures it slices cleanly.
Nutrition
- Serving Size: one normal portion
- Calories: 450 to 650 calories.


