

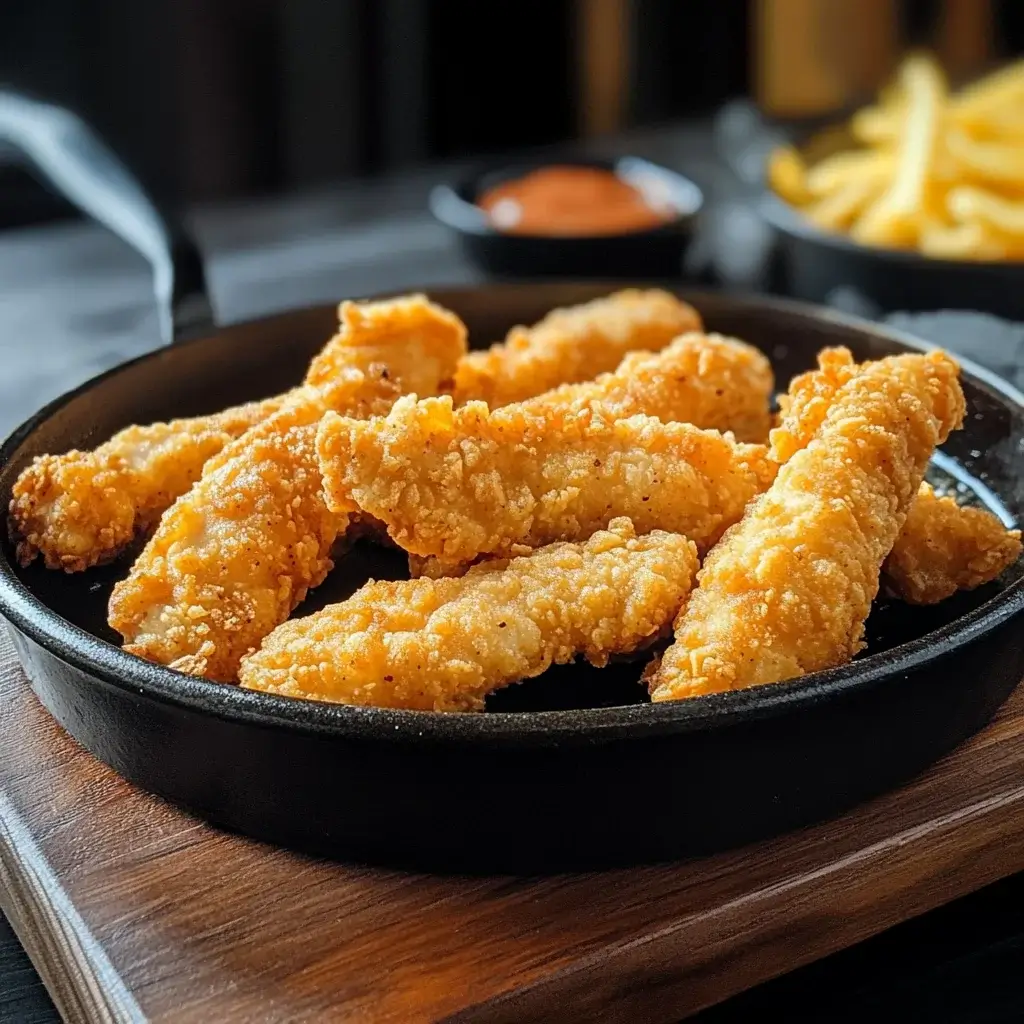
There are certain recipes that just become part of your family’s fabric, the ones requested week after week, and these One-Pan Baked Chicken Tenders are firmly in that category for us. I remember the first time I ditched the messy, splattery deep fryer and tried baking them instead. Honestly, I was bracing for disappointment, expecting dry, bland chicken strips. But when I pulled that single pan from the oven, revealing perfectly golden, crispy tenders nestled next to some roasted broccoli, the aroma alone told me I was onto something good. The kids devoured them, proclaiming them “even better than the fried ones!” – high praise indeed. The best part for me? Minimal cleanup. No vat of oil to deal with, just one pan to wash. It felt like a magic trick: delicious, healthier comfort food without the usual kitchen chaos. Now, it’s our go-to for busy weeknights, casual weekend lunches, and even game-day snacking. They’re simple, reliable, and consistently deliver crispy, juicy results that make everyone happy.
The Magic of One-Pan Meals: Why Simplify Dinner?
Before diving into the specifics of these delicious chicken tenders, let’s appreciate the sheer brilliance of the one-pan meal concept. In our fast-paced lives, anything that promises less work and less cleanup without sacrificing flavour is a welcome addition to the kitchen repertoire. One-pan recipes, like this baked chicken tender delight, are the unsung heroes of modern home cooking.
Firstly, the cleanup is drastically reduced. This is perhaps the most celebrated benefit. Instead of juggling multiple pots, pans, and bowls, everything cooks together on a single baking sheet. This means fewer dishes to scrub, less time spent at the sink, and more time enjoying your meal or relaxing afterward. For anyone who dreads the post-dinner dish pile, one-pan cooking feels revolutionary.
Secondly, they are inherently time-efficient. While ingredients might need some prep, the cooking process itself is often hands-off. Once everything is arranged on the pan and popped into the oven, you’re largely free until the timer goes off. This allows you to multitask, help with homework, or simply unwind. The streamlined process means less active cooking time and fewer steps overall.
Thirdly, flavour melding is a beautiful byproduct. As the chicken tenders bake alongside any accompanying vegetables, their juices and seasonings mingle. The chicken might pick up subtle notes from the veggies, and the veggies benefit from the savoury chicken drippings. This creates a more cohesive and often richer flavour profile than cooking components separately.
Furthermore, one-pan oven meals are often a healthier cooking method. Baking requires significantly less oil than deep-frying or even pan-frying, reducing overall fat and calorie content. It’s an easy way to enjoy typically indulgent foods, like crispy chicken tenders, in a more guilt-free manner. Roasting vegetables alongside the protein also encourages higher veggie consumption.
Finally, one-pan recipes are incredibly accessible and beginner-friendly. They require minimal specialized equipment (just a sturdy baking sheet!) and the techniques involved are usually straightforward. This makes them perfect for novice cooks looking to build confidence in the kitchen or for anyone seeking simple, reliable dinner solutions. Embracing the one-pan method means embracing simplicity, flavour, and efficiency – a winning combination for any home cook.
Complete Ingredients with Amounts: Your Shopping List
Gathering the right ingredients is the first step towards achieving perfectly crispy and flavourful baked chicken tenders. Precision helps, especially with seasonings, but feel free to adjust spices to your liking. This recipe serves approximately 4 people.
- Chicken:
- Chicken Tenderloins: 1.5 pounds (about 680g). Alternatively, you can use boneless, skinless chicken breasts, cut lengthwise into 1-inch thick strips. Tenderloins are naturally tender and perfectly portioned.
- For the Breading Station:
- Bowl 1 (Flour Dredge):
- All-Purpose Flour: ½ cup (about 60g). You can substitute with whole wheat flour or a gluten-free blend if needed.
- Salt: ½ teaspoon
- Black Pepper: ¼ teaspoon
- Bowl 2 (Egg Wash):
- Large Eggs: 2
- Water or Milk: 1 tablespoon (helps thin the egg slightly for better coating)
- Bowl 3 (Crumb Coating):
- Panko Breadcrumbs: 1 ½ cups (about 75g). Panko provides superior crispiness compared to regular breadcrumbs due to its airy, jagged texture.
- Grated Parmesan Cheese (Optional but recommended): ¼ cup (about 25g). Adds savoury flavour and aids browning.
- Paprika: 1 teaspoon (Sweet or smoked paprika both work well)
- Garlic Powder: 1 teaspoon
- Onion Powder: ½ teaspoon
- Dried Parsley or Italian Seasoning: 1 teaspoon (optional, for flavour)
- Salt: ½ teaspoon
- Black Pepper: ¼ teaspoon
- Bowl 1 (Flour Dredge):
- For Baking:
- Olive Oil or Avocado Oil: 2-3 tablespoons (or cooking spray). Essential for helping the breadcrumbs crisp up and prevent sticking. Avocado oil has a higher smoke point, ideal for higher baking temperatures.
Ingredient Considerations:
- Chicken: Ensure your chicken is fresh. If using chicken breasts, try to cut the strips as evenly as possible for consistent cooking. Patting the chicken dry before starting helps the flour adhere better.
- Panko: While regular breadcrumbs work, Japanese Panko breadcrumbs are highly recommended for the crispiest texture. They absorb less oil and stay lighter.
- Seasoning: This blend is a classic starting point. Feel free to customize! Add cayenne pepper for heat, dried thyme or rosemary for herbal notes, or use a pre-made seasoning blend you enjoy.
- Oil: Don’t skip the oil drizzle or spray over the breaded tenders before baking. It’s crucial for achieving that golden-brown, crispy exterior that mimics frying.
Instructions: Your Step-by-Step Guide to Crispy Baked Tenders
Follow these instructions carefully for tender, juicy chicken with a perfectly crispy coating, all cooked on a single pan.
Step 1: Preheat Oven and Prepare Baking Sheet
- Position an oven rack in the center of the oven.
- Preheat your oven to 400°F (200°C). A hot oven is key for crispiness.
- Line a large, rimmed baking sheet with parchment paper for easiest cleanup. Alternatively, lightly grease the pan with oil or cooking spray. You can also place a wire rack inside the baking sheet – this allows air to circulate underneath the tenders, promoting extra crispiness, though it means washing the rack later.
Step 2: Prepare the Chicken
- If using chicken breasts, slice them lengthwise into even strips, about 1-inch thick. If using tenderloins, remove the tough white tendon if desired (you can often pull it out or snip it off with kitchen shears, though it’s edible if left on).
- Pat the chicken pieces completely dry with paper towels. This is crucial for helping the breading stick properly.
Step 3: Set Up the Breading Station
- Prepare three shallow bowls or dishes large enough to hold the chicken pieces.
- Bowl 1: Whisk together the all-purpose flour, ½ tsp salt, and ¼ tsp pepper.
- Bowl 2: In the second bowl, whisk the eggs thoroughly with the tablespoon of water or milk until smooth.
- Bowl 3: In the third bowl, combine the Panko breadcrumbs, grated Parmesan cheese (if using), paprika, garlic powder, onion powder, dried parsley/Italian seasoning (if using), ½ tsp salt, and ¼ tsp pepper. Stir well to ensure seasonings are evenly distributed.
Step 4: Bread the Chicken Tenders
- Work with one piece of chicken at a time. Use one hand for handling the wet ingredients and the other for dry to minimize clumping on your fingers (the “wet hand, dry hand” technique).
- Dredge in Flour: Coat the chicken piece lightly in the seasoned flour mixture (Bowl 1), shaking off any excess. The flour helps the egg wash adhere.
- Dip in Egg Wash: Transfer the floured chicken to the egg mixture (Bowl 2), ensuring it’s fully coated. Let any excess egg drip off.
- Coat in Breadcrumbs: Place the egg-coated chicken into the Panko mixture (Bowl 3). Press the breadcrumbs gently onto all sides of the chicken to ensure a thick, even coating.
- Place the breaded chicken tender onto the prepared baking sheet in a single layer. Repeat with the remaining chicken pieces, ensuring there is some space between each tender. Do not overcrowd the pan, as this will cause the chicken to steam rather than crisp up. Use a second pan if necessary.
Step 5: Prepare for Baking
- Once all chicken tenders are breaded and arranged on the baking sheet, drizzle them evenly with the 2-3 tablespoons of olive oil or avocado oil. Alternatively, generously spray them with cooking spray, ensuring the tops are well-coated. This fat is essential for browning and crisping.
Step 6: Bake to Perfection
- Place the baking sheet into the preheated 400°F (200°C) oven.
- Bake for 15-20 minutes. The exact time will depend on the thickness of your chicken tenders.
- (Optional but recommended for even crispiness): Carefully flip the chicken tenders halfway through the baking time (around the 8-10 minute mark) using tongs. Drizzle or spray the other side lightly with oil if it looks dry.
- The chicken tenders are done when they are golden brown and crispy, and the internal temperature reaches 165°F (74°C) when checked with a meat thermometer inserted into the thickest part. The chicken should be opaque and the juices should run clear.
Step 7: Rest and Serve
- Remove the baking sheet from the oven.
- Let the chicken tenders rest on the pan for a few minutes before serving. This allows the juices to redistribute, ensuring a more tender bite.
- Serve immediately with your favorite dipping sauces and sides.
One-Pan Variation with Vegetables:
- If you want to add vegetables, choose quick-roasting options like broccoli florets, asparagus spears, sliced bell peppers, or green beans.
- Toss the vegetables lightly with olive oil, salt, and pepper.
- Arrange the vegetables around the chicken tenders on the same baking sheet before putting it in the oven. Ensure nothing is overcrowded. They should cook in roughly the same amount of time as the chicken.
Nutrition Facts (Servings and Calories per Serving)
Understanding the nutritional profile helps incorporate these tasty tenders into a balanced diet. Please note these figures are estimates and can vary significantly based on the exact ingredients used (type of breadcrumbs, amount of oil absorbed, size of tenders, use of Parmesan) and serving size.
- Servings: This recipe typically yields 4 servings.
- Estimated Calories per Serving (approx. ¼ of the recipe): 350 – 450 calories.
Approximate Nutritional Breakdown (per serving):
- Protein: 40-50g (Excellent source, primarily from chicken)
- Fat: 10-20g (Influenced by oil used, Parmesan, and chicken fat content)
- Saturated Fat: 3-6g
- Carbohydrates: 20-30g (Primarily from breadcrumbs and flour)
- Fiber: 1-3g
- Sodium: 600-800mg (Can vary greatly depending on added salt and Parmesan)
Healthier Aspects:
- Baked, Not Fried: Significantly lower in fat and calories compared to traditional deep-fried chicken tenders. Baking uses minimal added oil for crisping, rather than submerging in fat.
- Lean Protein: Chicken tenderloins or breast meat are excellent sources of lean protein, crucial for muscle building, satiety, and overall bodily function.
- Control Over Ingredients: Making them at home allows you to control the quality of ingredients, sodium levels, and seasoning choices, avoiding excessive additives often found in store-bought or restaurant versions.
- Easy to Pair with Veggies: The one-pan method encourages adding nutrient-rich vegetables, boosting the overall nutritional value of the meal.
Enjoy these baked tenders as a healthier alternative that doesn’t compromise on flavour or satisfying crunch.
Preparation Time: Planning Your Cooking Workflow
Knowing the time commitment helps you fit this easy recipe into your schedule. Here’s a breakdown:
- Active Preparation Time:
- Preheating Oven & Preparing Pan: 5 minutes
- Preparing Chicken (Patting dry, cutting if needed): 5 minutes
- Setting Up Breading Station: 5 minutes
- Breading the Chicken: 10-15 minutes (depending on speed and quantity)
- Arranging on Pan & Oiling: 2-3 minutes
- Total Active Time: Approximately 25 – 35 minutes
- Inactive Time (Baking):
- Baking in Oven: 15-20 minutes
- Resting Time: 2-3 minutes
- Total Inactive Time: Approximately 17 – 23 minutes
- Total Overall Time:
- From starting prep to serving: Approximately 45 minutes to 1 hour.
Efficiency Tips:
- Set up your breading station while the oven preheats.
- If adding vegetables, chop them while the oven preheats or while breading the chicken.
- Using pre-cut tenderloins saves the step of slicing chicken breasts.
This recipe is relatively quick, making it genuinely suitable for a weeknight dinner when time is often limited.
How to Serve: Dips, Sides, and Beyond
These versatile baked chicken tenders are delicious on their own, but pairing them with the right accompaniments elevates the meal. Here are numerous ways to serve them:
- Classic Dips (Essential!):
- Honey Mustard Sauce (Classic sweet & tangy)
- BBQ Sauce (Smoky, sweet, or spicy)
- Ranch Dressing (Creamy and herby)
- Ketchup (Kid-favorite)
- Sweet Chili Sauce (Sweet heat)
- Buffalo Sauce (For a spicy kick, perhaps with blue cheese dip)
- Homemade Aioli (Garlic, lemon, or chipotle)
- Perfect Side Dishes (Many can be baked alongside!):
- Roasted Vegetables (One-Pan Option): Broccoli florets, asparagus, green beans, bell pepper strips, zucchini slices, or cherry tomatoes tossed in olive oil and seasoning. Add them to the same pan for the last 15-20 minutes of baking.
- Potatoes:
- Baked Sweet Potato Fries or Wedges (Can often bake alongside tenders, may need slightly longer cooking time or higher temp initially)
- Classic French Fries (Baked or air-fried)
- Mashed Potatoes (Creamy contrast)
- Roasted Potatoes
- Salads:
- Simple Green Salad with Vinaigrette
- Coleslaw (Creamy or vinegar-based)
- Caesar Salad
- Grains & Legumes:
- Quinoa Salad
- Corn on the Cob
- Macaroni and Cheese
- Incorporate into Other Meals:
- Salad Topping: Slice cooked tenders and add them to a large Caesar, Cobb, or mixed green salad for a protein boost.
- Wraps & Pitas: Slice tenders and stuff them into wraps or pitas with lettuce, tomato, cheese, and your favorite sauce.
- Chicken Parmesan (Quick Version): Top baked tenders with marinara sauce and mozzarella cheese, then broil briefly until cheese is melted and bubbly. Serve with pasta.
- Grain Bowls: Add sliced tenders to a bowl with quinoa or rice, roasted vegetables, and a drizzle of sauce.
- Sliders: Serve on small buns with slaw or pickles for mini chicken sandwiches.
- Kid-Friendly Presentation:
- Serve with familiar sides like mac and cheese, tater tots, or apple slices.
- Cut into smaller bite-sized pieces after cooking for very young children.
- Offer a variety of fun dips.
The possibilities are vast, making these baked chicken tenders a flexible base for countless meal combinations.
Additional Tips for Tender Triumph (5 Tips)
Master the art of the perfect baked chicken tender with these five essential tips:
- Embrace Panko & Don’t Skimp on Coating: For maximum crispiness that truly rivals fried chicken, Panko breadcrumbs are non-negotiable. Their larger, airier structure creates a much crunchier crust than standard fine breadcrumbs. When breading, actively press the Panko mixture onto the egg-washed chicken. Don’t just lightly roll it; ensure a thick, even layer adheres to all sides. This robust coating is key to a satisfying crunch.
- Pat Chicken Dry & Use the Flour Dredge: Moisture is the enemy of crispiness. Thoroughly patting the raw chicken dry with paper towels before starting ensures the initial flour layer sticks properly. Don’t skip the flour dredge (Bowl 1)! This step might seem minor, but it gives the egg wash something substantial to cling to, which in turn helps the Panko coating adhere much better, preventing patchy breading.
- Hot Oven & Proper Spacing are Crucial: Preheat your oven fully to 400°F (200°C) – or even 425°F (220°C) if your oven runs cool, watching closely. High heat helps the breading crisp up quickly before the chicken overcooks. Equally important is giving the tenders space on the baking sheet. Don’t overcrowd the pan! If the pieces are too close together, they will steam instead of bake, resulting in soggy breading. Use two pans if necessary; it’s better than compromising texture. Ensure air can circulate around each piece.
- Use Oil/Fat for Browning & Consider a Wire Rack: While baking is healthier than frying, some fat is necessary for achieving that desirable golden-brown colour and crisp texture. Drizzle olive oil, avocado oil, or use a generous amount of cooking spray over the breaded tenders before they go into the oven. This helps “fry” the exterior of the breadcrumbs. For ultimate crispiness all around, place the tenders on an oven-safe wire rack set inside the rimmed baking sheet. This elevates the chicken, allowing hot air to circulate underneath, crisping the bottom simultaneously with the top (and potentially eliminating the need to flip).
- Don’t Overbake – Use a Thermometer: The goal is juicy, tender chicken inside a crispy crust. Overbaking leads to dry, tough tenders, regardless of how good the breading is. Chicken tenderloins cook quickly. Start checking for doneness around the 15-minute mark. The most reliable way to ensure perfectly cooked chicken is to use an instant-read meat thermometer. Insert it into the thickest part of a tender – it should register 165°F (74°C). If you don’t have a thermometer, cut into one piece; the juices should run clear, and the meat should be opaque throughout.
By following these tips, you’ll consistently achieve baked chicken tenders that are crispy, golden, juicy, and utterly delicious.
FAQ Section: Your Baked Chicken Tender Questions Answered
Here are answers to some frequently asked questions about making one-pan baked chicken tenders:
Q1: Can I use frozen chicken tenders for this recipe?
- A: It is strongly recommended to thaw frozen chicken tenders completely before using them in this recipe. Breading will not adhere properly to frozen chicken, and the cooking time will be significantly longer and less predictable, often resulting in uneven cooking (overcooked exterior, potentially undercooked interior). Furthermore, excess moisture from frozen chicken will hinder crispiness, leading to soggy results. Thaw them safely in the refrigerator overnight for best results, then pat them thoroughly dry before starting the breading process.
Q2: How can I make these baked chicken tenders gluten-free?
- A: Making this recipe gluten-free is straightforward!
- Flour Dredge: Replace the all-purpose flour with a gluten-free all-purpose baking blend (one that contains xanthan gum usually works well) or use a single GF flour like rice flour or almond flour.
- Breadcrumbs: Substitute the Panko breadcrumbs with gluten-free Panko or other gluten-free breadcrumbs. Crushed gluten-free cereals (like cornflakes or rice Chex) or almond flour/meal can also work as alternatives, though the texture will differ. Ensure your chosen breadcrumb substitute is labelled gluten-free.
- Seasonings: Double-check that your seasonings (like garlic powder, onion powder, paprika) are certified gluten-free if cross-contamination is a major concern.
Q3: My baked chicken tenders weren’t crispy. What went wrong?
- A: Several factors can lead to less-than-crispy tenders:
- Oven Not Hot Enough: Ensure your oven is fully preheated to 400°F (200°C) or slightly higher. High heat is essential.
- Overcrowding the Pan: Tenders placed too close together will steam. Give them space!
- Not Enough Oil: The breadcrumbs need fat to crisp and brown. Be sure to drizzle or spray generously with oil before baking.
- Skipping Panko: Regular breadcrumbs don’t get as crispy as Panko.
- Chicken Was Too Wet: Did you pat the chicken thoroughly dry before breading? Excess moisture prevents crisping.
- Not Baking Long Enough: They might need a few extra minutes to reach peak crispiness (but don’t overbake the chicken itself). Using a wire rack can also significantly improve bottom crispiness.
Q4: Can I add vegetables to the pan? If so, which ones work best?
- A: Absolutely! That’s a major advantage of this one-pan method. Choose vegetables that roast relatively quickly, in about 15-20 minutes at 400°F (200°C). Great options include:
- Broccoli or Broccolini Florets
- Asparagus Spears (ends trimmed)
- Green Beans (trimmed)
- Sliced Bell Peppers (any colour)
- Sliced Zucchini or Summer Squash
- Sliced Onions
- Cherry Tomatoes (add during the last 10 minutes)
- Small Mushroom Caps
Toss your chosen veggies lightly with olive oil, salt, and pepper, then arrange them in a single layer around the chicken tenders on the baking sheet. Avoid overcrowding the pan. Root vegetables like potatoes or carrots will need a longer cooking time and should typically be started before adding the chicken or cut very small.
Q5: How should I store and reheat leftover baked chicken tenders?
- A:
- Storage: Let the tenders cool completely to room temperature. Store them in an airtight container in the refrigerator for up to 3-4 days. Storing them while warm will create condensation and make the breading soggy.
- Reheating (Best Methods for Crispiness): The key is to reheat them in a way that re-crisps the breading. Avoid the microwave, which makes them soft and rubbery.
- Oven/Toaster Oven: Place tenders on a baking sheet or toaster oven tray. Reheat in a preheated oven or toaster oven at 375-400°F (190-200°C) for 5-10 minutes, or until heated through and crispy again.
- Air Fryer: Reheat at around 350-375°F (175-190°C) for 3-5 minutes, checking frequently until hot and crisp. This is often the fastest and most effective method.
- Leftovers are great cold in salads or wraps too!

One-Pan Baked Chicken Tenders recipe
Ingredients
-
- Chicken:
-
- Chicken Tenderloins: 1.5 pounds (about 680g). Alternatively, you can use boneless, skinless chicken breasts, cut lengthwise into 1-inch thick strips. Tenderloins are naturally tender and perfectly portioned.
-
- Chicken:
-
- For the Breading Station:
-
- Bowl 1 (Flour Dredge):
-
- All-Purpose Flour: ½ cup (about 60g). You can substitute with whole wheat flour or a gluten-free blend if needed.
-
- Salt: ½ teaspoon
-
- Black Pepper: ¼ teaspoon
-
- Bowl 1 (Flour Dredge):
-
- Bowl 2 (Egg Wash):
-
- Large Eggs: 2
-
- Water or Milk: 1 tablespoon (helps thin the egg slightly for better coating)
-
- Bowl 2 (Egg Wash):
-
- Bowl 3 (Crumb Coating):
-
- Panko Breadcrumbs: 1 ½ cups (about 75g). Panko provides superior crispiness compared to regular breadcrumbs due to its airy, jagged texture.
-
- Grated Parmesan Cheese (Optional but recommended): ¼ cup (about 25g). Adds savoury flavour and aids browning.
-
- Paprika: 1 teaspoon (Sweet or smoked paprika both work well)
-
- Garlic Powder: 1 teaspoon
-
- Onion Powder: ½ teaspoon
-
- Dried Parsley or Italian Seasoning: 1 teaspoon (optional, for flavour)
-
- Salt: ½ teaspoon
-
- Black Pepper: ¼ teaspoon
-
- Bowl 3 (Crumb Coating):
-
- For the Breading Station:
-
- For Baking:
-
- Olive Oil or Avocado Oil: 2-3 tablespoons (or cooking spray). Essential for helping the breadcrumbs crisp up and prevent sticking. Avocado oil has a higher smoke point, ideal for higher baking temperatures.
-
- For Baking:
Ingredient Considerations:
-
- Chicken: Ensure your chicken is fresh. If using chicken breasts, try to cut the strips as evenly as possible for consistent cooking. Patting the chicken dry before starting helps the flour adhere better.
-
- Panko: While regular breadcrumbs work, Japanese Panko breadcrumbs are highly recommended for the crispiest texture. They absorb less oil and stay lighter.
-
- Seasoning: This blend is a classic starting point. Feel free to customize! Add cayenne pepper for heat, dried thyme or rosemary for herbal notes, or use a pre-made seasoning blend you enjoy.
-
- Oil: Don’t skip the oil drizzle or spray over the breaded tenders before baking. It’s crucial for achieving that golden-brown, crispy exterior that mimics frying.
Instructions
Step 1: Preheat Oven and Prepare Baking Sheet
-
- Position an oven rack in the center of the oven.
-
- Preheat your oven to 400°F (200°C). A hot oven is key for crispiness.
-
- Line a large, rimmed baking sheet with parchment paper for easiest cleanup. Alternatively, lightly grease the pan with oil or cooking spray. You can also place a wire rack inside the baking sheet – this allows air to circulate underneath the tenders, promoting extra crispiness, though it means washing the rack later.
Step 2: Prepare the Chicken
-
- If using chicken breasts, slice them lengthwise into even strips, about 1-inch thick. If using tenderloins, remove the tough white tendon if desired (you can often pull it out or snip it off with kitchen shears, though it’s edible if left on).
-
- Pat the chicken pieces completely dry with paper towels. This is crucial for helping the breading stick properly.
Step 3: Set Up the Breading Station
-
- Prepare three shallow bowls or dishes large enough to hold the chicken pieces.
-
- Bowl 1: Whisk together the all-purpose flour, ½ tsp salt, and ¼ tsp pepper.
-
- Bowl 2: In the second bowl, whisk the eggs thoroughly with the tablespoon of water or milk until smooth.
-
- Bowl 3: In the third bowl, combine the Panko breadcrumbs, grated Parmesan cheese (if using), paprika, garlic powder, onion powder, dried parsley/Italian seasoning (if using), ½ tsp salt, and ¼ tsp pepper. Stir well to ensure seasonings are evenly distributed.
Step 4: Bread the Chicken Tenders
-
- Work with one piece of chicken at a time. Use one hand for handling the wet ingredients and the other for dry to minimize clumping on your fingers (the “wet hand, dry hand” technique).
-
- Dredge in Flour: Coat the chicken piece lightly in the seasoned flour mixture (Bowl 1), shaking off any excess. The flour helps the egg wash adhere.
-
- Dip in Egg Wash: Transfer the floured chicken to the egg mixture (Bowl 2), ensuring it’s fully coated. Let any excess egg drip off.
-
- Coat in Breadcrumbs: Place the egg-coated chicken into the Panko mixture (Bowl 3). Press the breadcrumbs gently onto all sides of the chicken to ensure a thick, even coating.
-
- Place the breaded chicken tender onto the prepared baking sheet in a single layer. Repeat with the remaining chicken pieces, ensuring there is some space between each tender. Do not overcrowd the pan, as this will cause the chicken to steam rather than crisp up. Use a second pan if necessary.
Step 5: Prepare for Baking
-
- Once all chicken tenders are breaded and arranged on the baking sheet, drizzle them evenly with the 2-3 tablespoons of olive oil or avocado oil. Alternatively, generously spray them with cooking spray, ensuring the tops are well-coated. This fat is essential for browning and crisping.
Step 6: Bake to Perfection
-
- Place the baking sheet into the preheated 400°F (200°C) oven.
-
- Bake for 15-20 minutes. The exact time will depend on the thickness of your chicken tenders.
-
- (Optional but recommended for even crispiness): Carefully flip the chicken tenders halfway through the baking time (around the 8-10 minute mark) using tongs. Drizzle or spray the other side lightly with oil if it looks dry.
-
- The chicken tenders are done when they are golden brown and crispy, and the internal temperature reaches 165°F (74°C) when checked with a meat thermometer inserted into the thickest part. The chicken should be opaque and the juices should run clear.
Step 7: Rest and Serve
-
- Remove the baking sheet from the oven.
-
- Let the chicken tenders rest on the pan for a few minutes before serving. This allows the juices to redistribute, ensuring a more tender bite.
-
- Serve immediately with your favorite dipping sauces and sides.
One-Pan Variation with Vegetables:
-
- If you want to add vegetables, choose quick-roasting options like broccoli florets, asparagus spears, sliced bell peppers, or green beans.
-
- Toss the vegetables lightly with olive oil, salt, and pepper.
-
- Arrange the vegetables around the chicken tenders on the same baking sheet before putting it in the oven. Ensure nothing is overcrowded. They should cook in roughly the same amount of time as the chicken.
Nutrition
- Serving Size: one normal portion
- Calories: 350 – 450


