

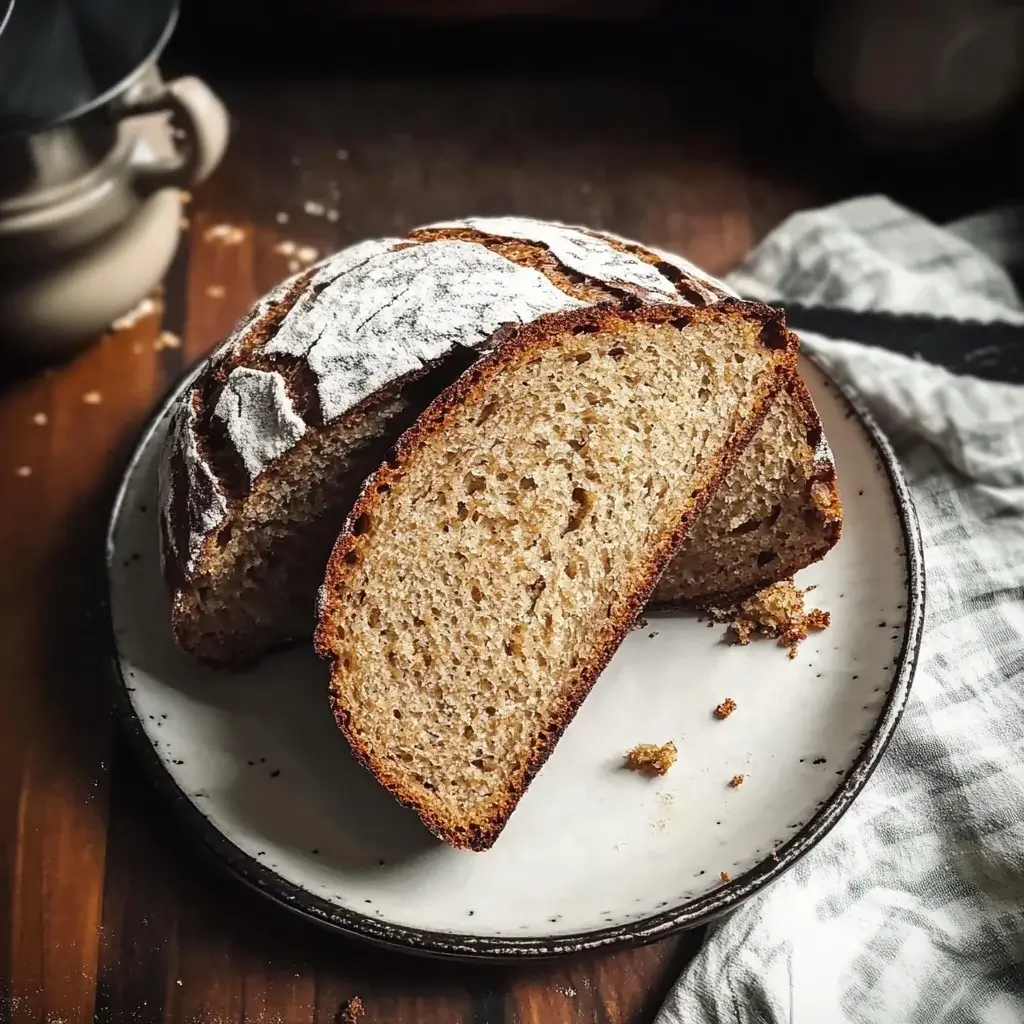
The aroma of freshly baked bread wafting through the house is one of life’s simplest, yet most profound, pleasures. For years, I shied away from homemade bread, intimidated by the tales of vigorous kneading and precise timings. Then, I discovered the magic of no-knead recipes, and my kitchen – and my family’s breakfast table – has never been the same. This No-Knead Brown Bread recipe, in particular, has become a staple. The first time I pulled this loaf from the oven, its deep mahogany crust crackling invitingly, I knew I was onto something special. The kids, usually picky, were drawn by the warm, earthy scent. Sliced thick and slathered with butter, it was an instant hit. The slightly sweet, nutty flavor from the whole wheat and molasses, combined with a wonderfully chewy crumb and that irresistible crust, makes it far superior to any store-bought loaf. It’s become our go-to for sandwiches, toast, or simply for tearing off a chunk to accompany a hearty soup. The best part? It’s astonishingly easy, requiring minimal effort for maximum reward. If you think baking bread is too complicated, this recipe will joyfully prove you wrong.
No-Knead Brown Bread: The Ultimate Guide to Effortless Baking
Welcome to a journey that will transform your perception of bread making! This No-Knead Brown Bread recipe is designed for both novice bakers and seasoned enthusiasts looking for a simpler, yet incredibly rewarding, baking experience. Forget the intensive kneading; this method relies on a long, slow fermentation to develop flavor and texture, resulting in an artisan-quality loaf with a rustic charm and a deeply satisfying taste. The beauty of this recipe lies in its simplicity and the minimal hands-on time required. Imagine waking up to the possibility of fresh, homemade brown bread, its crust perfectly crisp, its crumb soft and inviting, all with very little fuss. This recipe uses a blend of whole wheat and all-purpose flour, offering a wholesome, nutty flavor balanced with a light, airy texture. A touch of molasses or dark treacle not only imparts a beautiful rich color but also adds a subtle sweetness that complements the earthy notes of the whole grains. Whether you’re looking to impress guests, provide your family with healthier bread options, or simply indulge in the therapeutic process of baking, this No-Knead Brown Bread is your perfect companion. Get ready to fill your home with the intoxicating aroma of baking bread and savor every delicious slice.
Ingredients You’ll Need for Your No-Knead Brown Bread
Gathering your ingredients is the first step towards a beautiful, homemade loaf. Precision is less critical in no-knead recipes than in some other baking endeavors, but good quality ingredients will always yield a better result.
- 3 cups (360g) All-Purpose Flour: This provides structure and a lighter crumb. Unbleached is preferred.
- 1 ½ cups (180g) Whole Wheat Flour: Adds a nutty flavor, wholesome fiber, and contributes to the “brown bread” character.
- ¼ cup (50g) Rolled Oats (Optional, but recommended): Adds a lovely texture and slight chewiness. Quick oats can also be used.
- 2 teaspoons Instant Yeast (or Active Dry Yeast): If using active dry yeast, you may want to proof it in a little of the warm water with a pinch of sugar for 5-10 minutes until foamy.
- 1 ½ teaspoons Salt: Crucial for flavor and for controlling yeast activity. Use fine sea salt or kosher salt.
- ¼ cup (84g) Molasses or Dark Treacle: This is key for the characteristic color and slightly sweet, rich flavor of brown bread. You can substitute with dark corn syrup, maple syrup, or honey for a different flavor profile, though molasses is traditional for classic brown bread.
- 2 cups (480ml) Lukewarm Water: Approximately 105-115°F (40-46°C). Too hot, and it will kill the yeast; too cold, and the yeast won’t activate properly.
- 2 tablespoons Melted Butter or Neutral Oil (e.g., canola, vegetable): Adds richness and softness to the crumb.
- Extra flour for dusting: For handling the sticky dough.
- Cornmeal or extra oats for dusting the baking vessel (optional): Prevents sticking and adds a nice texture to the bottom crust.
Step-by-Step Instructions for Baking Perfection
Follow these simple steps, and you’ll be rewarded with a stunning loaf of No-Knead Brown Bread. The process is largely hands-off, relying on time to do the work.
- Combine Dry Ingredients: In a large mixing bowl, whisk together the all-purpose flour, whole wheat flour, optional rolled oats, instant yeast, and salt. Ensure they are well combined. This even distribution is important for consistent results.
- Combine Wet Ingredients: In a separate smaller bowl or measuring cup, combine the lukewarm water, molasses (or chosen sweetener), and melted butter or oil. Stir until the molasses is mostly dissolved.
- Mix Dough: Pour the wet ingredients into the dry ingredients. Using a sturdy spatula or wooden spoon, mix until a shaggy, sticky dough forms. Ensure there are no dry patches of flour remaining. The dough will be quite wet and sticky – this is normal for no-knead bread. Do not be tempted to add much more flour at this stage.
- First Rise (Bulk Fermentation): Cover the bowl tightly with plastic wrap or a clean kitchen towel. Let the dough rise at room temperature (ideally around 70-75°F or 21-24°C) for 12 to 18 hours, or even up to 24 hours. The longer it rises, the more developed the flavor will be. The dough should at least double in size and become bubbly and web-like on the surface. If your room is warmer, the rise time might be shorter; if cooler, it might take longer.
- Shape the Loaf (Gently!): Lightly flour a clean work surface. Gently scrape the dough out of the bowl onto the floured surface. The dough will be very soft and sticky. With floured hands, gently fold the dough over itself a few times (like folding a letter) to form a rough ball or oval shape. Be gentle; you want to preserve as many of those precious air bubbles as possible.
- Second Rise (Proofing): Line a bowl (roughly the size of your intended loaf) with a clean kitchen towel and generously dust it with flour, cornmeal, or oats. Alternatively, you can use parchment paper. Carefully place the shaped dough, seam-side down (if you made a seam), into the prepared bowl/towel. If using parchment, place the dough seam-side up on the parchment and use the parchment to lift it into the bowl. Lightly dust the top of the dough with flour. Cover loosely with plastic wrap or another towel and let it rise for another 1 to 2 hours, or until it has increased in size by about 50% and doesn’t spring back immediately when gently poked.
- Preheat Oven and Dutch Oven: About 30-45 minutes before the second rise is complete, place a 4 to 6-quart Dutch oven (with its lid) into your oven. Preheat the oven to 450°F (230°C). The Dutch oven needs to be screaming hot to create that beautiful crust.
- Score and Bake: Once the oven and Dutch oven are fully preheated and the dough has finished its second rise, carefully remove the hot Dutch oven from the oven (use sturdy oven mitts!).
- If you proofed in a floured towel: Quickly and carefully invert the dough from the towel into the hot Dutch oven. It should land seam-side up.
- If you proofed on parchment: Lift the dough using the parchment paper and carefully lower it into the hot Dutch oven.
- Optional: Quickly score the top of the dough with a lame, sharp knife, or razor blade (about ½ inch deep). This allows steam to escape and controls where the bread expands.
- Bake Covered: Immediately place the lid back on the Dutch oven and return it to the hot oven. Bake for 30 minutes with the lid on. The lid traps steam, which is essential for a crispy crust and good oven spring.
- Bake Uncovered: After 30 minutes, carefully remove the lid (watch out for hot steam!). Continue baking for another 15-25 minutes, or until the crust is a deep golden brown and the internal temperature of the bread reaches 200-210°F (93-99°C) when checked with an instant-read thermometer.
- Cool Completely: Carefully remove the bread from the Dutch oven and place it on a wire rack to cool completely (at least 1-2 hours, preferably longer) before slicing. This is a crucial step! Slicing into hot bread can result in a gummy texture as the internal structure is still setting. The wait is hard, but worth it.
Nutrition Facts (Estimated)
Please note that these are estimates and can vary based on the specific ingredients used (e.g., brand of flour, type of molasses) and the final size of your slices.
- Servings: This recipe typically yields one large loaf, which can be cut into approximately 12-16 slices.
- Calories per serving (assuming 14 slices): Approximately 180-220 calories per slice.
This bread is a good source of dietary fiber, especially due to the whole wheat flour and optional oats. Molasses also contributes small amounts of minerals like iron and calcium.
Preparation Time: A Breakdown
Understanding the time commitment is key to planning your baking adventure. Most of it is hands-off!
- Active Preparation Time:
- Mixing dough: 10-15 minutes
- Shaping dough: 5-10 minutes
- Total Active Time: Approximately 15-25 minutes
- Inactive Time:
- First Rise (Bulk Fermentation): 12-24 hours
- Second Rise (Proofing): 1-2 hours
- Baking Time: 45-55 minutes
- Cooling Time: At least 1-2 hours (crucial)
- Total Inactive Time: Approximately 14.75 – 28.75 hours
So, while the total time from start to a sliceable loaf is long, your actual hands-on involvement is minimal. This makes it perfect for fitting into a busy schedule – mix it one evening, bake it the next!
How to Serve Your Delicious No-Knead Brown Bread
The versatility of this No-Knead Brown Bread is one of its greatest strengths. Its robust flavor and satisfying texture make it suitable for a wide array of pairings and uses. Here are some delightful ways to enjoy your homemade loaf:
- Classic & Simple:
- With Butter: Sometimes, simplicity reigns. A thick slice, warm or toasted, slathered with good quality salted butter is pure bliss.
- With Jam or Honey: The slightly sweet and nutty notes of the bread pair beautifully with fruit preserves, marmalade, or a drizzle of local honey.
- Breakfast Star:
- Toast: Makes fantastic toast – crispy on the outside, still chewy within. Top with avocado and a sprinkle of everything bagel seasoning, or a perfectly poached egg.
- French Toast: The sturdy slices hold up exceptionally well to an egg custard bath, creating a decadent French toast. The molasses notes in the bread add an extra layer of flavor.
- Savory Pairings:
- Soup Companion: Essential for dunking into hearty soups, stews, and chilis. It soaks up broths beautifully without falling apart.
- Cheese Board: A wonderful addition to any cheese platter. Pair with sharp cheddar, creamy brie, or tangy goat cheese.
- Sandwiches: Its robust structure makes it ideal for substantial sandwiches. Think:
- Roast beef with horseradish cream.
- Smoked salmon and cream cheese.
- A classic Ploughman’s lunch with cheese, pickles, and ham.
- Grilled cheese – the molasses in the bread caramelizes slightly for an extra delicious crust.
- Appetizers & Snacks:
- Crostini/Bruschetta: Slice thinly, toast until crisp, and top with your favorite bruschetta toppings (diced tomatoes, basil, garlic) or savory spreads like olive tapenade or pâté.
- Alongside Dips: Perfect for scooping up hummus, baba ghanoush, or a creamy spinach artichoke dip.
- Sweet Treats (Unexpected!):
- Bread Pudding: Leftover stale slices can be transformed into a rich and comforting brown bread pudding. The inherent sweetness of the bread works well here.
No matter how you choose to serve it, this No-Knead Brown Bread is sure to be a crowd-pleaser, adding a touch of homemade warmth and goodness to any meal.
Additional Tips for No-Knead Brown Bread Success
To help you achieve the perfect loaf every time, here are five additional tips that can elevate your no-knead baking game:
- Embrace the Stickiness: No-knead doughs are characteristically high in hydration, meaning they are wet and sticky. Resist the urge to add too much extra flour during shaping, as this can make your bread dense. Instead, use well-floured hands and a floured work surface, or a dough scraper, to manage it. The high moisture content is what contributes to a wonderfully moist crumb and a good rise.
- Experiment with Flour Blends (Gradually): While this recipe uses a specific ratio of all-purpose to whole wheat, feel free to experiment once you’re comfortable. You could try incorporating a small amount of rye flour (for a tangier, denser loaf) or spelt flour (for a nuttier, slightly sweeter taste). Start by substituting no more than 1/2 cup of the all-purpose or whole wheat flour with your alternative flour to see how it affects the texture and hydration.
- Master the “Poke Test” for Proofing: Knowing when your dough is perfectly proofed for the second rise can be tricky. Instead of just relying on time, use the poke test. Gently poke the side of the dough with a floured finger. If the indentation springs back immediately, it needs more time. If it springs back slowly and leaves a slight indent, it’s ready to bake. If the indentation stays completely and doesn’t spring back at all, it might be slightly over-proofed (bake it quickly!).
- Dutch Oven Alternatives & Enhancements: If you don’t have a Dutch oven, you can still achieve a decent crust. Bake on a hot pizza stone or heavy baking sheet. To create steam (which the Dutch oven does naturally), place a shallow metal pan (like a broiler pan or cast iron skillet) on the bottom rack of your oven while it preheats. When you put the bread in, carefully pour about 1 cup of hot water into the shallow pan to create steam. Be cautious of steam burns.
- Flavor Boosters & Add-Ins: Don’t be afraid to customize your brown bread! Consider adding up to 1 cup of extras during the initial mixing stage. Some great options include:
- Seeds: Sunflower seeds, pumpkin seeds (pepitas), flax seeds, or sesame seeds.
- Nuts: Chopped walnuts or pecans.
- Dried Fruit: Raisins, cranberries, or chopped dates (reduce molasses slightly if adding very sweet fruits).
- Herbs/Spices: A teaspoon of caraway seeds for a rye-like flavor, or a touch of cinnamon and nutmeg for a warmer, sweeter profile.
These tips are designed to empower you to not only bake a fantastic loaf but also to understand the process and feel confident in making it your own. Happy baking!
Frequently Asked Questions (FAQ) About No-Knead Brown Bread
Here are answers to some common questions you might have about making this delightful No-Knead Brown Bread:
- Q: My dough didn’t rise much during the first 12-18 hour period. What went wrong?
A: Several factors could be at play. Yeast Viability: Your yeast might be old or inactive. Always check the expiration date. If using active dry yeast, ensure you proofed it correctly if you chose that route. Water Temperature: If the water was too hot, it could have killed the yeast; too cold, and it won’t activate efficiently. Aim for lukewarm (105-115°F or 40-46°C). Room Temperature: A very cold room will significantly slow down yeast activity. Try to find a slightly warmer spot for your dough to rise, or be prepared for a longer rise time (even up to 24 hours or a bit more in cool conditions). Salt: While essential, too much salt or direct contact of undissolved salt with yeast can hinder its activity. Ensure salt is mixed well with the flour. - Q: Can I make this recipe entirely with whole wheat flour?
A: You can, but be prepared for a much denser and heavier loaf. All-purpose flour provides gluten strength and a lighter texture. If you want to increase the whole wheat content, do it gradually. For example, try a 50/50 blend of whole wheat and all-purpose flour. If you go 100% whole wheat, you might also need to slightly increase the water content, as whole wheat flour absorbs more liquid. The resulting bread will be very rustic and hearty. - Q: How do I store my homemade No-Knead Brown Bread, and how long will it last?
A: Once completely cooled, store your bread at room temperature. The best way is in a bread box, a paper bag, or wrapped loosely in a clean kitchen towel. This helps maintain the crust’s crispness for a day or two. Avoid storing it in plastic bags at room temperature if you want to keep the crust crisp, as plastic traps moisture and can make the crust soft (though it will keep the interior moister for longer). It’s best enjoyed within 2-3 days. For longer storage, slice the completely cooled bread, wrap it tightly in plastic wrap and then in foil or a freezer bag, and freeze for up to 3 months. Thaw slices at room temperature or toast them directly from frozen. - Q: My crust isn’t as crispy as I’d like. What can I do?
A: Several things contribute to a crispy crust: Hot Dutch Oven: Ensure your Dutch oven (or baking vessel) is thoroughly preheated. This initial blast of heat is crucial. Steam: Baking with the lid on the Dutch oven for the first part of the bake traps steam, which allows the crust to expand and then crisp up when the lid is removed. If not using a Dutch oven, make sure you’re creating enough steam (see “Additional Tips”). Baking Time Uncovered: Don’t be afraid to bake it a little longer uncovered until it’s a deep, rich brown. Cooling: Cooling the bread completely on a wire rack allows air to circulate, preventing the bottom from getting soggy and helping the crust set properly. - Q: Can I make this recipe in a loaf pan instead of a Dutch oven?
A: Yes, you can bake this bread in a standard 9×5 inch loaf pan. After the first long rise, gently shape the dough into a log and place it in a greased loaf pan for its second rise (1-2 hours, or until nearly doubled). You won’t get the same super-crusty, artisan-style round loaf as with a Dutch oven, but it will still be a delicious brown bread with a softer crust, more akin to a traditional sandwich loaf. Bake in a preheated oven at a slightly lower temperature, perhaps 375-400°F (190-200°C), for about 35-45 minutes, or until golden brown and the internal temperature reaches 200-210°F (93-99°C). You can try to create steam in your oven as mentioned in the tips section to improve the crust.
No-Knead Brown Bread recipe
Ingredients
-
- 3 cups (360g) All-Purpose Flour: This provides structure and a lighter crumb. Unbleached is preferred.
-
- 1 ½ cups (180g) Whole Wheat Flour: Adds a nutty flavor, wholesome fiber, and contributes to the “brown bread” character.
-
- ¼ cup (50g) Rolled Oats (Optional, but recommended): Adds a lovely texture and slight chewiness. Quick oats can also be used.
-
- 2 teaspoons Instant Yeast (or Active Dry Yeast): If using active dry yeast, you may want to proof it in a little of the warm water with a pinch of sugar for 5-10 minutes until foamy.
-
- 1 ½ teaspoons Salt: Crucial for flavor and for controlling yeast activity. Use fine sea salt or kosher salt.
-
- ¼ cup (84g) Molasses or Dark Treacle: This is key for the characteristic color and slightly sweet, rich flavor of brown bread. You can substitute with dark corn syrup, maple syrup, or honey for a different flavor profile, though molasses is traditional for classic brown bread.
-
- 2 cups (480ml) Lukewarm Water: Approximately 105-115°F (40-46°C). Too hot, and it will kill the yeast; too cold, and the yeast won’t activate properly.
-
- 2 tablespoons Melted Butter or Neutral Oil (e.g., canola, vegetable): Adds richness and softness to the crumb.
-
- Extra flour for dusting: For handling the sticky dough.
-
- Cornmeal or extra oats for dusting the baking vessel (optional): Prevents sticking and adds a nice texture to the bottom crust.
Instructions
-
- Combine Dry Ingredients: In a large mixing bowl, whisk together the all-purpose flour, whole wheat flour, optional rolled oats, instant yeast, and salt. Ensure they are well combined. This even distribution is important for consistent results.
-
- Combine Wet Ingredients: In a separate smaller bowl or measuring cup, combine the lukewarm water, molasses (or chosen sweetener), and melted butter or oil. Stir until the molasses is mostly dissolved.
-
- Mix Dough: Pour the wet ingredients into the dry ingredients. Using a sturdy spatula or wooden spoon, mix until a shaggy, sticky dough forms. Ensure there are no dry patches of flour remaining. The dough will be quite wet and sticky – this is normal for no-knead bread. Do not be tempted to add much more flour at this stage.
-
- First Rise (Bulk Fermentation): Cover the bowl tightly with plastic wrap or a clean kitchen towel. Let the dough rise at room temperature (ideally around 70-75°F or 21-24°C) for 12 to 18 hours, or even up to 24 hours. The longer it rises, the more developed the flavor will be. The dough should at least double in size and become bubbly and web-like on the surface. If your room is warmer, the rise time might be shorter; if cooler, it might take longer.
-
- Shape the Loaf (Gently!): Lightly flour a clean work surface. Gently scrape the dough out of the bowl onto the floured surface. The dough will be very soft and sticky. With floured hands, gently fold the dough over itself a few times (like folding a letter) to form a rough ball or oval shape. Be gentle; you want to preserve as many of those precious air bubbles as possible.
-
- Second Rise (Proofing): Line a bowl (roughly the size of your intended loaf) with a clean kitchen towel and generously dust it with flour, cornmeal, or oats. Alternatively, you can use parchment paper. Carefully place the shaped dough, seam-side down (if you made a seam), into the prepared bowl/towel. If using parchment, place the dough seam-side up on the parchment and use the parchment to lift it into the bowl. Lightly dust the top of the dough with flour. Cover loosely with plastic wrap or another towel and let it rise for another 1 to 2 hours, or until it has increased in size by about 50% and doesn’t spring back immediately when gently poked.
-
- Preheat Oven and Dutch Oven: About 30-45 minutes before the second rise is complete, place a 4 to 6-quart Dutch oven (with its lid) into your oven. Preheat the oven to 450°F (230°C). The Dutch oven needs to be screaming hot to create that beautiful crust.
-
- Score and Bake: Once the oven and Dutch oven are fully preheated and the dough has finished its second rise, carefully remove the hot Dutch oven from the oven (use sturdy oven mitts!).
-
- If you proofed in a floured towel: Quickly and carefully invert the dough from the towel into the hot Dutch oven. It should land seam-side up.
-
- If you proofed on parchment: Lift the dough using the parchment paper and carefully lower it into the hot Dutch oven.
-
- Optional: Quickly score the top of the dough with a lame, sharp knife, or razor blade (about ½ inch deep). This allows steam to escape and controls where the bread expands.
-
- Score and Bake: Once the oven and Dutch oven are fully preheated and the dough has finished its second rise, carefully remove the hot Dutch oven from the oven (use sturdy oven mitts!).
-
- Bake Covered: Immediately place the lid back on the Dutch oven and return it to the hot oven. Bake for 30 minutes with the lid on. The lid traps steam, which is essential for a crispy crust and good oven spring.
-
- Bake Uncovered: After 30 minutes, carefully remove the lid (watch out for hot steam!). Continue baking for another 15-25 minutes, or until the crust is a deep golden brown and the internal temperature of the bread reaches 200-210°F (93-99°C) when checked with an instant-read thermometer.
-
- Cool Completely: Carefully remove the bread from the Dutch oven and place it on a wire rack to cool completely (at least 1-2 hours, preferably longer) before slicing. This is a crucial step! Slicing into hot bread can result in a gummy texture as the internal structure is still setting. The wait is hard, but worth it.
Nutrition
- Serving Size: one normal portion
- Calories: 180-220


