

Honestly, some nights dinner needs to happen fast. Between work deadlines, homework help, and general household chaos, spending an hour prepping a meal just isn’t in the cards. That’s where these Mini Pita Pizzas became my secret weapon. The first time I made them, it was out of sheer necessity – staring into a fridge with minimal inspiration but spotting a pack of pita bread. Twenty minutes later, we were all sitting down to hot, bubbly, personalized pizzas. The kids went wild! They loved being able to choose their own toppings (even if it just meant extra cheese for one and precisely three pieces of pepperoni for the other). They’ve become a regular feature on our menu, perfect for busy weeknights, lazy weekend lunches, or even fun, interactive party food. They are incredibly forgiving, endlessly customizable, and deliver that satisfying pizza craving without the fuss or the delivery fee.
Why Mini Pita Pizzas Are a Weeknight Hero
In the quest for quick, easy, and crowd-pleasing meals, Mini Pita Pizzas stand out as a true champion. They bridge the gap between a convenient snack and a satisfying meal, offering a multitude of benefits that make them a go-to option for busy households, picky eaters, and anyone craving pizza without the commitment of making dough from scratch or ordering takeout.
The primary appeal lies in their simplicity and speed. Using pre-made pita bread as the crust eliminates the most time-consuming part of pizza making – the dough preparation and rising. This means you can go from concept to cooked pizza in under 30 minutes, often faster. This makes them an absolute lifesaver on those evenings when time is tight, energy is low, but appetites are high.
Customization is another major draw. Unlike a large, shared pizza where compromises on toppings are often necessary, mini pita pizzas allow everyone to become their own pizza chef. Each person can tailor their toppings to their exact preferences. This is particularly fantastic for families with diverse tastes or dietary needs. Got a vegetarian? Load up on veggies! A meat lover? Pile on the pepperoni and sausage. Someone avoiding dairy? Use dairy-free cheese. This personal touch not only ensures everyone gets what they want but also makes mealtime more interactive and fun, especially for children who love having control over their food choices.
Furthermore, pita pizzas offer built-in portion control. Standard pitas are typically smaller than a personal pan pizza from a restaurant, making it easier to manage serving sizes. This can be beneficial for individuals mindful of their calorie intake or for providing appropriately sized meals for younger children. You can easily choose whole wheat pitas for an added fiber boost, making it a relatively healthier alternative to traditional pizza crusts depending on your topping choices.
Finally, they are versatile. Mini pita pizzas aren’t just for dinner. They make a fantastic quick lunch, an easy after-school snack, or even a fun appetizer for casual get-togethers. You can prep toppings ahead of time, making assembly even faster when hunger strikes. Their inherent ease and adaptability make them a staple recipe worth mastering.
Ingredients You’ll Need for Perfect Mini Pita Pizzas
The beauty of mini pita pizzas lies in their flexibility, but here’s a baseline list to get you started. Quantities are approximate and can be adjusted based on the number of pizzas you’re making and personal preference. This list assumes you’re making about 4 mini pizzas.
- Pita Bread: 4 rounds (Standard size, approx. 6-7 inches). White, whole wheat, or even pocketless Mediterranean-style flatbreads work well. Thicker pitas tend to yield a slightly softer crust, while thinner ones get crispier.
- Pizza Sauce: ½ to ¾ cup. Use your favorite store-bought pizza sauce, marinara sauce, or even plain tomato sauce seasoned with a pinch of oregano, basil, and garlic powder. About 2-3 tablespoons per pita is usually sufficient.
- Shredded Cheese: 1 to 1 ½ cups. Mozzarella is the classic choice for its meltability. A blend of mozzarella and cheddar, provolone, or Monterey Jack also works wonderfully. Use about ¼ to ⅓ cup per pita.
- Olive Oil (Optional): 1-2 tablespoons. Brushing the pitas lightly with olive oil before adding sauce can help create a barrier and prevent sogginess, adding a hint of flavor too.
- Dried Oregano or Italian Seasoning (Optional): For sprinkling on top for extra flavor.
Suggested Toppings (Use Your Favorites!):
(Amount depends on preference – start with small amounts per pita)
- Meats: Sliced pepperoni, cooked crumbled sausage, chopped ham, cooked bacon bits, shredded cooked chicken.
- Vegetables: Sliced mushrooms, chopped bell peppers (any color), sliced onions (red or white), sliced black olives, halved cherry tomatoes, drained pineapple tidbits (if you’re on that team!), fresh spinach leaves (they wilt down considerably), sliced jalapeños.
- Cheeses (Beyond Mozzarella): Grated Parmesan, crumbled feta, dollops of ricotta, goat cheese.
- Fresh Herbs (After Baking): Fresh basil leaves, chopped fresh parsley.
- Sauce Alternatives: Pesto, BBQ sauce, Alfredo sauce, garlic and olive oil base.
Gather your pitas, sauce, cheese, and chosen toppings, and you’re ready for the fun part!
Step-by-Step Instructions: Making Your Pita Pizzas
Making these mini pizzas is incredibly straightforward. Follow these simple steps for delicious results every time.
Step 1: Preheat Your Oven and Prepare Baking Sheet
- Position an oven rack in the upper-middle position (or use two racks if making many pizzas).
- Preheat your oven to 400°F (200°C). A hot oven helps the pita crisp up quickly.
- Line a large baking sheet (or two) with parchment paper for easy cleanup, or lightly grease it. You can also place pitas directly on the oven rack for a crispier bottom, but be mindful of potential drips.
Step 2: Prepare the Pitas (Optional Crispiness Boost)
- If you prefer a crispier crust, place the plain pita rounds directly on the oven rack or baking sheet in the preheated oven for 2-3 minutes per side. Watch carefully to prevent burning. This step helps dry out the pita slightly.
- Remove the pitas from the oven and place them on your prepared baking sheet (if not already there).
Step 3: Assemble Your Mini Pizzas
- (Optional) Lightly brush the top surface of each pita with olive oil.
- Spread your chosen sauce evenly over each pita, leaving a small border (about ½ inch) around the edge for the crust. Use about 2-3 tablespoons per pita, adjusting to your preference – too much sauce can make it soggy.
- Sprinkle the shredded cheese evenly over the sauce.
- Arrange your desired toppings over the cheese. Avoid overloading, as this can prevent even cooking and make the pita soggy. Remember that vegetables will release some moisture as they cook.
- (Optional) Sprinkle a little dried oregano or Italian seasoning over the toppings.
Step 4: Bake the Pizzas
- Carefully place the baking sheet with the assembled pita pizzas into the preheated oven.
- Bake for 8-12 minutes. Baking time will vary depending on your oven, the thickness of the pita, and the amount of toppings.
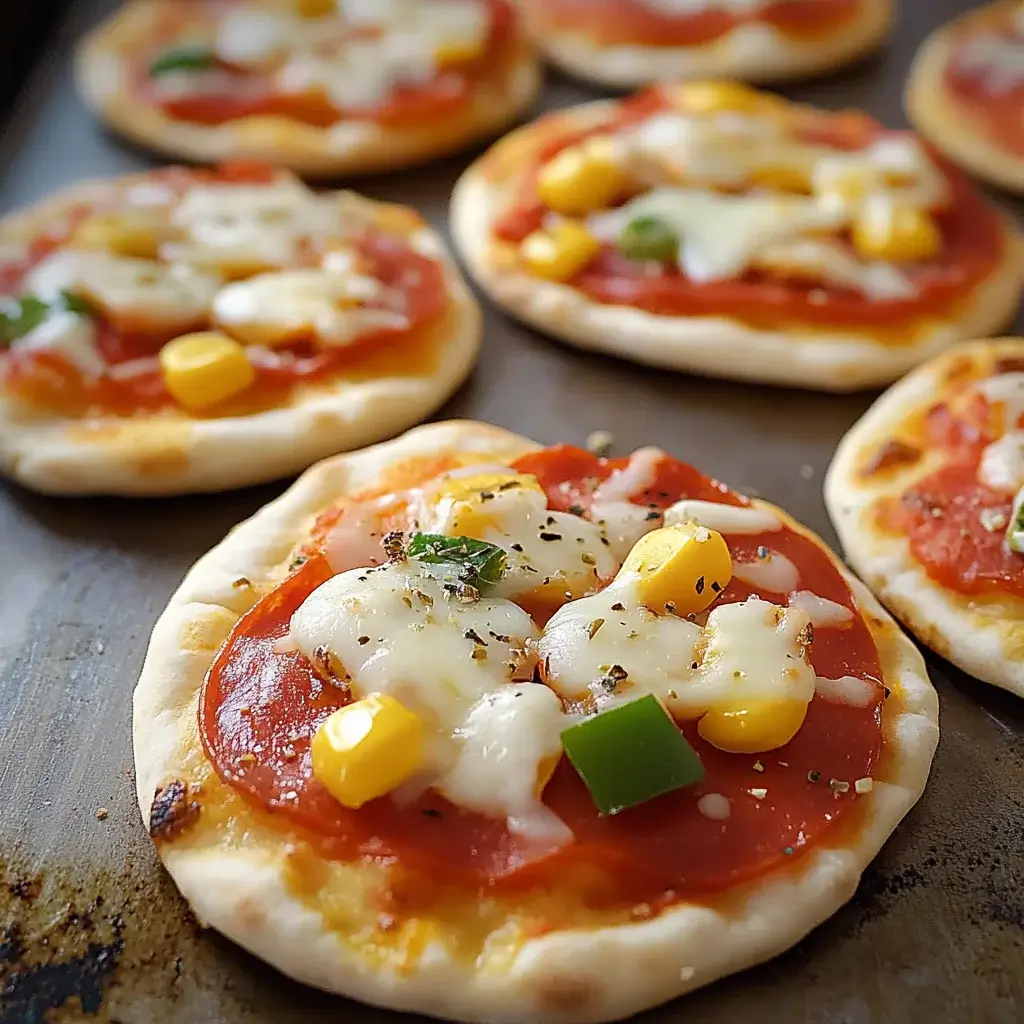
- The pizzas are done when the cheese is completely melted, bubbly, and slightly golden brown in spots, and the edges of the pita are golden and crisp.
Step 5: Cool and Serve
- Carefully remove the baking sheet from the oven using oven mitts.
- Let the mini pita pizzas cool on the baking sheet for a minute or two – the cheese will be very hot!
- If desired, garnish with fresh basil or parsley.
- Use a pizza cutter or a sharp knife to slice them into wedges if preferred, or serve them whole. Enjoy immediately!
Alternative Cooking Methods:
- Toaster Oven: Works great for one or two pizzas. Follow the same temperature and time guidelines, keeping a close eye as toaster ovens can cook faster.
- Air Fryer: Preheat the air fryer to 375°F (190°C). Place one pita pizza in the basket (ensure it fits flat). Air fry for 5-7 minutes, or until cheese is bubbly and crust is crisp. Work in batches.
- Outdoor Grill: Preheat grill to medium heat. Place assembled pizzas on the grill grates (indirect heat side if possible) or on a pizza stone. Close the lid and cook for 5-10 minutes, checking frequently until cheese is melted and crust has grill marks.
Nutritional Information (Estimated)
Nutritional values for mini pita pizzas are highly variable and depend heavily on the type of pita bread used (white vs. whole wheat, size, thickness), the amount and type of sauce, cheese, and especially the toppings chosen. The following is a rough estimate per single mini pita pizza using a standard 6-inch whole wheat pita, 2 tablespoons of marinara sauce, ¼ cup of mozzarella cheese, and minimal toppings like a few slices of pepperoni or some vegetables.
- Servings: 1 Mini Pita Pizza
- Estimated Calories per Serving: 280 – 400 calories
Approximate Breakdown (Highly Variable):
- Fat: 10-20g (influenced significantly by cheese and meat toppings)
- Saturated Fat: 5-10g
- Cholesterol: 20-40mg
- Sodium: 600-900mg (Pita bread, sauce, cheese, and processed meats contribute significantly)
- Carbohydrates: 30-45g
- Fiber: 3-6g (Higher if using whole wheat pita and veggie toppings)
- Sugar: 4-8g (Mainly from sauce and naturally in pita)
- Protein: 12-20g (Primarily from cheese and any meat toppings)
Making Healthier Choices:
- Opt for whole wheat pita bread for increased fiber.
- Use low-sodium sauce and part-skim mozzarella cheese.
- Load up on vegetable toppings (peppers, onions, mushrooms, spinach) instead of processed meats.
- Be mindful of portion sizes for higher-calorie toppings like pepperoni and sausage.
These mini pizzas can easily fit into a balanced diet, especially when made with thoughtful ingredient choices.
Quick Prep, Quicker Meal: Timing Your Pita Pizzas
One of the biggest advantages of mini pita pizzas is how quickly they come together. Here’s a realistic breakdown of the time involved:
- Preparation Time:
- Gathering Ingredients & Preheating Oven: 5 minutes
- Chopping/Prepping Toppings (if needed): 5-10 minutes (can be done ahead)
- Assembling Pizzas: 5-8 minutes (for about 4 pizzas)
- Total Active Prep Time: Approximately 10-15 minutes (assuming toppings are ready or require minimal chopping)
- Cooking Time:
- Baking in Oven: 8-12 minutes
- (Optional Pre-bake for crispiness): 4-6 minutes extra
- Total Time:
- From starting prep to serving: Approximately 20 – 30 minutes
Factors Influencing Time:
- Topping Complexity: Using pre-sliced pepperoni takes seconds; chopping multiple fresh vegetables takes longer.
- Number of Pizzas: Assembling a dozen pizzas will naturally take more time than making two or three.
- Oven Preheating: Ensure your oven is fully preheated before the pizzas go in for efficient cooking.
Even with chopping fresh vegetables, you can realistically have these delicious mini pizzas on the table in under half an hour, making them an undisputed winner for fast meals.
Serving Suggestions: Beyond the Basic Slice
While fantastic on their own, mini pita pizzas can be served in various ways to suit different occasions and appetites. Here are some ideas:
- Simple Weeknight Dinner:
- Serve one or two pizzas per person alongside a simple green salad with vinaigrette for a balanced meal.
- Pair with a cup of tomato soup for a comforting combo, especially on cooler days.
- Fun Lunch Option:
- Perfect for kids’ lunchboxes (serve cold or reheat if facilities allow). Slice into wedges for easier handling.
- Serve whole with a side of crunchy carrot sticks, cucumber slices, and a small fruit cup.
- Party Appetizers / Snacks:
- Make a variety of pizzas with different toppings and cut them into small wedges or quarters. Arrange on a platter for guests to sample.
- Serve alongside dips like ranch dressing, extra marinara sauce, or garlic butter for dipping the crusts.
- Interactive Pizza Night:
- Set up a “pizza bar” with various sauces, cheeses, and a wide array of toppings.
- Let everyone assemble their own pita pizza before baking – a guaranteed hit with kids and adults alike!
- Themed Variations:
- BBQ Chicken: Use BBQ sauce, cooked chicken, red onion, and cheddar cheese.
- Mediterranean: Use pesto or hummus as a base, feta cheese, olives, sun-dried tomatoes, and artichoke hearts.
- Breakfast Pizza: Use a scrambled egg base or top with cooked bacon/sausage and cheese, bake until set.
- Accompaniments:
- Garlic Knots or Breadsticks
- Caesar Salad
- Vegetable Crudités with Dip
- Fruit Salad
No matter how you serve them, these versatile mini pizzas are sure to disappear quickly!
Pro Tips for Pita Pizza Perfection (5 Tips)
Take your mini pita pizzas from good to great with these simple but effective tips:
- Aim for a Crispy Crust (Combat Sogginess): Pitas can sometimes get soggy under sauce and toppings. To avoid this:
- Pre-Bake: Briefly bake the plain pitas for 2-3 minutes per side at 400°F (200°C) before adding toppings. This dries them out slightly.
- Olive Oil Barrier: Brush the pita lightly with olive oil before adding the sauce. This creates a small barrier.
- Bake Directly on Rack: For maximum crispiness, carefully place assembled pizzas directly on the oven rack (place a drip tray below just in case).
- Don’t Overload: Too many toppings, especially watery vegetables, can lead to sogginess.
- Sauce Savvy: Less is often more when it comes to sauce on pita pizzas. Spread a thin, even layer, leaving a border. Too much sauce makes the pita heavy and prone to sogginess and can overpower other flavors. Ensure your sauce isn’t excessively watery.
- Cheese Choices Matter: While pre-shredded mozzarella is convenient, shredding your own block mozzarella often results in better melting because it doesn’t have the anti-caking agents. Don’t be afraid to mix cheeses! A little Parmesan adds salty sharpness, while cheddar adds color and a different flavor profile. Distribute cheese evenly for consistent coverage.
- Pre-Cook Certain Toppings: While thin toppings like pepperoni or sliced mushrooms cook quickly, heartier ingredients benefit from pre-cooking. Raw sausage, chunks of chicken, or dense vegetables like broccoli florets or thick onion slices should be cooked beforehand to ensure they are heated through by the time the cheese is bubbly and the pita is crisp. Sautéing onions and peppers beforehand also deepens their flavor.
- Watch Closely – Don’t Walk Away! Pita pizzas cook fast. Oven temperatures and pita thicknesses vary, so rely on visual cues more than exact timing. Keep an eye on them during the last few minutes of baking. You’re looking for melted, bubbly cheese that might be starting to get golden spots, and pita edges that are golden brown and look crisp. Overbaking will lead to a dry, cracker-like crust.
By incorporating these tips, you’ll ensure your mini pita pizzas have the perfect balance of crispy crust, flavourful toppings, and melted cheesy goodness every time.
Mini Pita Pizza FAQs: Your Questions Answered
Here are answers to some common questions about making mini pita pizzas:
Q1: What type of pita bread is best for mini pizzas?
- A: Most types work, but results vary slightly. Standard pocket pitas (white or whole wheat) are readily available and work well; they yield a slightly softer crust unless pre-baked. Thicker, pocketless Mediterranean-style flatbreads or Greek pitas create a chewier, slightly more substantial base. Thinner pitas will result in a crispier, almost cracker-like crust. Choose based on your preference! Just ensure they are relatively fresh, as stale pitas can become too brittle.
Q2: Can I prepare mini pita pizzas ahead of time?
- A: It’s best to assemble them just before baking to prevent the pita from becoming soggy from the sauce. However, you can definitely do prep work ahead:
- Prep Toppings: Chop vegetables, cook meats, and shred cheese. Store them in airtight containers in the refrigerator.
- Prepare Sauce: Have your sauce ready to go.
- With prepped ingredients, assembly takes only minutes, making it feasible even on busy nights.
Q3: Can I freeze mini pita pizzas?
- A: Yes, you can freeze them either baked or unbaked.
- Freezing Unbaked: Assemble the pizzas fully on a parchment-lined baking sheet. Place the sheet in the freezer until the pizzas are solid (about 1-2 hours). Then, wrap each pizza tightly in plastic wrap and place them in a freezer bag or container. Bake directly from frozen, adding a few extra minutes to the baking time. Note: The crust texture might be slightly softer than fresh.
- Freezing Baked: Let baked pizzas cool completely. Wrap individually in plastic wrap and store in a freezer bag. Reheat in an oven or toaster oven at 350°F (175°C) until heated through and crisp, or in an air fryer. Microwave reheating tends to make them soft/chewy.
Q4: Besides the oven, what are other ways to cook pita pizzas?
- A: Mini pita pizzas are very adaptable!
- Toaster Oven: Ideal for making one or two at a time. Use similar temperature settings as a conventional oven (400°F/200°C), but watch closely as they may cook faster.
- Air Fryer: Great for extra crispiness. Cook at around 375°F (190°C) for 5-7 minutes. Work in batches.
- Outdoor Grill: Adds a smoky flavour. Cook over indirect medium heat until cheese melts and crust is marked.
- Stovetop (Skillet): Place assembled pita in a lightly oiled skillet over medium heat. Cover and cook until cheese is melted and bottom is crisp (about 5-7 minutes).
Q5: What can I use if I don’t have pizza sauce or marinara?
- A: Get creative with the base! Many other sauces work wonderfully:
- Pesto: Basil pesto provides a fresh, herby base.
- BBQ Sauce: Creates a tangy base, great with chicken, red onion, and cheddar.
- Alfredo Sauce: For a creamy white pizza vibe.
- Olive Oil and Garlic: Simply brush with olive oil and sprinkle with minced garlic and herbs.
- Hummus: Offers a Mediterranean twist, especially good with feta and veggies.
- Salsa: For a Mexican-inspired pizza with corn, black beans, and Monterey Jack cheese.
Experiment and find your favorite combinations!
Print
Mini Pita Pizzas recipe
Ingredients
-
- Pita Bread: 4 rounds (Standard size, approx. 6-7 inches). White, whole wheat, or even pocketless Mediterranean-style flatbreads work well. Thicker pitas tend to yield a slightly softer crust, while thinner ones get crispier.
-
- Pizza Sauce: ½ to ¾ cup. Use your favorite store-bought pizza sauce, marinara sauce, or even plain tomato sauce seasoned with a pinch of oregano, basil, and garlic powder. About 2-3 tablespoons per pita is usually sufficient.
-
- Shredded Cheese: 1 to 1 ½ cups. Mozzarella is the classic choice for its meltability. A blend of mozzarella and cheddar, provolone, or Monterey Jack also works wonderfully. Use about ¼ to ⅓ cup per pita.
-
- Olive Oil (Optional): 1-2 tablespoons. Brushing the pitas lightly with olive oil before adding sauce can help create a barrier and prevent sogginess, adding a hint of flavor too.
-
- Dried Oregano or Italian Seasoning (Optional): For sprinkling on top for extra flavor.
Suggested Toppings (Use Your Favorites!):
(Amount depends on preference – start with small amounts per pita)
-
- Meats: Sliced pepperoni, cooked crumbled sausage, chopped ham, cooked bacon bits, shredded cooked chicken.
-
- Vegetables: Sliced mushrooms, chopped bell peppers (any color), sliced onions (red or white), sliced black olives, halved cherry tomatoes, drained pineapple tidbits (if you’re on that team!), fresh spinach leaves (they wilt down considerably), sliced jalapeños.
-
- Cheeses (Beyond Mozzarella): Grated Parmesan, crumbled feta, dollops of ricotta, goat cheese.
-
- Fresh Herbs (After Baking): Fresh basil leaves, chopped fresh parsley.
-
- Sauce Alternatives: Pesto, BBQ sauce, Alfredo sauce, garlic and olive oil base.
Instructions
Step 1: Preheat Your Oven and Prepare Baking Sheet
-
- Position an oven rack in the upper-middle position (or use two racks if making many pizzas).
-
- Preheat your oven to 400°F (200°C). A hot oven helps the pita crisp up quickly.
-
- Line a large baking sheet (or two) with parchment paper for easy cleanup, or lightly grease it. You can also place pitas directly on the oven rack for a crispier bottom, but be mindful of potential drips.
Step 2: Prepare the Pitas (Optional Crispiness Boost)
-
- If you prefer a crispier crust, place the plain pita rounds directly on the oven rack or baking sheet in the preheated oven for 2-3 minutes per side. Watch carefully to prevent burning. This step helps dry out the pita slightly.
-
- Remove the pitas from the oven and place them on your prepared baking sheet (if not already there).
Step 3: Assemble Your Mini Pizzas
-
- (Optional) Lightly brush the top surface of each pita with olive oil.
-
- Spread your chosen sauce evenly over each pita, leaving a small border (about ½ inch) around the edge for the crust. Use about 2-3 tablespoons per pita, adjusting to your preference – too much sauce can make it soggy.
-
- Sprinkle the shredded cheese evenly over the sauce.
-
- Arrange your desired toppings over the cheese. Avoid overloading, as this can prevent even cooking and make the pita soggy. Remember that vegetables will release some moisture as they cook.
-
- (Optional) Sprinkle a little dried oregano or Italian seasoning over the toppings.
Step 4: Bake the Pizzas
-
- Carefully place the baking sheet with the assembled pita pizzas into the preheated oven.
-
- Bake for 8-12 minutes. Baking time will vary depending on your oven, the thickness of the pita, and the amount of toppings.
-
- The pizzas are done when the cheese is completely melted, bubbly, and slightly golden brown in spots, and the edges of the pita are golden and crisp.
Step 5: Cool and Serve
-
- Carefully remove the baking sheet from the oven using oven mitts.
-
- Let the mini pita pizzas cool on the baking sheet for a minute or two – the cheese will be very hot!
-
- If desired, garnish with fresh basil or parsley.
-
- Use a pizza cutter or a sharp knife to slice them into wedges if preferred, or serve them whole. Enjoy immediately!
Alternative Cooking Methods:
-
- Toaster Oven: Works great for one or two pizzas. Follow the same temperature and time guidelines, keeping a close eye as toaster ovens can cook faster.
-
- Air Fryer: Preheat the air fryer to 375°F (190°C). Place one pita pizza in the basket (ensure it fits flat). Air fry for 5-7 minutes, or until cheese is bubbly and crust is crisp. Work in batches.
-
- Outdoor Grill: Preheat grill to medium heat. Place assembled pizzas on the grill grates (indirect heat side if possible) or on a pizza stone. Close the lid and cook for 5-10 minutes, checking frequently until cheese is melted and crust has grill marks.
Nutrition
- Serving Size: one normal portion
- Calories: 280 – 400


