

Spring gatherings at our house are always a flurry of color, laughter, and delicious food. Every year, I try to come up with something new and adorable to add to our appetizer spread, something that captures the lighthearted spirit of the season. Last Easter, I stumbled upon the idea of Mini Chick Cheeseball Crackers, and let me tell you, they were an absolute sensation! Not only were they incredibly cute – shaped like tiny, fluffy chicks – but they were also incredibly delicious and surprisingly easy to make. The creamy, tangy cheeseball paired perfectly with the crisp crackers, creating a delightful bite that was both savory and satisfying. The kids adored helping to shape the cheeseballs and add the little candy eyes, turning the kitchen into a joyful, crafting-meets-cooking zone. And when I served them at our Easter brunch, they were the first appetizer to disappear! Guests couldn’t stop raving about how adorable and tasty they were. These Mini Chick Cheeseball Crackers are now a must-have for our spring and Easter celebrations, and I’m thrilled to share this recipe with you. Get ready to wow your guests with these charming, flavorful, and utterly irresistible little chick snacks!
Ingredients for Adorable Mini Chick Cheeseball Crackers
Creating these delightful Mini Chick Cheeseball Crackers is all about using the right combination of flavors and textures. The ingredients are simple, yet when combined, they create a creamy, tangy, and utterly addictive appetizer. Here’s what you’ll need to gather to make these charming chick treats:
- 8 ounces Cream Cheese, softened: The base of our cheeseballs! Full-fat cream cheese is recommended for the richest flavor and creamiest texture. Make sure it’s softened to room temperature so it blends smoothly without lumps.
- Lower Fat Option: You can use reduced-fat cream cheese if you prefer, but the texture might be slightly less creamy. Ensure it’s still softened properly.
- 4 ounces Sharp Cheddar Cheese, finely shredded: Sharp cheddar cheese provides a bold, tangy flavor that complements the cream cheese beautifully. Finely shredded cheese will incorporate more evenly into the cheeseball mixture.
- Cheese Variations: You can experiment with other types of cheddar, such as mild or medium cheddar, or even a blend of cheddar and Monterey Jack for a milder flavor. For a spicier kick, consider using pepper jack cheese. Pre-shredded cheese works, but shredding your own from a block often results in better flavor and melting.
- 1/4 Cup Mayonnaise: Mayonnaise adds moisture and tanginess to the cheeseball mixture, helping to bind the ingredients together and create a smooth, spreadable consistency. Use a good quality mayonnaise for the best flavor.
- Mayonnaise Alternatives: For a slightly lighter option, you can use light mayonnaise or Greek yogurt. Sour cream can also be used for a tangier flavor, but the texture might be slightly less creamy.
- 2 Tablespoons Milk: Milk helps to further soften the cheeseball mixture and adjust the consistency to make it easier to shape. Whole milk or 2% milk works best.
- Dairy-Free Option: For a dairy-free version, you can use unsweetened almond milk or soy milk, but be aware it might slightly alter the flavor and texture.
- 1 Tablespoon Dijon Mustard: Dijon mustard adds a subtle tang and a depth of flavor that enhances the cheesiness. Its slightly sharp and complex flavor profile works wonderfully in cheeseballs.
- Mustard Substitutions: If you don’t have Dijon mustard, you can use yellow mustard, but the flavor will be milder. For a spicier kick, try using a grainy mustard or even a touch of horseradish mustard.
- 1/2 Teaspoon Garlic Powder: Garlic powder provides a savory, aromatic background flavor that complements the cheese and other seasonings.
- Fresh Garlic Option: For a more intense garlic flavor, you can use 1 clove of garlic, minced very finely. Be sure to mince it extremely well to avoid large pieces in the cheeseball.
- 1/4 Teaspoon Onion Powder: Onion powder adds a subtle savory sweetness that rounds out the flavor profile of the cheeseball.
- Fresh Onion Option (Use Sparingly): Finely minced shallot or a very small amount of minced white onion can be used, but use sparingly as fresh onion can be overpowering in a cheeseball.
- 1/4 Teaspoon Salt (or to taste): Salt is essential for enhancing the flavors of all the ingredients and balancing the richness of the cheese. Start with 1/4 teaspoon and adjust to your taste preference.
- Salt Type: Fine sea salt or table salt works well. If using kosher salt, you might need to use slightly more as it is less dense.
- 1/8 Teaspoon Black Pepper (or to taste): Black pepper adds a subtle spice and depth of flavor. Freshly ground black pepper is always preferable.
- Spice Variations: For a touch of heat, you can add a pinch of cayenne pepper or white pepper.
- 1/4 Cup Fresh Parsley, finely chopped: Fresh parsley adds a bright, herbaceous flavor and a pop of color to the cheeseballs. It also provides a nice visual contrast.
- Herb Alternatives: You can substitute other fresh herbs like chives, dill, or a blend of Italian herbs. Dried parsley can be used in a pinch, but fresh parsley provides a much brighter flavor.
- Crackers, for serving: Choose your favorite crackers for serving with the Mini Chick Cheeseballs. Buttery crackers, water crackers, or even vegetable crackers all work well. Consider providing a variety of crackers for guests to choose from.
- Cracker Suggestions: Ritz crackers, Town House crackers, Wheat Thins, Triscuit crackers, assorted vegetable crackers, pretzel crackers.
- Candy Eyes (small, edible): For the adorable chick look! Small candy eyes are readily available in the baking section of most grocery stores. Use black or dark brown candy eyes for the chick’s eyes.
- Edible Marker Alternative: If you can’t find candy eyes, you can use a food-safe edible marker to draw eyes onto the cheeseballs, or use tiny pieces of black olive or black sesame seeds if you prefer to avoid candy.
- Orange or Yellow Candy Melts or Sprinkles (for beaks, optional): To create the chick’s beaks, you can use orange or yellow candy melts, melted and piped into small triangles, or use small orange or yellow sprinkles. Alternatively, you can use small pieces of carrot or bell pepper cut into triangles.
- Beak Alternatives: Small triangles of cheddar cheese, bell pepper, or carrot can be used for a less sweet and more savory beak option.
Ingredient Notes & Quality:
- Cream Cheese: Using full-fat cream cheese is highly recommended for the best flavor and texture. Ensure it is softened completely for smooth mixing.
- Cheese Shredding: Finely shredded cheese incorporates better into the cheeseball mixture. If using pre-shredded cheese, ensure it’s fresh and not dried out.
- Fresh Herbs: Fresh parsley (or your herb of choice) adds a significant flavor boost compared to dried herbs.
- Crackers: Choose sturdy crackers that can hold the cheeseball without breaking easily.
By gathering these simple yet flavorful ingredients, you’re ready to create Mini Chick Cheeseball Crackers that are both delicious and undeniably adorable!
Instructions: Crafting Your Mini Chick Cheeseball Crackers
Making Mini Chick Cheeseball Crackers is a fun and easy process, perfect for getting kids involved in the kitchen. The steps are straightforward, and the result is a charming and delicious appetizer. Follow these step-by-step instructions to create your own flock of chick cheeseballs:
Step 1: Prepare the Cheeseball Mixture
- Combine Cream Cheese, Cheddar Cheese, and Mayonnaise: In a medium-sized mixing bowl, combine the softened cream cheese, shredded cheddar cheese, and mayonnaise.
- Softened Cream Cheese is Key: Ensure the cream cheese is truly softened to room temperature. This will make it much easier to mix and prevent lumps in your cheeseball mixture.
- Mix Until Smooth: Using an electric mixer (hand mixer or stand mixer) or a sturdy spoon, beat the cream cheese mixture until it is smooth and creamy, with no lumps.
- Mixing Time: Mix for about 1-2 minutes until everything is well combined and the texture is uniform.
- Add Milk, Dijon Mustard, and Spices: Add the milk, Dijon mustard, garlic powder, onion powder, salt, and black pepper to the bowl.
- Mix Again to Combine: Mix all ingredients together until they are thoroughly combined and the mixture is smooth and evenly seasoned.
- Taste and Adjust Seasoning: At this stage, taste the cheeseball mixture and adjust the seasoning if needed. You might want to add a little more salt, pepper, or garlic powder to your preference.
- Stir in Fresh Parsley: Gently fold in the finely chopped fresh parsley until it is evenly distributed throughout the cheeseball mixture.
- Folding Technique: Use a spatula to gently fold in the parsley, rather than stirring vigorously, to keep the parsley from bruising and maintain its fresh appearance.
Step 2: Chill the Cheeseball Mixture
- Cover and Chill: Cover the mixing bowl tightly with plastic wrap and refrigerate the cheeseball mixture for at least 1-2 hours, or preferably for 2-3 hours.
- Why Chilling is Essential: Chilling the mixture is crucial for firming it up and making it easier to shape into balls. If you try to shape the cheeseballs immediately, the mixture will be too soft and sticky.
- Longer Chilling Time: You can chill the mixture for up to 24 hours if needed, which is helpful for making the cheeseball mixture ahead of time.
Step 3: Shape the Mini Chick Cheeseballs
- Prepare a Parchment-Lined Baking Sheet: Line a baking sheet with parchment paper or wax paper. This will prevent the cheeseballs from sticking and make cleanup easier.
- Scoop and Roll Cheeseballs: Once the cheeseball mixture is chilled and firm, use a small cookie scoop (about 1-inch diameter) or a spoon to scoop out portions of the mixture.
- Roll into Balls: Roll each portion of the mixture between your palms to form smooth, round cheeseballs. Aim for uniform size for a consistent look.
- Tips for Easy Shaping: If the mixture is still a bit sticky, you can lightly dampen your hands with water or coat them with a tiny bit of cooking spray to prevent sticking.
- Place Cheeseballs on Baking Sheet: Place the shaped cheeseballs onto the prepared parchment-lined baking sheet, spacing them slightly apart.
Step 4: Add Candy Eyes and Beaks (Chick Decoration)
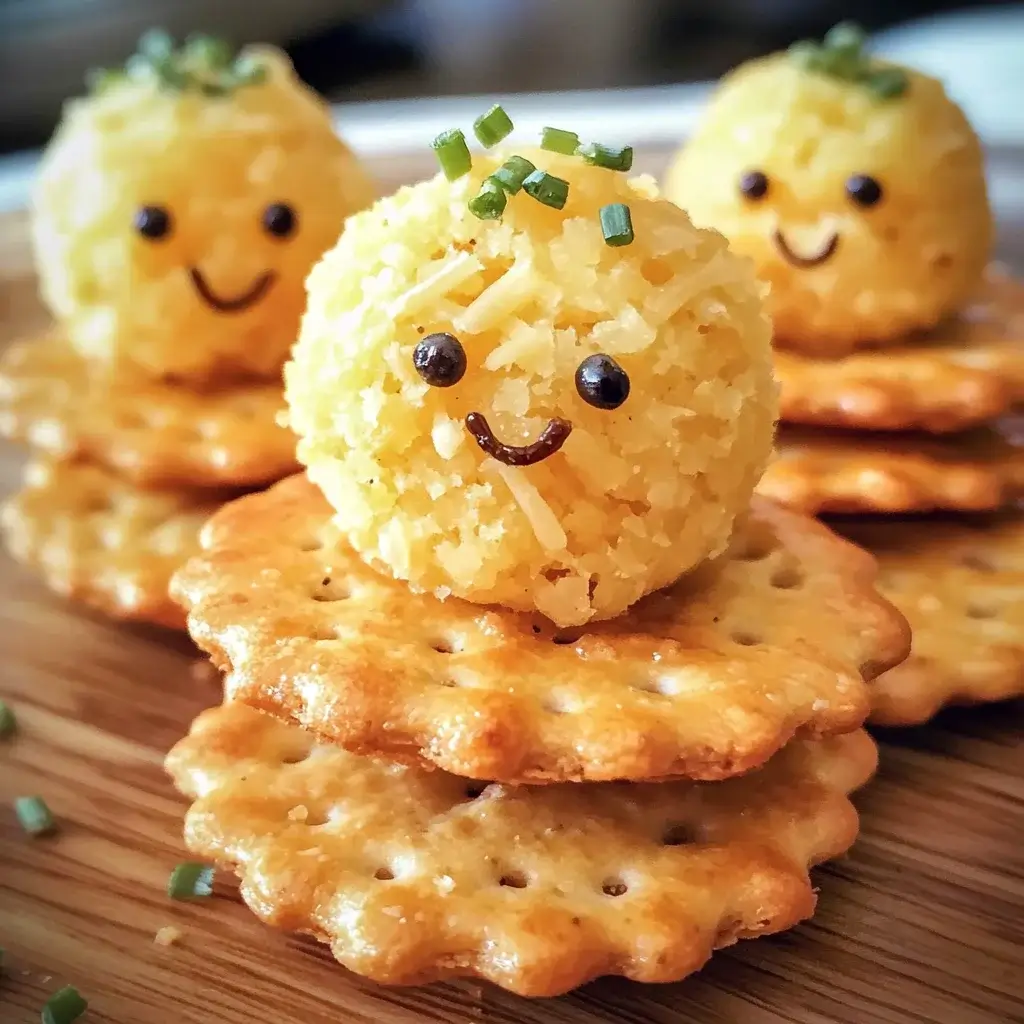
- Attach Candy Eyes: Gently press two small candy eyes onto each cheeseball to create the chick’s eyes. Position them close together in the center of the ball for a cute chick-like appearance.
- Securing Candy Eyes: The slightly tacky surface of the chilled cheeseball should be enough to hold the candy eyes in place.
- Add Beaks (Optional):
- Candy Melt Beaks: If using candy melts, melt orange or yellow candy melts according to package directions. Transfer melted candy melts to a piping bag or zip-top bag with a corner snipped off. Pipe small triangle shapes onto parchment paper and let them harden. Once hardened, gently attach a candy melt beak to each chick cheeseball using a tiny dab of melted candy melt as “glue.”
- Sprinkle Beaks: If using sprinkles, gently press a small orange or yellow sprinkle into the cheeseball just below the candy eyes to create a beak.
- Vegetable Beaks: If using vegetable beaks, cut small triangles of carrot or bell pepper. Gently press a triangle beak into each chick cheeseball below the candy eyes.
Step 5: Chill Decorated Cheeseballs (Optional but Recommended)
- Chill Again (Optional): For best results, especially if you added candy melt beaks, chill the decorated cheeseballs in the refrigerator for another 30 minutes to an hour to allow the decorations to set and the cheeseballs to firm up further. This also makes them easier to handle when serving.
Step 6: Assemble and Serve
- Arrange on Crackers: When ready to serve, arrange the Mini Chick Cheeseballs on your choice of crackers. You can place a cheeseball directly on top of each cracker.
- Serve Immediately or Shortly After Assembling: Serve the Mini Chick Cheeseball Crackers immediately or shortly after assembling to ensure the crackers remain crisp.
- Garnish (Optional): You can garnish the serving platter with fresh parsley sprigs or carrot sticks for extra visual appeal.
Following these detailed instructions will guide you through each step of making these adorable and delicious Mini Chick Cheeseball Crackers. They are sure to be a hit at your next spring gathering!
Nutrition Facts: Mini Chick Cheeseball Crackers – A Savory Treat
(Estimated Nutrition Facts – may vary based on specific ingredients, brands, cracker type, and serving size)
Servings: Approximately 24-36 Mini Chick Cheeseballs (depending on size)
Serving Size: 2 Mini Chick Cheeseballs with 4 Crackers (estimated)
Estimated Nutrition per Serving (2 cheeseballs + 4 crackers):
- Calories: 200-250
- Protein: 6-8 grams
- Fat: 15-20 grams
- Saturated Fat: 9-12 grams
- Trans Fat: 0 grams
- Cholesterol: 40-50 mg
- Sodium: 250-350 mg (depending on cracker type and salt added)
- Carbohydrates: 10-15 grams
- Fiber: 1-2 grams
- Sugar: 1-3 grams
Important Notes on Nutrition:
- These are estimated values and can vary based on the specific ingredients used (brand of cream cheese, type of cheddar, crackers chosen, etc.) and the exact serving size.
- Cheeseballs are relatively calorie-dense and higher in fat due to the cheese and mayonnaise. They should be enjoyed in moderation as part of a balanced diet.
- The primary source of fat is from the cream cheese, cheddar cheese, and mayonnaise.
- The protein content comes mainly from the cheese.
- The carbohydrate content comes primarily from the crackers. Choose whole-grain crackers for a slightly higher fiber content.
- To get a more accurate nutritional breakdown for your specific recipe, you can use online nutritional calculators and input the exact brands and quantities of ingredients you use, along with the specific type of crackers.
Mini Chick Cheeseball Crackers are a delicious savory appetizer, perfect for special occasions or festive gatherings. Being mindful of portion sizes is key to enjoying them as part of a balanced eating plan.
Preparation Time: Quick and Easy Chick Delight
One of the great things about Mini Chick Cheeseball Crackers is that they are relatively quick and easy to prepare, especially considering how adorable and impressive they look. Here’s a breakdown of the time involved in making these chick treats:
- Prep Time (Active Time): 25-30 minutes
- This includes:
- Softening cream cheese and shredding cheese: 5 minutes
- Mixing the cheeseball mixture: 10-12 minutes
- Chopping parsley and adding seasonings: 5-7 minutes
- Shaping cheeseballs: 5-6 minutes
- This includes:
- Chill Time (Inactive Time): 2-3 hours (minimum) or longer (up to 24 hours)
- This is the time the cheeseball mixture needs to chill in the refrigerator to firm up and become easy to shape.
- Decoration Time (Active Time): 15-20 minutes (depending on complexity of beaks)
- This includes:
- Adding candy eyes: 5-7 minutes
- Making and attaching candy melt beaks (if using): 10-15 minutes (less if using sprinkles or vegetable beaks)
- Optional second chill time for decorated cheeseballs: 30-60 minutes (inactive)
- This includes:
- Assembly Time (Active Time): 5-10 minutes
- Arranging cheeseballs on crackers just before serving.
Total Active Time: Approximately 45-60 minutes
Total Inactive Time (Chilling): 2-4 hours (minimum)
Make-Ahead Friendly:
Mini Chick Cheeseball Crackers are very make-ahead friendly, which is a huge advantage for entertaining. You can:
- Make the Cheeseball Mixture: Prepare the cheeseball mixture up to 24 hours in advance and store it covered in the refrigerator.
- Shape the Cheeseballs: Shape the cheeseballs a day ahead and store them covered on a parchment-lined baking sheet in the refrigerator.
- Decorate Ahead (Partially): You can even add the candy eyes a day ahead. However, if using candy melt beaks, it’s best to attach them closer to serving time to maintain their appearance. Vegetable beaks should be added just before serving.
- Assemble Just Before Serving: Assemble the cheeseballs on crackers just before serving to prevent the crackers from becoming soggy.
Time-Saving Tips:
- Use Pre-shredded Cheese: While shredding your own cheese is often preferable for flavor, using pre-shredded cheese can save you a few minutes of prep time.
- Simple Beaks: Using sprinkles or small vegetable pieces for beaks is much faster than making candy melt beaks.
- Make in Batches: If you need a large quantity, you can easily double or triple the recipe.
Even with the chilling time, the active preparation time for Mini Chick Cheeseball Crackers is quite manageable, making them a great appetizer choice for both casual and more formal spring gatherings. Their make-ahead nature also makes them perfect for busy hosts.
How to Serve Mini Chick Cheeseball Crackers: Presentation Matters
Mini Chick Cheeseball Crackers are not only delicious but also visually appealing, and presentation plays a big role in enhancing their charm. Here are some serving suggestions to make your chick appetizers stand out:
Serving Platters & Arrangements:
- Tiered Platter: Use a tiered serving platter to create height and visual interest. Arrange the cheeseball crackers on different tiers, alternating with other spring-themed appetizers or fresh fruits and vegetables.
- Circular Platter: Arrange the chick cheeseball crackers in a circular pattern on a round platter, working from the outside in. You can create a spiral or concentric circles for an elegant look.
- Rectangular Platter: Use a rectangular platter or serving board and arrange the chick cheeseball crackers in neat rows or columns. Garnish with fresh herbs or edible flowers for added color.
- Individual Plates: For a more formal setting, serve 2-3 Mini Chick Cheeseball Crackers per person on individual appetizer plates.
Garnishes & Decorations:
- Fresh Parsley Sprigs: Scatter fresh parsley sprigs around the platter to add a pop of green and reinforce the fresh herb flavor in the cheeseballs.
- Carrot Sticks & Celery Sticks: Arrange carrot sticks and celery sticks around the platter for a healthy and colorful garnish that complements the cheeseballs.
- Edible Flowers: Use edible flowers like pansies, violas, or nasturtiums to add a touch of spring elegance and color to the platter.
- Lemon Wedges: Include lemon wedges on the platter for guests who might want a squeeze of lemon juice over their cheeseball crackers.
- Cracked Black Pepper: Lightly sprinkle freshly cracked black pepper over the assembled cheeseball crackers just before serving for a subtle visual and flavor enhancement.
Occasions & Themes:
- Easter Brunch or Dinner: Mini Chick Cheeseball Crackers are perfect for Easter celebrations. Incorporate spring colors and Easter-themed decorations into your serving platter.
- Spring Gatherings: Serve these chick appetizers at any spring get-together, such as garden parties, baby showers, or Mother’s Day brunch.
- Kid-Friendly Parties: Children will adore these cute chick snacks! They are ideal for kids’ birthday parties, playdates, or spring-themed classroom events.
- Casual Appetizer Spread: Include Mini Chick Cheeseball Crackers as part of a larger appetizer spread for casual gatherings or cocktail parties.
Serving Tips:
- Assemble Just Before Serving: Assemble the cheeseball crackers just before serving to prevent the crackers from becoming soggy.
- Keep Chilled (If Necessary): If serving outdoors on a warm day, keep the platter chilled until serving time to maintain the freshness and coolness of the cheeseballs.
- Provide Variety of Crackers: Offer a selection of different crackers to cater to various tastes and dietary preferences.
- Label Ingredients (If Needed): If you are serving guests with allergies or dietary restrictions, consider labeling the ingredients of the cheeseball crackers.
By paying attention to presentation and using creative serving ideas, you can elevate your Mini Chick Cheeseball Crackers from a simple appetizer to a delightful and memorable part of your spring gathering.
Additional Tips for Perfect Mini Chick Cheeseball Crackers
To ensure your Mini Chick Cheeseball Crackers are consistently adorable and delicious, here are five additional tips to keep in mind:
- Start with Truly Softened Cream Cheese: This is crucial for a smooth and lump-free cheeseball mixture. Take the cream cheese out of the refrigerator at least 1-2 hours before you plan to start making the recipe, or even longer if your kitchen is cool. If you’re short on time, you can carefully microwave the cream cheese in 10-second intervals, checking and stirring after each interval, until just softened, but be very careful not to melt it.
- Chill the Cheeseball Mixture Thoroughly: Don’t rush the chilling process! Chilling the mixture for at least 2-3 hours, or even longer, is essential for firming it up enough to be easily shaped into balls. If the mixture is not chilled sufficiently, it will be too soft and sticky to handle. A well-chilled mixture will roll smoothly and hold its shape beautifully.
- Use a Cookie Scoop for Uniform Size: Using a small cookie scoop (about 1-inch diameter) is the easiest way to ensure your Mini Chick Cheeseballs are all the same size. This not only looks more professional but also ensures consistent serving portions. If you don’t have a cookie scoop, use a measuring spoon to scoop out equal amounts of the mixture.
- Lightly Dampen Hands for Shaping: If you find the cheeseball mixture is still slightly sticky when shaping, lightly dampen your hands with cold water or coat them with a tiny amount of cooking spray. This will prevent the mixture from sticking to your hands and make rolling the cheeseballs much easier. Re-dampen or re-spray your hands as needed during the shaping process.
- Make Candy Melt Beaks Ahead of Time (If Using): If you choose to make candy melt beaks, prepare them in advance and allow them to harden completely before attaching them to the cheeseballs. This makes the decorating process smoother and less messy. You can make the candy melt beaks a day or two ahead of time and store them at room temperature in an airtight container. This will save you time and stress on the day you are assembling the chick cheeseball crackers.
Bonus Tip: For extra flavor, consider adding a dash of hot sauce (like Tabasco or your favorite brand) to the cheeseball mixture for a subtle kick. This is optional but can add a nice layer of complexity for those who like a little spice.
By following these additional tips, you’ll be well on your way to creating flawless Mini Chick Cheeseball Crackers that are not only adorable and delicious but also consistently perfect every time you make them.
Frequently Asked Questions (FAQ) About Mini Chick Cheeseball Crackers
Got questions about making these charming Mini Chick Cheeseball Crackers? You’re in the right place! Here are answers to some frequently asked questions to help you troubleshoot and perfect your chick appetizer creations:
Q1: Can I Make Mini Chick Cheeseball Crackers Ahead of Time?
A: Yes, absolutely! Mini Chick Cheeseball Crackers are very make-ahead friendly, which is one of their biggest advantages for entertaining. You can:
- Cheeseball Mixture: Prepare the cheeseball mixture up to 24 hours in advance and store it covered in the refrigerator.
- Shaped Cheeseballs: Shape the cheeseballs a day ahead and store them covered on a parchment-lined baking sheet in the refrigerator.
- Decorated Cheeseballs: You can even add the candy eyes a day ahead. If using candy melt beaks, it’s best to attach them closer to serving time.
- Assemble Just Before Serving: Assemble the cheeseballs on crackers just before serving to prevent soggy crackers.
Q2: Can I Freeze Mini Chick Cheeseballs?
A: While you can technically freeze cheeseballs, it’s generally not recommended for optimal texture and flavor. Freezing and thawing can sometimes alter the texture of cream cheese-based items, making them slightly grainy. If you do need to freeze them, freeze the shaped (but undecorated) cheeseballs on a baking sheet until solid, then transfer them to a freezer-safe bag or container. Thaw in the refrigerator overnight before decorating and serving. However, freshly made cheeseballs are always best.
Q3: What are Good Cracker Alternatives for Serving?
A: Besides traditional crackers, you have many other options for serving Mini Chick Cheeseballs:
- Vegetable Sticks: Serve with carrot sticks, celery sticks, cucumber slices, or bell pepper strips for a healthier, gluten-free option.
- Pretzel Crisps or Sticks: Pretzel crisps or sticks offer a salty and crunchy alternative to crackers.
- Toasted Baguette Slices: Thinly sliced and toasted baguette slices provide a sturdy and flavorful base.
- Tortilla Chips (Baked): Baked tortilla chips can also be used for a different texture and flavor profile.
- Cucumber Rounds: For a very light and refreshing option, serve on cucumber rounds.
Q4: Can I Make These Cheeseballs Larger or Smaller?
A: Yes, you can adjust the size of the cheeseballs to your preference.
- Larger Cheeseballs: If you want larger cheeseballs, use a larger cookie scoop and adjust the number of servings accordingly. Larger cheeseballs might require slightly longer chilling time.
- Smaller Cheeseballs (Bite-Sized): For bite-sized appetizers, use a smaller cookie scoop (e.g., 1/2-inch diameter). Smaller cheeseballs will be even quicker to chill and decorate.
Q5: Can I Adapt This Recipe for Different Flavors?
A: Absolutely! The basic cheeseball mixture is a great base for flavor variations. Here are a few ideas:
- Spicy Chick Cheeseballs: Add a pinch of cayenne pepper or red pepper flakes, or use pepper jack cheese for a spicy kick.
- Herb & Garlic Chick Cheeseballs: Increase the garlic powder and parsley, and add other fresh herbs like dill, chives, or rosemary.
- Olive & Pimento Chick Cheeseballs: Add finely chopped black olives and pimentos to the mixture for a classic olive and pimento cheeseball flavor.
- Bacon & Cheddar Chick Cheeseballs: Add cooked and crumbled bacon to the mixture for a smoky bacon and cheddar flavor.

Mini Chick Cheeseball Crackers recipe
Ingredients
- 8 ounces Cream Cheese, softened: The base of our cheeseballs! Full-fat cream cheese is recommended for the richest flavor and creamiest texture. Make sure it’s softened to room temperature so it blends smoothly without lumps.
- Lower Fat Option: You can use reduced-fat cream cheese if you prefer, but the texture might be slightly less creamy. Ensure it’s still softened properly.
- 4 ounces Sharp Cheddar Cheese, finely shredded: Sharp cheddar cheese provides a bold, tangy flavor that complements the cream cheese beautifully. Finely shredded cheese will incorporate more evenly into the cheeseball mixture.
- Cheese Variations: You can experiment with other types of cheddar, such as mild or medium cheddar, or even a blend of cheddar and Monterey Jack for a milder flavor. For a spicier kick, consider using pepper jack cheese. Pre-shredded cheese works, but shredding your own from a block often results in better flavor and melting.
- 1/4 Cup Mayonnaise: Mayonnaise adds moisture and tanginess to the cheeseball mixture, helping to bind the ingredients together and create a smooth, spreadable consistency. Use a good quality mayonnaise for the best flavor.
- Mayonnaise Alternatives: For a slightly lighter option, you can use light mayonnaise or Greek yogurt. Sour cream can also be used for a tangier flavor, but the texture might be slightly less creamy.
- 2 Tablespoons Milk: Milk helps to further soften the cheeseball mixture and adjust the consistency to make it easier to shape. Whole milk or 2% milk works best.
- Dairy-Free Option: For a dairy-free version, you can use unsweetened almond milk or soy milk, but be aware it might slightly alter the flavor and texture.
- 1 Tablespoon Dijon Mustard: Dijon mustard adds a subtle tang and a depth of flavor that enhances the cheesiness. Its slightly sharp and complex flavor profile works wonderfully in cheeseballs.
- Mustard Substitutions: If you don’t have Dijon mustard, you can use yellow mustard, but the flavor will be milder. For a spicier kick, try using a grainy mustard or even a touch of horseradish mustard.
- 1/2 Teaspoon Garlic Powder: Garlic powder provides a savory, aromatic background flavor that complements the cheese and other seasonings.
- Fresh Garlic Option: For a more intense garlic flavor, you can use 1 clove of garlic, minced very finely. Be sure to mince it extremely well to avoid large pieces in the cheeseball.
- 1/4 Teaspoon Onion Powder: Onion powder adds a subtle savory sweetness that rounds out the flavor profile of the cheeseball.
- Fresh Onion Option (Use Sparingly): Finely minced shallot or a very small amount of minced white onion can be used, but use sparingly as fresh onion can be overpowering in a cheeseball.
- 1/4 Teaspoon Salt (or to taste): Salt is essential for enhancing the flavors of all the ingredients and balancing the richness of the cheese. Start with 1/4 teaspoon and adjust to your taste preference.
- Salt Type: Fine sea salt or table salt works well. If using kosher salt, you might need to use slightly more as it is less dense.
- 1/8 Teaspoon Black Pepper (or to taste): Black pepper adds a subtle spice and depth of flavor. Freshly ground black pepper is always preferable.
- Spice Variations: For a touch of heat, you can add a pinch of cayenne pepper or white pepper.
- 1/4 Cup Fresh Parsley, finely chopped: Fresh parsley adds a bright, herbaceous flavor and a pop of color to the cheeseballs. It also provides a nice visual contrast.
- Herb Alternatives: You can substitute other fresh herbs like chives, dill, or a blend of Italian herbs. Dried parsley can be used in a pinch, but fresh parsley provides a much brighter flavor.
- Crackers, for serving: Choose your favorite crackers for serving with the Mini Chick Cheeseballs. Buttery crackers, water crackers, or even vegetable crackers all work well. Consider providing a variety of crackers for guests to choose from.
- Cracker Suggestions: Ritz crackers, Town House crackers, Wheat Thins, Triscuit crackers, assorted vegetable crackers, pretzel crackers.
- Candy Eyes (small, edible): For the adorable chick look! Small candy eyes are readily available in the baking section of most grocery stores. Use black or dark brown candy eyes for the chick’s eyes.
- Edible Marker Alternative: If you can’t find candy eyes, you can use a food-safe edible marker to draw eyes onto the cheeseballs, or use tiny pieces of black olive or black sesame seeds if you prefer to avoid candy.
- Orange or Yellow Candy Melts or Sprinkles (for beaks, optional): To create the chick’s beaks, you can use orange or yellow candy melts, melted and piped into small triangles, or use small orange or yellow sprinkles. Alternatively, you can use small pieces of carrot or bell pepper cut into triangles.
- Beak Alternatives: Small triangles of cheddar cheese, bell pepper, or carrot can be used for a less sweet and more savory beak option.
Instructions
Step 1: Prepare the Cheeseball Mixture
- Combine Cream Cheese, Cheddar Cheese, and Mayonnaise: In a medium-sized mixing bowl, combine the softened cream cheese, shredded cheddar cheese, and mayonnaise.
- Softened Cream Cheese is Key: Ensure the cream cheese is truly softened to room temperature. This will make it much easier to mix and prevent lumps in your cheeseball mixture.
- Mix Until Smooth: Using an electric mixer (hand mixer or stand mixer) or a sturdy spoon, beat the cream cheese mixture until it is smooth and creamy, with no lumps.
- Mixing Time: Mix for about 1-2 minutes until everything is well combined and the texture is uniform.
- Add Milk, Dijon Mustard, and Spices: Add the milk, Dijon mustard, garlic powder, onion powder, salt, and black pepper to the bowl.
- Mix Again to Combine: Mix all ingredients together until they are thoroughly combined and the mixture is smooth and evenly seasoned.
- Taste and Adjust Seasoning: At this stage, taste the cheeseball mixture and adjust the seasoning if needed. You might want to add a little more salt, pepper, or garlic powder to your preference.
- Stir in Fresh Parsley: Gently fold in the finely chopped fresh parsley until it is evenly distributed throughout the cheeseball mixture.
- Folding Technique: Use a spatula to gently fold in the parsley, rather than stirring vigorously, to keep the parsley from bruising and maintain its fresh appearance.
Step 2: Chill the Cheeseball Mixture
- Cover and Chill: Cover the mixing bowl tightly with plastic wrap and refrigerate the cheeseball mixture for at least 1-2 hours, or preferably for 2-3 hours.
- Why Chilling is Essential: Chilling the mixture is crucial for firming it up and making it easier to shape into balls. If you try to shape the cheeseballs immediately, the mixture will be too soft and sticky.
- Longer Chilling Time: You can chill the mixture for up to 24 hours if needed, which is helpful for making the cheeseball mixture ahead of time.
Step 3: Shape the Mini Chick Cheeseballs
- Prepare a Parchment-Lined Baking Sheet: Line a baking sheet with parchment paper or wax paper. This will prevent the cheeseballs from sticking and make cleanup easier.
- Scoop and Roll Cheeseballs: Once the cheeseball mixture is chilled and firm, use a small cookie scoop (about 1-inch diameter) or a spoon to scoop out portions of the mixture.
- Roll into Balls: Roll each portion of the mixture between your palms to form smooth, round cheeseballs. Aim for uniform size for a consistent look.
- Tips for Easy Shaping: If the mixture is still a bit sticky, you can lightly dampen your hands with water or coat them with a tiny bit of cooking spray to prevent sticking.
- Place Cheeseballs on Baking Sheet: Place the shaped cheeseballs onto the prepared parchment-lined baking sheet, spacing them slightly apart.
Step 4: Add Candy Eyes and Beaks (Chick Decoration)
- Attach Candy Eyes: Gently press two small candy eyes onto each cheeseball to create the chick’s eyes. Position them close together in the center of the ball for a cute chick-like appearance.
- Securing Candy Eyes: The slightly tacky surface of the chilled cheeseball should be enough to hold the candy eyes in place.
- Add Beaks (Optional):
- Candy Melt Beaks: If using candy melts, melt orange or yellow candy melts according to package directions. Transfer melted candy melts to a piping bag or zip-top bag with a corner snipped off. Pipe small triangle shapes onto parchment paper and let them harden. Once hardened, gently attach a candy melt beak to each chick cheeseball using a tiny dab of melted candy melt as “glue.”
- Sprinkle Beaks: If using sprinkles, gently press a small orange or yellow sprinkle into the cheeseball just below the candy eyes to create a beak.
- Vegetable Beaks: If using vegetable beaks, cut small triangles of carrot or bell pepper. Gently press a triangle beak into each chick cheeseball below the candy eyes.
Step 5: Chill Decorated Cheeseballs (Optional but Recommended)
- Chill Again (Optional): For best results, especially if you added candy melt beaks, chill the decorated cheeseballs in the refrigerator for another 30 minutes to an hour to allow the decorations to set and the cheeseballs to firm up further. This also makes them easier to handle when serving.
Step 6: Assemble and Serve
- Arrange on Crackers: When ready to serve, arrange the Mini Chick Cheeseballs on your choice of crackers. You can place a cheeseball directly on top of each cracker.
- Serve Immediately or Shortly After Assembling: Serve the Mini Chick Cheeseball Crackers immediately or shortly after assembling to ensure the crackers remain crisp.
- Garnish (Optional): You can garnish the serving platter with fresh parsley sprigs or carrot sticks for extra visual appeal.
Nutrition
- Serving Size: one normal portion
- Calories: 200-250
- Sugar: 1-3 grams
- Sodium: 250-350 mg
- Fat: 15-20 grams
- Saturated Fat: 9-12 grams
- Carbohydrates: 10-15 grams
- Fiber: 1-2 grams
- Protein: 6-8 grams
- Cholesterol: 40-50 mg


