

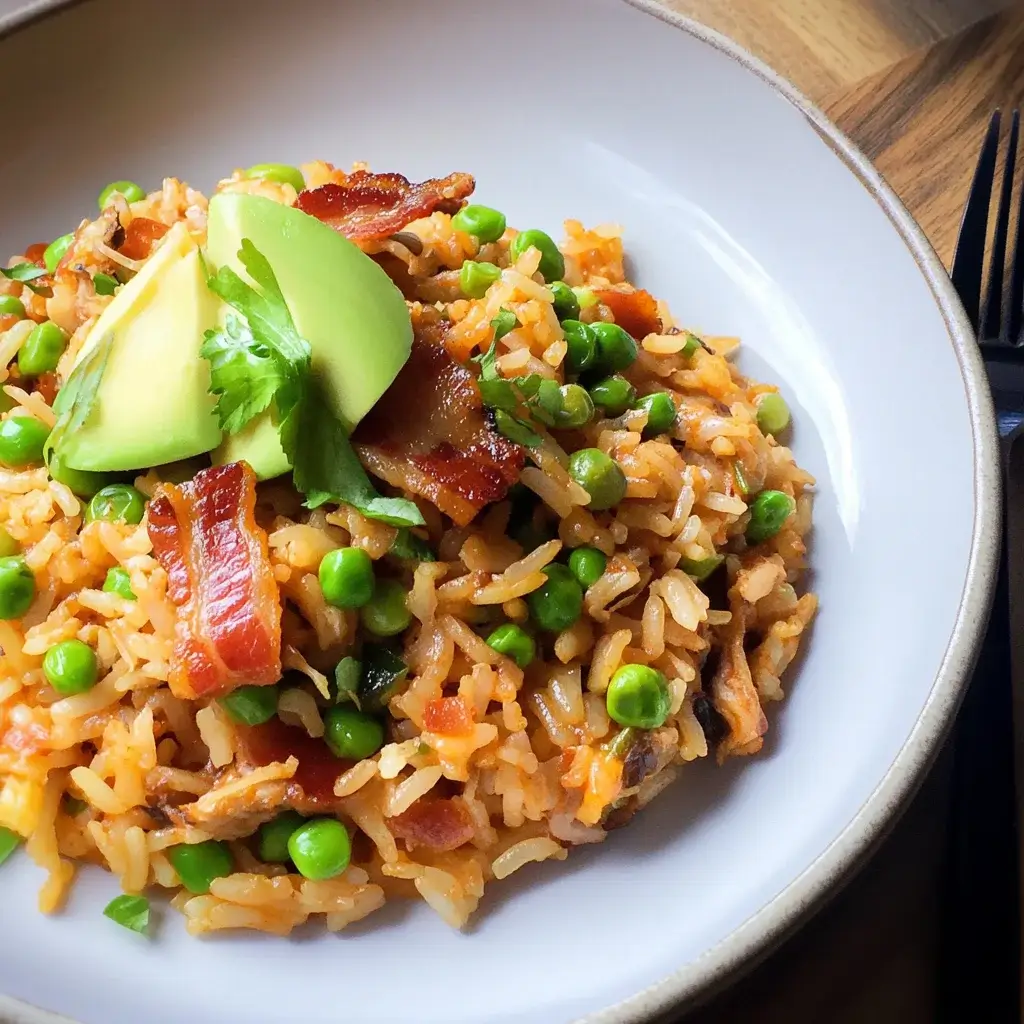
Let me tell you, in our house, weeknight dinners are often a balancing act between speed, ease, and, most importantly, deliciousness. We’re always on the lookout for meals that can be whipped up quickly after a long day, but that don’t compromise on flavor. That’s where this Kimchi-Bacon Fried Rice recipe comes in – it’s been a total game-changer! From the first sizzling sound of bacon hitting the pan to the last flavorful bite, this dish is a symphony of textures and tastes. My family, even the pickiest eaters, absolutely devour it. The spicy, tangy kimchi perfectly complements the smoky, savory bacon, all nestled within fluffy, perfectly cooked rice. It’s a dish that’s both comforting and exciting, and honestly, it’s become a regular feature on our dinner table. If you’re looking for a quick, incredibly flavorful, and satisfying meal, you absolutely must try this Kimchi-Bacon Fried Rice. Trust me, your taste buds will thank you!
Ingredients for Kimchi-Bacon Fried Rice
To create this flavour-packed Kimchi-Bacon Fried Rice, you’ll need a handful of readily available ingredients that come together to create magic in your wok or skillet. Here’s what you’ll need to gather for a truly unforgettable culinary experience:
- Cooked Rice (Day-old rice is best): 4 cups. Using day-old rice is crucial for fried rice as it has less moisture, resulting in perfectly separated grains that fry up beautifully without becoming mushy. Long-grain rice like jasmine or basmati works exceptionally well. If you’re in a pinch, you can freshly cook rice and spread it out thinly on a plate to cool and dry slightly before using.
- Thick-Cut Bacon: 6-8 strips, cut into lardons or small pieces. Thick-cut bacon provides a robust smoky flavor and satisfyingly chewy texture. Feel free to use your favorite type of bacon – smoked, maple, or even peppered bacon can add a unique twist. For a leaner option, you can use turkey bacon, but the flavor profile will be slightly different.
- Kimchi (Well-fermented): 1 ½ cups, chopped. The star of the show! Use well-fermented kimchi for the best flavor – it should be tangy and slightly sour. Both napa cabbage kimchi and radish kimchi work wonderfully. Don’t discard the kimchi juice! It’s packed with flavour and adds depth to the fried rice. Adjust the amount of kimchi to your spice preference; for a milder version, use less kimchi or opt for a less spicy variety.
- Kimchi Juice: 2 tablespoons. This liquid gold intensifies the kimchi flavor and adds moisture to the dish. If your kimchi is very dry, you might need to add a touch more juice or even a splash of water to help distribute the flavor.
- Onion: 1 medium, finely diced. Onion provides a foundational aromatic base for the fried rice. Yellow or white onions work best, offering a mild sweetness that complements the other ingredients.
- Garlic: 3-4 cloves, minced. Garlic is essential for adding pungent and savory notes to the dish. Freshly minced garlic is always preferred for the best flavor.
- Soy Sauce (or Tamari for gluten-free): 3 tablespoons. Soy sauce provides umami richness and saltiness, balancing the spiciness of the kimchi and the smokiness of the bacon. Tamari is a gluten-free alternative with a similar flavor profile. Low-sodium soy sauce is recommended to control the overall salt level.
- Sesame Oil: 1 tablespoon. Toasted sesame oil adds a distinct nutty aroma and flavor that is characteristic of Asian cuisine and elevates the fried rice. A little goes a long way, so don’t overdo it.
- Gochujang (Korean Chili Paste – optional, for extra spice): 1 teaspoon (or more to taste). Gochujang adds a deeper level of heat and a slightly sweet and fermented flavor. If you love extra spice, this is a fantastic addition. Adjust the amount to your spice tolerance.
- Sugar: 1 teaspoon (or to taste, optional). A pinch of sugar can balance the acidity of the kimchi and enhance the overall flavors. This is optional, but it can round out the taste profile, especially if your kimchi is very sour.
- Eggs: 2-3 large. Eggs add protein and richness to the fried rice. They also create a lovely texture and bind the ingredients together.
- Green Onions (Scallions): 2-3 stalks, thinly sliced, for garnish. Green onions provide a fresh, mild oniony flavor and a vibrant green garnish that brightens up the dish visually.
- Sesame Seeds (optional, for garnish): 1 tablespoon, toasted. Toasted sesame seeds add a nutty crunch and visual appeal. Toasting them in a dry pan for a few minutes enhances their flavor.
- Cooking Oil (Vegetable or Canola Oil): 2 tablespoons. A neutral cooking oil with a high smoke point is ideal for stir-frying. Vegetable or canola oil works well.
Variations and Substitutions:
- Protein: Feel free to add other proteins like cooked chicken, shrimp, beef, or tofu. Leftover cooked meats are perfect for this recipe.
- Vegetables: Incorporate other vegetables such as carrots, peas, bell peppers, zucchini, or mushrooms for added nutrients and texture.
- Spicy Level: Adjust the amount of kimchi and gochujang to control the spiciness. For a milder version, use less kimchi juice or rinse the kimchi briefly before chopping.
- Vegan Option: Substitute bacon with smoked tofu or tempeh bacon for a vegan version. Ensure your kimchi is vegan-friendly as some may contain fish sauce.
- Cheese Topping: For a fusion twist, try melting a slice of mozzarella or cheddar cheese over the fried rice just before serving – a popular Korean-American adaptation.
By using high-quality ingredients and following the instructions carefully, you’ll be well on your way to creating a truly delicious and satisfying Kimchi-Bacon Fried Rice that will become a new favorite in your kitchen.
Instructions: How to Make Kimchi-Bacon Fried Rice
Making Kimchi-Bacon Fried Rice is surprisingly simple and quick, perfect for a weeknight dinner. Follow these step-by-step instructions to create this flavorful dish in your own kitchen:
Step 1: Prepare the Bacon
- Cook the Bacon: In a large skillet, wok, or Dutch oven over medium heat, add the diced bacon. Cook, stirring occasionally, until the bacon is crispy and has rendered its fat. This usually takes about 5-7 minutes. Crispy bacon is key for both texture and flavor in this dish.
- Remove Bacon and Reserve Fat: Once the bacon is crispy, use a slotted spoon to remove it from the skillet and set it aside on a paper towel-lined plate to drain excess grease. Leave the bacon fat in the skillet – this flavorful fat will be used to cook the rest of the ingredients and adds incredible depth to the fried rice.
Step 2: Sauté Aromatics
- Sauté Onion: In the same skillet with the bacon fat, add the diced onion and cook over medium heat, stirring occasionally, until softened and translucent. This typically takes about 3-5 minutes. Softened onions release their sweetness and create a flavorful base.
- Add Garlic and Kimchi: Add the minced garlic and chopped kimchi to the skillet with the softened onions. Cook, stirring frequently, for another 2-3 minutes until the garlic is fragrant and the kimchi is slightly softened and heated through. Cooking the kimchi deepens its flavor and mellows its raw edge.
Step 3: Add Rice and Seasoning
- Add Rice: Push the onion, garlic, and kimchi mixture to one side of the skillet. Add the cooked rice to the empty space in the skillet. Break up any clumps of rice with your spatula or spoon.
- Fry the Rice: Increase the heat to medium-high. Stir-fry the rice, breaking it apart and tossing it with the bacon fat in the skillet, for about 3-5 minutes until the rice is heated through and slightly toasted. Frying the rice helps to dry it out further and gives it a slightly crispy texture.
- Combine Ingredients: Mix the rice with the onion, garlic, and kimchi mixture, ensuring everything is well combined and evenly distributed.
- Add Seasonings: Pour in the soy sauce (or tamari), sesame oil, kimchi juice, and gochujang (if using). Stir well to coat the rice and vegetables evenly with the seasonings. Taste and adjust seasonings as needed, adding a pinch of sugar if desired to balance the flavors.
Step 4: Cook Eggs (Optional)
- Make Space for Eggs: Push the rice mixture to one side of the skillet, creating an empty space.
- Cook Eggs: Crack the eggs into the empty space. You can scramble them directly in the skillet or cook them sunny-side up or over-easy, depending on your preference. If scrambling, use your spatula to break the yolks and scramble the eggs until cooked through. If cooking sunny-side up or over-easy, cook until the whites are set and the yolks are cooked to your desired doneness.
- Incorporate Eggs: Once the eggs are cooked, chop them up (if scrambled or over-easy/over-medium) and mix them into the fried rice. If you cooked sunny-side up eggs, you can leave them whole and place them on top of the fried rice when serving.
Step 5: Finish and Serve
- Add Bacon Back: Return the crispy cooked bacon to the skillet and stir it into the fried rice.
- Garnish: Stir in most of the sliced green onions, reserving some for garnish. Sprinkle with toasted sesame seeds (if using).
- Serve Immediately: Serve the Kimchi-Bacon Fried Rice hot, garnished with the remaining green onions and extra sesame seeds, if desired.
Tips for Perfect Fried Rice:
- Use Day-Old Rice: This is crucial for preventing mushy fried rice. Day-old rice has less moisture and fries up beautifully.
- Hot Wok/Skillet: Use a large skillet, wok, or Dutch oven and ensure it’s hot before adding the ingredients. High heat is essential for stir-frying and achieving that slightly smoky, wok-hei flavor.
- Don’t Overcrowd the Pan: Cook in batches if necessary to avoid overcrowding the pan, which can lower the temperature and result in steamed rather than fried rice.
- Prepare Ingredients in Advance: Have all your ingredients prepped and ready to go before you start cooking as the cooking process is quick. This includes dicing the onion, mincing the garlic, chopping the kimchi, and measuring out the seasonings.
- Taste and Adjust Seasoning: Taste the fried rice throughout the cooking process and adjust seasonings as needed to your preference. You might want to add more soy sauce, kimchi juice, gochujang, or sugar to balance the flavors perfectly.
With these detailed instructions, you’ll be able to create a restaurant-quality Kimchi-Bacon Fried Rice that is bursting with flavor and sure to impress your family and friends. Enjoy!
Nutrition Facts for Kimchi-Bacon Fried Rice
This nutrition information is an estimate and can vary based on specific ingredients and portion sizes. It is calculated for approximately one serving of Kimchi-Bacon Fried Rice, assuming the recipe serves 4-6 people.
Servings: 4-6 servings
Serving Size: Approximately 1 ½ – 2 cups
Approximate Nutrition per Serving (based on 4 servings):
- Calories: 550-700 kcal
- Protein: 20-25g
- Fat: 30-40g
- Saturated Fat: 10-15g
- Unsaturated Fat: 15-25g
- Cholesterol: 150-200mg
- Sodium: 1200-1800mg
- Carbohydrates: 50-70g
- Fiber: 3-5g
- Sugar: 5-8g
Key Nutritional Highlights:
- Good Source of Protein: Bacon and eggs contribute to a significant protein content, essential for muscle building and satiety.
- Moderate in Fat: Contains a moderate amount of fat, primarily from bacon and cooking oil. Choose leaner cuts of bacon or turkey bacon to reduce fat content.
- Source of Carbohydrates: Rice provides carbohydrates for energy. Opt for brown rice for a higher fiber content.
- Rich in Sodium: Kimchi and soy sauce contribute to a high sodium content. Use low-sodium soy sauce and consume in moderation, especially if you are watching your sodium intake.
- Source of Vitamins and Minerals: Kimchi is a good source of vitamins (especially Vitamin C and Vitamin K) and minerals. Eggs provide vitamins A, D, and B vitamins.
Note: These values are estimations. For precise nutritional information, use a nutrition calculator with the specific brands and quantities of ingredients you use. To make this dish healthier, consider:
- Using leaner bacon or turkey bacon.
- Reducing the amount of cooking oil.
- Adding more vegetables to increase fiber and nutrient content.
- Using brown rice instead of white rice for higher fiber.
- Using low-sodium soy sauce.
Always consult with a healthcare professional or registered dietitian for personalized dietary advice.
Preparation Time for Kimchi-Bacon Fried Rice
Kimchi-Bacon Fried Rice is a wonderfully quick and efficient meal. Here’s a breakdown of the estimated preparation and cooking times:
Prep Time: 15-20 minutes
- Chopping Vegetables: Dicing the onion, mincing the garlic, and slicing green onions.
- Preparing Bacon: Cutting bacon into lardons or small pieces.
- Chopping Kimchi: Roughly chopping the kimchi.
- Measuring Ingredients: Gathering and measuring out all the ingredients, including seasonings.
Cook Time: 15-20 minutes
- Cooking Bacon: Rendering bacon fat and crisping bacon (5-7 minutes).
- Sautéing Aromatics: Cooking onion and garlic (5-7 minutes).
- Frying Rice: Stir-frying rice and combining all ingredients (5-7 minutes).
- Cooking Eggs (Optional): Cooking and incorporating eggs (2-3 minutes).
Total Time: 30-40 minutes
From start to finish, you can have a delicious and satisfying Kimchi-Bacon Fried Rice meal on the table in under 40 minutes. This makes it an ideal choice for busy weeknights when you want a flavorful and quick dinner.
Time-Saving Tips:
- Use Pre-cooked Rice: Having day-old cooked rice ready to go significantly speeds up the process.
- Pre-chop Vegetables: If you have time, you can chop the onions, garlic, and green onions ahead of time and store them in airtight containers in the refrigerator.
- Use Pre-cut Bacon: Buying pre-diced bacon can save a few minutes of prep time.
- Efficient Cooking: Having all your ingredients prepped and organized (mise en place) before you start cooking ensures a smooth and efficient cooking process.
With a little bit of preparation, this Kimchi-Bacon Fried Rice can be a lifesaver for those evenings when you need a fast, flavorful, and satisfying meal without spending hours in the kitchen.
How to Serve Kimchi-Bacon Fried Rice
Kimchi-Bacon Fried Rice is a complete meal in itself, packed with flavor and satisfying textures. However, you can enhance your dining experience by serving it with complementary dishes and garnishes. Here are some ideas on how to serve this delicious fried rice:
Serving Suggestions:
- As a Main Dish:
- Standalone Meal: Kimchi-Bacon Fried Rice is flavorful and substantial enough to be enjoyed on its own as a satisfying main course. Its combination of carbohydrates, protein, and vegetables makes it a well-rounded meal.
- Family Style: Serve it in a large bowl in the center of the table and let everyone help themselves. This is perfect for casual family dinners.
- With Side Dishes (Korean Inspired):
- Banchan (Korean Side Dishes): Enhance your meal with a selection of Korean side dishes (Banchan) to create a traditional Korean dining experience.
- Cucumber Kimchi (Oi Muchim): A refreshing and crunchy side dish that complements the richness of the fried rice.
- Spinach Namul (Sigeumchi Namul): Seasoned spinach salad adds a healthy and flavorful green element.
- Bean Sprout Salad (Kongnamul Muchim): A simple and crunchy salad with a light and savory dressing.
- Korean Potato Salad (Gamja Salad): A creamy and slightly sweet potato salad that provides a different texture and flavor profile.
- Soup or Broth:
- Miso Soup: A light and savory miso soup can cleanse the palate and provide a comforting warmth.
- Egg Drop Soup: A classic and simple soup that pairs well with fried rice.
- Kimchi Jjigae (Kimchi Stew): For the kimchi lovers! A more intense kimchi experience, serve a small bowl of Kimchi Jjigae alongside for extra warmth and spice (be mindful of spice levels if serving to those sensitive to heat).
- Banchan (Korean Side Dishes): Enhance your meal with a selection of Korean side dishes (Banchan) to create a traditional Korean dining experience.
- Garnishes and Toppings:
- Sesame Seeds: Toasted sesame seeds add a nutty aroma, flavor, and a pleasant crunch.
- Green Onions (Scallions): Freshly sliced green onions provide a mild oniony flavor and a vibrant green color.
- Fried Egg (Sunny-Side Up or Over-Easy): Adding a fried egg on top is a popular and delicious way to serve fried rice. The runny yolk adds richness and creaminess.
- Roasted Seaweed Snacks (Gim): Crispy roasted seaweed sheets can be crumbled over the fried rice for a salty and umami-rich garnish.
- Sriracha or Gochujang (for extra spice): Offer sriracha or extra gochujang on the side for those who want to increase the spice level.
Serving Style Ideas:
- Individual Bowls: Serve neatly portioned servings in individual bowls for a more formal or organized presentation.
- Hot Stone Bowl (Dolsot Bibimbap Style): For a fun and interactive experience, you can serve the fried rice in a hot stone bowl (dolsot). The rice will get crispy on the bottom and stay warm longer. Be careful when handling hot stone bowls!
- Bento Box: Kimchi-Bacon Fried Rice is perfect for packing in a bento box for lunch. Include some side dishes and garnishes for a complete and portable meal.
By considering these serving suggestions and garnishes, you can elevate your Kimchi-Bacon Fried Rice from a simple weeknight meal to a more elaborate and enjoyable dining experience. Experiment with different side dishes and toppings to find your favorite combinations!
Additional Tips for Perfect Kimchi-Bacon Fried Rice
To consistently create exceptional Kimchi-Bacon Fried Rice, consider these helpful tips and techniques that will elevate your cooking game:
- Rice is King: Choose the Right Rice and Prepare it Properly:
- Day-Old Cooked Rice is Essential: As mentioned before, day-old rice is crucial for preventing mushy fried rice. The drier rice grains fry up beautifully and absorb flavors better.
- Long-Grain Rice is Preferred: Opt for long-grain rice varieties like jasmine or basmati. These types of rice are less starchy and hold their shape well during stir-frying.
- Cook Rice Ahead of Time: Plan ahead and cook your rice a day in advance. Spread it out thinly on a plate or baking sheet to cool down quickly and dry out slightly in the refrigerator.
- Avoid Freshly Cooked, Hot Rice: Using hot, freshly cooked rice will result in sticky and clumpy fried rice. If you must use freshly cooked rice, allow it to cool completely and spread it out to dry before using.
- Embrace the Heat: High Heat is Your Friend:
- Hot Wok or Skillet: Ensure your wok, skillet, or Dutch oven is properly heated before adding ingredients. High heat is essential for stir-frying and achieving that desirable smoky “wok hei” flavor that is characteristic of good fried rice.
- Maintain Heat Throughout Cooking: Keep the heat consistently high throughout the cooking process to ensure the rice fries properly and doesn’t steam.
- Don’t Overcrowd the Pan: If you are making a large batch, cook the fried rice in batches to avoid overcrowding the pan. Overcrowding lowers the temperature and can lead to steamed, not fried, rice.
- Flavor Building Blocks: Layer Flavors for Depth:
- Render Bacon Fat Fully: Don’t skimp on cooking the bacon properly to render out its flavorful fat. This bacon fat is the foundation of flavor in the fried rice.
- Sauté Aromatics First: Sautéing the onion and garlic in the bacon fat before adding other ingredients builds a flavorful aromatic base. Cook them until softened and fragrant to release their full potential.
- Don’t Forget the Kimchi Juice: Kimchi juice is a flavor powerhouse! It adds tanginess, spice, and umami depth. Don’t discard it – incorporate it into your fried rice for an extra layer of flavor.
- Season Gradually and Taste: Season in layers, starting with soy sauce and sesame oil, and then adjust with gochujang, sugar, or salt as needed. Taste and adjust seasonings throughout the cooking process to ensure the flavors are balanced to your liking.
- Kimchi Know-How: Understand Your Kimchi:
- Use Well-Fermented Kimchi: Well-fermented kimchi has a more complex and tangy flavor that is ideal for fried rice. It should taste sour and pungent.
- Adjust Kimchi Amount to Spice Preference: Kimchi comes in varying levels of spiciness. Adjust the amount of kimchi you use based on your spice tolerance and the spiciness of your kimchi. For a milder version, use less kimchi or choose a less spicy type.
- Chop Kimchi Appropriately: Chop the kimchi into bite-sized pieces that are easy to distribute throughout the fried rice.
- Efficiency is Key: Mise en Place – Prepare Everything in Advance:
- Prep Ingredients Before Cooking: “Mise en place” (French for “everything in its place”) is crucial for stir-frying. Have all your ingredients prepped, measured, and ready to go before you start cooking. This includes dicing vegetables, chopping kimchi, cooking rice, and measuring out seasonings.
- Organize Your Cooking Station: Having everything organized and within reach will make the cooking process faster and smoother, especially since stir-frying is a quick cooking method.
- Fast Cooking Process: Stir-frying is a fast cooking method. Having everything prepped allows you to focus on the cooking process without scrambling to chop ingredients mid-way.
By following these additional tips, you’ll be well-equipped to master the art of making perfect Kimchi-Bacon Fried Rice every time. Enjoy experimenting and refining your technique to create your own signature version of this delicious dish!
Frequently Asked Questions (FAQ) About Kimchi-Bacon Fried Rice
Here are some frequently asked questions about making Kimchi-Bacon Fried Rice to help you troubleshoot and perfect your recipe:
Q1: Can I use freshly cooked rice for this recipe?
A: While it’s highly recommended to use day-old rice for the best texture in fried rice, you can use freshly cooked rice in a pinch. However, freshly cooked rice contains more moisture and is more likely to become sticky and mushy when stir-fried. If you must use fresh rice, make sure to let it cool down completely and spread it out thinly on a plate or baking sheet to allow some of the moisture to evaporate before using it. This will help to improve the texture of your fried rice.
Q2: I don’t have gochujang, can I still make this recipe?
A: Yes, absolutely! Gochujang is optional and primarily adds an extra layer of spice and flavor depth. If you don’t have gochujang, you can still make delicious Kimchi-Bacon Fried Rice. The kimchi itself provides plenty of flavor and spice. If you want a little extra heat, you can add a pinch of red pepper flakes or a dash of your favorite hot sauce instead. The recipe will still be flavorful and satisfying without gochujang.
Q3: Can I make this recipe vegetarian or vegan?
A: Yes, you can easily adapt this recipe to be vegetarian or vegan.
- Vegetarian: Simply omit the bacon. You can add other vegetables like mushrooms, bell peppers, or tofu to add substance.
- Vegan: To make it vegan, replace the bacon with a plant-based bacon alternative like smoked tofu or tempeh bacon. Ensure your kimchi is vegan-friendly, as some kimchi varieties contain fish sauce. You can also omit the eggs or substitute them with crumbled firm tofu that has been pan-fried separately for protein.
Q4: How do I store leftover Kimchi-Bacon Fried Rice?
A: Leftover Kimchi-Bacon Fried Rice can be stored in an airtight container in the refrigerator for up to 3-4 days. To reheat, you can microwave it until heated through, or stir-fry it again in a skillet with a little oil until warmed. Adding a tablespoon of water when reheating in the microwave can help prevent it from drying out. Ensure the leftovers are heated to an internal temperature of 165°F (74°C) before consuming.
Q5: My fried rice is mushy, what did I do wrong?
A: Mushy fried rice is often caused by using rice that is too moist or by overcrowding the pan. Here are the most common reasons and how to avoid them:
- Using Freshly Cooked, Hot Rice: As mentioned earlier, using hot, freshly cooked rice is a primary cause of mushy fried rice. Always use day-old, cooled rice.
- Overcrowding the Pan: Overcrowding the pan lowers the temperature and causes the rice to steam instead of fry. Cook in batches if necessary to avoid overcrowding.
- Adding Too Much Liquid: Be mindful of the amount of liquid you add, such as soy sauce and kimchi juice. While these add flavor, too much liquid can make the rice mushy. Stick to the recommended amounts in the recipe.
- Cooking at Too Low Heat: Not using high enough heat can also result in mushy fried rice as the rice doesn’t fry properly. Ensure your wok or skillet is hot before adding the rice and maintain high heat throughout cooking.
By addressing these potential issues, you can avoid mushy fried rice and achieve perfectly textured, flavorful Kimchi-Bacon Fried Rice every time. If you have any more questions, feel free to ask!
Print
Kimchi-bacon Fried Rice recipe
Ingredients
- Cooked Rice (Day-old rice is best): 4 cups. Using day-old rice is crucial for fried rice as it has less moisture, resulting in perfectly separated grains that fry up beautifully without becoming mushy. Long-grain rice like jasmine or basmati works exceptionally well. If you’re in a pinch, you can freshly cook rice and spread it out thinly on a plate to cool and dry slightly before using.
- Thick-Cut Bacon: 6-8 strips, cut into lardons or small pieces. Thick-cut bacon provides a robust smoky flavor and satisfyingly chewy texture. Feel free to use your favorite type of bacon – smoked, maple, or even peppered bacon can add a unique twist. For a leaner option, you can use turkey bacon, but the flavor profile will be slightly different.
- Kimchi (Well-fermented): 1 ½ cups, chopped. The star of the show! Use well-fermented kimchi for the best flavor – it should be tangy and slightly sour. Both napa cabbage kimchi and radish kimchi work wonderfully. Don’t discard the kimchi juice! It’s packed with flavour and adds depth to the fried rice. Adjust the amount of kimchi to your spice preference; for a milder version, use less kimchi or opt for a less spicy variety.
- Kimchi Juice: 2 tablespoons. This liquid gold intensifies the kimchi flavor and adds moisture to the dish. If your kimchi is very dry, you might need to add a touch more juice or even a splash of water to help distribute the flavor.
- Onion: 1 medium, finely diced. Onion provides a foundational aromatic base for the fried rice. Yellow or white onions work best, offering a mild sweetness that complements the other ingredients.
- Garlic: 3-4 cloves, minced. Garlic is essential for adding pungent and savory notes to the dish. Freshly minced garlic is always preferred for the best flavor.
- Soy Sauce (or Tamari for gluten-free): 3 tablespoons. Soy sauce provides umami richness and saltiness, balancing the spiciness of the kimchi and the smokiness of the bacon. Tamari is a gluten-free alternative with a similar flavor profile. Low-sodium soy sauce is recommended to control the overall salt level.
- Sesame Oil: 1 tablespoon. Toasted sesame oil adds a distinct nutty aroma and flavor that is characteristic of Asian cuisine and elevates the fried rice. A little goes a long way, so don’t overdo it.
- Gochujang (Korean Chili Paste – optional, for extra spice): 1 teaspoon (or more to taste). Gochujang adds a deeper level of heat and a slightly sweet and fermented flavor. If you love extra spice, this is a fantastic addition. Adjust the amount to your spice tolerance.
- Sugar: 1 teaspoon (or to taste, optional). A pinch of sugar can balance the acidity of the kimchi and enhance the overall flavors. This is optional, but it can round out the taste profile, especially if your kimchi is very sour.
- Eggs: 2-3 large. Eggs add protein and richness to the fried rice. They also create a lovely texture and bind the ingredients together.
- Green Onions (Scallions): 2-3 stalks, thinly sliced, for garnish. Green onions provide a fresh, mild oniony flavor and a vibrant green garnish that brightens up the dish visually.
- Sesame Seeds (optional, for garnish): 1 tablespoon, toasted. Toasted sesame seeds add a nutty crunch and visual appeal. Toasting them in a dry pan for a few minutes enhances their flavor.
- Cooking Oil (Vegetable or Canola Oil): 2 tablespoons. A neutral cooking oil with a high smoke point is ideal for stir-frying. Vegetable or canola oil works well.
Instructions
Step 1: Prepare the Bacon
- Cook the Bacon: In a large skillet, wok, or Dutch oven over medium heat, add the diced bacon. Cook, stirring occasionally, until the bacon is crispy and has rendered its fat. This usually takes about 5-7 minutes. Crispy bacon is key for both texture and flavor in this dish.
- Remove Bacon and Reserve Fat: Once the bacon is crispy, use a slotted spoon to remove it from the skillet and set it aside on a paper towel-lined plate to drain excess grease. Leave the bacon fat in the skillet – this flavorful fat will be used to cook the rest of the ingredients and adds incredible depth to the fried rice.
Step 2: Sauté Aromatics
- Sauté Onion: In the same skillet with the bacon fat, add the diced onion and cook over medium heat, stirring occasionally, until softened and translucent. This typically takes about 3-5 minutes. Softened onions release their sweetness and create a flavorful base.
- Add Garlic and Kimchi: Add the minced garlic and chopped kimchi to the skillet with the softened onions. Cook, stirring frequently, for another 2-3 minutes until the garlic is fragrant and the kimchi is slightly softened and heated through. Cooking the kimchi deepens its flavor and mellows its raw edge.
- Add Rice: Push the onion, garlic, and kimchi mixture to one side of the skillet. Add the cooked rice to the empty space in the skillet. Break up any clumps of rice with your spatula or spoon.
- Fry the Rice: Increase the heat to medium-high. Stir-fry the rice, breaking it apart and tossing it with the bacon fat in the skillet, for about 3-5 minutes until the rice is heated through and slightly toasted. Frying the rice helps to dry it out further and gives it a slightly crispy texture.
- Combine Ingredients: Mix the rice with the onion, garlic, and kimchi mixture, ensuring everything is well combined and evenly distributed.
- Add Seasonings: Pour in the soy sauce (or tamari), sesame oil, kimchi juice, and gochujang (if using). Stir well to coat the rice and vegetables evenly with the seasonings. Taste and adjust seasonings as needed, adding a pinch of sugar if desired to balance the flavors.
Step 4: Cook Eggs (Optional)
- Make Space for Eggs: Push the rice mixture to one side of the skillet, creating an empty space.
- Cook Eggs: Crack the eggs into the empty space. You can scramble them directly in the skillet or cook them sunny-side up or over-easy, depending on your preference. If scrambling, use your spatula to break the yolks and scramble the eggs until cooked through. If cooking sunny-side up or over-easy, cook until the whites are set and the yolks are cooked to your desired doneness.
- Incorporate Eggs: Once the eggs are cooked, chop them up (if scrambled or over-easy/over-medium) and mix them into the fried rice. If you cooked sunny-side up eggs, you can leave them whole and place them on top of the fried rice when serving.
Step 5: Finish and Serve
- Add Bacon Back: Return the crispy cooked bacon to the skillet and stir it into the fried rice.
- Garnish: Stir in most of the sliced green onions, reserving some for garnish. Sprinkle with toasted sesame seeds (if using).
- Serve Immediately: Serve the Kimchi-Bacon Fried Rice hot, garnished with the remaining green onions and extra sesame seeds, if desired.
Nutrition
- Serving Size: one normal portion
- Calories: 550-700 kcal
- Sugar: 5-8g
- Sodium: 1200-1800mg
- Fat: 30-40g
- Saturated Fat: 10-15g
- Unsaturated Fat: 15-25g
- Carbohydrates: 50-70g
- Fiber: 3-5g
- Protein: 20-25g
- Cholesterol: 150-200mg


