


There’s nothing quite like the smell of freshly baked bread wafting through the house, and this Honey Oat Bread recipe takes that comforting aroma to a whole new level. I first stumbled upon this recipe when searching for a healthier, yet still delicious, alternative to our usual white bread. The promise of the gentle sweetness of honey combined with the wholesome goodness of oats intrigued me, and let me tell you, it didn’t disappoint! From the very first loaf, my family was hooked. The soft, slightly chewy texture, the subtle sweetness, and that wonderful oaty flavor made it an instant hit. It’s become a weekend staple in our home, perfect for toast in the morning, sandwiches for lunch, or simply enjoyed warm with a pat of butter. If you’re looking for a bread recipe that’s both nutritious and incredibly satisfying, you’ve come to the right place. Get ready to fill your kitchen with the irresistible scent of homemade Honey Oat Bread!
Ingredients
Creating a truly exceptional Honey Oat Bread starts with gathering the right ingredients. Each component plays a vital role in the final texture, flavor, and nutritional profile of your loaf. Let’s explore each ingredient in detail:
- Active Dry Yeast (2 ¼ teaspoons or 1 packet): Yeast is the magic ingredient that brings bread to life! It’s a living organism that consumes sugars and produces carbon dioxide, which creates the air bubbles that make bread rise and become light and airy. Active dry yeast needs to be proofed, meaning it needs to be dissolved in warm liquid to ensure it’s active and ready to work its magic. Using fresh yeast is crucial for a good rise. If your yeast is old, it may not be as potent, and your bread might not rise properly. Always check the expiration date and store yeast in a cool, dry place.
- Warm Water (1 cup, approximately 105-115°F): Warm water is essential for activating the yeast. The temperature range is crucial – too cold and the yeast won’t activate; too hot and it can kill the yeast. Using a kitchen thermometer is the best way to ensure the water is at the correct temperature. If you don’t have a thermometer, the water should feel comfortably warm to the touch, like bathwater. This warm water also helps to hydrate the flour and start the gluten development process.
- Honey (¼ cup): Honey is the star sweetener in this recipe, imparting a delicate sweetness and a unique floral aroma to the bread that white sugar simply can’t replicate. Beyond its flavor, honey also adds moisture to the bread, contributing to a softer crumb. It also acts as food for the yeast, aiding in the fermentation process. You can use various types of honey, such as wildflower, clover, or buckwheat, each offering a slightly different flavor profile. For a milder sweetness, clover or wildflower honey works beautifully. For a more robust flavor, consider buckwheat honey, though its stronger taste may be more pronounced in the final bread.
- Unsalted Butter, Melted and Cooled (¼ cup): Butter adds richness, flavor, and tenderness to the bread. Melted butter incorporates smoothly into the dough and contributes to a softer texture. Unsalted butter is preferred in baking because it gives you more control over the salt content. If you only have salted butter, you can use it, but you may want to reduce the amount of salt added separately in the recipe. Make sure the butter is cooled slightly before adding it to the yeast mixture, as hot butter can also kill the yeast.
- Salt (1 ½ teaspoons): Salt is a vital ingredient in bread making, often underestimated but absolutely essential. It not only enhances the flavor of the bread, balancing the sweetness of the honey, but it also controls the yeast activity, slowing down the fermentation process and preventing the bread from rising too quickly. Salt also strengthens the gluten structure, which is crucial for creating a loaf with good texture and structure. Use regular table salt or fine sea salt. Avoid using coarse salt, as it may not dissolve evenly in the dough.
- Rolled Oats (1 cup, plus more for topping): Rolled oats are the heart and soul of this Honey Oat Bread, lending a wonderful nutty flavor, a slightly chewy texture, and a boost of fiber and nutrition. Both old-fashioned rolled oats and quick-cooking oats can be used. Old-fashioned oats will provide a slightly chewier texture, while quick-cooking oats will result in a slightly softer crumb. For the best texture and flavor, old-fashioned rolled oats are generally recommended. Reserving some oats for topping adds visual appeal and a delightful textural contrast to the crust.
- All-Purpose Flour (3 ½ – 4 cups): All-purpose flour forms the structure of the bread. It contains gluten, a protein that, when mixed with water and kneaded, develops elasticity and strength, allowing the dough to rise and hold its shape. The amount of flour needed can vary slightly depending on humidity and the type of flour used. Start with 3 ½ cups and gradually add more until the dough is soft, slightly sticky, but not overly wet and unmanageable. Too much flour will result in a dry, dense loaf. Too little flour will make the dough too sticky and difficult to handle, and the bread may spread too thin during baking. Bread flour, with its higher protein content, can also be used for a chewier texture, but all-purpose flour works perfectly well for this recipe.
Optional Ingredients for Added Flavor and Texture:
- Cinnamon (½ teaspoon): A touch of cinnamon can enhance the warm, comforting flavors of honey and oats, adding a subtle spice note.
- Nuts (½ cup, chopped walnuts, pecans, or almonds): Adding chopped nuts provides a delightful crunch and nutty flavor, complementing the oats and honey beautifully. Toasted nuts will have a richer flavor.
- Seeds (¼ cup, sunflower seeds, pumpkin seeds, or flax seeds): Seeds add a healthy boost and a pleasant textural contrast. They can be mixed into the dough or sprinkled on top along with the oats.
- Dried Fruit (½ cup, raisins, cranberries, or chopped dates): Dried fruit adds sweetness and chewiness, creating a delightful sweet and savory combination. Soaking dried fruit in warm water for a few minutes before adding it to the dough will plump them up and prevent them from drawing moisture out of the dough.
Instructions
Baking Honey Oat Bread is a rewarding process, and following these step-by-step instructions will guide you to a perfectly baked loaf. Let’s break down each stage:
Step 1: Proof the Yeast
This initial step is crucial to ensure your yeast is active and ready to make your bread rise.
- Combine Yeast and Warm Water: In a large mixing bowl, or the bowl of your stand mixer if using one, combine the active dry yeast with 1 cup of warm water (105-115°F).
- Add Honey: Stir in ¼ cup of honey. The honey provides food for the yeast and kickstarts the activation process.
- Let it Sit and Froth: Let the mixture stand for 5-10 minutes. You should see small bubbles forming on the surface, and the mixture should become slightly frothy. This indicates that the yeast is active and alive. If no bubbles appear after 10 minutes, your yeast might be inactive, and you’ll need to start with fresh yeast.
Step 2: Combine Wet and Dry Ingredients
Now it’s time to bring together the wet and dry components to form the dough.
- Add Melted Butter and Salt: To the yeast mixture, add the melted and cooled butter and salt. Stir to combine.
- Incorporate Rolled Oats: Add 1 cup of rolled oats to the wet ingredients. Stir to ensure the oats are well combined and moistened. Let the mixture sit for a few minutes to allow the oats to soften slightly. This step helps to prevent the oats from drawing too much moisture from the dough later on.
Step 3: Gradually Add Flour and Knead
This is where the dough comes together, and the gluten begins to develop.
- Add Flour Gradually: Gradually add the all-purpose flour, starting with 3 ½ cups. Add the flour in ½ cup increments, mixing well after each addition. You can use a wooden spoon, spatula, or the dough hook attachment of your stand mixer on low speed.
- Form a Soft Dough: Continue adding flour until the dough comes together and forms a soft, slightly sticky dough. You might not need to use all 4 cups of flour, or you might need a little more, depending on the humidity and your flour. The dough should be soft and pliable but not overly sticky. It should pull away from the sides of the bowl but still feel slightly tacky to the touch.
- Knead the Dough: Turn the dough out onto a lightly floured surface. Knead the dough for 6-8 minutes, or until it becomes smooth and elastic. If using a stand mixer, knead with the dough hook on medium-low speed for 4-5 minutes. Kneading develops the gluten in the flour, which gives the bread its structure and chewy texture. To knead by hand, push the dough away from you with the heel of your hand, fold it over, and repeat. Rotate the dough as you knead. If the dough is too sticky, add a little more flour, a tablespoon at a time, but be careful not to add too much, as this can make the bread dry. The dough is properly kneaded when it is smooth, elastic, and springs back when gently poked.
Step 4: First Rise (Bulk Fermentation)
The first rise is crucial for developing flavor and texture.
- Place Dough in a Greased Bowl: Lightly grease a large bowl with oil or butter. Place the kneaded dough in the bowl and turn it to coat all sides with grease. This prevents the dough from drying out during the rise.
- Cover and Rise in a Warm Place: Cover the bowl with plastic wrap or a clean kitchen towel. Place the bowl in a warm, draft-free place to rise. A warm oven (turned off), a sunny spot, or a warm room are ideal. Let the dough rise for 1-1 ½ hours, or until it has doubled in size. The rising time will depend on the temperature of your environment. In a warmer environment, it will rise faster.
- Check for Doubling: To check if the dough has doubled, gently poke it with two fingers. If the indentations remain, the dough is ready for the next step.
Step 5: Shape the Loaf and Second Rise (Proofing)
Shaping and the second rise prepare the dough for baking.
- Punch Down the Dough: Gently punch down the risen dough to release the air bubbles. Turn the dough out onto a lightly floured surface.
- Shape into a Loaf: Shape the dough into a loaf. You can shape it into a round loaf or a rectangular loaf for a standard loaf pan. To shape a rectangular loaf, gently flatten the dough into a rectangle and then roll it up tightly, tucking in the ends as you roll. Pinch the seam to seal.
- Place in a Greased Loaf Pan: Grease a 9×5 inch loaf pan. Place the shaped loaf in the prepared pan, seam-side down.
- Second Rise (Proofing): Cover the loaf pan loosely with plastic wrap or a clean kitchen towel. Let the dough rise again in a warm place for 45-60 minutes, or until it has almost doubled in size and is puffy. This second rise is called proofing. It’s important not to let it over-proof, as it can collapse during baking. The dough is ready for baking when it springs back slowly when gently poked.
Step 6: Bake the Bread
Baking transforms the dough into a golden brown, fragrant loaf.
- Preheat Oven: Preheat your oven to 350°F (175°C). Place the oven rack in the center position.
- Optional Oat Topping: If desired, brush the top of the loaf with a little milk or water and sprinkle with extra rolled oats for a decorative topping. Gently press the oats into the dough so they adhere during baking.
- Bake: Bake for 30-40 minutes, or until the loaf is golden brown and sounds hollow when tapped on the bottom. The internal temperature of the bread should reach 200-210°F (93-99°C) when measured with a digital thermometer inserted into the center. If the top of the bread is browning too quickly, you can tent it loosely with aluminum foil during the last 10-15 minutes of baking.
- Cool in Pan Briefly: Once baked, remove the loaf from the oven and let it cool in the pan for 5-10 minutes. This makes it easier to remove from the pan without breaking.
- Transfer to Wire Rack to Cool Completely: Carefully remove the loaf from the pan and place it on a wire rack to cool completely before slicing. Cooling completely is essential for the texture and flavor of the bread to fully develop and to make slicing easier. Resist the temptation to slice into it while it’s still hot, as it can be gummy.
Step 7: Enjoy!
Once cooled, your homemade Honey Oat Bread is ready to be enjoyed! Slice and savor the deliciousness of your freshly baked creation.
Nutrition Facts
(Approximate values per serving – Note: Nutritional values are estimates and can vary based on specific ingredients and serving sizes.)
- Serving Size: 1 slice (approximately 1/12 of the loaf)
- Calories per Serving: Approximately 180-220 calories
Typical Nutritional Breakdown per Serving (Estimated):
- Protein: 5-6 grams
- Fat: 5-7 grams
- Saturated Fat: 2-3 grams
- Unsaturated Fat: 3-4 grams
- Cholesterol: 10-15 mg
- Sodium: 200-250 mg
- Carbohydrates: 30-35 grams
- Fiber: 2-3 grams
- Sugar: 5-7 grams (from honey and naturally occurring in flour and oats)
Key Nutritional Highlights:
- Source of Fiber: Rolled oats contribute dietary fiber, which is beneficial for digestion and helps promote satiety.
- Moderate Protein: Provides a decent amount of plant-based protein.
- Energy Source: Carbohydrates provide energy for the body.
- Lower in Processed Sugar Compared to Some Commercial Breads: Sweetened primarily with honey, which, while still sugar, offers some trace minerals and antioxidants compared to refined white sugar.
- Homemade Goodness: Generally free from artificial preservatives and additives found in many store-bought breads.
Important Considerations:
- Portion Control: While Honey Oat Bread is a healthier option compared to some other breads, it’s still important to be mindful of portion sizes, especially if you are watching your calorie or carbohydrate intake.
- Ingredient Variations: The nutritional content can vary depending on the specific ingredients used. For example, using whole wheat flour instead of all-purpose flour will increase the fiber content. Adding nuts and seeds will increase the healthy fat and protein content.
- Honey Content: While honey is a natural sweetener, it’s still a form of sugar. Individuals monitoring their sugar intake should be mindful of the honey content.
This Honey Oat Bread, when enjoyed in moderation as part of a balanced diet, can be a nutritious and delicious addition to your meals.
Preparation Time
Making homemade Honey Oat Bread involves several stages, each contributing to the final delicious loaf. Here’s a breakdown of the preparation time:
- Active Time (Hands-on Time): Approximately 30-40 minutes
- Proofing Yeast: 5-10 minutes (mostly inactive time)
- Mixing Ingredients: 10-15 minutes
- Kneading Dough: 6-8 minutes (by hand) or 4-5 minutes (stand mixer)
- Shaping Loaf: 5-7 minutes
- Preparing Pan and Topping: 2-3 minutes
- Inactive Time (Rising and Baking): Approximately 2 hours 45 minutes – 3 hours 30 minutes
- First Rise (Bulk Fermentation): 1-1 ½ hours
- Second Rise (Proofing): 45-60 minutes
- Baking Time: 30-40 minutes
- Cooling Time (in pan and on rack): 30-60 minutes (recommended for optimal texture and slicing)
- Total Time (Start to Finish): Approximately 3 hours 15 minutes – 4 hours
Time Breakdown Summary:
- Yeast Activation: 5-10 minutes
- Dough Preparation (Mixing & Kneading): 20-25 minutes
- First Rise: 1-1 ½ hours
- Shaping & Second Rise: 50-65 minutes
- Baking: 30-40 minutes
- Cooling: 30-60 minutes
Tips for Time Management:
- Maximize Inactive Time: While the dough is rising and baking, you can attend to other tasks. Bread making is a great activity to fit into your day as much of the time is hands-off.
- Prep Ingredients in Advance: Measure out all your ingredients before you start mixing. This will streamline the process and make it quicker to assemble the dough.
- Use a Stand Mixer: If you have a stand mixer, it can significantly reduce the kneading time and effort.
- Warm Environment for Rising: Ensure a warm, draft-free environment for rising to keep rising times within the estimated range. A slightly warmer environment will speed up the rise, while a colder environment will slow it down.
- Cooling is Crucial: Don’t rush the cooling process! Allowing the bread to cool completely is essential for achieving the best texture and making it easier to slice.
While making bread takes time, the active time is relatively short, and the reward of fresh, homemade Honey Oat Bread is well worth the effort!
How to Serve Honey Oat Bread
Honey Oat Bread is incredibly versatile and can be enjoyed in countless ways. Its subtle sweetness and oaty flavor make it a perfect complement to both sweet and savory dishes. Here are some delicious serving suggestions:
Breakfast:
- Toast with Butter and Honey: A classic and simple way to enjoy the bread’s natural flavors. The melted butter and extra drizzle of honey enhance the sweetness.
- Avocado Toast: Top toasted slices with mashed avocado, a sprinkle of salt and pepper, and a squeeze of lemon or lime juice. The creamy avocado pairs beautifully with the oaty bread.
- Peanut Butter and Banana Toast: A kid-friendly favorite! Spread peanut butter (or almond butter) on toast and top with sliced bananas.
- French Toast: Honey Oat Bread makes exceptionally flavorful French toast. Its slightly denser texture holds up well to soaking and frying.
- Breakfast Sandwich: Use slices to make a breakfast sandwich with eggs, cheese, bacon, sausage, or ham.
Lunch & Snacks:
- Sandwiches and Wraps: The sturdy texture of Honey Oat Bread makes it ideal for sandwiches. It holds fillings well without getting soggy.
- Classic Deli Sandwiches: Ham and cheese, turkey and Swiss, roast beef, or tuna salad.
- Vegetarian Sandwiches: Hummus and vegetables, grilled halloumi and roasted peppers, or black bean burgers.
- Grilled Cheese: Elevate your grilled cheese with Honey Oat Bread and your favorite cheese combination.
- Open-Faced Sandwiches (Tartines): Top slices with ricotta cheese and roasted vegetables, smoked salmon and cream cheese, or bruschetta toppings.
- Breadsticks or Croutons: Cut leftover bread into strips or cubes, toss with olive oil and herbs, and bake until crispy for breadsticks or homemade croutons for salads and soups.
Dinner:
- Side with Soups and Stews: Serve warm slices alongside hearty soups, stews, and chili. The bread is perfect for dipping and soaking up flavorful broths.
- Bread Basket: Include Honey Oat Bread in a bread basket as part of a dinner party or family meal.
- Garlic Bread: Brush slices with garlic butter and bake for a flavorful garlic bread variation.
- Bruschetta: Top toasted slices with diced tomatoes, basil, garlic, and olive oil for a simple and flavorful appetizer.
Sweet Treats & Desserts:
- Bread Pudding: Honey Oat Bread makes a wonderfully flavorful bread pudding. Its texture and subtle sweetness are perfect for soaking up custard.
- Grilled Bread with Fruit and Honey: Grill slices and top with grilled or fresh fruit (peaches, berries, figs), a drizzle of honey, and a dollop of yogurt or ice cream for a simple dessert.
- Toast with Nutella and Berries: A sweet treat for breakfast or dessert. Toast slices and spread with Nutella, topping with fresh berries.
Serving Tips:
- Warm it Up: Slightly warming Honey Oat Bread enhances its aroma and flavor. You can warm it in the toaster, oven, or microwave.
- Fresh is Best: Enjoy Honey Oat Bread fresh for the best flavor and texture. Homemade bread is at its peak on the day it’s baked.
- Storage: Store leftover bread in an airtight container at room temperature for 2-3 days or in the freezer for longer storage. Slice before freezing for easier thawing and toasting.
- Pair with Complementary Flavors: Consider the subtle sweetness and oaty notes of the bread when choosing toppings and pairings. Honey, butter, cinnamon, nuts, fruits, and creamy cheeses all complement it well.
No matter how you choose to serve it, Honey Oat Bread is sure to be a delightful addition to your table!
Additional Tips for Baking Perfect Honey Oat Bread
Baking bread can be a rewarding experience, and with a few extra tips, you can ensure your Honey Oat Bread turns out perfectly every time. Here are five helpful tips for success:
- Use Fresh and Active Yeast: Yeast is the engine that makes bread rise, so using fresh, active yeast is crucial. Always check the expiration date on your yeast package. To test yeast activity, proof it as described in the instructions. If it doesn’t become frothy and bubbly within 10 minutes, it’s best to use fresh yeast. Storing yeast properly (in a cool, dry place) helps maintain its activity.
- Water Temperature Matters: The temperature of the water used to activate the yeast is critical. Aim for warm water between 105-115°F (40-46°C). Too cold, and the yeast won’t activate properly. Too hot, and it can kill the yeast. Use a kitchen thermometer for accuracy. If you don’t have a thermometer, the water should feel comfortably warm to the touch, like bathwater.
- Don’t Over-Knead or Under-Knead: Kneading is essential for developing gluten, which gives bread its structure. However, both over-kneading and under-kneading can affect the final texture. Knead for the recommended time (6-8 minutes by hand, 4-5 minutes in a stand mixer) until the dough is smooth, elastic, and springs back when gently poked. Over-kneading can result in tough bread, while under-kneading can lead to a dense, less structured loaf.
- Control Rising Temperatures: Consistent rising temperatures are important for predictable results. A warm, draft-free environment is ideal for rising. A slightly warm oven (turned off), a sunny spot, or a warm room are good options. Avoid placing the dough in a cold or drafty area, as this will significantly slow down the rising process. If your kitchen is cool, you can create a warmer environment by placing the bowl of dough in a slightly warmed oven (turned off) or in a microwave with a cup of boiling water (not while the microwave is running!).
- Don’t Over-Proof or Under-Proof: Proofing (the second rise after shaping) is just as crucial as the first rise. Over-proofing can cause the dough to collapse during baking, resulting in a deflated loaf. Under-proofing can lead to a dense, heavy loaf. Let the dough rise until it has almost doubled in size and is puffy. To check for readiness, gently poke the dough. If the indentation springs back slowly, it’s ready to bake. If it springs back immediately, it needs more proofing time. If it doesn’t spring back at all and collapses, it’s likely over-proofed (though slightly over-proofed dough can sometimes still bake decently, but may be denser).
By following these tips, along with the recipe instructions, you’ll be well on your way to baking consistently delicious Honey Oat Bread!
Frequently Asked Questions (FAQ) About Honey Oat Bread
Baking bread can sometimes raise questions, especially for those new to bread making. Here are five common questions and their answers to help you bake with confidence:
Q1: My dough isn’t rising. What did I do wrong?
A: Several factors can prevent dough from rising. The most common culprits are:
- Inactive Yeast: Ensure your yeast is fresh and active. Proof it in warm water with honey as instructed in the recipe. If it doesn’t froth, it’s likely inactive and needs to be replaced.
- Water Temperature: The water used to activate the yeast might be too cold or too hot. Use water between 105-115°F (40-46°C).
- Temperature of Rising Environment: The dough needs a warm environment to rise. If your kitchen is cold, find a warmer spot for rising, like a slightly warmed oven (turned off) or a sunny location.
- Too Much Salt: While salt is necessary, too much salt can inhibit yeast activity. Ensure you are using the correct amount of salt as specified in the recipe.
Q2: My bread is dense and heavy, not light and airy. Why?
A: Dense, heavy bread can be due to several reasons:
- Not Enough Kneading: Kneading develops gluten, which creates the airy texture. Ensure you knead the dough for the recommended time (6-8 minutes by hand, 4-5 minutes in a stand mixer).
- Under-Proofing: If the dough doesn’t rise enough during the proofing stages, it will be dense. Allow sufficient rising time in a warm place until the dough has doubled in size.
- Too Much Flour: Adding too much flour can make the dough dry and dense. Measure flour accurately and add it gradually until the dough reaches the desired soft and slightly sticky consistency.
- Oven Temperature Too Low: If the oven temperature is too low, the bread might not rise properly and can become dense. Ensure your oven is accurately preheated to 350°F (175°C).
Q3: Can I use quick-cooking oats instead of rolled oats?
A: Yes, you can use quick-cooking oats, but the texture of the bread might be slightly different. Quick-cooking oats are more finely processed and will absorb liquid more quickly, resulting in a slightly softer, less chewy crumb. Rolled oats (old-fashioned oats) are generally preferred for Honey Oat Bread for their texture and slightly nuttier flavor. If using quick-cooking oats, you might need to adjust the liquid slightly, as they absorb more moisture.
Q4: How do I store Honey Oat Bread to keep it fresh?
A: To keep Honey Oat Bread fresh:
- Room Temperature: Store cooled bread in an airtight container or wrapped tightly in plastic wrap or a bread bag at room temperature for 2-3 days.
- Freezing: For longer storage, freeze the bread. Slice the cooled loaf and wrap slices individually or the entire loaf tightly in plastic wrap and then in a freezer bag. Frozen bread can last for up to 2-3 months. Thaw at room temperature or toast directly from frozen.
- Avoid Refrigeration: Refrigerating bread can actually make it dry out faster. Room temperature or freezing are the best options for storage.
Q5: Can I add other ingredients to this Honey Oat Bread recipe?
A: Absolutely! Honey Oat Bread is a versatile base recipe. You can customize it by adding:
- Nuts and Seeds: Chopped walnuts, pecans, almonds, sunflower seeds, pumpkin seeds, or flax seeds for added flavor and texture.
- Dried Fruit: Raisins, cranberries, chopped dates, or apricots for sweetness and chewiness.
- Spices: Cinnamon, nutmeg, or cardamom to enhance the warm flavors.
- Herbs: For a savory twist, you could experiment with adding chopped fresh rosemary or thyme.
When adding extra ingredients, incorporate them after the first rise, during the shaping stage. Be mindful of the amount of additions; too many heavy ingredients might affect the rise and texture of the bread.
We hope these FAQs and tips help you bake beautiful and delicious Honey Oat Bread! Happy baking!
Print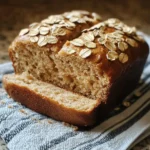
Honey Oat Bread recipe
Ingredients
- Active Dry Yeast (2 ¼ teaspoons or 1 packet): Yeast is the magic ingredient that brings bread to life! It’s a living organism that consumes sugars and produces carbon dioxide, which creates the air bubbles that make bread rise and become light and airy. Active dry yeast needs to be proofed, meaning it needs to be dissolved in warm liquid to ensure it’s active and ready to work its magic. Using fresh yeast is crucial for a good rise. If your yeast is old, it may not be as potent, and your bread might not rise properly. Always check the expiration date and store yeast in a cool, dry place.
- Warm Water (1 cup, approximately 105-115°F): Warm water is essential for activating the yeast. The temperature range is crucial – too cold and the yeast won’t activate; too hot and it can kill the yeast. Using a kitchen thermometer is the best way to ensure the water is at the correct temperature. If you don’t have a thermometer, the water should feel comfortably warm to the touch, like bathwater. This warm water also helps to hydrate the flour and start the gluten development process.
- Honey (¼ cup): Honey is the star sweetener in this recipe, imparting a delicate sweetness and a unique floral aroma to the bread that white sugar simply can’t replicate. Beyond its flavor, honey also adds moisture to the bread, contributing to a softer crumb. It also acts as food for the yeast, aiding in the fermentation process. You can use various types of honey, such as wildflower, clover, or buckwheat, each offering a slightly different flavor profile. For a milder sweetness, clover or wildflower honey works beautifully. For a more robust flavor, consider buckwheat honey, though its stronger taste may be more pronounced in the final bread.
- Unsalted Butter, Melted and Cooled (¼ cup): Butter adds richness, flavor, and tenderness to the bread. Melted butter incorporates smoothly into the dough and contributes to a softer texture. Unsalted butter is preferred in baking because it gives you more control over the salt content. If you only have salted butter, you can use it, but you may want to reduce the amount of salt added separately in the recipe. Make sure the butter is cooled slightly before adding it to the yeast mixture, as hot butter can also kill the yeast.
- Salt (1 ½ teaspoons): Salt is a vital ingredient in bread making, often underestimated but absolutely essential. It not only enhances the flavor of the bread, balancing the sweetness of the honey, but it also controls the yeast activity, slowing down the fermentation process and preventing the bread from rising too quickly. Salt also strengthens the gluten structure, which is crucial for creating a loaf with good texture and structure. Use regular table salt or fine sea salt. Avoid using coarse salt, as it may not dissolve evenly in the dough.
- Rolled Oats (1 cup, plus more for topping): Rolled oats are the heart and soul of this Honey Oat Bread, lending a wonderful nutty flavor, a slightly chewy texture, and a boost of fiber and nutrition. Both old-fashioned rolled oats and quick-cooking oats can be used. Old-fashioned oats will provide a slightly chewier texture, while quick-cooking oats will result in a slightly softer crumb. For the best texture and flavor, old-fashioned rolled oats are generally recommended. Reserving some oats for topping adds visual appeal and a delightful textural contrast to the crust.
- All-Purpose Flour (3 ½ – 4 cups): All-purpose flour forms the structure of the bread. It contains gluten, a protein that, when mixed with water and kneaded, develops elasticity and strength, allowing the dough to rise and hold its shape. The amount of flour needed can vary slightly depending on humidity and the type of flour used. Start with 3 ½ cups and gradually add more until the dough is soft, slightly sticky, but not overly wet and unmanageable. Too much flour will result in a dry, dense loaf. Too little flour will make the dough too sticky and difficult to handle, and the bread may spread too thin during baking. Bread flour, with its higher protein content, can also be used for a chewier texture, but all-purpose flour works perfectly well for this recipe.
Instructions
Step 1: Proof the Yeast
This initial step is crucial to ensure your yeast is active and ready to make your bread rise.
- Combine Yeast and Warm Water: In a large mixing bowl, or the bowl of your stand mixer if using one, combine the active dry yeast with 1 cup of warm water (105-115°F).
- Add Honey: Stir in ¼ cup of honey. The honey provides food for the yeast and kickstarts the activation process.
- Let it Sit and Froth: Let the mixture stand for 5-10 minutes. You should see small bubbles forming on the surface, and the mixture should become slightly frothy. This indicates that the yeast is active and alive. If no bubbles appear after 10 minutes, your yeast might be inactive, and you’ll need to start with fresh yeast.
Step 2: Combine Wet and Dry Ingredients
Now it’s time to bring together the wet and dry components to form the dough.
- Add Melted Butter and Salt: To the yeast mixture, add the melted and cooled butter and salt. Stir to combine.
- Incorporate Rolled Oats: Add 1 cup of rolled oats to the wet ingredients. Stir to ensure the oats are well combined and moistened. Let the mixture sit for a few minutes to allow the oats to soften slightly. This step helps to prevent the oats from drawing too much moisture from the dough later on.
Step 3: Gradually Add Flour and Knead
This is where the dough comes together, and the gluten begins to develop.
- Add Flour Gradually: Gradually add the all-purpose flour, starting with 3 ½ cups. Add the flour in ½ cup increments, mixing well after each addition. You can use a wooden spoon, spatula, or the dough hook attachment of your stand mixer on low speed.
- Form a Soft Dough: Continue adding flour until the dough comes together and forms a soft, slightly sticky dough. You might not need to use all 4 cups of flour, or you might need a little more, depending on the humidity and your flour. The dough should be soft and pliable but not overly sticky. It should pull away from the sides of the bowl but still feel slightly tacky to the touch.
- Knead the Dough: Turn the dough out onto a lightly floured surface. Knead the dough for 6-8 minutes, or until it becomes smooth and elastic. If using a stand mixer, knead with the dough hook on medium-low speed for 4-5 minutes. Kneading develops the gluten in the flour, which gives the bread its structure and chewy texture. To knead by hand, push the dough away from you with the heel of your hand, fold it over, and repeat. Rotate the dough as you knead. If the dough is too sticky, add a little more flour, a tablespoon at a time, but be careful not to add too much, as this can make the bread dry. The dough is properly kneaded when it is smooth, elastic, and springs back when gently poked.
Step 4: First Rise (Bulk Fermentation)
The first rise is crucial for developing flavor and texture.
- Place Dough in a Greased Bowl: Lightly grease a large bowl with oil or butter. Place the kneaded dough in the bowl and turn it to coat all sides with grease. This prevents the dough from drying out during the rise.
- Cover and Rise in a Warm Place: Cover the bowl with plastic wrap or a clean kitchen towel. Place the bowl in a warm, draft-free place to rise. A warm oven (turned off), a sunny spot, or a warm room are ideal. Let the dough rise for 1-1 ½ hours, or until it has doubled in size. The rising time will depend on the temperature of your environment. In a warmer environment, it will rise faster.
- Check for Doubling: To check if the dough has doubled, gently poke it with two fingers. If the indentations remain, the dough is ready for the next step.
Step 5: Shape the Loaf and Second Rise (Proofing)
Shaping and the second rise prepare the dough for baking.
- Punch Down the Dough: Gently punch down the risen dough to release the air bubbles. Turn the dough out onto a lightly floured surface.
- Shape into a Loaf: Shape the dough into a loaf. You can shape it into a round loaf or a rectangular loaf for a standard loaf pan. To shape a rectangular loaf, gently flatten the dough into a rectangle and then roll it up tightly, tucking in the ends as you roll. Pinch the seam to seal.
- Place in a Greased Loaf Pan: Grease a 9×5 inch loaf pan. Place the shaped loaf in the prepared pan, seam-side down.
- Second Rise (Proofing): Cover the loaf pan loosely with plastic wrap or a clean kitchen towel. Let the dough rise again in a warm place for 45-60 minutes, or until it has almost doubled in size and is puffy. This second rise is called proofing. It’s important not to let it over-proof, as it can collapse during baking. The dough is ready for baking when it springs back slowly when gently poked.
Step 6: Bake the Bread
Baking transforms the dough into a golden brown, fragrant loaf.
- Preheat Oven: Preheat your oven to 350°F (175°C). Place the oven rack in the center position.
- Optional Oat Topping: If desired, brush the top of the loaf with a little milk or water and sprinkle with extra rolled oats for a decorative topping. Gently press the oats into the dough so they adhere during baking.
- Bake: Bake for 30-40 minutes, or until the loaf is golden brown and sounds hollow when tapped on the bottom. The internal temperature of the bread should reach 200-210°F (93-99°C) when measured with a digital thermometer inserted into the center. If the top of the bread is browning too quickly, you can tent it loosely with aluminum foil during the last 10-15 minutes of baking.
- Cool in Pan Briefly: Once baked, remove the loaf from the oven and let it cool in the pan for 5-10 minutes. This makes it easier to remove from the pan without breaking.
- Transfer to Wire Rack to Cool Completely: Carefully remove the loaf from the pan and place it on a wire rack to cool completely before slicing. Cooling completely is essential for the texture and flavor of the bread to fully develop and to make slicing easier. Resist the temptation to slice into it while it’s still hot, as it can be gummy.
Step 7: Enjoy!
Once cooled, your homemade Honey Oat Bread is ready to be enjoyed! Slice and savor the deliciousness of your freshly baked creation.
Nutrition
- Serving Size: one normal portion
- Calories: 180-220
- Sugar: 5-7 grams
- Sodium: 200-250 mg
- Fat: 5-7 grams
- Saturated Fat: 2-3 grams
- Unsaturated Fat: 3-4 grams
- Carbohydrates: 30-35 grams
- Fiber: 2-3 grams
- Protein: 5-6 grams
- Cholesterol: 10-15 mg


