

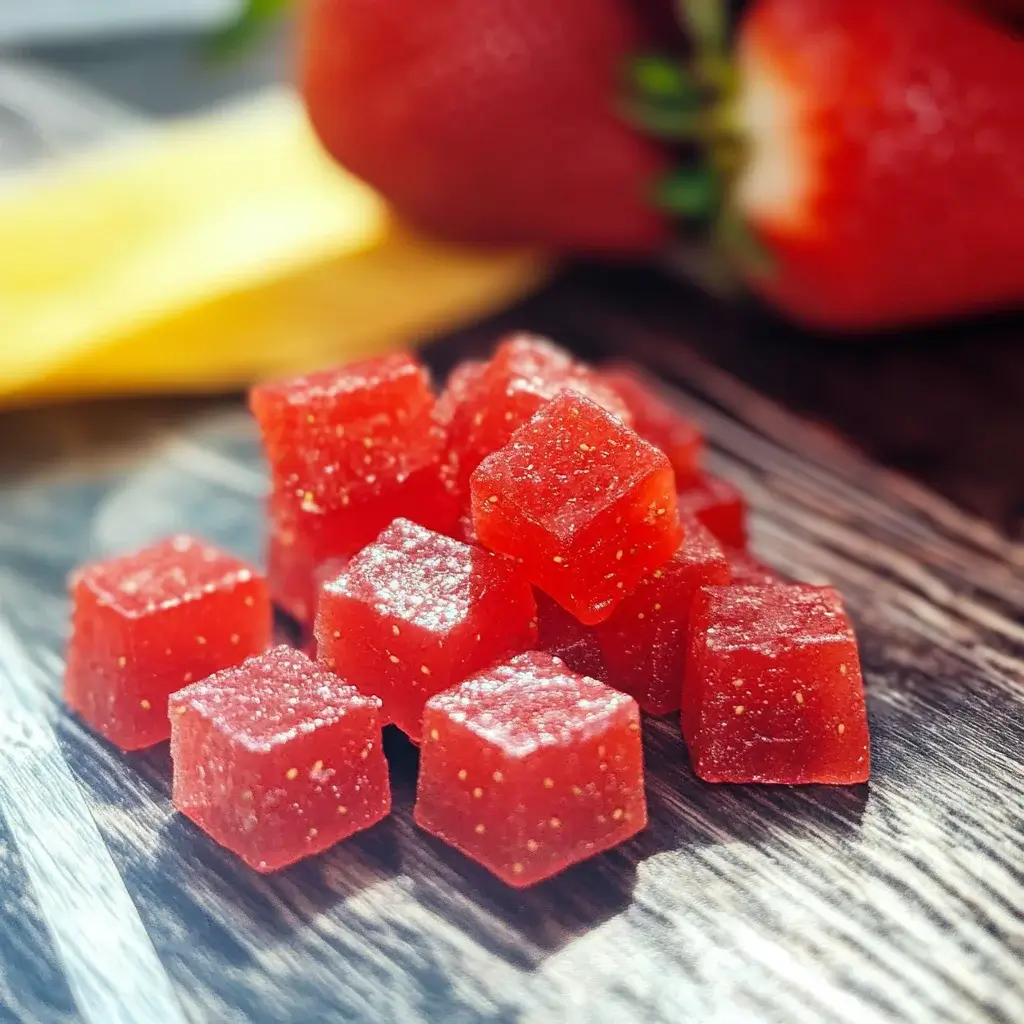
My kids, like most, are absolutely obsessed with gummy candies. The bright colors, the chewy texture, and the burst of fruity flavor – what’s not to love? However, as a health-conscious parent, I’ve always been wary of the store-bought versions, packed with artificial colors, flavors, and loads of refined sugar. That’s why I embarked on a mission to create a healthier, homemade alternative that would satisfy their sweet cravings without the guilt. After countless trials and tweaks, I’ve landed on this recipe for Healthy Homemade Strawberry Gummies, and let me tell you, it’s been a game-changer in our household. These gummies are not only incredibly delicious, bursting with real strawberry flavor, but they are also surprisingly easy to make and packed with natural goodness. My children devour them, and I feel good knowing they are enjoying a treat made with wholesome ingredients. The best part? They are so versatile – perfect for a fun snack, a healthy dessert, or even a playful addition to lunchboxes. If you’re looking for a way to indulge your sweet tooth or treat your family to something special without compromising on health, you absolutely have to try these homemade strawberry gummies. They are truly a delightful and guilt-free way to enjoy a classic candy favorite.
Ingredients: The Building Blocks of Deliciously Healthy Gummies
Creating healthy and delicious strawberry gummies starts with selecting the right ingredients. We are focusing on natural flavors and wholesome components to craft a treat that’s both tasty and good for you. Here’s a breakdown of what you’ll need:
- Fresh or Frozen Strawberries (2 cups): Strawberries are the heart and soul of these gummies, delivering that vibrant, sweet, and slightly tart flavor that we all adore. You have the flexibility to use either fresh or frozen strawberries.
- Fresh Strawberries: Opting for fresh strawberries, especially when they are in season, will yield the most intense and vibrant strawberry flavor. Choose ripe, red strawberries for the best sweetness and aroma. Make sure to wash them thoroughly, hull them (remove the green tops), and chop them into smaller pieces before using.
- Frozen Strawberries: Frozen strawberries are a fantastic alternative, especially when fresh berries are not readily available or are out of season. They are often picked at their peak ripeness and frozen quickly, preserving their flavor and nutrients. You can use frozen strawberries directly from the freezer; no need to thaw them beforehand. Using frozen berries can even help thicken the mixture slightly as they release their juices during cooking.
- Water (1/2 cup): Water plays a crucial role in the gummy-making process. It helps to:
- Hydrate the Gelatin: Water is essential for “blooming” the gelatin, which is the process of hydrating the gelatin powder in cold water. This step is critical for achieving the desired gummy texture. Blooming allows the gelatin granules to absorb water and swell, ensuring they dissolve smoothly when heated and create a firm, chewy texture in the final gummies.
- Thin the Strawberry Puree: Adding water to the strawberry puree helps to thin it out, making it easier to work with and ensuring a smoother consistency in the finished gummies. It prevents the puree from becoming too thick and sticky, which could lead to unevenly set gummies.
- Control Sweetness and Flavor Intensity: Water can help to balance the sweetness of the strawberries and the overall flavor intensity. It prevents the gummies from becoming overly sweet or intensely flavored, allowing the natural strawberry taste to shine through.
- Unflavored Gelatin Powder (3 tablespoons): Gelatin is the magic ingredient that transforms the strawberry puree into those delightful, chewy gummies. It’s a protein derived from collagen and is responsible for the gelling and thickening properties in this recipe.
- Type of Gelatin: Ensure you are using unflavored gelatin powder, not flavored gelatin mixes like Jell-O, which contain added sugars, artificial colors, and flavors. Unflavored gelatin allows you to control the flavor and sweetness of your gummies entirely.
- Bloom Time: The blooming process is crucial for activating the gelatin’s gelling power. Sprinkling the gelatin powder over cold water and letting it sit for 5-10 minutes allows the granules to absorb water and swell. This step prevents clumping and ensures the gelatin dissolves smoothly when heated. Properly bloomed gelatin will result in a smoother, more consistent gummy texture.
- Vegetarian Alternatives: While traditional gelatin is derived from animal collagen, there are vegetarian alternatives available, such as agar-agar powder or pectin. However, using these alternatives may require adjusting the recipe and cooking times as they have different gelling properties than gelatin. For this recipe, unflavored gelatin powder is recommended for optimal texture and ease of use.
- Natural Sweetener (2-4 tablespoons, adjust to taste): To add a touch of sweetness and balance the natural tartness of the strawberries, you’ll need a natural sweetener. Choosing a natural sweetener is key to keeping these gummies healthy and refined sugar-free. Here are some excellent options:
- Raw Honey: Honey is a fantastic natural sweetener with a distinct floral flavor that complements strawberries beautifully. It also adds a touch of moisture and richness to the gummies. Start with 2 tablespoons and adjust to taste, as different honeys have varying levels of sweetness.
- Maple Syrup (Pure): Pure maple syrup is another excellent natural sweetener with a warm, caramel-like flavor that pairs wonderfully with strawberries. Choose pure maple syrup, not pancake syrup, which is often made with corn syrup and artificial flavors. Similar to honey, start with 2 tablespoons and adjust according to your sweetness preference.
- Stevia or Monk Fruit Sweetener: For a sugar-free option, stevia or monk fruit sweetener are excellent choices. These are natural, plant-based sweeteners that have zero calories and do not raise blood sugar levels. They are intensely sweet, so you’ll need to use much less than honey or maple syrup. Start with a very small amount (about 1/2 to 1 teaspoon of liquid stevia or monk fruit extract or equivalent in powdered form) and gradually add more to taste, being careful not to over-sweeten.
- Other Options: You can also experiment with other natural sweeteners like agave nectar or date syrup, but be mindful of their flavor profiles and sweetness levels and adjust accordingly.
- Lemon Juice (1 tablespoon, optional but recommended): A touch of fresh lemon juice is an optional but highly recommended ingredient that brightens the strawberry flavor and adds a subtle tartness that balances the sweetness.
- Flavor Enhancement: Lemon juice enhances the natural strawberry flavor, making it pop and taste even more vibrant. It cuts through the sweetness and prevents the gummies from tasting flat or one-dimensional.
- Natural Preservative: Lemon juice acts as a natural preservative, helping to extend the shelf life of the gummies slightly. Its acidity helps to inhibit bacterial growth and keep the gummies fresher for longer.
- Acidity Balance: The acidity of lemon juice helps to balance the sweetness of the strawberries and the chosen sweetener. It creates a more complex and well-rounded flavor profile.
- Optional Ingredient: While highly recommended, lemon juice is optional. If you prefer a sweeter, less tart gummy, you can omit it. However, for the best flavor and balance, a tablespoon of fresh lemon juice is a fantastic addition.
By carefully selecting these wholesome ingredients, you’re setting the stage for creating healthy and delicious homemade strawberry gummies that are far superior to store-bought alternatives. You’ll be in control of the sweetness, flavor, and ingredients, ensuring a treat that’s both enjoyable and good for you.
Instructions: Crafting Your Homemade Strawberry Gummies Step-by-Step
Making these healthy homemade strawberry gummies is surprisingly straightforward. Follow these detailed, step-by-step instructions to create your own batch of delicious and guilt-free treats:
Step 1: Prepare the Strawberries
- Wash and Hull: If using fresh strawberries, thoroughly wash them under cool water and remove the green hulls (tops).
- Chop: Chop the strawberries into smaller pieces. This will help them cook down more quickly and evenly when pureed. If using frozen strawberries, no need to chop them.
- Combine with Water (Optional): Place the chopped fresh strawberries or frozen strawberries in a saucepan. You can add a tablespoon or two of water to the bottom of the pan if using fresh strawberries to prevent sticking, especially if your saucepan tends to be prone to scorching. Frozen strawberries will release their own liquid as they heat.
Step 2: Cook and Puree the Strawberries
- Cook Down: Place the saucepan with the strawberries over medium heat. Bring to a gentle simmer, stirring occasionally. Cook the strawberries for about 5-7 minutes, or until they have softened and released their juices. If using frozen strawberries, cook until they are completely thawed and softened.
- Puree: Remove the saucepan from the heat. Carefully transfer the cooked strawberries and their juices to a blender or use an immersion blender directly in the saucepan. Blend until completely smooth. If using a regular blender, be cautious when blending hot liquids. Start on a low speed and gradually increase to high, venting the lid slightly to allow steam to escape. Alternatively, let the strawberries cool slightly before blending to minimize the risk of splattering.
- Strain (Optional for Smooth Texture): For an extra smooth gummy texture, you can strain the strawberry puree through a fine-mesh sieve to remove any seeds or pulp. Press the puree through the sieve with a spatula or spoon, discarding any solids left behind. This step is optional, but it will result in a more refined texture, especially if you are using fresh strawberries that may have more seeds.
Step 3: Bloom the Gelatin
- Prepare a Small Bowl: In a small, heatproof bowl, pour the cold water (1/2 cup).
- Sprinkle Gelatin: Evenly sprinkle the unflavored gelatin powder over the surface of the cold water. Do not stir.
- Bloom: Let the gelatin sit undisturbed for 5-10 minutes. You will notice the gelatin absorbing the water and becoming thick and jelly-like. This is the blooming process, which is crucial for activating the gelatin’s gelling properties.
Step 4: Combine and Heat the Mixture
- Return Puree to Saucepan: Pour the strawberry puree back into the saucepan.
- Add Sweetener and Lemon Juice: Stir in your chosen natural sweetener (honey, maple syrup, stevia, etc.) and lemon juice (if using) to the strawberry puree.
- Heat Gently: Place the saucepan over low heat. Gently heat the strawberry puree mixture, stirring constantly, until it is warm and the sweetener is fully dissolved. Do not boil the mixture. Boiling can weaken the gelling power of the gelatin.
- Add Bloomed Gelatin: Once the puree is warm and the sweetener is dissolved, add the bloomed gelatin to the saucepan.
- Dissolve Gelatin: Continue to stir constantly over low heat until the gelatin is completely dissolved and the mixture is smooth and homogenous. This should take about 2-3 minutes. Ensure there are no visible granules of gelatin remaining. Again, avoid boiling the mixture.
Step 5: Pour into Molds or Dish and Set
- Prepare Molds or Dish: Choose your desired molds for the gummies. Silicone gummy molds are ideal as they make it easy to release the gummies once set. Alternatively, you can use a small, shallow baking dish (e.g., 8×8 inch) lined with parchment paper. Lightly grease the silicone molds or parchment paper with coconut oil or cooking spray to prevent sticking (optional, but recommended for easier removal).
- Pour Mixture: Carefully pour the hot strawberry gelatin mixture into the prepared molds or baking dish. If using a baking dish, pour the mixture evenly to create a uniform layer.
- Refrigerate to Set: Transfer the molds or baking dish to the refrigerator. Refrigerate for at least 2-3 hours, or preferably overnight, to allow the gummies to set completely and firm up. The longer they chill, the firmer they will become.
Step 6: Unmold and Store
- Unmold Gummies: Once the gummies are fully set, gently unmold them from the silicone molds. If you used a baking dish, lift the parchment paper out of the dish and place it on a cutting board. Use a sharp knife or pizza cutter to cut the gummies into squares or desired shapes.
- Store: Store the homemade strawberry gummies in an airtight container in the refrigerator. They will keep well for up to 1-2 weeks in the refrigerator.
Congratulations! You have successfully made healthy homemade strawberry gummies. Enjoy these delicious and wholesome treats! Feel free to get creative with different molds and shapes to make them even more fun, especially for kids.
Nutrition Facts: A Healthier Treat Option
These homemade strawberry gummies are not only delicious but also offer a healthier alternative to store-bought candies. Here’s a general overview of the nutrition facts per serving (serving size is estimated to be about 5-6 gummies, depending on mold size and recipe yield). Please note that the exact nutritional values can vary slightly depending on the specific ingredients used, particularly the type and amount of sweetener.
Servings: Approximately 4-6 servings (recipe yields around 25-30 gummies, depending on mold size)
Calories per serving (estimated): 50-80 calories (This can vary based on the type and amount of sweetener used. Using stevia or monk fruit will significantly reduce calorie count).
Approximate Nutrition Breakdown per Serving (using honey or maple syrup as sweetener):
- Protein: 3-5 grams (from gelatin) – Gelatin is a source of protein derived from collagen, offering some amino acids.
- Carbohydrates: 10-15 grams (from strawberries and sweetener) – These are primarily natural sugars from the strawberries and the added sweetener.
- Fiber: 1-2 grams (from strawberries) – Strawberries contribute a small amount of dietary fiber, which is beneficial for digestion.
- Fat: 0 grams – This recipe is naturally very low in fat.
- Vitamins and Minerals: Strawberries are a good source of Vitamin C and antioxidants. The gummies will retain some of these nutrients, although processing and cooking can reduce vitamin content.
- Sugar: 5-10 grams (natural sugars from strawberries and added sweetener) – This is significantly lower than most store-bought gummy candies, which are often loaded with refined sugars.
Key Nutritional Advantages Compared to Store-Bought Gummies:
- Real Fruit: Made with real strawberries, providing natural fruit flavor, vitamins, and antioxidants.
- No Artificial Colors or Flavors: Free from artificial colors, flavors, and preservatives commonly found in commercial gummy candies.
- Control over Sweetness: You control the type and amount of sweetener, allowing you to reduce sugar content or use natural alternatives.
- Gelatin Benefits: Gelatin is a source of protein and collagen, which may have potential benefits for joint health, skin, and hair (although more research is needed).
- Fewer Additives: Avoids many of the processed ingredients and additives often present in store-bought candies.
Important Note: While these homemade strawberry gummies are a healthier option, they are still a treat and should be enjoyed in moderation as part of a balanced diet. Be mindful of portion sizes, especially when serving to children.
Preparation Time: From Prep to Gummy Goodness
The preparation time for these healthy homemade strawberry gummies is relatively quick and easy, making them a great option for a wholesome snack or dessert. Here’s a breakdown of the estimated time involved:
- Active Prep Time: 20-25 minutes
- This includes washing and chopping strawberries (if using fresh), cooking and pureeing the strawberries, blooming the gelatin, and combining and heating the mixture.
- These are the hands-on steps that require your active involvement in the kitchen.
- Inactive Setting Time: Minimum 2-3 hours (ideally overnight)
- This is the time the gummies need to spend in the refrigerator to set and firm up. During this time, you don’t need to do anything actively.
- It’s best to plan ahead and make these gummies at least a few hours before you want to enjoy them, or even the day before.
- Total Time (Approximate): 2 hours 20 minutes – overnight (including setting time)
Time-Saving Tips:
- Use Frozen Strawberries: Using frozen strawberries eliminates the need for washing and chopping, saving you a few minutes of prep time.
- Immersion Blender: Using an immersion blender directly in the saucepan reduces cleanup compared to transferring hot puree to a regular blender.
- Make a Double Batch: If you know you’ll be making these gummies frequently, consider doubling the recipe. The active prep time will only increase slightly, but you’ll have a larger batch of gummies to enjoy for longer.
Planning Ahead:
- Make Ahead: These gummies are perfect for making ahead of time. They can be stored in the refrigerator for up to a week or two, making them a convenient snack or dessert to have on hand.
- Weekend Prep: Consider making a batch on the weekend to have healthy treats ready for the week ahead, especially for kids’ lunchboxes or after-school snacks.
While the setting time requires patience, the active preparation is quick and simple. The total time investment is well worth it for the reward of delicious, healthy, homemade strawberry gummies that you can feel good about eating and sharing.
How to Serve: Creative Ways to Enjoy Your Gummies
These healthy homemade strawberry gummies are incredibly versatile and can be enjoyed in various ways. Here are some fun and delicious serving suggestions:
- Classic Snack:
- Simple Enjoyment: The most straightforward way to serve them is as a simple, healthy snack. Pop a few gummies whenever you crave a sweet treat.
- Portion Control: Pre-portion gummies into small containers or bags for easy snacking and to manage portion sizes, especially for children.
- Kid-Friendly Treats:
- Lunchbox Surprise: Include a small portion of gummies in your child’s lunchbox as a healthy and fun dessert option.
- After-School Snack: Offer gummies as a nutritious and appealing after-school snack instead of processed candies or sugary snacks.
- Party Favors: Make gummies in fun shapes using silicone molds and package them as party favors for children’s birthday parties.
- Fun Shapes: Use various silicone molds in animal shapes, stars, hearts, or other fun designs to make them more appealing to kids.
- Dessert Options:
- Light Dessert: Serve a small bowl of gummies as a light and refreshing dessert after a meal.
- Garnish for Yogurt or Oatmeal: Add a few chopped gummies as a topping for yogurt, oatmeal, or chia seed pudding for a touch of sweetness and fruity flavor.
- Dessert Platter Addition: Include gummies as part of a dessert platter or charcuterie board alongside fresh fruit, cheese, and other healthy treats.
- Creative Serving Ideas:
- Frozen Gummies: For a cool and refreshing treat, try freezing the gummies. Frozen gummies have a slightly different texture, becoming chewier and almost like gummy ice pops.
- Gummy Skewers: Thread gummies onto small skewers with pieces of fresh fruit like strawberries, blueberries, and grapes for a fun and colorful fruit and gummy skewer.
- Infused Water: Add a few gummies to a pitcher of water for a subtle strawberry flavor infusion. This is a fun way to encourage hydration, especially for kids.
- Adult Garnish (Optional): For adult gatherings, you can use these gummies as a playful garnish for cocktails or mocktails, especially strawberry-based drinks.
Serving Tips:
- Keep Refrigerated: Always serve gummies chilled directly from the refrigerator for the best texture and to maintain freshness.
- Presentation: Arrange gummies attractively in a bowl or on a plate to make them visually appealing.
- Variety: Offer a variety of gummy shapes and sizes to make serving more fun and interesting.
No matter how you choose to serve them, these homemade strawberry gummies are sure to be a hit. Their delicious flavor and healthy ingredients make them a treat you can feel good about enjoying and sharing.
Additional Tips for Gummy Success
To ensure your homemade strawberry gummies turn out perfectly every time, here are five helpful tips to keep in mind:
- Bloom Gelatin Properly: Don’t skip or rush the gelatin blooming process. Allowing the gelatin powder to fully hydrate in cold water for the recommended 5-10 minutes is crucial for achieving the right gummy texture. Proper blooming prevents clumping and ensures the gelatin dissolves smoothly, resulting in a consistent and firm gummy. If the gelatin is not properly bloomed, your gummies may be grainy or not set properly.
- Gentle Heating is Key: When heating the strawberry puree and gelatin mixture, keep the heat low and gentle. Avoid boiling the mixture. High heat can weaken the gelling power of gelatin and may result in gummies that are not as firm or chewy as desired. Gentle heating ensures the gelatin dissolves fully without compromising its gelling properties. Stir constantly while heating to prevent scorching and ensure even dissolution of the gelatin.
- Adjust Sweetness to Taste: The amount of sweetener in this recipe is a guideline. Taste the strawberry puree mixture after adding the sweetener and before adding the bloomed gelatin. Adjust the sweetness to your preference. Consider the sweetness of your strawberries and your personal taste. If you prefer a less sweet gummy, reduce the amount of sweetener. If you have a sweeter tooth, you can add a bit more. Remember that the sweetness will become slightly less pronounced once the gummies are chilled and set.
- Experiment with Flavors (Safely): While this recipe focuses on strawberry flavor, you can experiment with other fruit purees to create different flavors of healthy gummies. Raspberry, blueberry, mango, or peach puree are all excellent options. When substituting fruits, keep in mind the natural sweetness and acidity of the fruit and adjust the sweetener and lemon juice accordingly. Ensure you are using fruit purees that are smooth and free of large seeds or chunks for the best gummy texture.
- Storage is Important for Texture: Store your homemade strawberry gummies in an airtight container in the refrigerator. Proper storage is essential for maintaining the texture and freshness of the gummies. Leaving them at room temperature can cause them to become sticky or lose their shape. Refrigeration helps them stay firm and chewy for a longer period. Consume them within 1-2 weeks for the best quality and flavor.
By following these tips, you’ll be well on your way to consistently making perfect batches of healthy and delicious homemade strawberry gummies that your family and friends will love.
FAQ: Your Gummy Questions Answered
Here are some frequently asked questions about making healthy homemade strawberry gummies to help you troubleshoot and ensure gummy success:
Q1: My gummies are not setting up, what did I do wrong?
A: There are a few common reasons why your gummies might not be setting properly:
- Insufficient Gelatin: Ensure you are using the correct amount of gelatin (3 tablespoons) as specified in the recipe. Too little gelatin will result in gummies that are too soft or liquidy.
- Gelatin Not Bloomed Properly: Make sure you bloomed the gelatin correctly by sprinkling it over cold water and letting it sit for 5-10 minutes. Improper blooming can hinder its gelling ability.
- Boiling the Mixture: Avoid boiling the strawberry puree and gelatin mixture. Boiling can weaken the gelling power of gelatin. Keep the heat low and gentle.
- Not Chilling Long Enough: Gummies need sufficient time to set in the refrigerator. Refrigerate for at least 2-3 hours, or preferably overnight, to allow them to firm up completely.
Q2: My gummies are too chewy or rubbery, how can I fix this?
A: Overly chewy or rubbery gummies can be due to:
- Too Much Gelatin: Using too much gelatin can make the gummies overly firm and chewy. Ensure you are using the correct amount (3 tablespoons).
- Overcooking: While gentle heating is needed to dissolve gelatin, prolonged or excessive heating can also affect the texture and make them rubbery. Heat just until the gelatin is dissolved and the mixture is smooth.
Q3: Can I use other types of sweeteners besides honey or maple syrup?
A: Yes, you can use other natural sweeteners. Stevia or monk fruit sweetener are excellent sugar-free options. Agave nectar or date syrup can also be used. Adjust the amount of sweetener to taste, as different sweeteners have varying sweetness levels. When using liquid sweeteners, you may need to slightly reduce the amount of water in the recipe if the puree becomes too thin.
Q4: Can I make these gummies vegan?
A: Traditional gelatin is derived from animal collagen and is not vegan. To make vegan gummies, you can substitute gelatin with a vegan gelling agent like agar-agar powder or pectin. However, these alternatives have different gelling properties than gelatin, and you will need to research specific vegan gummy recipes using agar-agar or pectin as they may require different ratios and cooking methods.
Q5: How long do homemade strawberry gummies last?
A: Homemade strawberry gummies will last for approximately 1-2 weeks when stored in an airtight container in the refrigerator. Proper refrigeration is crucial for maintaining their texture and freshness. While they may still be safe to eat after 2 weeks, the texture and flavor may start to degrade over time. It’s best to consume them within the first week for optimal quality.
By understanding these common questions and their answers, you’ll be better equipped to make perfect healthy homemade strawberry gummies every time and troubleshoot any issues that may arise. Enjoy your gummy-making adventures!
Print
Healthy Homemade Strawberry Gummies recipe
Ingredients
- Fresh or Frozen Strawberries (2 cups): Strawberries are the heart and soul of these gummies, delivering that vibrant, sweet, and slightly tart flavor that we all adore. You have the flexibility to use either fresh or frozen strawberries.
- Fresh Strawberries: Opting for fresh strawberries, especially when they are in season, will yield the most intense and vibrant strawberry flavor. Choose ripe, red strawberries for the best sweetness and aroma. Make sure to wash them thoroughly, hull them (remove the green tops), and chop them into smaller pieces before using.
- Frozen Strawberries: Frozen strawberries are a fantastic alternative, especially when fresh berries are not readily available or are out of season. They are often picked at their peak ripeness and frozen quickly, preserving their flavor and nutrients. You can use frozen strawberries directly from the freezer; no need to thaw them beforehand. Using frozen berries can even help thicken the mixture slightly as they release their juices during cooking.
- Water (1/2 cup): Water plays a crucial role in the gummy-making process. It helps to:
- Hydrate the Gelatin: Water is essential for “blooming” the gelatin, which is the process of hydrating the gelatin powder in cold water. This step is critical for achieving the desired gummy texture. Blooming allows the gelatin granules to absorb water and swell, ensuring they dissolve smoothly when heated and create a firm, chewy texture in the final gummies.
- Thin the Strawberry Puree: Adding water to the strawberry puree helps to thin it out, making it easier to work with and ensuring a smoother consistency in the finished gummies. It prevents the puree from becoming too thick and sticky, which could lead to unevenly set gummies.
- Control Sweetness and Flavor Intensity: Water can help to balance the sweetness of the strawberries and the overall flavor intensity. It prevents the gummies from becoming overly sweet or intensely flavored, allowing the natural strawberry taste to shine through.
- Unflavored Gelatin Powder (3 tablespoons): Gelatin is the magic ingredient that transforms the strawberry puree into those delightful, chewy gummies. It’s a protein derived from collagen and is responsible for the gelling and thickening properties in this recipe.
- Type of Gelatin: Ensure you are using unflavored gelatin powder, not flavored gelatin mixes like Jell-O, which contain added sugars, artificial colors, and flavors. Unflavored gelatin allows you to control the flavor and sweetness of your gummies entirely.
- Bloom Time: The blooming process is crucial for activating the gelatin’s gelling power. Sprinkling the gelatin powder over cold water and letting it sit for 5-10 minutes allows the granules to absorb water and swell. This step prevents clumping and ensures the gelatin dissolves smoothly when heated. Properly bloomed gelatin will result in a smoother, more consistent gummy texture.
- Vegetarian Alternatives: While traditional gelatin is derived from animal collagen, there are vegetarian alternatives available, such as agar-agar powder or pectin. However, using these alternatives may require adjusting the recipe and cooking times as they have different gelling properties than gelatin. For this recipe, unflavored gelatin powder is recommended for optimal texture and ease of use.
- Natural Sweetener (2-4 tablespoons, adjust to taste): To add a touch of sweetness and balance the natural tartness of the strawberries, you’ll need a natural sweetener. Choosing a natural sweetener is key to keeping these gummies healthy and refined sugar-free. Here are some excellent options:
- Raw Honey: Honey is a fantastic natural sweetener with a distinct floral flavor that complements strawberries beautifully. It also adds a touch of moisture and richness to the gummies. Start with 2 tablespoons and adjust to taste, as different honeys have varying levels of sweetness.
- Maple Syrup (Pure): Pure maple syrup is another excellent natural sweetener with a warm, caramel-like flavor that pairs wonderfully with strawberries. Choose pure maple syrup, not pancake syrup, which is often made with corn syrup and artificial flavors. Similar to honey, start with 2 tablespoons and adjust according to your sweetness preference.
- Stevia or Monk Fruit Sweetener: For a sugar-free option, stevia or monk fruit sweetener are excellent choices. These are natural, plant-based sweeteners that have zero calories and do not raise blood sugar levels. They are intensely sweet, so you’ll need to use much less than honey or maple syrup. Start with a very small amount (about 1/2 to 1 teaspoon of liquid stevia or monk fruit extract or equivalent in powdered form) and gradually add more to taste, being careful not to over-sweeten.
- Other Options: You can also experiment with other natural sweeteners like agave nectar or date syrup, but be mindful of their flavor profiles and sweetness levels and adjust accordingly.
- Lemon Juice (1 tablespoon, optional but recommended): A touch of fresh lemon juice is an optional but highly recommended ingredient that brightens the strawberry flavor and adds a subtle tartness that balances the sweetness.
- Flavor Enhancement: Lemon juice enhances the natural strawberry flavor, making it pop and taste even more vibrant. It cuts through the sweetness and prevents the gummies from tasting flat or one-dimensional.
- Natural Preservative: Lemon juice acts as a natural preservative, helping to extend the shelf life of the gummies slightly. Its acidity helps to inhibit bacterial growth and keep the gummies fresher for longer.
- Acidity Balance: The acidity of lemon juice helps to balance the sweetness of the strawberries and the chosen sweetener. It creates a more complex and well-rounded flavor profile.
- Optional Ingredient: While highly recommended, lemon juice is optional. If you prefer a sweeter, less tart gummy, you can omit it. However, for the best flavor and balance, a tablespoon of fresh lemon juice is a fantastic addition.
By carefully selecting these wholesome ingredients, you’re setting the stage for creating healthy and delicious homemade strawberry gummies that are far superior to store-bought alternatives. You’ll be in control of the sweetness, flavor, and ingredients, ensuring a treat that’s both enjoyable and good for you.
Instructions
Step 1: Prepare the Strawberries
- Wash and Hull: If using fresh strawberries, thoroughly wash them under cool water and remove the green hulls (tops).
- Chop: Chop the strawberries into smaller pieces. This will help them cook down more quickly and evenly when pureed. If using frozen strawberries, no need to chop them.
- Combine with Water (Optional): Place the chopped fresh strawberries or frozen strawberries in a saucepan. You can add a tablespoon or two of water to the bottom of the pan if using fresh strawberries to prevent sticking, especially if your saucepan tends to be prone to scorching. Frozen strawberries will release their own liquid as they heat.
Step 2: Cook and Puree the Strawberries
- Cook Down: Place the saucepan with the strawberries over medium heat. Bring to a gentle simmer, stirring occasionally. Cook the strawberries for about 5-7 minutes, or until they have softened and released their juices. If using frozen strawberries, cook until they are completely thawed and softened.
- Puree: Remove the saucepan from the heat. Carefully transfer the cooked strawberries and their juices to a blender or use an immersion blender directly in the saucepan. Blend until completely smooth. If using a regular blender, be cautious when blending hot liquids. Start on a low speed and gradually increase to high, venting the lid slightly to allow steam to escape. Alternatively, let the strawberries cool slightly before blending to minimize the risk of splattering.
- Strain (Optional for Smooth Texture): For an extra smooth gummy texture, you can strain the strawberry puree through a fine-mesh sieve to remove any seeds or pulp. Press the puree through the sieve with a spatula or spoon, discarding any solids left behind. This step is optional, but it will result in a more refined texture, especially if you are using fresh strawberries that may have more seeds.
Step 3: Bloom the Gelatin
- Prepare a Small Bowl: In a small, heatproof bowl, pour the cold water (1/2 cup).
- Sprinkle Gelatin: Evenly sprinkle the unflavored gelatin powder over the surface of the cold water. Do not stir.
- Bloom: Let the gelatin sit undisturbed for 5-10 minutes. You will notice the gelatin absorbing the water and becoming thick and jelly-like. This is the blooming process, which is crucial for activating the gelatin’s gelling properties.
Step 4: Combine and Heat the Mixture
- Return Puree to Saucepan: Pour the strawberry puree back into the saucepan.
- Add Sweetener and Lemon Juice: Stir in your chosen natural sweetener (honey, maple syrup, stevia, etc.) and lemon juice (if using) to the strawberry puree.
- Heat Gently: Place the saucepan over low heat. Gently heat the strawberry puree mixture, stirring constantly, until it is warm and the sweetener is fully dissolved. Do not boil the mixture. Boiling can weaken the gelling power of the gelatin.
- Add Bloomed Gelatin: Once the puree is warm and the sweetener is dissolved, add the bloomed gelatin to the saucepan.
- Dissolve Gelatin: Continue to stir constantly over low heat until the gelatin is completely dissolved and the mixture is smooth and homogenous. This should take about 2-3 minutes. Ensure there are no visible granules of gelatin remaining. Again, avoid boiling the mixture.
Step 5: Pour into Molds or Dish and Set
- Prepare Molds or Dish: Choose your desired molds for the gummies. Silicone gummy molds are ideal as they make it easy to release the gummies once set. Alternatively, you can use a small, shallow baking dish (e.g., 8×8 inch) lined with parchment paper. Lightly grease the silicone molds or parchment paper with coconut oil or cooking spray to prevent sticking (optional, but recommended for easier removal).
- Pour Mixture: Carefully pour the hot strawberry gelatin mixture into the prepared molds or baking dish. If using a baking dish, pour the mixture evenly to create a uniform layer.
- Refrigerate to Set: Transfer the molds or baking dish to the refrigerator. Refrigerate for at least 2-3 hours, or preferably overnight, to allow the gummies to set completely and firm up. The longer they chill, the firmer they will become.
Step 6: Unmold and Store
- Unmold Gummies: Once the gummies are fully set, gently unmold them from the silicone molds. If you used a baking dish, lift the parchment paper out of the dish and place it on a cutting board. Use a sharp knife or pizza cutter to cut the gummies into squares or desired shapes.
- Store: Store the homemade strawberry gummies in an airtight container in the refrigerator. They will keep well for up to 1-2 weeks in the refrigerator.
Congratulations! You have successfully made hea
Nutrition
- Serving Size: one normal portion
- Calories: 50-80 calories
- Sugar: 5-10 grams
- Fat: 0 grams
- Carbohydrates: 10-15 grams
- Fiber: 1-2 grams
- Protein: 3-5 grams


