

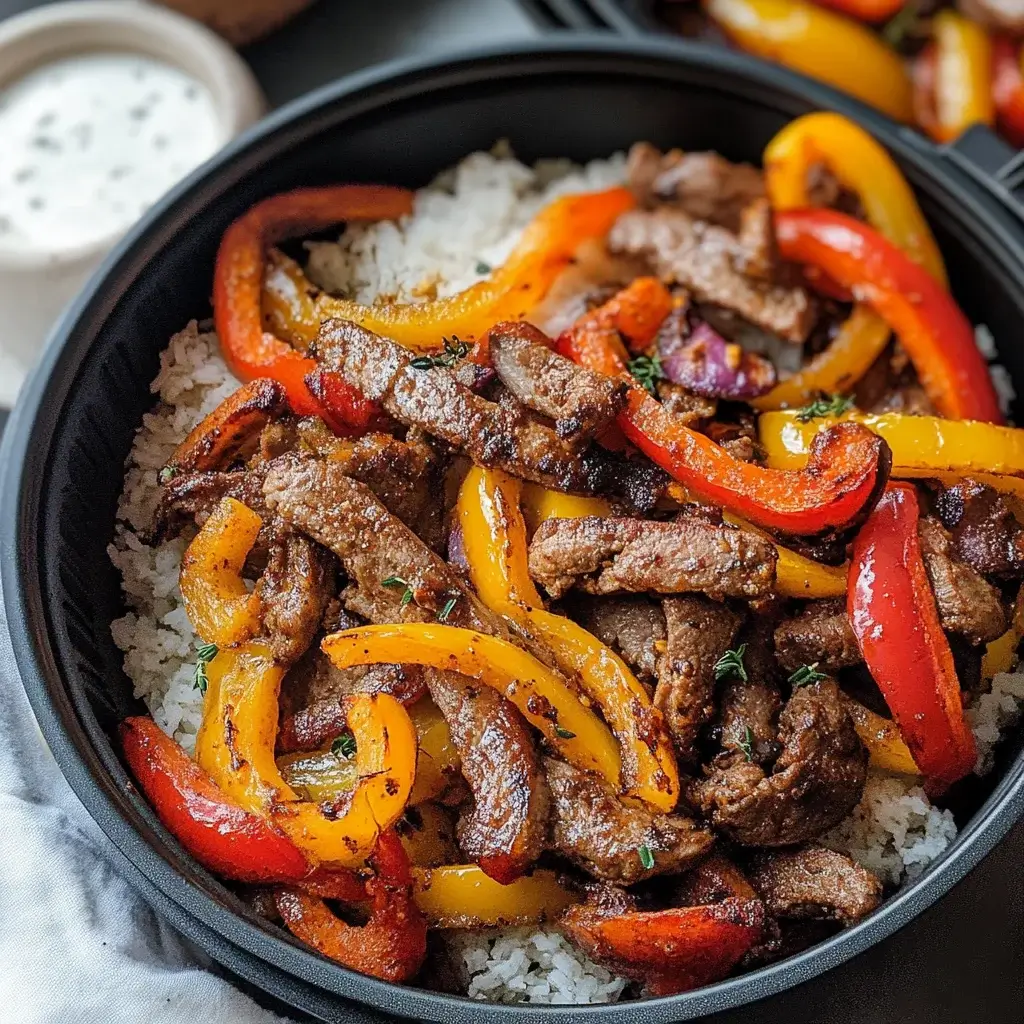
Our household has officially declared these Gluten-Free Air Fryer Fajitas a weeknight champion! For the longest time, fajitas felt like a “restaurant-only” treat or a weekend project involving multiple pans and a smoky kitchen. Then came the air fryer, and let me tell you, it’s a game-changer. The first time I tried making fajitas this way, I was skeptical. Could an air fryer really deliver that signature sizzle and perfectly tender-crisp veggies and juicy chicken without the stovetop fuss? The answer was a resounding YES! My kids, who can be picky eaters, devoured them, happily stuffing their gluten-free corn tortillas with the colorful, flavorful filling. My husband, a fajita aficionado, gave his enthusiastic seal of approval. The cleanup was ridiculously easy, and the entire meal came together in under 30 minutes. Now, it’s a regular on our meal rotation, perfect for busy evenings when we crave something delicious, healthy, and satisfying without spending hours in the kitchen. The aroma alone fills the house with a promise of a fiesta, and the vibrant colors make it as appealing to the eyes as it is to the palate. This recipe isn’t just about convenience; it’s about unlocking incredible flavor and texture with minimal effort, all while keeping it entirely gluten-free.
Why You’ll Absolutely Adore These Gluten-Free Air Fryer Fajitas
Before we dive into the nitty-gritty of the recipe, let’s talk about why these Gluten-Free Air Fryer Fajitas are about to become your new obsession. If you’re looking for a meal that’s quick, incredibly flavorful, healthy, and adaptable, you’ve hit the jackpot.
- Speed and Convenience: The air fryer is a miracle worker for busy weeknights. It preheats quickly and cooks food faster than a conventional oven, meaning these fajitas can be on your table in under 30 minutes from prep to plate.
- Healthier Option: Using an air fryer significantly reduces the amount of oil needed compared to traditional pan-frying, without sacrificing flavor or that delightful char. This makes for a lighter, healthier meal that doesn’t skimp on satisfaction.
- Incredibly Flavorful: The circulating hot air in the fryer sears the chicken and vegetables, locking in juices and creating beautifully caramelized, slightly crispy edges. The smoky, spicy fajita seasoning infuses every bite with authentic Mexican-inspired taste.
- Perfectly Gluten-Free: By using gluten-free corn tortillas (or other gluten-free alternatives) and ensuring your fajita seasoning is gluten-free, this recipe is a safe and delicious option for anyone with celiac disease or gluten sensitivity.
- Minimal Cleanup: One air fryer basket means less mess! No more scrubbing multiple pans. A quick wash of the basket, and you’re done.
- Customizable: This recipe is a fantastic base. You can easily swap out the chicken for steak, shrimp, or even make it entirely vegetarian with extra veggies or tofu. Adjust the spice level to your liking!
- Family-Friendly: Fajitas are a fun, interactive meal. Everyone can build their own, choosing their favorite toppings. It’s a great way to get kids involved in the kitchen and excited about eating colorful vegetables.
- Meal Prep Gold: You can slice the veggies and chicken ahead of time, making dinner assembly even faster. Leftovers (if you have any!) are fantastic for lunch the next day.
These Gluten-Free Air Fryer Fajitas are more than just a recipe; they’re a solution for delicious, stress-free meals that cater to dietary needs without compromising on the joy of food.
Gather Your Ingredients: The Foundation of Flavor
For sensational Gluten-Free Air Fryer Fajitas that serve approximately 4 people, you will need the following:
For the Fajita Filling:
- Protein (Choose One):
- 1.5 lbs (approx. 680g) boneless, skinless chicken breasts or thighs, sliced into ½-inch strips
- Alternative: 1.5 lbs (approx. 680g) flank steak or sirloin, sliced thinly against the grain
- Alternative: 1 lb (approx. 450g) large shrimp, peeled and deveined
- Alternative (Vegetarian): 1 block (14-16 oz) extra-firm tofu, pressed and cubed/sliced, or 2 additional bell peppers and 1 large portobello mushroom cap, sliced.
- Vegetables:
- 2 large bell peppers (a mix of colors like red, yellow, and orange looks beautiful), deseeded and sliced into ½-inch strips
- 1 large onion (yellow or red), sliced into ½-inch strips
- Marinade & Seasoning:
- 2 tablespoons olive oil or avocado oil
- 1 lime, juiced (about 2 tablespoons)
- 1 packet (approx. 1 oz or 28g) gluten-free fajita seasoning (check labels carefully, or see homemade option below)
- Optional for extra spice: ¼ – ½ teaspoon cayenne pepper or a pinch of red pepper flakes
- ½ teaspoon salt (or to taste, especially if your seasoning is low-sodium)
- ¼ teaspoon black pepper (or to taste)
- Optional Homemade Gluten-Free Fajita Seasoning (makes extra):
- 2 tablespoons chili powder
- 1 tablespoon smoked paprika
- 1 tablespoon ground cumin
- 1 teaspoon garlic powder
- 1 teaspoon onion powder
- 1 teaspoon dried oregano
- ½ teaspoon salt
- ½ teaspoon black pepper
- ¼ – ½ teaspoon cayenne pepper (optional, for heat)
- (Mix well and store in an airtight container. Use about 2-3 tablespoons for this recipe.)
For Serving (Gluten-Free):
- 8-12 gluten-free corn tortillas (check labels to ensure they are 100% corn or certified gluten-free)
- Alternative Gluten-Free Wraps: Cassava flour tortillas, almond flour tortillas, or lettuce wraps for a low-carb option.
- Toppings (all optional, choose your favorites!):
- Fresh cilantro, chopped
- Salsa (ensure it’s gluten-free)
- Guacamole or sliced avocado
- Sour cream or plain Greek yogurt (dairy-free options available)
- Shredded lettuce
- Pickled jalapeños
- Lime wedges, for squeezing
Ensuring all your packaged ingredients, especially the fajita seasoning and tortillas, are certified gluten-free is crucial if you are cooking for someone with celiac disease or severe gluten intolerance.
Step-by-Step Instructions for Perfect Gluten-Free Air Fryer Fajitas
Follow these simple steps to achieve fajita perfection in your air fryer. The process is straightforward, leading to delicious results every time.
- Prepare the Protein and Vegetables:
- If using chicken or steak, slice it into uniform ½-inch strips. If using shrimp, ensure they are peeled and deveined. For a vegetarian option, press and slice tofu or prepare your extra vegetables.
- Slice the bell peppers and onion into similar-sized ½-inch strips. Uniformity in size helps ensure even cooking.
- Marinate (The Flavor Boost!):
- In a large bowl, combine the sliced protein (chicken, steak, or tofu) and vegetables.
- Drizzle with olive oil and lime juice.
- Sprinkle generously with the gluten-free fajita seasoning, salt, and pepper (and optional cayenne/red pepper flakes if using).
- Toss everything together thoroughly until the protein and vegetables are evenly coated with the oil and seasonings.
- Optional but Recommended: For best flavor, cover the bowl and let it marinate in the refrigerator for at least 20-30 minutes. If you’re short on time, you can proceed directly to air frying, but even 15 minutes of marinating makes a difference. For steak, marinating for an hour or more can help tenderize it further.
- Preheat Your Air Fryer:
- Preheat your air fryer to 400°F (200°C) for about 5 minutes. Preheating is key to getting that nice sear and helps the food cook more evenly.
- Air Fry the Fajita Mixture:
- Once preheated, carefully add the seasoned chicken (or other protein) and vegetable mixture to the air fryer basket. Spread it out in a single layer as much as possible. Do not overcrowd the basket. If necessary, cook in two batches to ensure everything gets nicely charred and cooked through rather than steamed.
- For Chicken/Steak/Tofu: Air fry at 400°F (200°C) for 12-18 minutes, shaking the basket or tossing the contents halfway through (around the 6-9 minute mark).
- Chicken should be cooked through (internal temperature of 165°F or 74°C) and no longer pink.
- Steak can be cooked to your preferred doneness (less time for medium-rare, more for well-done).
- Tofu should be golden and slightly crispy.
- For Shrimp: Shrimp cooks much faster. Air fry at 400°F (200°C) for 6-10 minutes, shaking halfway, until pink and cooked through.
- The vegetables should be tender-crisp and slightly charred at the edges. Adjust cooking time based on your air fryer model and the thickness of your ingredients.
- Warm the Gluten-Free Tortillas:
- While the fajita mixture is air frying, warm your gluten-free tortillas. You can do this in a few ways:
- Microwave: Wrap a stack of tortillas in a slightly damp paper towel and microwave for 20-30 seconds until warm and pliable.
- Stovetop: Warm them one by one in a dry skillet over medium heat for about 15-30 seconds per side.
- Air Fryer (after fajitas are done): Briefly warm them in the air fryer at a lower temperature (around 300°F or 150°C) for a minute or two, watching carefully so they don’t get too crispy.
- While the fajita mixture is air frying, warm your gluten-free tortillas. You can do this in a few ways:
- Serve and Enjoy:
- Once the fajita filling is cooked to perfection, carefully remove it from the air fryer.
- Serve immediately with the warm gluten-free tortillas and your desired array of toppings like fresh cilantro, salsa, guacamole, sour cream, and lime wedges.
This method simplifies fajita night, bringing all the sizzle and flavor you crave directly from your air fryer to your table.
Nutrition Facts (Approximate)
Understanding the nutritional value of your meals is important, especially when following specific dietary guidelines. The following are approximate nutrition facts for one serving of Gluten-Free Air Fryer Chicken Fajitas, assuming the recipe serves 4 and does not include tortillas or toppings, as these can vary widely.
- Servings: 4
- Calories per serving (filling only): Approximately 300-380 calories
Breakdown (estimates, will vary based on exact ingredients and portion sizes):
- Protein: 35-45g
- Fat: 12-18g (primarily from oil and chicken thighs if used)
- Saturated Fat: 2-4g
- Carbohydrates: 10-15g (mainly from vegetables)
- Fiber: 3-5g
- Sugar: 4-7g (naturally occurring in vegetables)
- Sodium: Varies significantly based on the fajita seasoning used (typically 500-800mg if using store-bought seasoning; can be much lower with homemade, controlled-salt seasoning).
Important Considerations:
- Tortillas: A typical gluten-free corn tortilla (6-inch) adds around 50-60 calories and 10-12g of carbohydrates.
- Toppings:
- Guacamole (2 tbsp): ~50 calories, 4.5g fat
- Sour Cream (2 tbsp): ~60 calories, 6g fat
- Salsa (2 tbsp): ~10 calories
- Protein Choice: Using leaner chicken breast will result in lower fat and calories compared to chicken thighs or steak. Shrimp is also a very lean option. Tofu’s nutritional profile will differ, generally being lower in calories and fat but still a good protein source.
These figures are estimates. For precise nutritional information, it’s always best to use a nutrition calculator and input your exact ingredients and quantities. This recipe, centered around lean protein and plenty of vegetables, forms the base of a healthy and satisfying gluten-free meal.
Preparation and Cook Time: A Speedy Meal Solution
One of the most appealing aspects of these Gluten-Free Air Fryer Fajitas is how quickly they come together, making them ideal for busy schedules.
- Preparation Time: 15-20 minutes
- This includes slicing the protein and vegetables, and mixing the marinade. If you buy pre-sliced vegetables or are very efficient with your knife skills, you might reduce this slightly. If you opt for the 20-30 minute marinating time, factor that in as “inactive prep time.”
- Cook Time: 12-18 minutes (for chicken/steak/tofu) or 6-10 minutes (for shrimp)
- This also includes the 5-minute preheating time for the air fryer.
- Total Time: Approximately 30-45 minutes
- From starting your prep to serving the meal, you’re looking at a remarkably short window, especially considering the depth of flavor achieved. If marinating for longer, the active time remains low.
This quick turnaround makes it a perfect candidate for weeknight dinners when time is of the essence, but you don’t want to compromise on a delicious, home-cooked, and healthy gluten-free meal.
How to Serve Your Delicious Gluten-Free Air Fryer Fajitas
Serving fajitas is all about the interactive experience and the delicious array of accompaniments. Here’s how to present your Gluten-Free Air Fryer Fajitas for maximum enjoyment:
- The Main Event:
- Arrange the sizzling hot air-fried chicken (or other protein) and vegetable mixture on a platter or directly from the air fryer basket if it’s presentable. The vibrant colors of the peppers and onions, along with the beautifully browned protein, are instantly appetizing.
- Gluten-Free Tortilla Options:
- Corn Tortillas: The classic choice. Ensure they are 100% corn or certified gluten-free. Warm them as described in the instructions to make them pliable. Serve them in a tortilla warmer or wrapped in a clean kitchen towel to keep them soft.
- Cassava Flour Tortillas: A great grain-free and gluten-free alternative with a soft, pliable texture.
- Almond Flour Tortillas: Another popular low-carb, grain-free, and gluten-free option.
- Lettuce Wraps: For a low-carb, keto-friendly, and paleo option, serve the fajita filling in large, crisp lettuce leaves like butter lettuce, romaine, or iceberg.
- The Toppings Bar (The Fun Part!): Set out small bowls of various toppings so everyone can customize their fajitas. Here are some popular gluten-free choices:
- Salsa:
- Pico de Gallo (fresh, chunky salsa)
- Salsa Verde (green tomatillo salsa)
- Roasted Tomato Salsa (smoky flavor)
- Ensure store-bought salsas are gluten-free.
- Creamy Elements:
- Guacamole (homemade or store-bought, check GF status)
- Sliced or diced avocado
- Sour cream (or dairy-free sour cream alternative like cashew cream)
- Plain Greek yogurt (a lighter alternative to sour cream)
- Fresh & Zesty:
- Fresh cilantro, roughly chopped
- Lime wedges, for squeezing extra fresh lime juice over the fajitas
- Shredded lettuce or cabbage for extra crunch
- Spicy Kicks:
- Pickled jalapeños or fresh sliced jalapeños
- Your favorite gluten-free hot sauce
- Cheese (Optional):
- Shredded cheddar, Monterey Jack, or a Mexican blend (if dairy is tolerated)
- Crumbled cotija cheese (check for gluten-free processing if sensitive)
- Dairy-free cheese shreds
- Salsa:
- Building Your Fajita:
- Lay a warm tortilla flat.
- Spoon a generous amount of the air-fried fajita filling down the center.
- Add your chosen toppings.
- Fold or roll, and enjoy immediately!
- Side Dishes (Optional, ensure they are gluten-free):
- Mexican Rice or Cilantro-Lime Rice (use gluten-free broth)
- Black Beans or Refried Beans (check for gluten-free brands)
- A simple side salad with a light vinaigrette
- Grilled corn on the cob (elote style, if desired, ensuring crema/mayo is GF)
Presenting your Gluten-Free Air Fryer Fajitas with a vibrant array of tortillas and toppings turns a simple meal into a festive and engaging dining experience.
Additional Tips for Fajita Perfection
Want to elevate your Gluten-Free Air Fryer Fajita game even further? Here are five extra tips to ensure every batch is a culinary triumph:
- Don’t Overcrowd the Air Fryer Basket: This is crucial for achieving that desirable char and avoiding steaming your ingredients. If your air fryer is small or you’re making a large batch, cook the fajita filling in two (or even three) separate batches. A single layer allows the hot air to circulate effectively, browning and crisping the chicken and vegetables beautifully.
- Uniform Slicing is Key: Try to slice your chicken (or other protein) and vegetables into roughly the same thickness and length. This promotes even cooking, ensuring that smaller pieces don’t burn before larger pieces are cooked through. Consistency in size leads to consistency in texture and doneness.
- Embrace the Marinade (Even for a Short Time): While you can skip marinating if you’re in an extreme rush, even 15-20 minutes allows the oil, lime juice, and seasonings to penetrate the ingredients, significantly boosting the flavor. For steak, a longer marinade (1-2 hours) can also help tenderize the meat.
- Taste and Adjust Seasoning Before Air Frying: After tossing your ingredients with the marinade, take a tiny nibble of a seasoned vegetable (if comfortable) or simply trust your seasoning amounts. Different brands of fajita seasoning can vary in saltiness and spice. Don’t be afraid to add an extra pinch of salt, cumin, chili powder, or cayenne to match your preference. It’s easier to adjust seasoning before cooking.
- Finish with Freshness: A generous squeeze of fresh lime juice and a sprinkle of freshly chopped cilantro after the fajitas come out of the air fryer can make a world of difference. The bright, zesty flavors cut through the richness and add a vibrant finishing touch that elevates the entire dish. Keep these on hand as toppings as well!
By keeping these simple yet effective tips in mind, you’ll consistently produce Gluten-Free Air Fryer Fajitas that are bursting with flavor, perfectly textured, and sure to impress.
Frequently Asked Questions (FAQ) About Gluten-Free Air Fryer Fajitas
Here are answers to some common questions you might have about making these delicious and easy fajitas:
- Q: Can I use frozen chicken or vegetables for this recipe?
- A: It’s best to use fresh or fully thawed chicken and vegetables. Frozen ingredients release a lot of moisture during cooking, which can prevent them from browning and charring properly in the air fryer, leading to a soggier result. If using frozen chicken, ensure it’s completely thawed and pat it dry before slicing and marinating. For vegetables, fresh will yield the best texture.
- Q: My fajita seasoning isn’t labeled gluten-free. Is it safe to use?
- A: Not necessarily. Many commercial spice blends, including some fajita seasonings, can contain gluten-based fillers, anti-caking agents, or are processed on shared equipment, leading to cross-contamination. If you have celiac disease or high gluten sensitivity, it’s crucial to use a seasoning blend that is explicitly certified gluten-free or make your own (as suggested in the ingredients list) to ensure it’s safe. Always read labels carefully.
- Q: How do I prevent the ingredients from sticking to the air fryer basket?
- A: The oil in the marinade should help prevent major sticking. However, you can lightly spray the air fryer basket with a gluten-free cooking spray (like avocado or olive oil spray) before adding the ingredients if you’re concerned, especially if your air fryer basket tends to stick. Avoid aerosol sprays with propellants if your air fryer manual advises against them, as they can sometimes damage non-stick coatings over time. Shaking the basket halfway through cooking also helps prevent sticking.
- Q: Can I make these fajitas ahead of time for meal prep?
- A: Yes, components can be prepped ahead! You can slice the chicken and vegetables and store them in an airtight container in the refrigerator for up to 2-3 days. You can also mix the marinade ingredients and store them separately. Combine and marinate 30 minutes to a few hours before you plan to cook. For the best texture, it’s recommended to air fry the fajitas just before serving. Cooked leftovers store well for 3-4 days and reheat nicely in the air fryer or microwave.
- Q: What if I don’t have an air fryer? Can I still make these fajitas?
- A: Absolutely! While this recipe is optimized for the air fryer, you can easily adapt it:
- Stovetop: Heat a large skillet or cast-iron pan over medium-high heat with a tablespoon of oil. Add the marinated chicken and vegetables (you may need to do this in batches to avoid overcrowding) and cook, stirring occasionally, until the chicken is cooked through and the vegetables are tender-crisp and slightly charred (about 8-12 minutes).
- Oven: Preheat your oven to 400°F (200°C). Spread the marinated chicken and vegetables in a single layer on a large baking sheet. Roast for 15-20 minutes, or until chicken is cooked and vegetables are tender and slightly caramelized, flipping halfway through. You can also broil for the last 1-2 minutes for extra char, watching carefully.
- A: Absolutely! While this recipe is optimized for the air fryer, you can easily adapt it:
These answers should help you tackle your Gluten-Free Air Fryer Fajitas with confidence, ensuring a delicious and safe meal every time!
Beyond the Basics: Customizing Your Gluten-Free Air Fryer Fajitas
The beauty of fajitas lies in their versatility. This recipe provides a fantastic foundation, but feel free to get creative and tailor it to your specific tastes, dietary needs, or what you have on hand.
Protein Power-Ups & Swaps:
- Spicy Chorizo: Add some sliced, gluten-free Spanish chorizo along with your chicken or steak for a smoky, spicy depth. Ensure it’s fully cooked.
- Pork Tenderloin: Thinly sliced pork tenderloin is another excellent, lean protein option that cooks quickly and absorbs marinades well.
- Fish Fajitas: Use firm white fish like cod, mahi-mahi, or tilapia, cut into chunks. Season and air fry carefully, as fish cooks very quickly (likely 8-10 minutes).
- Plant-Based Power:
- Mushrooms: Portobello, shiitake, or oyster mushrooms, thickly sliced, add a meaty texture and umami flavor.
- Black Beans or Pinto Beans: Add a can of rinsed and drained beans (ensure gluten-free) to the vegetable mixture during the last 5 minutes of air frying for extra fiber and protein.
- Halloumi Cheese: If you tolerate dairy, slices of halloumi can be air-fried until golden and slightly crispy, offering a salty, chewy element.
Vegetable Variations:
- Zucchini or Yellow Squash: Sliced zucchini or yellow squash can be a great addition, adding more nutrients and bulk. Add them with the other veggies.
- Corn: Fresh or frozen (thawed) corn kernels can add a touch of sweetness and texture. Mix them in with the other vegetables.
- Poblano Peppers: For a milder heat and smoky flavor, substitute one of the bell peppers with a sliced poblano pepper.
- Jalapeños or Serrano Peppers: If you love heat, slice a jalapeño or serrano pepper (seeds removed for less heat) and add it to the vegetable mix before air frying.
Flavor Twists in the Marinade:
- Smoky Chipotle: Add 1-2 teaspoons of adobo sauce (from a can of chipotles in adobo, ensure GF) or ½ teaspoon of chipotle powder to the marinade for a deep, smoky heat.
- Orange Zest & Juice: Replace half of the lime juice with fresh orange juice and add a teaspoon of orange zest for a brighter, slightly sweeter citrus note.
- Pineapple Power: A tablespoon of pineapple juice in the marinade can add a tropical twist and help tenderize the meat.
- Herbaceous Notes: Add a teaspoon of dried cilantro or a pinch of ground coriander to the fajita seasoning for an extra layer of flavor.
Don’t be afraid to experiment! The air fryer is very forgiving, and discovering new favorite combinations is part of the fun.
The Magic of the Air Fryer for Fajitas: Why It Works So Well
You might wonder what makes the air fryer particularly suited for cooking fajitas, especially gluten-free versions. The science is simple but effective:
- Intense, Circulating Heat: Air fryers work by circulating superheated air at high speed around the food. This creates a convection effect that cooks food quickly and evenly. For fajitas, this means the chicken (or other protein) gets a nice sear on the outside, locking in juices, while the vegetables become tender-crisp with beautifully charred edges – all signature characteristics of great fajitas.
- Less Oil, More Crisp: Traditional pan-fried fajitas often require a good amount of oil to achieve charring and prevent sticking. The air fryer achieves similar, if not better, results with significantly less oil. The high heat and airflow do the heavy lifting, resulting in a lighter, less greasy dish without sacrificing that desirable texture.
- Mimicking the “Sizzle”: While you might not get the auditory sizzle of a cast-iron skillet hitting your table, the air fryer replicates the textural results of that sizzle. The edges of the peppers, onions, and protein get slightly crispy and caramelized, providing a delightful contrast to the tender interiors.
- Efficiency and Speed: Air fryers preheat rapidly and cook faster than conventional ovens. This means your fajita filling can be ready in a fraction of the time, making it an incredibly efficient way to get a flavorful, satisfying meal on the table.
- Contained Mess: All the cooking happens within the air fryer basket. This means no oil splattering all over your stovetop. Cleanup is typically a breeze, often just involving washing the basket and drawer.
For gluten-free cooking, where you might be using more delicate gluten-free tortillas, having a perfectly cooked, non-soggy filling is paramount. The air fryer delivers this by cooking off excess moisture quickly, ensuring your fajita components are distinct and flavorful, ready to be piled into your favorite GF wrap.
Making it a Full Gluten-Free Mexican Fiesta: Side Dish Ideas
To transform your Gluten-Free Air Fryer Fajitas into a complete Mexican-inspired feast, consider adding a few simple, gluten-free side dishes. These can round out the meal and add even more flavor and texture to your spread.
- Cilantro-Lime Rice:
- Cook your favorite long-grain white or brown rice according to package directions, using gluten-free chicken or vegetable broth instead of water for extra flavor. Once cooked, fluff with a fork and stir in freshly chopped cilantro and a generous squeeze of lime juice.
- Easy Black Beans:
- Sauté a chopped small onion and a clove of minced garlic in a bit of olive oil. Add a can of rinsed and drained black beans (ensure GF), ½ cup of gluten-free broth or water, ½ teaspoon of cumin, and a pinch of chili powder. Simmer for 10-15 minutes until slightly thickened. Mash some of the beans against the side of the pot for a creamier texture.
- Quick Corn Salad (Esquites-Inspired):
- Combine 1 can (drained) or 2 cups of cooked corn kernels (fresh or frozen, thawed) with ¼ cup finely diced red onion, ¼ cup chopped cilantro, 1 tablespoon lime juice, and a pinch of chili powder (or tajin, check GF). For a creamy version, stir in a tablespoon of mayonnaise or Greek yogurt and a sprinkle of cotija cheese (if tolerated and GF).
- Simple Avocado Salad:
- Dice 2 ripe avocados and combine with ½ cup cherry tomatoes (halved), ¼ cup diced red onion, and a handful of chopped cilantro. Drizzle with lime juice and olive oil, and season with salt and pepper.
- Jicama Slaw:
- For a refreshing crunch, julienne jicama, carrots, and a bit of red cabbage. Toss with a simple dressing of lime juice, a touch of honey (or agave), and chopped cilantro.
- Gluten-Free Tortilla Chips and Dips:
- Serve a bowl of your favorite certified gluten-free tortilla chips alongside extra salsa, guacamole, or even a gluten-free queso dip.
When selecting sides, always double-check labels on canned goods, broths, and seasonings to ensure they are gluten-free, especially if cooking for someone with celiac disease. These additions will complement the savory, smoky flavors of your air fryer fajitas beautifully.
Storing and Reheating Leftover Gluten-Free Air Fryer Fajitas
If you happen to have leftovers (though they’re so good, you might not!), storing and reheating them properly will ensure they taste almost as good as fresh.
Storing:
- Cool Completely: Allow the cooked fajita filling (chicken/protein and vegetables) to cool down to room temperature before storing. Storing hot food directly in the refrigerator can raise the temperature inside and promote bacterial growth.
- Airtight Container: Transfer the cooled fajita filling to an airtight container.
- Refrigerate: Store in the refrigerator for up to 3-4 days.
- Store Tortillas and Toppings Separately: Keep leftover tortillas in their original packaging or a zip-top bag at room temperature or in the fridge. Store toppings like salsa, guacamole, and sour cream in their own airtight containers in the refrigerator.
Reheating:
The goal when reheating is to warm the fajitas through without overcooking the protein or making the vegetables mushy.
- Air Fryer (Recommended Method):
- Preheat your air fryer to around 350°F (175°C).
- Place the leftover fajita filling in the air fryer basket in a single layer.
- Reheat for 3-5 minutes, shaking the basket halfway, until warmed through. This method helps to retain some of the original texture and even re-crisp the edges slightly.
- Microwave:
- Place the fajita filling on a microwave-safe plate.
- Cover loosely to prevent splattering.
- Microwave on medium power in 30-second to 1-minute intervals, stirring in between, until warmed through. Be careful not to overcook, as this can make the chicken tough.
- Stovetop:
- Heat a skillet over medium heat with a tiny splash of oil or water/broth (to prevent sticking and add moisture).
- Add the leftover fajita filling and cook, stirring occasionally, until heated through.
Reheating Tortillas:
Warm leftover gluten-free tortillas using your preferred method (microwave, dry skillet, or briefly in the air fryer) just before serving.
By following these storage and reheating tips, you can enjoy your delicious Gluten-Free Air Fryer Fajitas for another meal, making them a convenient option for lunch or a quick dinner later in the week.
Final Thoughts: Your New Go-To Healthy, Gluten-Free Dinner
These Gluten-Free Air Fryer Fajitas are more than just a recipe; they’re a testament to how modern kitchen appliances can simplify healthy eating without sacrificing an ounce of flavor or enjoyment. The combination of tender, juicy, seasoned protein and perfectly charred, sweet vegetables, all achieved with minimal effort and oil, is truly a weeknight game-changer.
The ease of preparation, coupled with the quick cooking time of the air fryer, means that a vibrant, satisfying, and entirely gluten-free meal is always within easy reach. Whether you’re navigating celiac disease, gluten sensitivity, or simply aiming for a lighter, more wholesome way to enjoy a beloved classic, this recipe delivers on all fronts. The ability to customize with different proteins, an array of colorful vegetables, and a mountain of fresh toppings ensures that fajita night will never be boring.
So, fire up that air fryer, gather your fresh ingredients, and get ready to experience the joy of sizzling, flavor-packed fajitas that will have everyone at the table asking for seconds. This is a recipe you’ll return to time and time again, proving that delicious, healthy, and gluten-free can coexist beautifully on your dinner plate. Enjoy the fiesta!
Print
Gluten Free Air Fryer Fajitas Recipe
Ingredients
For the Fajita Filling:
-
- Protein (Choose One):
-
- 1.5 lbs (approx. 680g) boneless, skinless chicken breasts or thighs, sliced into ½-inch strips
-
- Alternative: 1.5 lbs (approx. 680g) flank steak or sirloin, sliced thinly against the grain
-
- Alternative: 1 lb (approx. 450g) large shrimp, peeled and deveined
-
- Alternative (Vegetarian): 1 block (14-16 oz) extra-firm tofu, pressed and cubed/sliced, or 2 additional bell peppers and 1 large portobello mushroom cap, sliced.
-
- Protein (Choose One):
-
- Vegetables:
-
- 2 large bell peppers (a mix of colors like red, yellow, and orange looks beautiful), deseeded and sliced into ½-inch strips
-
- 1 large onion (yellow or red), sliced into ½-inch strips
-
- Vegetables:
-
- Marinade & Seasoning:
-
- 2 tablespoons olive oil or avocado oil
-
- 1 lime, juiced (about 2 tablespoons)
-
- 1 packet (approx. 1 oz or 28g) gluten-free fajita seasoning (check labels carefully, or see homemade option below)
-
- Optional for extra spice: ¼ – ½ teaspoon cayenne pepper or a pinch of red pepper flakes
-
- ½ teaspoon salt (or to taste, especially if your seasoning is low-sodium)
-
- ¼ teaspoon black pepper (or to taste)
-
- Marinade & Seasoning:
-
- Optional Homemade Gluten-Free Fajita Seasoning (makes extra):
-
- 2 tablespoons chili powder
-
- 1 tablespoon smoked paprika
-
- 1 tablespoon ground cumin
-
- 1 teaspoon garlic powder
-
- 1 teaspoon onion powder
-
- 1 teaspoon dried oregano
-
- ½ teaspoon salt
-
- ½ teaspoon black pepper
-
- ¼ – ½ teaspoon cayenne pepper (optional, for heat)
-
- (Mix well and store in an airtight container. Use about 2-3 tablespoons for this recipe.)
-
- Optional Homemade Gluten-Free Fajita Seasoning (makes extra):
For Serving (Gluten-Free):
-
- 8–12 gluten-free corn tortillas (check labels to ensure they are 100% corn or certified gluten-free)
-
- Alternative Gluten-Free Wraps: Cassava flour tortillas, almond flour tortillas, or lettuce wraps for a low-carb option.
-
- Toppings (all optional, choose your favorites!):
-
- Fresh cilantro, chopped
-
- Salsa (ensure it’s gluten-free)
-
- Guacamole or sliced avocado
-
- Sour cream or plain Greek yogurt (dairy-free options available)
-
- Shredded lettuce
-
- Pickled jalapeños
-
- Lime wedges, for squeezing
-
- Toppings (all optional, choose your favorites!):
Instructions
-
- Prepare the Protein and Vegetables:
-
- If using chicken or steak, slice it into uniform ½-inch strips. If using shrimp, ensure they are peeled and deveined. For a vegetarian option, press and slice tofu or prepare your extra vegetables.
-
- Slice the bell peppers and onion into similar-sized ½-inch strips. Uniformity in size helps ensure even cooking.
-
- Prepare the Protein and Vegetables:
-
- Marinate (The Flavor Boost!):
-
- In a large bowl, combine the sliced protein (chicken, steak, or tofu) and vegetables.
-
- Drizzle with olive oil and lime juice.
-
- Sprinkle generously with the gluten-free fajita seasoning, salt, and pepper (and optional cayenne/red pepper flakes if using).
-
- Toss everything together thoroughly until the protein and vegetables are evenly coated with the oil and seasonings.
-
- Optional but Recommended: For best flavor, cover the bowl and let it marinate in the refrigerator for at least 20-30 minutes. If you’re short on time, you can proceed directly to air frying, but even 15 minutes of marinating makes a difference. For steak, marinating for an hour or more can help tenderize it further.
-
- Marinate (The Flavor Boost!):
-
- Preheat Your Air Fryer:
-
- Preheat your air fryer to 400°F (200°C) for about 5 minutes. Preheating is key to getting that nice sear and helps the food cook more evenly.
-
- Preheat Your Air Fryer:
-
- Air Fry the Fajita Mixture:
-
- Once preheated, carefully add the seasoned chicken (or other protein) and vegetable mixture to the air fryer basket. Spread it out in a single layer as much as possible. Do not overcrowd the basket. If necessary, cook in two batches to ensure everything gets nicely charred and cooked through rather than steamed.
-
- For Chicken/Steak/Tofu: Air fry at 400°F (200°C) for 12-18 minutes, shaking the basket or tossing the contents halfway through (around the 6-9 minute mark).
-
- Chicken should be cooked through (internal temperature of 165°F or 74°C) and no longer pink.
-
- Steak can be cooked to your preferred doneness (less time for medium-rare, more for well-done).
-
- Tofu should be golden and slightly crispy.
-
- For Chicken/Steak/Tofu: Air fry at 400°F (200°C) for 12-18 minutes, shaking the basket or tossing the contents halfway through (around the 6-9 minute mark).
-
- For Shrimp: Shrimp cooks much faster. Air fry at 400°F (200°C) for 6-10 minutes, shaking halfway, until pink and cooked through.
-
- The vegetables should be tender-crisp and slightly charred at the edges. Adjust cooking time based on your air fryer model and the thickness of your ingredients.
-
- Air Fry the Fajita Mixture:
-
- Warm the Gluten-Free Tortillas:
-
- While the fajita mixture is air frying, warm your gluten-free tortillas. You can do this in a few ways:
-
- Microwave: Wrap a stack of tortillas in a slightly damp paper towel and microwave for 20-30 seconds until warm and pliable.
-
- Stovetop: Warm them one by one in a dry skillet over medium heat for about 15-30 seconds per side.
-
- Air Fryer (after fajitas are done): Briefly warm them in the air fryer at a lower temperature (around 300°F or 150°C) for a minute or two, watching carefully so they don’t get too crispy.
-
- While the fajita mixture is air frying, warm your gluten-free tortillas. You can do this in a few ways:
-
- Warm the Gluten-Free Tortillas:
-
- Serve and Enjoy:
-
- Once the fajita filling is cooked to perfection, carefully remove it from the air fryer.
-
- Serve immediately with the warm gluten-free tortillas and your desired array of toppings like fresh cilantro, salsa, guacamole, sour cream, and lime wedges.
-
- Serve and Enjoy:
Nutrition
- Serving Size: one normal portion
- Calories: 300-380
- Sugar: 4-7g
- Fat: 12-18g
- Saturated Fat: 2-4g
- Carbohydrates: 10-15g
- Fiber: 3-5g
- Protein: 35-45g


