


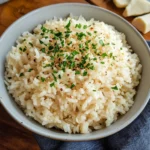
Sometimes, the simplest things are truly the most profound, especially in the kitchen. Plain steamed rice is fine, a blank canvas really, but Garlic Butter Rice? That’s a whole different story. I remember the first time I swapped out plain water for broth and added a generous knob of butter and fragrant garlic to my everyday rice pot. The aroma alone was intoxicating, filling the kitchen with a warmth that promised pure comfort. When I finally fluffed those glistening grains, infused with savory garlic and rich butter, it was a revelation. My family, initially expecting just “rice,” were instantly hooked. “What is this?” quickly turned into “Can we have this rice every time?” It’s become our go-to side dish, effortlessly elevating simple weeknight dinners – grilled chicken, pan-seared fish, even just roasted vegetables – into something special. It proves that you don’t need complicated techniques or exotic ingredients to create incredible flavor; sometimes, all it takes is butter, garlic, and a little bit of love for a humble grain.
Ingredients for Flavorful Garlic Butter Rice
Creating this aromatic and delicious side dish requires just a few pantry staples. The magic lies in the synergy between garlic, butter, and perfectly cooked rice, enhanced by the cooking liquid. Quality ingredients will make a noticeable difference.
Here’s what you’ll need for approximately 4-6 servings:
- Long-Grain White Rice: 1.5 cups (approx. 300g)
- Recommendation: Jasmine or Basmati rice work exceptionally well. Their slightly floral or nutty aromas complement the garlic and butter beautifully, and they cook up into fluffy, separate grains. Standard long-grain white rice is also perfectly suitable.
- Rinsing: It’s highly recommended to rinse the rice thoroughly before cooking to remove excess surface starch, which helps prevent clumping and results in fluffier individual grains.
- Butter: 3 tablespoons (approx. 42g)
- Recommendation: Unsalted butter is preferred, as it allows you to control the final saltiness of the dish, especially since you’ll likely be using broth and adding salt. If using salted butter, adjust the added salt accordingly. Use good quality butter for the best flavor.
- Garlic: 4-6 cloves, finely minced (about 1.5 – 2 tablespoons)
- Fresh is Best: Freshly minced garlic provides the most vibrant and authentic flavor. The potency can vary, so adjust the amount based on the size of your cloves and your personal preference for garlic intensity. Garlic paste can work in a pinch, but avoid garlic powder for this recipe if possible – the texture and flavor profile are different.
- Cooking Liquid: 2.75 to 3 cups (approx. 650 – 710 ml)
- Broth: Chicken broth (low-sodium recommended) adds a wonderful depth of savory flavor and is the preferred choice.
- Vegetable Broth: An excellent vegetarian alternative that still provides more flavor than water.
- Water: If you don’t have broth, water will work, but the final dish will be less savory. You might want to slightly increase the salt or consider adding a bouillon cube (adjust salt carefully if using bouillon).
- Note: The exact liquid amount can vary slightly depending on the specific type of rice and your cooking method (stovetop vs. rice cooker). A general ratio for long-grain white rice on the stovetop is often 1 part rice to 1.75 – 2 parts liquid.
- Salt: ½ to ¾ teaspoon (adjust to taste)
- Start with less, especially if using salted butter or regular (not low-sodium) broth. You can always add more salt at the end after tasting. Kosher salt or sea salt is recommended for better flavor distribution.
- Black Pepper: ¼ teaspoon, freshly ground (optional, but recommended)
- Freshly ground black pepper adds a subtle warmth.
- Fresh Parsley: 1-2 tablespoons, finely chopped (optional, for garnish and freshness)
- Adds a pop of color and a touch of freshness to cut through the richness. Chives or thinly sliced green onions can also be used.
Ingredient Considerations:
- Garlic Intensity: If you really love garlic, feel free to add another clove or two. If you prefer a milder flavor, start with 3-4 cloves.
- Richness: For an even richer flavor, you can increase the butter slightly, perhaps up to 4 tablespoons.
Step-by-Step Instructions for Perfect Garlic Butter Rice
Follow these instructions for fluffy, aromatic garlic butter rice cooked perfectly on the stovetop. A rice cooker variation is also included.
Stovetop Method:
- Rinse the Rice: Place the rice in a fine-mesh sieve. Rinse it under cold running water, swishing the rice gently with your hand, until the water runs mostly clear. This removes excess surface starch and helps ensure fluffy, separate grains. Drain the rice thoroughly.
- Sauté the Garlic: Select a medium saucepan or pot with a tight-fitting lid. Melt the butter over medium-low heat. Be careful not to let the butter brown too quickly. Once melted and shimmering, add the minced garlic. Sauté the garlic, stirring constantly, for about 30-60 seconds until it becomes fragrant. Crucial: Do not let the garlic brown or burn, as it will become bitter and ruin the flavor. You just want to soften it and release its aroma into the butter.
- Toast the Rice (Optional but Recommended): Add the rinsed and drained rice to the saucepan with the garlic butter. Stir gently to coat the rice grains evenly with the butter and garlic mixture. Toast the rice over medium-low heat for 1-2 minutes, stirring occasionally. You might notice the edges of the grains becoming slightly translucent. This step adds a subtle nutty flavor and further helps keep the grains separate.
- Add Liquid and Seasoning: Carefully pour the broth (or water) into the saucepan. Add the salt and freshly ground black pepper (if using). Stir everything together once to combine.
- Bring to a Boil, Then Simmer: Increase the heat to medium-high and bring the liquid to a rolling boil. As soon as it boils, give it one last quick stir, then immediately reduce the heat to the lowest possible setting that still maintains a very gentle simmer.
- Cover and Cook: Place the tight-fitting lid on the saucepan. Let the rice simmer undisturbed (do not lift the lid!) for 15-20 minutes. The exact time depends on your stove and rice type. Most of the liquid should be absorbed. If you have a glass lid, you can peek to see if most liquid is gone, but avoid lifting it if possible as escaping steam disrupts the cooking process.
- Rest Off the Heat (Essential Step): Once the simmering time is up (or you see tiny steam vents on the surface and most liquid is gone), turn off the heat completely. Move the saucepan off the hot burner. Let the rice stand, covered and undisturbed, for another 10 minutes. This crucial resting period allows the residual steam to finish cooking the rice evenly and helps the grains firm up, resulting in a perfectly fluffy texture.
- Fluff and Serve: Remove the lid. Use a fork (not a spoon, which can mash the grains) to gently fluff the rice, separating the grains. Stir in the optional chopped fresh parsley for color and freshness.
- Taste and Adjust: Taste the rice and add more salt if needed. Serve immediately.
Rice Cooker Method:
- Rinse Rice: Rinse the rice thoroughly as described in Step 1 above. Drain well.
- Sauté Garlic (Optional but Recommended): If your rice cooker has a sauté or “keep warm” function that gets hot enough, you can melt the butter and sauté the garlic directly in the cooker pot first (Step 2). If not, you can do this step in a small skillet on the stovetop and then add the garlic butter mixture to the rice cooker pot. Alternatively, for maximum simplicity (though slightly less depth of flavor), you can skip sautéing and add the minced garlic and butter directly with the other ingredients.
- Combine Ingredients: Place the rinsed rice, sautéed garlic butter (or raw minced garlic and butter), broth (or water), salt, and pepper into the rice cooker pot. Use the liquid measurement lines on your rice cooker bowl appropriate for the amount of rice, or use the recommended liquid amount (adjusting slightly if needed based on your cooker’s manual – typically a 1:1.5 or 1:1.75 ratio works for white rice). Stir once to combine.
- Cook: Close the lid and select the standard “White Rice” or “Cook” setting on your rice cooker. Let it run through its cycle.
- Rest: Once the rice cooker switches to the “Keep Warm” setting, let the rice rest, undisturbed, for at least 10 minutes before opening the lid.
- Fluff and Serve: Open the lid, fluff the rice gently with a fork, stir in the optional fresh parsley, taste and adjust salt if needed, and serve.
Nutrition Facts (Approximate)
Please remember these nutritional values are estimates. The final figures can vary based on the specific type of rice, whether you use broth or water, the exact amount and type of butter (salted vs. unsalted), and your final serving size.
- Servings: This recipe yields approximately 4 to 6 side dish servings.
- Serving Size: Calculated based on 1/5th of the total recipe.
- Approximate Calories per Serving: 280 – 380 calories
Breakdown Considerations:
- Carbohydrates: The primary macronutrient, mainly from the rice. Typically around 45-60 grams per serving, depending on portion size.
- Fat: Comes almost entirely from the butter. Approximately 8-12 grams per serving, with a significant portion being saturated fat if using traditional butter.
- Protein: Relatively low, around 4-6 grams per serving, primarily from the rice itself. Using bone broth could slightly increase protein content.
- Sodium: Highly variable. Depends on whether you use broth or water, low-sodium vs. regular broth, salted vs. unsalted butter, and how much salt you add. Using low-sodium options and salting to taste gives you the most control.
- Fiber: Relatively low in white rice, typically 1-2 grams per serving. Using brown rice would significantly increase fiber content (but require adjustments to liquid and cooking time).
Disclaimer: This Garlic Butter Rice is intended as a flavorful side dish. While delicious, it’s primarily a source of carbohydrates and fat. For precise nutritional information based on your specific ingredients, consult an online nutritional calculator.
Preparation and Cooking Time
This flavorful rice dish comes together relatively quickly, making it an excellent choice for busy weeknights or when you need an easy but impressive side.
- Preparation Time: 10 minutes
- This includes rinsing the rice (essential!), mincing the garlic, measuring ingredients, and chopping parsley (if using).
- Cooking Time: 35 – 40 minutes
- Sautéing garlic/toasting rice: ~3-5 minutes
- Bringing liquid to a boil: ~3-5 minutes
- Simmering time (covered): ~15-20 minutes
- Resting time (covered, off heat): ~10 minutes (Do not skip this!)
- Total Time: Approximately 45 – 50 minutes from start to finish.
Note: If using brown rice, the simmering time will increase significantly (typically 40-50 minutes), plus the resting time, making the total time closer to 65-75 minutes.
How to Serve Your Delicious Garlic Butter Rice
Garlic Butter Rice is incredibly versatile and pairs beautifully with a wide range of main courses. Its savory, comforting flavor profile makes it a welcome addition to almost any plate. Here are some serving suggestions:
- Perfect Side Dish For:
- Chicken: Grilled chicken breast, roasted chicken, pan-seared chicken thighs, lemon herb chicken, chicken piccata. The rice soaks up any pan sauces beautifully.
- Fish: Baked salmon, pan-seared cod or halibut, shrimp scampi (double the garlic!), grilled shrimp skewers.
- Beef: Steak (especially grilled or pan-seared like sirloin or flank steak), beef kebabs, meatballs in sauce.
- Pork: Pan-seared pork chops, roasted pork tenderloin.
- Vegetarian Mains: Roasted vegetables (broccoli, asparagus, bell peppers, zucchini), black bean burgers, lentil loaf, or alongside a hearty salad.
- Base for Bowls:
- Use Garlic Butter Rice as the foundation for delicious rice bowls. Top with your favorite protein (shredded chicken, sautéed shrimp, baked tofu), roasted or steamed vegetables, and perhaps a drizzle of sauce (like teriyaki, yum yum sauce, or a lemon vinaigrette).
- Standalone Comfort:
- Honestly, sometimes a warm bowl of just Garlic Butter Rice is comfort food perfection on its own or with a simple fried egg on top.
- Stuffing Alternative:
- Can be used as a flavorful base for stuffing peppers or mushrooms.
- Elevating Simple Meals:
- Turns a basic rotisserie chicken and steamed veggie dinner into something more special.
- Garnishes for Extra Flair:
- Fresh Herbs: Chopped fresh parsley (classic), chives, or thinly sliced green onions add freshness and color.
- Cheese: A sprinkle of grated Parmesan cheese stirred in at the end or served on top adds a salty, umami kick.
- Spice: A pinch of red pepper flakes adds a gentle heat.
- Lemon: A squeeze of fresh lemon juice right before serving can brighten the flavors.
- Toasted Nuts/Seeds: Toasted slivered almonds or sesame seeds could add a nice textural contrast for certain pairings.
Serve the rice hot and freshly fluffed for the best texture and aroma.
5 Essential Tips for Masterful Garlic Butter Rice
Elevate your garlic butter rice from good to absolutely irresistible with these crucial tips:
- Rinse That Rice Relentlessly: Don’t underestimate the power of rinsing! Washing away the excess surface starch from the rice grains under cold water until it runs mostly clear is the single most important step for achieving fluffy, individual grains instead of a sticky, clumpy mess. Drain it well before adding it to the pot.
- Gentle Garlic, Maximum Flavor: Sauté the minced garlic in the butter over medium-low heat just until fragrant (30-60 seconds). Burnt garlic tastes acrid and bitter, and it can easily overpower the dish. If your heat is too high or you walk away, you risk ruining the foundational flavor. Softening it gently infuses the butter without any harshness.
- Don’t Skip the Rest! The 10-minute resting period after the rice has finished simmering and before you lift the lid is non-negotiable for perfect texture. It allows the steam trapped inside the pot to redistribute evenly, finish cooking the grains gently, and lets the rice absorb any remaining moisture without becoming mushy. Lifting the lid too soon releases steam and disrupts this crucial process.
- Broth is Better (But Water Works): Using low-sodium chicken or vegetable broth instead of plain water significantly enhances the savory depth of flavor in the final dish. It adds a background richness that complements the garlic and butter beautifully. If using water, you might need to be slightly more generous with salt or consider adding other flavor boosters (like a touch of onion powder or a bay leaf during simmering).
- Fluff, Don’t Stir: Once the rice has rested, use a fork – not a spoon – to gently fluff the grains. Run the tines of the fork through the rice, lifting and separating the grains from the bottom up. Stirring with a spoon, especially vigorously, can mash the tender grains and make the rice gummy. Gentle fluffing keeps it light and airy.
Bonus Tip: Toasting the rinsed rice in the garlic butter for a minute or two before adding the liquid adds a wonderful nutty dimension and further encourages separate grains. It’s an easy step that adds noticeable complexity!
Frequently Asked Questions (FAQ)
Here are answers to common questions about making Garlic Butter Rice:
- Q: Can I use brown rice instead of white rice?
- A: Yes, you can definitely use brown rice for a healthier, more fiber-rich version! However, brown rice requires significantly more liquid and a longer cooking time. You’ll typically need about 2 to 2.5 parts liquid for every 1 part brown rice, and the simmering time will increase to 40-50 minutes (followed by the 10-minute rest). Check the specific instructions on your brown rice package for the best liquid ratio and timing. The flavor profile will be nuttier and the texture chewier.
- Q: I don’t have fresh garlic. Can I substitute garlic powder?
- A: While fresh garlic provides the best, most authentic flavor and aroma, you can substitute garlic powder in a pinch. However, the flavor will be different – less bright and more one-dimensional. A general guideline is to use about ¼ to ½ teaspoon of garlic powder for every clove of fresh garlic called for (so, about 1 to 1.5 teaspoons for this recipe). Add the garlic powder along with the salt and pepper when you add the liquid, rather than trying to sauté it in the butter (as it burns very easily).
- Q: Can this recipe be made in an Instant Pot or pressure cooker?
- A: Yes, Garlic Butter Rice adapts well to the Instant Pot. Use the Sauté function to melt the butter and gently cook the fresh garlic. Turn off Sauté, add the rinsed rice, broth/water (typically use a 1:1 ratio of rice to liquid for white rice in the Instant Pot, but check your manual), salt, and pepper. Stir, lock the lid, set the vent to Sealing, and pressure cook on High for 3-5 minutes (depending on rice type and preference). Allow a 10-minute Natural Pressure Release before quick releasing any remaining pressure. Fluff with a fork and stir in parsley.
- Q: How do I store and reheat leftover Garlic Butter Rice?
- A: Cool leftover rice quickly and store it in an airtight container in the refrigerator for up to 3-4 days. Reheating rice requires care to avoid drying it out. The best way is often in the microwave: place the rice in a microwave-safe bowl, sprinkle a tablespoon or two of water or broth over it (this creates steam), cover loosely (or use a damp paper towel), and heat until warmed through, stirring halfway. Alternatively, you can reheat it gently in a skillet over low heat with a splash of water or broth, covered, stirring occasionally.
- Q: Can I add other vegetables or herbs to this rice?
- A: Absolutely! This recipe is a fantastic base for additions.
- Vegetables: Finely diced onions or shallots can be sautéed with the garlic. Frozen peas or corn can be stirred in during the last 5 minutes of simmering or simply stirred in while fluffing (the residual heat will cook them). Sautéed mushrooms are also a great addition.
- Herbs: Besides parsley, fresh chives, dill, cilantro (depending on the main dish), or even a pinch of dried herbs like thyme or oregano (added with the liquid) can work well.
- Other Flavors: A squeeze of lemon juice at the end brightens it up. A pinch of saffron threads (bloomed in the warm broth) creates a beautiful color and aroma. Stirring in some Parmesan cheese after fluffing adds savory richness.
- A: Absolutely! This recipe is a fantastic base for additions.
Garlic Butter Rice recipe
Ingredients
- Long-Grain White Rice: 1.5 cups (approx. 300g)
- Recommendation: Jasmine or Basmati rice work exceptionally well. Their slightly floral or nutty aromas complement the garlic and butter beautifully, and they cook up into fluffy, separate grains. Standard long-grain white rice is also perfectly suitable.
- Rinsing: It’s highly recommended to rinse the rice thoroughly before cooking to remove excess surface starch, which helps prevent clumping and results in fluffier individual grains.
- Butter: 3 tablespoons (approx. 42g)
- Recommendation: Unsalted butter is preferred, as it allows you to control the final saltiness of the dish, especially since you’ll likely be using broth and adding salt. If using salted butter, adjust the added salt accordingly. Use good quality butter for the best flavor.
- Garlic: 4-6 cloves, finely minced (about 1.5 – 2 tablespoons)
- Fresh is Best: Freshly minced garlic provides the most vibrant and authentic flavor. The potency can vary, so adjust the amount based on the size of your cloves and your personal preference for garlic intensity. Garlic paste can work in a pinch, but avoid garlic powder for this recipe if possible – the texture and flavor profile are different.
- Cooking Liquid: 2.75 to 3 cups (approx. 650 – 710 ml)
- Broth: Chicken broth (low-sodium recommended) adds a wonderful depth of savory flavor and is the preferred choice.
- Vegetable Broth: An excellent vegetarian alternative that still provides more flavor than water.
- Water: If you don’t have broth, water will work, but the final dish will be less savory. You might want to slightly increase the salt or consider adding a bouillon cube (adjust salt carefully if using bouillon).
- Note: The exact liquid amount can vary slightly depending on the specific type of rice and your cooking method (stovetop vs. rice cooker). A general ratio for long-grain white rice on the stovetop is often 1 part rice to 1.75 – 2 parts liquid.
- Salt: ½ to ¾ teaspoon (adjust to taste)
- Start with less, especially if using salted butter or regular (not low-sodium) broth. You can always add more salt at the end after tasting. Kosher salt or sea salt is recommended for better flavor distribution.
- Black Pepper: ¼ teaspoon, freshly ground (optional, but recommended)
- Freshly ground black pepper adds a subtle warmth.
- Fresh Parsley: 1-2 tablespoons, finely chopped (optional, for garnish and freshness)
- Adds a pop of color and a touch of freshness to cut through the richness. Chives or thinly sliced green onions can also be used.
Instructions
- Rinse the Rice: Place the rice in a fine-mesh sieve. Rinse it under cold running water, swishing the rice gently with your hand, until the water runs mostly clear. This removes excess surface starch and helps ensure fluffy, separate grains. Drain the rice thoroughly.
- Sauté the Garlic: Select a medium saucepan or pot with a tight-fitting lid. Melt the butter over medium-low heat. Be careful not to let the butter brown too quickly. Once melted and shimmering, add the minced garlic. Sauté the garlic, stirring constantly, for about 30-60 seconds until it becomes fragrant. Crucial: Do not let the garlic brown or burn, as it will become bitter and ruin the flavor. You just want to soften it and release its aroma into the butter.
- Toast the Rice (Optional but Recommended): Add the rinsed and drained rice to the saucepan with the garlic butter. Stir gently to coat the rice grains evenly with the butter and garlic mixture. Toast the rice over medium-low heat for 1-2 minutes, stirring occasionally. You might notice the edges of the grains becoming slightly translucent. This step adds a subtle nutty flavor and further helps keep the grains separate.
- Add Liquid and Seasoning: Carefully pour the broth (or water) into the saucepan. Add the salt and freshly ground black pepper (if using). Stir everything together once to combine.
- Bring to a Boil, Then Simmer: Increase the heat to medium-high and bring the liquid to a rolling boil. As soon as it boils, give it one last quick stir, then immediately reduce the heat to the lowest possible setting that still maintains a very gentle simmer.
- Cover and Cook: Place the tight-fitting lid on the saucepan. Let the rice simmer undisturbed (do not lift the lid!) for 15-20 minutes. The exact time depends on your stove and rice type. Most of the liquid should be absorbed. If you have a glass lid, you can peek to see if most liquid is gone, but avoid lifting it if possible as escaping steam disrupts the cooking process.
- Rest Off the Heat (Essential Step): Once the simmering time is up (or you see tiny steam vents on the surface and most liquid is gone), turn off the heat completely. Move the saucepan off the hot burner. Let the rice stand, covered and undisturbed, for another 10 minutes. This crucial resting period allows the residual steam to finish cooking the rice evenly and helps the grains firm up, resulting in a perfectly fluffy texture.
- Fluff and Serve: Remove the lid. Use a fork (not a spoon, which can mash the grains) to gently fluff the rice, separating the grains. Stir in the optional chopped fresh parsley for color and freshness.
- Taste and Adjust: Taste the rice and add more salt if needed. Serve immediately.
Rice Cooker Method:
- Rinse Rice: Rinse the rice thoroughly as described in Step 1 above. Drain well.
- Sauté Garlic (Optional but Recommended): If your rice cooker has a sauté or “keep warm” function that gets hot enough, you can melt the butter and sauté the garlic directly in the cooker pot first (Step 2). If not, you can do this step in a small skillet on the stovetop and then add the garlic butter mixture to the rice cooker pot. Alternatively, for maximum simplicity (though slightly less depth of flavor), you can skip sautéing and add the minced garlic and butter directly with the other ingredients.
- Combine Ingredients: Place the rinsed rice, sautéed garlic butter (or raw minced garlic and butter), broth (or water), salt, and pepper into the rice cooker pot. Use the liquid measurement lines on your rice cooker bowl appropriate for the amount of rice, or use the recommended liquid amount (adjusting slightly if needed based on your cooker’s manual – typically a 1:1.5 or 1:1.75 ratio works for white rice). Stir once to combine.
- Cook: Close the lid and select the standard “White Rice” or “Cook” setting on your rice cooker. Let it run through its cycle.
- Rest: Once the rice cooker switches to the “Keep Warm” setting, let the rice rest, undisturbed, for at least 10 minutes before opening the lid.
- Fluff and Serve: Open the lid, fluff the rice gently with a fork, stir in the optional fresh parsley, taste and adjust salt if needed, and serve.
Nutrition
- Serving Size: one normal portion
- Calories: 280 – 380


