

Introduction
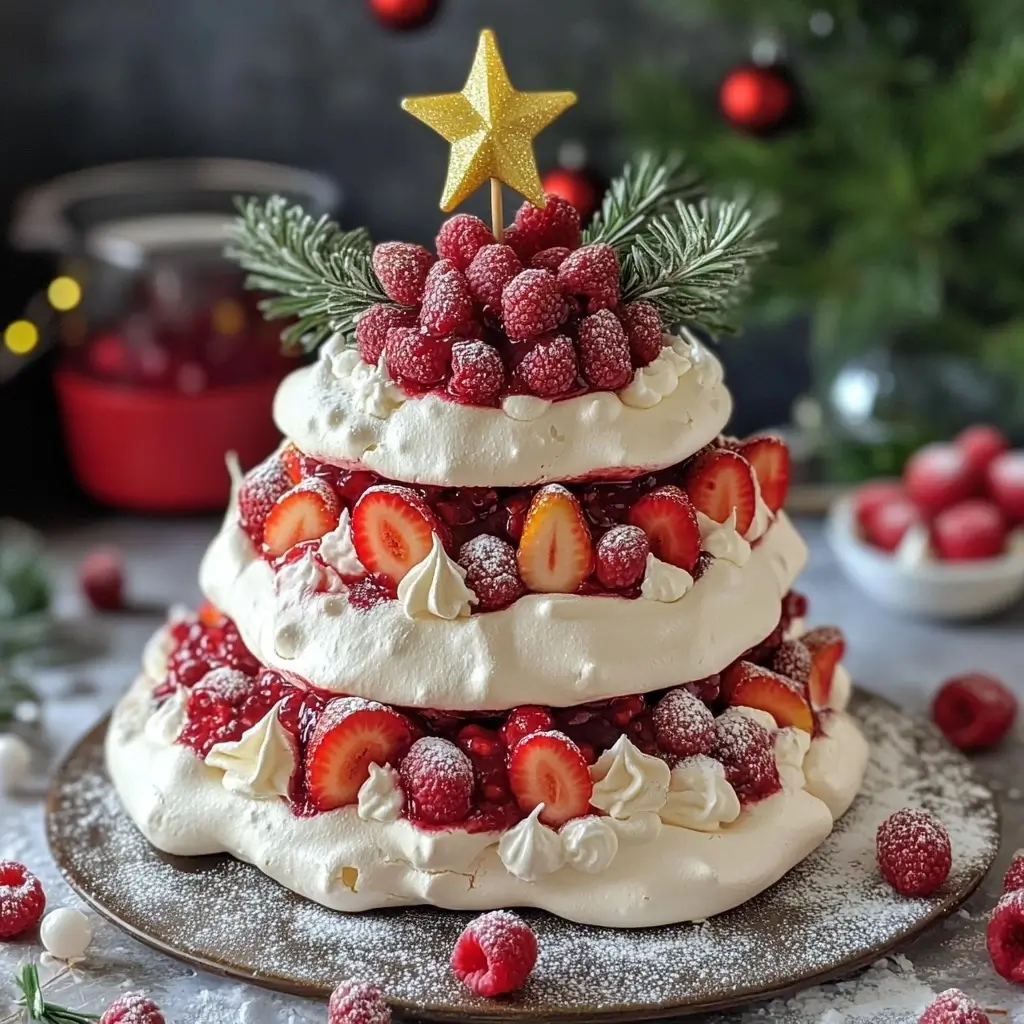
As the holiday season approaches, the quest for show-stopping desserts becomes a delightful necessity. Enter the Festive Pavlova Christmas Tree—a stunning, edible masterpiece that promises to wow your guests and satisfy your sweet tooth. This elegant dessert combines the light, airy texture of a classic pavlova with the vibrant flavors of fresh fruits and cream. Perfect for festive gatherings, this pavlova tree is not only delicious but also a feast for the eyes. Let’s embark on a journey to create this beautiful holiday treat.
Ingredients
Creating a Festive Pavlova Christmas Tree requires a few essential ingredients, each playing a crucial role in its texture and flavor. Here’s what you’ll need:
Pavlova
- 5-6 large egg whites (at room temperature)
- 1 1/4 cups superfine sugar
- 2 1/2 tsp cornstarch
- 1 1/4 tsp white vinegar
Raspberry Coulis
- 250g (8oz) frozen or fresh raspberries
- 2 tbsp superfine sugar
Whipped Cream
- 2 cups heavy cream
- 2 tsp vanilla extract
- 1 tbsp superfine sugar
To Build
- Bamboo skewer 11” or 2 smaller ones
- 10 medium strawberries, sliced
- 12 strawberries, diced
- Decorations: Edible star, raspberries, small rosemary sprigs, powdered sugar for dusting
With these ingredients in hand, you’re ready to create a dessert that not only tastes amazing but also serves as a decorative centerpiece for your holiday table.
Instructions
Crafting this dessert requires a few steps, each designed to build upon the last to create a beautiful and delicious pavlova tree. Follow these detailed instructions to achieve the best results.
Prepare the Meringue
- Preheat Oven: Set your oven to 300°F (150°C) to ensure it’s ready for the meringue.
- Draw Circles: On a piece of parchment paper, trace circles of varying sizes using a bowl or glass. These will guide you in shaping the meringue layers. Flip the paper over to avoid direct contact with the food.
- Make Meringue: Using a stand mixer, beat the egg whites on medium-high speed until soft peaks form, which should take about 1.5 minutes. Gradually add in the sugar, continuing to beat for about 90 seconds, then for an additional 6 minutes until the mixture is glossy. Gently fold in the cornstarch and vinegar, ensuring a smooth consistency.
Bake the Meringue
- Pipe Rounds: Transfer the meringue mixture into a piping bag. Carefully pipe the meringue onto the traced circles, making them thick (approximately 2 cm or 0.8 inches) and adding decorative edges to the larger rounds for visual appeal.
- Bake: Place the meringue layers on the middle and lower racks of the oven. Lower the temperature to 250°F (120°C) and bake for 1 hour. After baking, turn off the oven and let the meringue cool completely inside for at least 3 hours, or overnight for best results.
Make Raspberry Coulis
- Cook Coulis: In a saucepan, simmer the raspberries and sugar over medium heat for about 5 minutes until the mixture is soft and syrupy. Blend until smooth and let it cool before using.
Prepare Whipped Cream
- Whip Cream: Beat the heavy cream, vanilla extract, and sugar together until stiff peaks form, about 5 minutes. Store in the refrigerator until you’re ready to assemble the pavlova tree.
Assemble the Tree
- Layering: Begin with the largest meringue layer on a serving platter. Spread a generous layer of whipped cream over it. Place strawberry slices as pillars to support the next layer. Continue stacking the meringue layers from largest to smallest, topping each with whipped cream, diced strawberries, and a drizzle of raspberry coulis. Finish with an edible star on top, additional raspberries, and small rosemary sprigs for a festive touch. Lightly dust with powdered sugar for a snowy effect.
Nutrition Facts
Understanding the nutritional content of your dessert can help you plan your holiday indulgence. Here’s a rough breakdown of what you can expect from the Festive Pavlova Christmas Tree:
- Calories: Approximately 300 per serving
- Total Fat: 15g
- Saturated Fat: 9g
- Cholesterol: 55mg
- Sodium: 25mg
- Total Carbohydrates: 39g
- Dietary Fiber: 2g
- Sugars: 37g
- Protein: 3g
These values are approximate and can vary based on the specific brands of ingredients used.
How to Serve
When it comes to serving your Festive Pavlova Christmas Tree, presentation is key. Not only does this dessert bring a stunning visual appeal to your holiday table, but it also tantalizes the taste buds with its delightful combination of textures and flavors. Here are some detailed tips to ensure your pavlova dessert steals the spotlight at your festive gathering:
Timing is Everything
One of the most critical aspects of serving your pavlova is timing. To maintain its signature crisp texture, it’s essential to assemble the pavlova tree just before serving. The delicate meringue is prone to softening when exposed to moisture from the cream and fruit. Ideally, you should plan to whip up the meringue and add the toppings no more than 30 minutes before you present it to your guests. This will ensure that each bite maintains that delightful crunch that contrasts beautifully with the creamy filling and juicy fruit.
If you must prepare components in advance, consider baking the meringue a day ahead and storing it in an airtight container at room temperature. Prepare your whipped cream and fruit toppings separately, then bring it all together just before serving.
Choose the Right Accompaniments
To elevate your dessert experience, consider pairing your pavlova with complementary beverages. A light dessert wine, such as a Moscato or a sweet Riesling, can enhance the sweetness of the pavlova without overwhelming it. These wines typically have fruity notes that echo the fresh toppings on your pavlova, creating a harmonious balance.
Alternatively, for a festive touch, you might opt for a signature cocktail. Consider mixing up a sparkling cocktail with ingredients like prosecco, elderflower liqueur, and a splash of fresh citrus juice. The effervescence and acidity will cut through the richness of the cream and balance the sweetness of the meringue, making each bite even more enjoyable.
Master the Art of Slicing
When it comes to slicing the pavlova, technique is key to ensuring that each serving looks as beautiful as it tastes. Use a sharp, serrated knife to gently cut through the layers of meringue, cream, and fruit. This type of knife minimizes pressure on the delicate meringue, preventing it from crumbling or breaking apart.
To achieve the best results, you might want to dip the knife in warm water before slicing. This technique helps to create cleaner cuts and can also help to melt through the cream slightly, making the slicing process smoother.
Aim for generous portions that include a good mix of the crispy meringue, the luscious whipped cream, and the vibrant fruits. A well-balanced slice will ensure that each guest enjoys the full experience of your festive creation.
Presentation Matters
Lastly, don’t underestimate the importance of presentation. A beautifully arranged pavlova can be a centerpiece in its own right. Consider placing your pavlova tree on a decorative cake stand or a festive platter to elevate its visual appeal. Garnish with additional seasonal fruits, edible flowers, or even a dusting of powdered sugar to add an extra touch of elegance.
If you’re serving a large group, consider providing a small serving spoon or spatula alongside the pavlova, allowing guests to serve themselves while keeping the presentation intact. This interactive element can enhance the experience, making the dessert feel even more special.
By focusing on timing, thoughtful pairings, precision in slicing, and a stunning presentation, your Festive Pavlova Christmas Tree will not only be a treat for the taste buds but a feast for the eyes as well. Enjoy the process of serving this impressive dessert and the joy it brings to your holiday celebrations!
Additional Tips
Creating the perfect pavlova tree is an art that requires precision, patience, and a touch of creativity. To ensure your dessert is not only visually stunning but also delicious, here are some comprehensive tips to guide you through the process:
1. Egg Whites: The Foundation of Your Meringue
Achieving the ideal texture for your meringue starts with the egg whites. Here are a few detailed considerations:
- Room Temperature: Allow your egg whites to come to room temperature before whipping. This step is crucial because warmer egg whites whip up more easily and reach a greater volume, leading to a lighter and airier meringue. To accelerate the process, you can separate the eggs while they are still cold and let the whites sit for about 30 minutes.
- Freshness Matters: Use the freshest eggs possible. Fresh egg whites contain more protein, which helps create a stable foam when whipped. If you have access to free-range or organic eggs, consider using them for an even better taste and texture.
2. Sugar: The Sweet Secret to a Smooth Meringue
The type of sugar you use can significantly affect the final texture of your pavlova:
- Superfine Sugar: For the best results, opt for superfine sugar. Its smaller crystals dissolve more easily in the egg whites, resulting in a smoother meringue without any graininess. If you can’t find superfine sugar at your local store, you can easily make your own by processing regular granulated sugar in a blender or food processor until it reaches a finer consistency. Be careful not to over-process it, or you may end up with powdered sugar.
- Gradual Addition: When incorporating the sugar into the whipped egg whites, add it gradually—about one tablespoon at a time—once the egg whites have reached soft peaks. This gradual process allows the sugar to dissolve fully and enhances the stability of the meringue.
3. Cream Stability: Whipping it Right
The cream you use to decorate your pavlova is just as important as the meringue itself. Here are some tips to ensure it stays perfectly whipped:
- Chill Everything: Before whipping your cream, chill your mixing bowl and beaters in the refrigerator for at least 15 minutes. A cold environment helps the cream whip up faster and maintain its structure longer. If possible, use a stainless-steel bowl as it retains the cold temperature better than glass or plastic.
- Stabilizers: For added stability, consider mixing in a stabilizer such as cornstarch or gelatin. For cornstarch, add about one tablespoon per cup of cream before whipping. If using gelatin, dissolve one teaspoon in two tablespoons of warm water, let it cool slightly, and then mix it into the cream once it starts to thicken.
4. Decorations: Unleashing Your Creativity
The finishing touches on your pavlova tree can elevate its appearance and taste. Here are some creative decoration ideas:
- Fruits and Berries: Fresh fruits like strawberries, kiwis, and blueberries add vibrant colors and refreshing flavors. Consider using seasonal fruits to enhance both the look and taste of your pavlova. Pomegranate seeds not only provide a pop of color but also a delightful crunch.
- Herbs: Fresh mint leaves or edible flowers can add a touch of elegance to your presentation. They create a beautiful contrast against the white meringue and add a subtle flavor that complements the sweetness.
- Edible Glitter and Sprinkles: For a whimsical touch, use edible glitter or sprinkles. They can add a magical effect to your pavlova tree, making it perfect for special occasions or festive celebrations.
- Drizzles and Sauces: Enhance your pavlova with a drizzle of chocolate sauce or a fruit coulis for added flavor and a beautiful finish. These sauces can also help tie together the flavors of your toppings.
Final Thoughts
Crafting a pavlova tree is not just about following a recipe—it’s about embracing the process and expressing your culinary creativity. With these additional tips, you’ll be well-equipped to create a stunning and delicious pavlova that will be the centerpiece of any dessert table. Enjoy the process, and don’t hesitate to experiment with flavors and designs to make your pavlova uniquely yours!
FAQs
Q: Can I make the meringue layers ahead of time?
A: Yes, the meringue layers can be made a day or two in advance. Store them in an airtight container at room temperature until ready to assemble.
Q: What if I don’t have superfine sugar?
A: You can make your own by processing granulated sugar in a food processor or blender until it reaches a finer consistency.
Q: Can I use other fruits besides raspberries and strawberries?
A: Absolutely! Feel free to experiment with other berries such as blueberries, blackberries, or kiwi slices for different flavors and colors.
Q: How do I prevent the meringue from cracking?
A: Ensure the meringue cools slowly in the oven to prevent cracking. Sudden temperature changes can cause the delicate structure to break.
Conclusion
The Festive Pavlova Christmas Tree is more than just a dessert; it’s a celebration of flavors and creativity that embodies the spirit of the holiday season. With its crisp meringue layers, luscious whipped cream, and vibrant fruits, it’s a dessert that captivates both the eyes and the palate. Whether you’re hosting a family gathering or attending a festive potluck, this pavlova tree is sure to impress. Gather your ingredients, follow the steps, and let this delightful creation be the crowning glory of your holiday table. Happy baking and happy holidays!


