

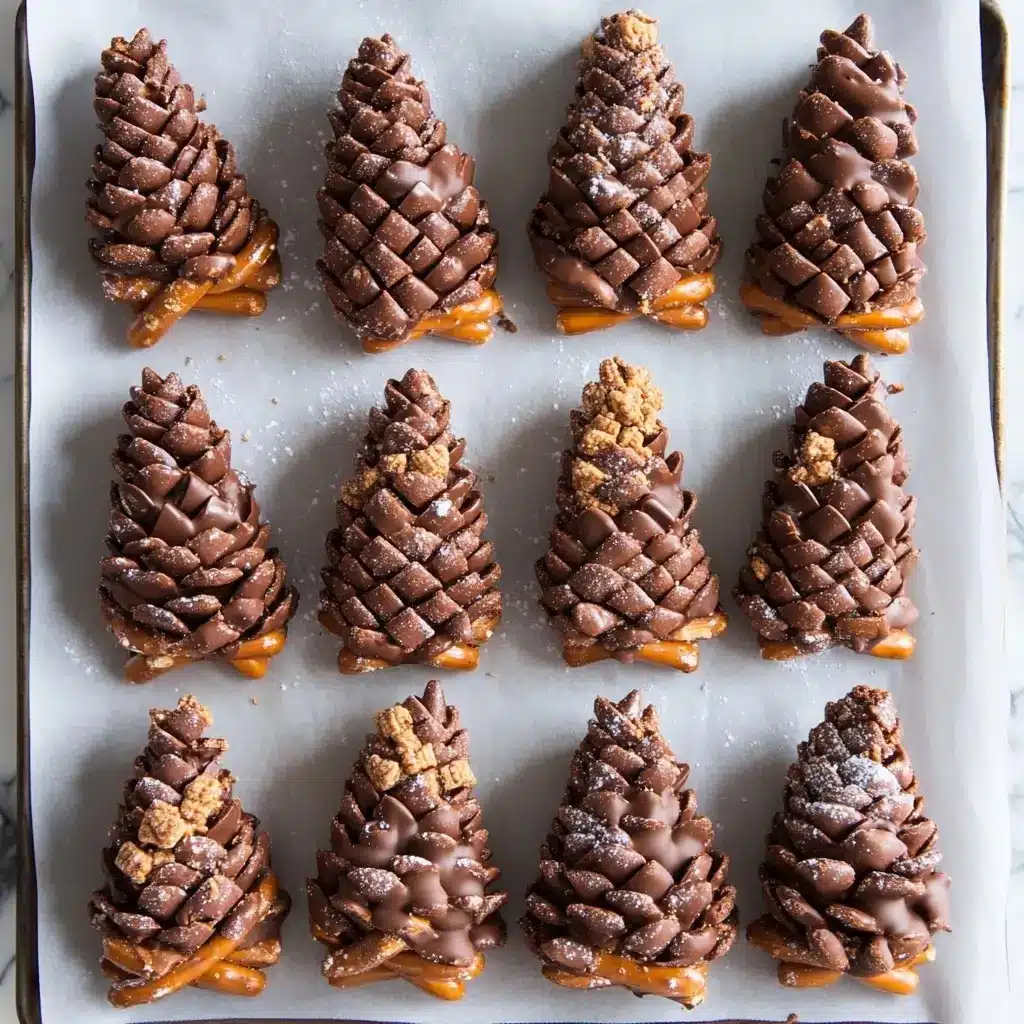
Welcome to the delightful world of Edible Chocolate Pinecones—an innovative and charming dessert perfect for the holiday season. Whether you’re hosting a festive party or simply want to add a dash of whimsy to your dessert table, these chocolate pinecones are sure to impress. In this article, we’ll explore the ingredients, step-by-step instructions, nutritional facts, serving suggestions, additional tips, and frequently asked questions about this unique treat. Get ready to embark on a culinary adventure that combines the rich flavors of chocolate, peanut butter, and Nutella in a fun and festive form.
Ingredients
To create these charming and delicious chocolate pinecones, you’ll need the following ingredients:
- 3 cups Chocolate Cinnamon Toast Crunch: This cereal forms the scales of the pinecone, adding both texture and flavor.
- 8 Honey Wheat Pretzel Twists: These serve as the sturdy core of your pinecones.
- 2/3 cup Peanut Butter: Provides a creamy and nutty base for the dough.
- 1/3 cup Nutella or Chocolate Spread: Adds a rich chocolatey flavor to the mix.
- 4 tablespoons Salted Butter, softened: Enhances the smoothness of the mixture.
- 1 teaspoon Pure Vanilla Extract: Infuses the dough with a warm, aromatic essence.
- 1 1/4 cup Powdered Sugar: Sweetens the dough and adds a dusting of “snow.”
Instructions
Creating these edible chocolate pinecones is a fun and straightforward process. Follow these steps for perfect results:
- Prepare the Baking Tray: Line a baking tray with parchment paper and set it aside for later use.
- Mix the Base Ingredients:
- In a medium-sized bowl, combine the peanut butter, Nutella, softened butter, and vanilla extract.
- Stir the ingredients together until the mixture is smooth and well-blended.
- Incorporate the Powdered Sugar:
- Gradually add the powdered sugar to the mixture, a little at a time.
- Ensure each addition is thoroughly mixed before adding more.
- Continue until all the powdered sugar is incorporated and the mixture reaches a thick dough consistency.
- Divide the Dough:
- Split the chocolate peanut butter dough into 8 equal parts.
- Shape the Pinecones:
- Take one portion of the dough and mold it completely around one pretzel twist, forming a cone shape with the pointy end at the top.
- Ensure the pretzel is entirely covered by the dough.
- Place the shaped pinecone on the prepared baking tray.
- Attach the Cereal Squares:
- Starting at the bottom of the cone and working your way up in a spiral, press one cereal square at a time into the dough at a slight upward angle.
- Continue until you reach the top of the cone.
- Finish the Top:
- Carefully slice a cereal square in half diagonally using a serrated knife.
- Attach these halves at the top of the pinecone to create the top middle pieces.
- Add the Final Touch:
- Dust each pinecone with extra powdered sugar to give the appearance of snow.
- Storage:
- Store the finished pinecones in an airtight container for up to 3 days.
Nutrition Facts
Understanding the nutritional content of your delightful creations is important for health-conscious eaters. While these values may vary slightly depending on the specific brands of ingredients used, here’s an approximate breakdown for each serving:
- Calories: Approximately 350
- Total Fat: 18g
- Saturated Fat: 7g
- Cholesterol: 15mg
- Sodium: 220mg
- Total Carbohydrates: 40g
- Dietary Fiber: 3g
- Sugars: 24g
- Protein: 5g
Note: These values are estimates and should be used as a general guide.
How to Serve
Edible chocolate pinecones are not only a delicious treat but also a visually appealing dessert that can enhance various occasions. Their versatility allows them to be served in multiple ways, making them a perfect addition to any gathering. Below are some comprehensive ideas on how to serve these delightful confections to maximize their impact.
As a Centerpiece
One of the most striking ways to serve edible chocolate pinecones is by using them as a centerpiece. This approach allows you to highlight their unique shape and texture, creating an inviting focal point for your dining table. Here’s how to do it:
- Choose the Right Platter: Select a decorative plate or platter that complements the overall theme of your gathering. For a rustic feel, consider using a wooden or slate board. For a more elegant touch, opt for a glass or metallic tray.
- Arrangement Techniques: Arrange the pinecones artistically, perhaps by clustering several together or creating a spiral pattern. You can also incorporate complementary elements, such as evergreen sprigs, cinnamon sticks, or even small ornaments to enhance the festive aesthetic.
- Lighting: If the occasion calls for it, consider placing the centerpiece on a table with soft lighting, such as candles or string lights, to create a warm and inviting atmosphere. The glow will make the chocolate pinecones shimmer and further entice your guests.
With a Cup of Hot Cocoa
Pairing chocolate pinecones with a warm cup of hot cocoa transforms an ordinary snack into a cozy experience. This combination is particularly delightful during colder months and can be enjoyed by guests of all ages. Here’s how to create the perfect pairing:
- Choose Your Cocoa: Make a rich, creamy hot cocoa using high-quality chocolate or cocoa powder. For an extra touch, consider adding flavors such as peppermint, vanilla, or a hint of cinnamon.
- Presentation: Serve the hot cocoa in festive mugs, perhaps adorned with whipped cream, marshmallows, or drizzles of chocolate syrup. Place a chocolate pinecone on a small plate or directly on the rim of the mug for a charming presentation.
- Create a Cocoa Bar: If you’re hosting a gathering, set up a hot cocoa bar where guests can customize their drinks with various toppings, such as crushed candy canes, sprinkles, or flavored syrups. Offer the chocolate pinecones as a delectable side treat to complement their creations.
On a Dessert Buffet
Including chocolate pinecones as part of a larger dessert buffet is an excellent way to showcase their uniqueness while providing guests with a variety of sweet options. Here’s how to incorporate them effectively:
- Diverse Dessert Selection: Curate a selection of desserts that complement the chocolate pinecones, such as cupcakes, cookies, brownies, and fruit tarts. This variety will cater to different tastes and preferences.
- Eye-Catching Display: Arrange the desserts on different levels using cake stands or tiered trays to create visual interest. Position the chocolate pinecones strategically among the other sweets to draw attention and encourage guests to sample them.
- Labeling: Consider labeling each dessert to help guests navigate the buffet. A small card next to the chocolate pinecones can describe their ingredients or flavor profile, enticing guests to try something new.
As Edible Gifts
Chocolate pinecones make charming homemade gifts that are perfect for the holiday season, birthdays, or any special occasion. They are not only delicious but also thoughtful, showcasing your effort and creativity. Here’s how to prepare them as gifts:
- Packaging: Use clear cellophane bags to wrap each chocolate pinecone individually, allowing the beautiful design to shine through. You can also opt for decorative boxes or tins for a more festive presentation.
- Finishing Touches: Tie the bags with a festive ribbon or twine, and consider adding a small gift tag with a personalized message. This adds a touch of warmth and makes the gift feel extra special.
- Batch Gifting: Create gift sets by grouping several chocolate pinecones together in a larger box or basket. You can include other homemade treats, such as cookies or fudge, for a delightful assortment that will impress anyone who receives it.
By incorporating these serving ideas, edible chocolate pinecones can become not only a treat to savor but also a beautiful addition to any gathering. Whether as a centerpiece, paired with hot cocoa, part of a dessert buffet, or as thoughtful gifts, these delightful confections are sure to delight and impress your guests.
Additional Tips
Creating edible chocolate pinecones is not just a fun activity; it’s an opportunity to impress with your culinary skills. To ensure your creations turn out perfectly, consider the following comprehensive tips that will enhance both the process and the final product:
1. Choose the Right Cereal
The choice of cereal is pivotal in achieving the desired texture and flavor profile of your chocolate pinecones. While Chocolate Cinnamon Toast Crunch is highly recommended for its delightful blend of chocolate and cinnamon flavors, you might also consider other options. For a crunchier texture, cereals like Rice Krispies or Cornflakes can work well, although they’ll alter the flavor. If you’re looking for a more robust chocolate experience, opting for cocoa-flavored cereals can enhance the chocolatey goodness of your pinecones. Remember, the cereal acts as the “scales” of the pinecone, so choose one that not only tastes good but also complements the other ingredients.
2. Use Room Temperature Ingredients
Before you start mixing, ensure that your peanut butter, Nutella, and butter are at room temperature. This simple step can make a significant difference in the consistency of your mixture. When ingredients are warm, they blend together more smoothly, resulting in a creamy, homogenous mixture that’s easier to mold. Cold ingredients can lead to clumping and make it more challenging to shape the pinecones. If you forgot to take them out in advance, you can quickly soften them by placing them in a microwave for a few seconds—just be cautious not to melt them completely.
3. Be Patient with Shaping
Shaping your chocolate pinecones is where the fun meets artistry. Take your time during this step. Carefully press the mixture into pinecone shapes, ensuring that you create the characteristic bumps and scales that mimic a real pinecone. Use your fingers to sculpt the mixture, and don’t rush the process. The more attention you give to each pinecone, the more realistic and visually appealing they will be. If you find the mixture sticking to your fingers, lightly wet your hands with water or oil to prevent sticking. Consider using a small ice cream scoop or a melon baller to create uniform shapes, which can enhance the overall presentation.
4. Experiment with Flavors
One of the most exciting aspects of making edible chocolate pinecones is the chance to personalize them. While the classic combination of peanut butter and Nutella is a favorite, don’t hesitate to experiment with other nut butters like almond, cashew, or even sunflower seed butter for a nut-free alternative. Each nut butter brings its unique flavor and texture, allowing you to customize the pinecones to your taste. Similarly, try using flavored chocolate spreads, such as hazelnut or cookie butter, to add a different dimension of flavor. Additionally, consider incorporating spices like cinnamon or vanilla extract into the mixture for a warm, inviting aroma that will enhance the overall taste.
5. Enhance with Toppings and Decorations
To elevate your chocolate pinecones further, consider adding toppings or decorations. A drizzle of melted white chocolate over the finished pinecones can create a beautiful contrast and mimic snow-covered pinecones. You can also sprinkle edible glitter or crushed nuts on top for added texture and visual appeal. For an extra touch of elegance, consider using edible gold or silver leaf, which will make your pinecones stand out at any gathering. If you’re making these treats for a specific occasion, such as a holiday or birthday, tailor the decorations to fit the theme—using colored sprinkles or themed candies can add a festive flair.
6. Proper Storage
Once you’ve crafted your edible chocolate pinecones, it’s essential to store them correctly to maintain their freshness and quality. Place them in an airtight container at room temperature if you plan to consume them within a few days. For longer storage, consider refrigerating them, which can help preserve their texture and taste but may make them a bit firmer. If you choose to freeze them, ensure they are well-wrapped to prevent freezer burn. Just remember to allow them to come back to room temperature before serving for the best taste and texture.
By following these additional tips, you’ll not only enhance the process of making edible chocolate pinecones but also ensure that your treats are as delicious and visually stunning as possible. Enjoy the creative journey and delight in sharing your tasty creations with family and friends!
FAQs
1. Can I use a different cereal for the pinecone scales?
Yes, you can experiment with different cereals, but keep in mind that the texture and flavor may vary. Chocolate Cinnamon Toast Crunch works exceptionally well due to its shape and taste.
2. Can I make these pinecones ahead of time?
Absolutely! These pinecones can be made up to three days in advance. Store them in an airtight container to maintain freshness.
3. What if I don’t have Nutella?
If you don’t have Nutella on hand, any chocolate spread can be used as a substitute. Alternatively, you can increase the amount of peanut butter and add a tablespoon of cocoa powder for a similar effect.
4. Are there any nut-free alternatives for this recipe?
For a nut-free version, consider using sunflower seed butter or cookie butter instead of peanut butter and Nutella.
Conclusion
Creating Edible Chocolate Pinecones is a delightful way to celebrate the holiday season with creativity and flavor. With a bit of patience and attention to detail, you can craft these charming desserts that are sure to impress both visually and taste-wise. Whether you’re sharing them with family, friends, or gifting them as a homemade treat, these chocolate pinecones are a testament to the joy of baking and the magic of the holidays. So roll up your sleeves, gather your ingredients, and let your culinary creativity shine with this unique and festive dessert!


