


The first time I pulled a batch of these Easy Baked Apple Fritters from the oven, the aroma alone was enough to bring my entire family running to the kitchen. Forget the greasy mess and lingering smell of deep-frying; these golden, apple-studded beauties offered all the cozy comfort of a classic fritter with a fraction of the fuss and fat. My kids, usually picky about “healthy” versions of treats, devoured them plain, still warm from the baking sheet. My partner, a notorious sweet tooth, declared them “dangerously good,” especially with a light dusting of powdered sugar. They’ve since become a fall staple in our house, perfect for lazy weekend breakfasts, after-school snacks, or even a simple dessert. The beauty lies in their simplicity – straightforward ingredients, minimal hands-on time, and that incredible payoff of tender, spiced apple chunks baked into a soft, cakey dough. It’s a recipe that feels like a warm hug, delivering pure, unadulterated comfort food joy without the guilt trip.
Why You’ll Absolutely Adore This Easy Baked Apple Fritter Recipe
Beyond the personal anecdote, there are compelling reasons why this specific recipe for baked apple fritters stands out and why it’s likely to become a favorite in your household too. It’s not just about avoiding the fryer; it’s about creating a genuinely delicious, accessible, and satisfying treat.
- Healthier Indulgence: This is perhaps the most significant draw. By baking instead of deep-frying, you drastically reduce the amount of oil absorbed by the fritters. This translates to significantly fewer calories and less saturated fat compared to their traditional counterparts. You can enjoy the delightful flavors and textures of apple fritters more often and with less guilt. It’s a smart swap that doesn’t compromise heavily on taste.
- Incredibly Easy to Make: The title doesn’t lie! This recipe is designed for simplicity. The batter comes together quickly in one bowl, requiring minimal mixing. There’s no complicated technique, no need to monitor hot oil temperatures, and no tricky dough handling. It’s perfect for beginner bakers or when you need a quick and impressive treat without much effort.
- Minimal Mess, Maximum Flavor: Say goodbye to oil splatters, greasy countertops, and the lingering smell of fried food. Baking contains the process neatly within your oven. Cleanup involves little more than washing a bowl, a whisk, and the baking sheet (especially if you use parchment paper!). Despite the easier cleanup, the flavor is robust, packed with warm spices and sweet, tender apple pieces.
- Family-Friendly Appeal: These fritters are universally loved. The soft texture is easy for kids to eat, and the familiar flavors of apple and cinnamon are comforting and appealing to all ages. They make a fantastic addition to breakfast or brunch spreads, a welcome after-school snack, or a simple, satisfying dessert.
- Customizable: While delicious as written, this recipe serves as a fantastic base. You can easily adjust the spices, add different mix-ins like chopped nuts or dried cranberries, or experiment with various glazes and toppings. It’s adaptable to your preferences and what you have on hand.
- Perfect Use for Apples: Got an abundance of apples from apple picking or just a few lingering in the fruit bowl? This recipe is an excellent way to use them up deliciously. It works well with various apple types, allowing flexibility.
In essence, this recipe delivers the cozy, comforting essence of apple fritters in a more manageable, healthier, and equally delicious format. It’s convenience and comfort baked into one perfect little package.
The Magic of Baking vs. Frying Fritters: A Closer Look
Understanding the fundamental differences between baking and frying helps appreciate why this baked version is such a game-changer. While fried fritters have their own undeniable charm – that deeply crispy, slightly irregular crust – baking offers a distinct set of advantages.
Frying:
- Mechanism: Food is submerged in hot oil (typically 350-375°F or 175-190°C). The intense heat quickly cooks the exterior, creating a crispy crust while the steam generated cooks the interior.
- Texture: Results in a distinctly crispy, often slightly greasy (in a good way, some might argue!) exterior and a tender interior. The texture can be somewhat irregular due to the bubbling oil.
- Flavor: The hot oil contributes its own subtle flavor and enhances the richness of the fritter. Maillard reactions and caramelization happen rapidly on the surface.
- Challenges: Requires careful temperature management (too low = greasy, too high = burnt exterior, raw interior), involves handling large amounts of hot, potentially dangerous oil, creates significant mess (splatter), and imparts a considerable amount of fat and calories.
Baking:
- Mechanism: Food is cooked using dry, hot air circulating in an oven. Heat transfer is slower and more gradual than in hot oil.
- Texture: Results in a softer, more cake-like or scone-like texture. The exterior will brown and become slightly firm but typically won’t achieve the same deep crispiness as frying without specific techniques (like a very high initial heat or an air fryer finish). The interior remains soft and tender.
- Flavor: Flavors of the ingredients themselves (apples, spices, batter) are more prominent as they aren’t competing with the flavor of frying oil. Browning still occurs, developing flavor, but often more gently.
- Advantages: Significantly less oil is used (often only a brushing or none on the baking sheet), leading to lower fat and calories. Much safer, as there’s no hot oil to handle. Far less mess and easier cleanup. More consistent results are often easier to achieve for home bakers. Allows for batch cooking easily.
For these Easy Baked Apple Fritters, the goal isn’t to perfectly replicate a deep-fried texture. Instead, it’s to create a delicious baked good that evokes the essence of a fritter – the apple chunks, the warm spices, the sweet glaze – in a softer, lighter, easier-to-make format. It’s a different, yet equally delightful, experience.
Choosing the Best Apples for Your Baked Fritters
The type of apple you choose significantly impacts the final texture and flavor of your baked fritters. You’re generally looking for apples that hold their shape reasonably well when baked and offer a good balance of sweetness and tartness. Softer apples can turn mushy, while overly tart apples might require more sugar in the batter.
Here are some excellent choices:
- Honeycrisp: A crowd favorite for a reason. They are incredibly crisp and have a wonderful sweet-tart balance. They hold their shape well during baking, providing distinct apple pieces in the finished fritter.
- Granny Smith: If you prefer a more tart flavor profile to contrast with the sweetness of the batter and glaze, Granny Smiths are ideal. They are very firm and maintain their structure perfectly during baking, ensuring noticeable apple chunks.
- Fuji: A sweet and crisp apple that also holds up well to heat. It offers a milder flavor than Honeycrisp or Granny Smith but provides a pleasant sweetness and good texture.
- Gala: Similar to Fuji, Galas are mildly sweet and crisp. They soften a bit more than the firmer varieties but still work beautifully in baked goods, offering a tender apple bite.
- Braeburn: Known for their complex sweet-tart flavor and firm texture, Braeburn apples are excellent baking apples that won’t turn to mush.
- Jonagold / Jonathan: These offer a good tang and hold their shape well, making them suitable choices for baking applications like these fritters.
Apples to Use with Caution (or Avoid):
- Red Delicious: While classic lunchbox apples, they tend to have a mealy texture that breaks down too much during baking, leading to a mushy result. Their flavor is also quite mild.
- McIntosh: These are fantastic for applesauce because they break down easily. That same quality makes them less ideal for fritters where you want discernible apple pieces.
Pro Tip: Using a combination of apples can yield fantastic results! For example, mixing a firm, tart apple like Granny Smith with a sweeter, slightly softer apple like Gala can provide both distinct chunks and pockets of softer, melded apple flavor throughout the fritter.
No matter which apple you choose, ensure you peel, core, and dice them into relatively small, uniform pieces (about ¼ to ½ inch). This ensures they cook through evenly within the baking time and are distributed nicely throughout the batter.
Essential Ingredients for Baked Apple Fritters (Complete List with Amounts)
This recipe uses common pantry staples, making it convenient to whip up whenever the craving strikes. Here’s what you’ll need:
- All-Purpose Flour: 1 ½ cups (approx. 180g) – Provides the structure for the fritters.
- Granulated Sugar: ½ cup (approx. 100g) – Adds sweetness to the batter. You can slightly adjust based on the sweetness of your apples and your preference.
- Baking Powder: 2 teaspoons – The primary leavening agent, making the fritters light and slightly fluffy. Ensure it’s fresh for best results.
- Ground Cinnamon: 1 ½ teaspoons – The classic warm spice pairing for apples. Feel free to adjust to your taste.
- Ground Nutmeg: ½ teaspoon – Adds depth and warmth. Freshly grated nutmeg is even better if you have it.
- Salt: ½ teaspoon – Balances the sweetness and enhances the overall flavor.
- Milk: ½ cup (approx. 120ml) – Adds moisture and richness. Whole milk, low-fat, or even plant-based milk (like almond or soy) can work.
- Large Egg: 1 – Binds the ingredients together and adds richness and structure.
- Melted Butter: ¼ cup (approx. 57g), slightly cooled – Adds flavor, tenderness, and moisture. Unsalted butter is preferred so you can control the salt level.
- Vanilla Extract: 1 teaspoon – Enhances the sweetness and adds aromatic depth.
- Apples: 1 ½ cups, peeled, cored, and finely diced (about ¼-½ inch pieces) – This usually equates to 2 medium apples. (See previous section for best types).
For the Optional Glaze:
- Powdered Sugar: 1 cup (approx. 120g), sifted – Forms the base of the glaze. Sifting prevents lumps.
- Milk or Cream: 2-3 tablespoons – Used to thin the powdered sugar to a drizzling consistency. Start with 2 and add more as needed.
- Vanilla Extract: ½ teaspoon (optional) – Adds flavor to the glaze.
- Pinch of Salt: (Optional) – Balances the sweetness of the glaze.
Having all your ingredients measured and ready (mise en place) before you start mixing makes the process smooth and efficient.
Step-by-Step Instructions: Baking Perfect Apple Fritters
Follow these simple steps to create delicious baked apple fritters:
- Preheat and Prepare: Preheat your oven to 400°F (200°C). Line a large baking sheet (or two smaller ones) with parchment paper or lightly grease it. This prevents sticking and makes cleanup easier.
- Combine Dry Ingredients: In a large mixing bowl, whisk together the all-purpose flour, granulated sugar, baking powder, ground cinnamon, ground nutmeg, and salt. Whisking well ensures the leavening agent and spices are evenly distributed.
- Combine Wet Ingredients: In a separate medium bowl or large measuring cup, whisk together the milk, large egg, melted (and slightly cooled) butter, and vanilla extract until well combined.
- Combine Wet and Dry: Pour the wet ingredients into the bowl containing the dry ingredients. Stir gently with a spatula or wooden spoon just until combined. Be careful not to overmix; a few lumps are perfectly fine. Overmixing can develop the gluten too much, resulting in tough fritters.
- Fold in Apples: Gently fold the finely diced apples into the batter until they are evenly distributed. Again, avoid overmixing. The batter will be thick.
- Portion the Fritters: Using a standard ice cream scoop (about ¼ cup size) or two spoons, drop mounds of batter onto the prepared baking sheet(s). Space them about 2 inches apart as they will spread slightly. Aim for roughly 12 fritters. You can gently shape them slightly with the back of a spoon if desired, but a rustic, irregular shape is part of their charm.
- Bake: Place the baking sheet(s) in the preheated oven. Bake for 15-20 minutes, or until the edges are golden brown, the tops are set, and a toothpick inserted into the center of a fritter comes out clean (or with moist crumbs, but no wet batter). Baking time may vary slightly depending on your oven and the size of your fritters.
- Cool Slightly: Once baked, let the fritters cool on the baking sheet for 5-10 minutes. This allows them to firm up slightly. Then, transfer them carefully to a wire rack to cool further.
Crafting the Perfect Glaze (Optional but Recommended!)
While the fritters are delicious plain, a simple glaze takes them to the next level.
- Sift Sugar: Place the sifted powdered sugar in a small bowl.
- Add Liquid and Flavor: Add 2 tablespoons of milk (or cream) and the ½ teaspoon of vanilla extract (if using) and a pinch of salt (if using).
- Whisk Until Smooth: Whisk vigorously until the glaze is smooth and free of lumps.
- Adjust Consistency: If the glaze is too thick, add more milk or cream, ½ teaspoon at a time, until it reaches your desired drizzling consistency. If it accidentally becomes too thin, whisk in a little more powdered sugar.
- Glaze the Fritters: Once the fritters have cooled slightly (they should still be warm, but not hot, so the glaze sets slightly but doesn’t completely melt off), place the wire rack over a piece of parchment paper or foil (to catch drips). Drizzle the glaze over the fritters using a spoon or whisk. Alternatively, you can dip the tops of the fritters directly into the glaze.
- Let Set: Allow the glaze to set for at least 10-15 minutes before serving.
Nutritional Information (Approximate)
Calculating exact nutrition is tricky due to variations in ingredient brands, apple types, and fritter size. However, here’s an estimated breakdown:
- Servings: This recipe makes approximately 12 fritters.
- Calories Per Serving (1 fritter, without glaze): Approximately 150-180 calories.
- Calories Per Serving (1 fritter, with glaze): Approximately 200-240 calories.
Disclaimer: These values are estimates only. For precise nutritional information, please use an online calculator with your specific ingredients and measurements. Compared to traditional deep-fried fritters, which can easily exceed 350-400 calories each, these baked versions offer a significantly lighter option.
Preparation and Cooking Time
One of the best things about this recipe is how quickly it comes together:
- Preparation Time: 15-20 minutes (includes peeling/dicing apples and mixing batter)
- Cooking Time: 15-20 minutes
- Total Time: Approximately 30-40 minutes (plus cooling and glazing time)
This makes them feasible even on busy mornings or for a relatively quick dessert fix.
Creative Ways to Serve Your Baked Apple Fritters
These versatile fritters can be enjoyed in numerous ways. Here are some ideas:
- Simply Warm:
- Serve them fresh and warm from the oven, either plain or with glaze. This is arguably the best way to enjoy their soft texture and aromatic spices.
- Breakfast or Brunch Star:
- Pair with a cup of hot coffee, tea, or apple cider.
- Serve alongside scrambled eggs and bacon for a sweet and savory contrast.
- Include them as part of a larger brunch spread with fruit salad and yogurt.
- Delicious Dessert:
- Serve warm with a scoop of vanilla bean ice cream. The contrast between the warm fritter and cold ice cream is divine.
- Drizzle with warm caramel sauce or dulce de leche for extra decadence.
- Top with a dollop of fresh whipped cream and an extra sprinkle of cinnamon.
- Afternoon Snack:
- Enjoy with a glass of cold milk.
- Pack them (once cooled) in lunchboxes for a special treat.
- Flavor Enhancements:
- Dust generously with powdered sugar instead of a glaze for a simpler finish.
- Mix cinnamon and sugar together and sprinkle over the warm, unglazed fritters.
<h2>**Pro Tips for Baked Apple Fritter Success**</h2>
Elevate your baked fritter game with these five essential tips:
- Uniform Apple Size is Key: Dice your apples into small, consistent pieces (around ¼ to ½ inch). If the pieces are too large, they might not cook through fully, or they could create pockets that cause the fritter structure to weaken. Uniformity ensures even cooking and distribution.
- Don’t Overmix the Batter: This is crucial for a tender texture. Mix the wet and dry ingredients just until they come together. A few lumps are okay! Overmixing develops gluten, which leads to tough, chewy fritters instead of soft, cakey ones. Fold the apples in gently at the very end.
- Use Parchment Paper: While greasing the baking sheet works, parchment paper is superior for baked goods like these. It guarantees the fritters won’t stick, promotes more even browning on the bottom, and makes cleanup incredibly easy – just slide the paper off!
- Check for Doneness Correctly: Oven temperatures can vary. Rely on visual cues (golden brown edges, set tops) and the toothpick test. Insert a toothpick into the center of the thickest part of a fritter. It should come out clean or with a few moist crumbs attached. If it comes out with wet batter, they need more time.
- Cool Before Glazing (But Not Completely): Let the fritters cool on the baking sheet for a few minutes, then transfer them to a wire rack. Glaze them while they are still warm, but not piping hot. If they’re too hot, the glaze will become very thin and just run off. If they’re completely cold, the glaze won’t set as nicely. Warm fritters allow the glaze to melt slightly, adhere well, and form a lovely coating as it cools.
Troubleshooting Common Baked Fritter Issues
Even simple recipes can sometimes go awry. Here’s how to troubleshoot potential problems:
- Problem: Fritters are dense or tough.
- Cause: Most likely overmixing the batter. Developing too much gluten makes them chewy instead of tender.
- Solution: Mix just until combined. Treat it like muffin or pancake batter – lumps are okay! Ensure your baking powder is fresh; old baking powder won’t provide enough lift.
- Problem: Fritters are dry.
- Cause: Overbaking is the usual culprit. Measuring flour incorrectly (scooping directly from the bag compacts it, adding too much) can also contribute.
- Solution: Bake only until the toothpick test is passed. Start checking at the lower end of the suggested baking time. Spoon flour into your measuring cup and level it off, or use a kitchen scale for accuracy (1 cup AP flour ≈ 120-125g). Ensure you used the correct amount of liquid and fat.
- Problem: Apples are still hard or uncooked inside.
- Cause: Apple pieces were cut too large, or the oven temperature was too high (cooking the outside before the inside).
- Solution: Dice apples into smaller, ¼ to ½ inch pieces. Ensure your oven is accurately preheated (use an oven thermometer if unsure). If they brown too quickly, you might need to lower the oven temperature slightly next time.
- Problem: Fritters spread too much and are flat.
- Cause: Batter might be too thin (incorrect liquid measurement), too much leavening, or the oven wasn’t hot enough when they went in. Melted butter might have been too hot when added.
- Solution: Double-check liquid measurements. Ensure baking powder is measured accurately. Always fully preheat the oven. Let melted butter cool slightly before adding it to the wet ingredients. Chilling the portioned batter briefly on the baking sheet before baking can sometimes help prevent spreading.
- Problem: Fritters stuck to the pan.
- Cause: Baking sheet wasn’t adequately prepared.
- Solution: Always use parchment paper for best results, or grease the baking sheet thoroughly.
Storing and Reheating Your Baked Apple Fritters
While best enjoyed fresh and warm, leftovers can still be delicious!
- Storing: Once the fritters are completely cool (especially if glazed), store them in an airtight container at room temperature. They are best consumed within 1-2 days. Storing them in the refrigerator can sometimes dry them out more quickly, but if your kitchen is very warm or humid, it might be necessary (allow them to come to room temp or reheat before eating).
- Reheating: Microwaving can make them slightly soggy, so it’s not the ideal method. For best results:
- Oven: Place fritters on a baking sheet in a preheated oven at 350°F (175°C) for 5-8 minutes, or until warmed through. This helps revive some of the texture.
- Air Fryer: Reheat at 350°F (175°C) for 3-5 minutes. This method works exceptionally well for restoring a slight crispness to the exterior.
- Toaster Oven: Similar to a regular oven, use a moderate setting until warmed through.
Note that glazed fritters might lose some of their glaze appearance upon reheating, but they will still taste great.
Frequently Asked Questions (FAQ)
Here are answers to some common questions about this Easy Baked Apple Fritter recipe:
- Q: Can I make these gluten-free?
- A: Yes, you likely can substitute a good quality gluten-free all-purpose flour blend (one that includes xanthan gum) for the regular all-purpose flour. Baking times and texture might vary slightly, so keep an eye on them. Ensure all other ingredients (like baking powder) are certified gluten-free if needed.
- Q: Can I make these ahead of time?
- A: While they are best fresh, you can make them a day ahead. Store them in an airtight container at room temperature (once cooled) and reheat gently using the oven or air fryer method described above just before serving. Avoid glazing them until after reheating if making them far in advance, as the glaze can become sticky or weep.
- Q: Can I use different spices or add mix-ins?
- A: Absolutely! Feel free to adjust the spices – add a pinch of cloves or allspice, or use apple pie spice blend. You can also fold in ¼ to ½ cup of chopped pecans or walnuts, or a couple of tablespoons of raisins or dried cranberries along with the apples for added texture and flavor.
- Q: Why aren’t my baked fritters as crispy as fried ones?
- A: Baking uses dry heat, which results in a softer, more cake-like texture compared to the intense, rapid cooking and dehydration of the surface that occurs during deep-frying in hot oil. These baked fritters aim for a delicious, tender crumb with browned edges, not the deep crispiness of their fried cousins. It’s a trade-off for being healthier and easier to make.
- Q: Can I freeze baked apple fritters?
- A: Yes, you can freeze them. It’s best to freeze them unglazed. Let the baked fritters cool completely. Place them in a single layer on a baking sheet and freeze until solid (about 1-2 hours). Then, transfer them to a freezer-safe bag or airtight container. They can be frozen for up to 2-3 months. Thaw at room temperature or reheat directly from frozen in a 350°F (175°C) oven or air fryer until warmed through (this will take longer than reheating fresh ones). Glaze after reheating, if desired.
This Easy Baked Apple Fritter recipe is more than just a set of instructions; it’s an invitation to create warm, comforting moments in your kitchen with minimal fuss. It delivers the beloved flavors of fall – sweet apples, warming spices – in a lighter, accessible format that the whole family can enjoy. Whether for a special breakfast, a simple dessert, or a cozy snack, these fritters are sure to bring smiles and satisfy cravings. Give them a try, and experience the simple magic of baking up a batch of pure comfort. Enjoy your delicious, homemade baked apple fritters!
Print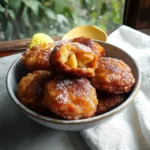
Easy Baked Apple Fritters recipe
Ingredients
- All-Purpose Flour: 1 ½ cups (approx. 180g) – Provides the structure for the fritters.
- Granulated Sugar: ½ cup (approx. 100g) – Adds sweetness to the batter. You can slightly adjust based on the sweetness of your apples and your preference.
- Baking Powder: 2 teaspoons – The primary leavening agent, making the fritters light and slightly fluffy. Ensure it’s fresh for best results.
- Ground Cinnamon: 1 ½ teaspoons – The classic warm spice pairing for apples. Feel free to adjust to your taste.
- Ground Nutmeg: ½ teaspoon – Adds depth and warmth. Freshly grated nutmeg is even better if you have it.
- Salt: ½ teaspoon – Balances the sweetness and enhances the overall flavor.
- Milk: ½ cup (approx. 120ml) – Adds moisture and richness. Whole milk, low-fat, or even plant-based milk (like almond or soy) can work.
- Large Egg: 1 – Binds the ingredients together and adds richness and structure.
- Melted Butter: ¼ cup (approx. 57g), slightly cooled – Adds flavor, tenderness, and moisture. Unsalted butter is preferred so you can control the salt level.
- Vanilla Extract: 1 teaspoon – Enhances the sweetness and adds aromatic depth.
- Apples: 1 ½ cups, peeled, cored, and finely diced (about ¼-½ inch pieces) – This usually equates to 2 medium apples. (See previous section for best types).
For the Optional Glaze:
- Powdered Sugar: 1 cup (approx. 120g), sifted – Forms the base of the glaze. Sifting prevents lumps.
- Milk or Cream: 2-3 tablespoons – Used to thin the powdered sugar to a drizzling consistency. Start with 2 and add more as needed.
- Vanilla Extract: ½ teaspoon (optional) – Adds flavor to the glaze.
- Pinch of Salt: (Optional) – Balances the sweetness of the glaze.
Instructions
- Preheat and Prepare: Preheat your oven to 400°F (200°C). Line a large baking sheet (or two smaller ones) with parchment paper or lightly grease it. This prevents sticking and makes cleanup easier.
- Combine Dry Ingredients: In a large mixing bowl, whisk together the all-purpose flour, granulated sugar, baking powder, ground cinnamon, ground nutmeg, and salt. Whisking well ensures the leavening agent and spices are evenly distributed.
- Combine Wet Ingredients: In a separate medium bowl or large measuring cup, whisk together the milk, large egg, melted (and slightly cooled) butter, and vanilla extract until well combined.
- Combine Wet and Dry: Pour the wet ingredients into the bowl containing the dry ingredients. Stir gently with a spatula or wooden spoon just until combined. Be careful not to overmix; a few lumps are perfectly fine. Overmixing can develop the gluten too much, resulting in tough fritters.
- Fold in Apples: Gently fold the finely diced apples into the batter until they are evenly distributed. Again, avoid overmixing. The batter will be thick.
- Portion the Fritters: Using a standard ice cream scoop (about ¼ cup size) or two spoons, drop mounds of batter onto the prepared baking sheet(s). Space them about 2 inches apart as they will spread slightly. Aim for roughly 12 fritters. You can gently shape them slightly with the back of a spoon if desired, but a rustic, irregular shape is part of their charm.
- Bake: Place the baking sheet(s) in the preheated oven. Bake for 15-20 minutes, or until the edges are golden brown, the tops are set, and a toothpick inserted into the center of a fritter comes out clean (or with moist crumbs, but no wet batter). Baking time may vary slightly depending on your oven and the size of your fritters.
- Cool Slightly: Once baked, let the fritters cool on the baking sheet for 5-10 minutes. This allows them to firm up slightly. Then, transfer them carefully to a wire rack to cool further.
Crafting the Perfect Glaze (Optional but Recommended!)
While the fritters are delicious plain, a simple glaze takes them to the next level.
- Sift Sugar: Place the sifted powdered sugar in a small bowl.
- Add Liquid and Flavor: Add 2 tablespoons of milk (or cream) and the ½ teaspoon of vanilla extract (if using) and a pinch of salt (if using).
- Whisk Until Smooth: Whisk vigorously until the glaze is smooth and free of lumps.
- Adjust Consistency: If the glaze is too thick, add more milk or cream, ½ teaspoon at a time, until it reaches your desired drizzling consistency. If it accidentally becomes too thin, whisk in a little more powdered sugar.
- Glaze the Fritters: Once the fritters have cooled slightly (they should still be warm, but not hot, so the glaze sets slightly but doesn’t completely melt off), place the wire rack over a piece of parchment paper or foil (to catch drips). Drizzle the glaze over the fritters using a spoon or whisk. Alternatively, you can dip the tops of the fritters directly into the glaze.
- Let Set: Allow the glaze to set for at least 10-15 minutes before serving.
Nutrition
- Serving Size: one normal portion
- Calories: 200-240 calories


