

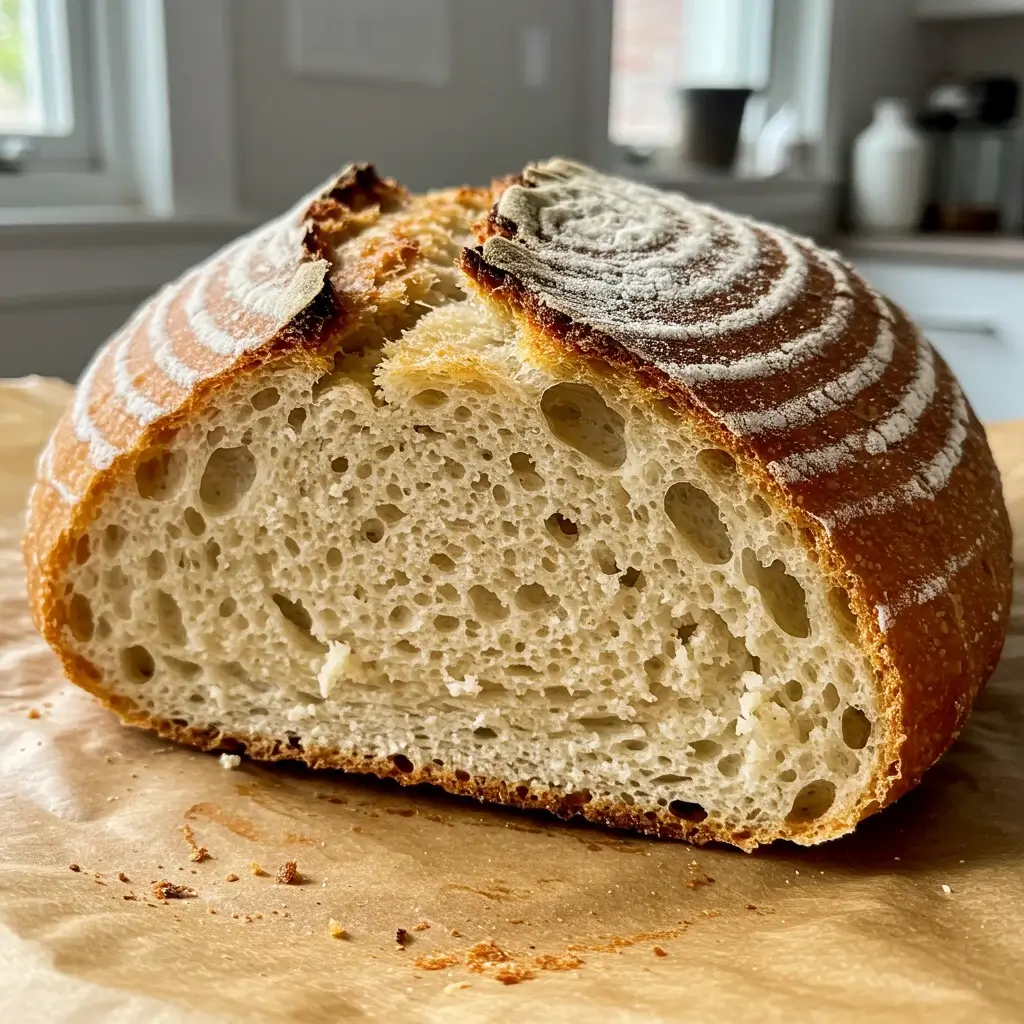
Artisan bread is a delightful treat that many believe requires intricate techniques and a multitude of ingredients. However, what if we told you that you could create a delicious, crusty loaf with just three simple ingredients? Welcome to the world of easy 3-ingredient artisan bread! This recipe will guide you through the process of making your own homemade bread with minimal effort, promising a warm, rustic loaf that rivals those of professional bakers.
Ingredients
To create this simple yet delectable bread, you will need the following ingredients:
- 3 cups all-purpose flour
- 1 ½ cups warm water
- 1 teaspoon salt
These three essential ingredients are all you need to produce a loaf with a perfect crust and soft, airy interior.
Instructions
Creating your own artisan bread at home is easier than you might think. Follow these straightforward steps to bake your perfect loaf:
- Mix the Dry Ingredients
- In a large bowl, combine the flour and salt. Stir them together to ensure the salt is evenly distributed throughout the flour.
- Add Water
- Slowly pour in the warm water, stirring continuously until a sticky dough forms. It may be helpful to use a wooden spoon or your hands to incorporate all the flour.
- Let the Dough Rest
- Cover the bowl with a cloth and let it sit at room temperature for 12-18 hours. This long resting period allows the dough to ferment and develop flavor, resulting in a rich, complex taste.
- Preheat the Oven
- Preheat your oven to 450°F (230°C). Place a Dutch oven inside to heat up as the oven preheats. This will ensure that the Dutch oven is hot enough to create steam, which is crucial for forming a crispy crust.
- Shape the Dough
- Once the dough has risen, gently shape it into a ball. It might be sticky, but try to handle it as little as possible to maintain the air pockets within. Place the dough ball onto a piece of parchment paper.
- Bake the Bread
- Carefully transfer the dough, along with the parchment paper, into the hot Dutch oven. Cover the Dutch oven with its lid and bake for 30 minutes.
- Finish Baking
- Remove the lid and bake for an additional 15 minutes. This step will give the bread its beautiful golden-brown crust.
- Cool and Serve
- Let the bread cool on a wire rack before slicing. This cooling period is crucial as it allows the interior to finish cooking and the flavors to meld.
Nutrition Facts
Here’s a breakdown of the nutritional content per slice, assuming the loaf is divided into 12 slices:
- Calories: 100
- Carbohydrates: 20g
- Protein: 3g
- Fat: 0.5g
- Fiber: 1g
- Sugars: 0g
This artisan bread is a relatively low-calorie option, making it a guilt-free addition to any meal.
How to Serve
Artisan bread is not just a staple; it’s a culinary delight that can elevate any meal with its rich flavors and varied textures. This bread is incredibly versatile and can be served in numerous ways, each providing a unique experience to complement its artisanal qualities. Here’s a comprehensive guide on how to serve artisan bread to maximize its potential.
1. With Butter or Olive Oil
One of the simplest yet most satisfying ways to enjoy artisan bread is to serve it warm with a pat of creamy butter or a drizzle of high-quality olive oil.
- Butter: Opt for a rich, salted butter to enhance the bread’s natural flavors. You can also experiment with compound butters, which are made by mixing softened butter with herbs, garlic, or spices. For an extra touch, consider browning the butter before serving to give it a nutty flavor.
- Olive Oil: Choose a robust extra virgin olive oil for dipping. The peppery notes of the oil can beautifully contrast the bread’s texture. Enhance the experience by adding a sprinkle of sea salt or freshly cracked black pepper, or infuse the oil with herbs such as rosemary or thyme for an aromatic twist.
2. As a Sandwich Base
Artisan bread makes an exceptional foundation for hearty sandwiches. Its crusty exterior and chewy interior provide both structure and flavor, making it ideal for various fillings.
- Classic Combinations: Try pairing whole grain or sourdough bread with roasted turkey, avocado, and a spread of aioli for a gourmet lunch. Alternatively, a rustic ciabatta can serve as a wonderful base for a classic Italian sub loaded with salami, provolone, and fresh arugula.
- Creative Sandwiches: Don’t shy away from innovative combinations! Use a sweet brioche for a pulled pork sandwich with tangy coleslaw or a multi-grain loaf for a vegetarian delight filled with hummus, roasted vegetables, and feta cheese.
3. With Soups and Stews
Artisan bread is perfect for pairing with soups and stews, acting as a perfect companion to soak up rich broths and sauces.
- Soaking Up Flavors: Consider serving a warm, crusty baguette with a bowl of hearty beef stew or a creamy tomato basil soup. The bread’s texture allows it to absorb the flavors while still maintaining its structure.
- Bread Bowls: For a fun twist, hollow out a round loaf of sourdough or round bread to create a bread bowl. Fill it with your favorite soup—like clam chowder or a spicy chili—and enjoy both the meal and the edible bowl when you’re done.
4. For Breakfast
Artisan bread can transform your breakfast routine into a gourmet experience, offering a canvas for a range of delicious toppings.
- Toasted Delights: Toast slices of artisan bread and top them with creamy avocado, a sprinkle of sea salt, and a drizzle of lemon juice for a nutritious start to your day. Alternatively, spread a layer of butter and a generous dollop of seasonal jam or honey for a sweet treat.
- Savory Options: For a heartier breakfast, try topping toasted slices with scrambled eggs, sautéed spinach, and crumbled feta or goat cheese. You can also prepare an egg-in-a-hole by cutting a hole in the center of the bread and cracking an egg into it while cooking, creating a delightful breakfast dish.
5. Gourmet Bruschetta
Artisan bread serves as an excellent base for bruschetta, a classic Italian appetizer that’s both simple to prepare and bursting with flavor.
- Classic Tomato Bruschetta: Top toasted slices of baguette or ciabatta with a mixture of diced ripe tomatoes, fresh basil, minced garlic, and a drizzle of balsamic reduction. This combination brings out the fresh, vibrant flavors of summer and pairs beautifully with the bread’s texture.
- Creative Variations: Experiment with different toppings, such as roasted red peppers with goat cheese, sautéed mushrooms with thyme, or even a sweet version with ricotta and honey. The versatility of artisan bread allows for endless culinary creativity in your bruschetta offerings.
In conclusion, artisan bread is a culinary gem that can be served in a multitude of ways, each highlighting its unique flavors and textures. Whether enjoyed simply with butter, as the base of a gourmet sandwich, or as a complement to soups and stews, artisan bread can enhance any dining experience. Embrace its versatility and creativity in your kitchen to delight your family and friends with delicious meals and snacks.
Additional Tips
Creating artisan bread at home is a rewarding endeavor, and a few additional tips can elevate your baking experience and results. Here is a more detailed look at some essential considerations that will ensure your bread turns out perfectly every time.
Flour Variations
While all-purpose flour is a staple choice for many home bakers due to its versatility, experimenting with different types of flour can significantly enhance your bread’s flavor and texture.
- Bread Flour: This flour has a higher protein content (about 12-14%) compared to all-purpose flour, which contributes to a chewier texture and increased gluten formation. This is particularly beneficial for rustic loaves like sourdough or baguettes, where a robust crust and an airy crumb structure are desirable.
- Whole Wheat Flour: Incorporating whole wheat flour adds a nutty flavor and a denser texture to your bread. It is more nutritious than white flour, containing more fiber, vitamins, and minerals. When using whole wheat flour, consider replacing a portion of the all-purpose flour with it for a balanced loaf; typically, a ratio of 50% whole wheat to 50% all-purpose is a good starting point. You may also need to increase the hydration level slightly, as whole wheat flour absorbs more water.
- Specialty Flours: Don’t hesitate to experiment with specialty flours like spelt, rye, or even gluten-free options. Each type brings unique flavors and textures, allowing you to create a variety of artisan breads that cater to different tastes and dietary needs.
Water Temperature
The temperature of the water used in your bread-making process plays a crucial role in yeast activation.
- Ideal Temperature: Aim for a temperature between 100°F to 110°F (37°C to 43°C). Water that is too hot can kill the yeast, while water that is too cold may not activate it efficiently, leading to poor fermentation and rising.
- Testing Temperature: If you don’t have a thermometer, a quick test is to dip your finger into the water; it should feel warm but not hot. This ensures a conducive environment for the yeast to thrive.
Resting Time Flexibility
While long resting times can significantly improve the flavor and texture of your bread, life can sometimes get in the way.
- Minimum Resting Time: If you find yourself pressed for time, reducing the resting period to a minimum of 8 hours can still yield decent results. However, be aware that this may compromise the depth of flavor and the development of the gluten structure.
- Cold Fermentation: As an alternative, consider a cold fermentation method by refrigerating your dough for an extended period (up to 24 hours or longer). This slow, cold rise allows for more complex flavors to develop without requiring constant attention.
Dutch Oven Alternatives
A Dutch oven is often recommended for baking artisan bread due to its ability to create a steamy environment, which is crucial for achieving a crusty exterior.
- Oven-Safe Pots: If you don’t have a Dutch oven, look for any heavy, oven-safe pot or casserole dish with a lid. Cast iron, ceramic, or enameled pots can all work well. Ensure that whatever vessel you choose can withstand high temperatures (at least 450°F or 232°C).
- Lid Alternatives: If your pot doesn’t have a lid, you can cover the bread with a large oven-safe bowl or even aluminum foil to trap steam during the initial baking phase.
Scoring the Dough
Scoring, or making shallow cuts on the surface of the dough, is a crucial step before baking.
- Purpose of Scoring: Not only does scoring provide a decorative touch, but it also serves a functional purpose. It allows the dough to expand in a controlled manner during baking, preventing it from bursting unpredictably.
- Techniques for Scoring: Use a sharp knife, razor blade, or bread lame to create your scores. You can make simple cuts or elaborate patterns; just ensure they are deep enough (about 1/4 inch) to allow for expansion but not so deep that they compromise the integrity of the loaf.
By incorporating these additional tips into your bread-making routine, you can enhance your artisan bread’s flavor, texture, and overall presentation, ensuring a delicious and visually appealing result every time you bake. Happy baking!
FAQs
Q: Can I add other ingredients to this bread recipe?
A: Absolutely! Feel free to incorporate ingredients like herbs, cheese, or seeds to customize the flavor to your liking.
Q: How should I store the bread?
A: Store it in an airtight container at room temperature for up to three days. For longer storage, freeze the bread after it has completely cooled.
Q: Can I use gluten-free flour?
A: Yes, but the texture may differ. Look for a gluten-free flour blend that includes xanthan gum for the best results.
Q: Is it necessary to use a Dutch oven?
A: While a Dutch oven is ideal for creating the perfect crust, you can use any oven-safe pot with a lid as an alternative.
Q: Why is my dough too sticky?
A: The dough is meant to be sticky, but if it feels too wet, you can add a little more flour. Different climates and humidity levels can affect dough hydration.
Conclusion
Making your own artisan bread at home is not only rewarding but also surprisingly simple with this easy 3-ingredient recipe. With just a few pantry staples, you can enjoy a loaf of bread that boasts a beautiful crust and soft interior, perfect for any occasion. Whether you’re a seasoned baker or a novice, this recipe will guide you to delicious success. So, roll up your sleeves, and get ready to fill your home with the irresistible aroma of freshly baked bread. Enjoy your baking journey!
Print
Easy 3-Ingredient Artisan Bread Recipe 🍞
Ingredients
- 3 cups all-purpose flour
- 1 ½ cups warm water
- 1 teaspoon salt
Instructions
- Mix the Dry Ingredients
- In a large bowl, combine the flour and salt. Stir them together to ensure the salt is evenly distributed throughout the flour.
- Add Water
- Slowly pour in the warm water, stirring continuously until a sticky dough forms. It may be helpful to use a wooden spoon or your hands to incorporate all the flour.
- Let the Dough Rest
- Cover the bowl with a cloth and let it sit at room temperature for 12-18 hours. This long resting period allows the dough to ferment and develop flavor, resulting in a rich, complex taste.
- Preheat the Oven
- Preheat your oven to 450°F (230°C). Place a Dutch oven inside to heat up as the oven preheats. This will ensure that the Dutch oven is hot enough to create steam, which is crucial for forming a crispy crust.
- Shape the Dough
- Once the dough has risen, gently shape it into a ball. It might be sticky, but try to handle it as little as possible to maintain the air pockets within. Place the dough ball onto a piece of parchment paper.
- Bake the Bread
- Carefully transfer the dough, along with the parchment paper, into the hot Dutch oven. Cover the Dutch oven with its lid and bake for 30 minutes.
- Finish Baking
- Remove the lid and bake for an additional 15 minutes. This step will give the bread its beautiful golden-brown crust.
- Cool and Serve
- Let the bread cool on a wire rack before slicing. This cooling period is crucial as it allows the interior to finish cooking and the flavors to meld.
Nutrition
- Serving Size: one normal portion
- Calories: 100
- Fat: 0.5g
- Carbohydrates: 20g
- Fiber: 1g
- Protein: 3g


