

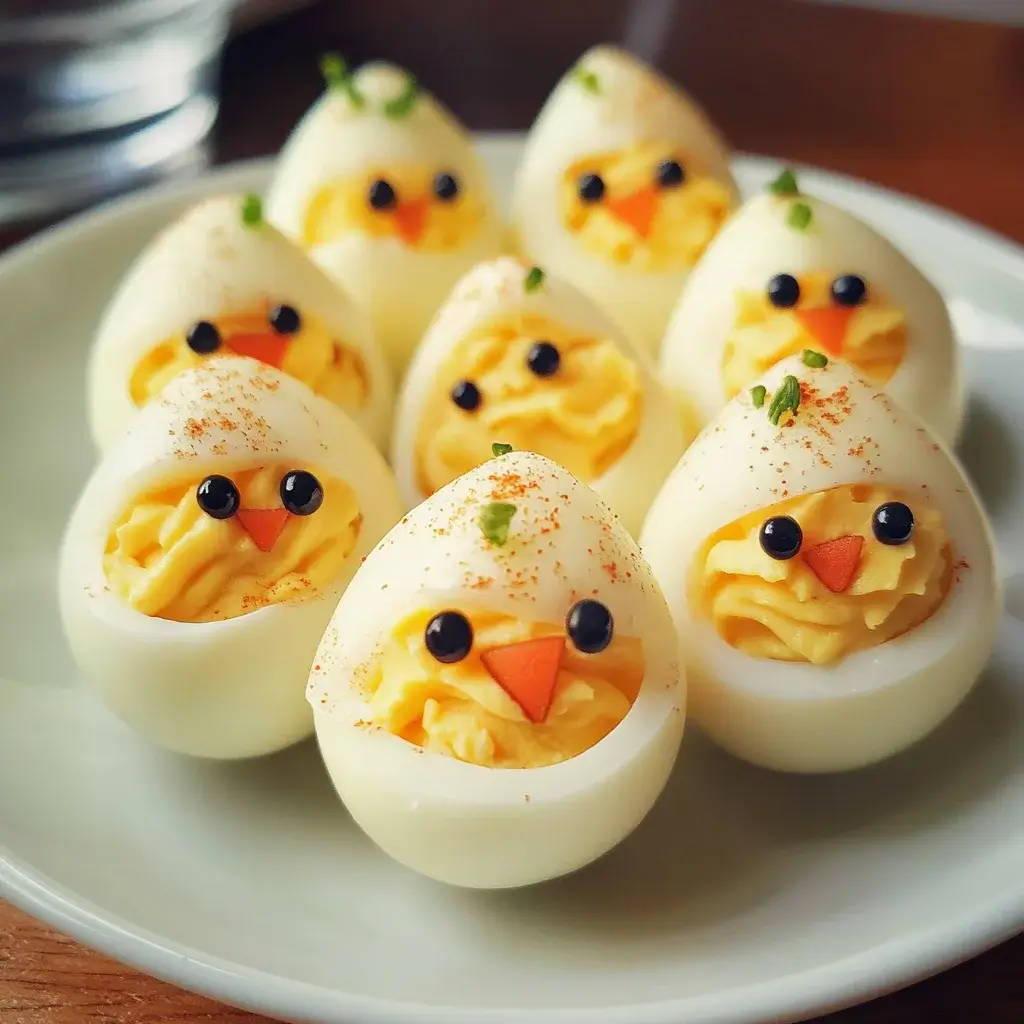
Easter brunch at our house is always a joyous, slightly chaotic affair. My kids, fueled by the sugar rush of hidden chocolate eggs, are buzzing with energy, while the adults are attempting to maintain some semblance of order amidst the egg-citement. Amidst the pastel tablecloths and bunny-shaped everything, I always try to include a few dishes that are both festive and fun. This year, the undisputed star of the appetizer table was, without a doubt, the Deviled Egg Chicks. Honestly, I’d seen pictures online and thought they were cute, but I wasn’t fully prepared for the chorus of “Awwws!” that erupted when I placed the platter down. These aren’t just deviled eggs; they are miniature works of edible art! Even my notoriously picky 8-year-old, who usually shuns anything vaguely resembling “healthy,” couldn’t resist their charm. He happily gobbled down two, proclaiming them “the cutest and yummiest eggs ever!”. The adults were equally impressed, praising their adorable appearance and classic deviled egg flavor. They are surprisingly easy to make, and the effort of transforming simple deviled eggs into these chick-shaped wonders is absolutely worth it for the smiles they bring. If you’re looking for a show-stopping appetizer that’s guaranteed to be a hit at your Easter gathering, spring brunch, or even just a fun afternoon snack, look no further than these delightful Deviled Egg Chicks. They’re not just delicious; they are pure springtime joy on a plate!
Gather Your Nest: Ingredients for Deviled Egg Chicks
Creating these charming Deviled Egg Chicks starts with simple, pantry-staple ingredients. The magic lies in the transformation, turning classic deviled eggs into adorable springtime creations. Here’s what you’ll need to gather from your kitchen to make these delightful appetizers:
For the Deviled Eggs:
- Large Eggs: 12 large eggs are the foundation of our chick flock. Choose fresh, high-quality eggs for the best flavor and texture. Using a dozen will yield 24 deviled egg chick halves, perfect for a gathering or family brunch.
- Mayonnaise: ½ cup of mayonnaise provides the creamy richness that is essential for classic deviled eggs. You can use your favorite brand of full-fat, light, or even avocado mayonnaise depending on your preference. Full-fat mayonnaise will offer the richest flavor and creamiest texture.
- Yellow Mustard: 2 teaspoons of yellow mustard adds a tangy zip and classic deviled egg flavor. Dijon mustard can also be used for a slightly more sophisticated flavor profile, but yellow mustard provides that quintessential deviled egg taste that most people recognize and love.
- White Wine Vinegar or Lemon Juice: 1 teaspoon of white wine vinegar or freshly squeezed lemon juice brightens the flavors and adds a touch of acidity to balance the richness of the mayonnaise and egg yolks. Lemon juice will impart a slightly fresher, citrusy note, while white wine vinegar offers a milder tang.
- Salt: ½ teaspoon of salt, or to taste, is crucial for seasoning the deviled egg mixture and enhancing all the other flavors. Start with ½ teaspoon and adjust to your preference.
- Black Pepper: ¼ teaspoon of freshly ground black pepper, or to taste, adds a subtle warmth and depth of flavor. Freshly ground pepper is always preferred for its brighter flavor.
- Paprika (for garnish): Sweet paprika, for dusting on top of the finished deviled eggs, adds a touch of color and a slightly sweet and smoky aroma. Smoked paprika can also be used for a deeper, smokier flavor if desired.
For the Chick Decorations:
- Carrots: 1 medium carrot is needed to create the beaks and feet for our chick decorations. Choose a firm, bright orange carrot for the best color and ease of cutting.
- Black Olives (pitted, sliced): 6-8 sliced black olives are used to create the eyes for the chicks. Pitted, sliced black olives are convenient and readily available. You can also use whole black olives and slice them yourself.
- Fresh Parsley or Dill (optional, for garnish): Fresh parsley or dill sprigs can be used as optional garnish to create a “nest” effect around the chicks on the serving platter or to represent grass. These fresh herbs add a touch of green and visual appeal.
Optional Ingredients and Variations:
- Celery: 1 tablespoon of finely diced celery can be added to the deviled egg mixture for a bit of crunch and fresh flavor.
- Sweet Pickle Relish: 1 tablespoon of sweet pickle relish can be added for a touch of sweetness and tang, adding another layer of flavor complexity.
- Hot Sauce: A dash of hot sauce (like Tabasco or your favorite brand) can be added for a subtle kick of heat.
- Garlic Powder or Onion Powder: A pinch of garlic powder or onion powder can enhance the savory flavor of the deviled eggs.
- Chives: Finely chopped fresh chives can be used as a garnish instead of or in addition to paprika, adding a mild oniony flavor and a pop of green.
- Red Bell Pepper: Small pieces of red bell pepper can be used as an alternative to carrots for the beaks and feet, offering a slightly sweeter flavor and vibrant red color.
Make sure you have all your ingredients ready before you begin, and you’ll be well on your way to creating a flock of adorable and delicious Deviled Egg Chicks! This simple ingredient list transforms into a springtime masterpiece with just a little creative assembly.
Hatching Happiness: Instructions for Making Deviled Egg Chicks
Creating these adorable Deviled Egg Chicks is easier than you might think! It’s a fun and engaging recipe, perfect for getting kids involved in the kitchen. Follow these step-by-step instructions to bring your chick flock to life:
Step 1: Hard-Boil the Eggs (Approximately 20 minutes)
- Place Eggs in a Pot: Gently place the 12 large eggs in a single layer in a large saucepan.
- Cover with Cold Water: Add enough cold water to the saucepan to cover the eggs by about an inch.
- Bring to a Boil: Bring the water to a rolling boil over medium-high heat. Once boiling, set a timer for 1 minute.
- Turn off Heat and Cover: After 1 minute of boiling, turn off the heat completely and immediately cover the saucepan with a lid.
- Let Stand: Let the eggs stand in the hot water, covered, for 10-12 minutes for perfectly hard-boiled yolks. For slightly softer yolks, reduce the standing time to 8-10 minutes.
- Ice Bath: While the eggs are standing, prepare an ice bath in a large bowl by filling it with cold water and ice cubes.
- Cool and Peel: After 10-12 minutes, carefully transfer the hard-boiled eggs to the ice bath using a slotted spoon. Let them cool completely in the ice bath for at least 15-20 minutes. This cooling process makes the eggs easier to peel. Once cooled, gently peel the eggs under cool running water.
Step 2: Prepare the Deviled Egg Filling (Approximately 15 minutes)
- Slice Eggs in Half: Carefully slice each peeled hard-boiled egg lengthwise in half.
- Remove Yolks: Gently scoop out the yolks from each egg white half and place them in a medium-sized mixing bowl. Arrange the egg white halves on a serving platter or plate.
- Mash Yolks: Using a fork, mash the egg yolks in the bowl until they are smooth and crumbly.
- Add Mayonnaise, Mustard, Vinegar/Lemon Juice: Add ½ cup of mayonnaise, 2 teaspoons of yellow mustard, and 1 teaspoon of white wine vinegar or lemon juice to the mashed yolks.
- Season with Salt and Pepper: Add ½ teaspoon of salt and ¼ teaspoon of black pepper to the mixture.
- Mix Until Creamy: Stir all the ingredients together with a fork or spoon until the mixture is smooth, creamy, and well combined. Taste and adjust seasoning (salt, pepper, mustard, vinegar/lemon juice) as needed to your preference.
Step 3: Fill the Egg Whites (Approximately 10 minutes)
- Spoon or Pipe Filling: You can use a spoon to scoop the deviled egg filling into each egg white half, or for a neater and more professional look, transfer the filling to a piping bag fitted with a star tip.
- Fill Generously: Fill each egg white half generously with the deviled egg mixture, creating a rounded mound on top.
Step 4: Decorate as Chicks (Approximately 20-30 minutes)
- Prepare Carrot Decorations: Peel the carrot and cut thin slices. From the slices, cut out small triangles for beaks and tiny feet shapes for each chick. You will need two feet and one beak per chick half.
- Attach Beaks and Feet: Gently insert a carrot triangle beak into the filling of each deviled egg chick half, positioning it in the center of the rounded filling to resemble a beak. Place two carrot feet shapes at the base of each chick half, underneath the egg white.
- Add Olive Eyes: Take the sliced black olives and carefully place two slices on each deviled egg chick to create eyes above the beak.
- Paprika Dusting: Lightly dust the top of each deviled egg chick with sweet paprika for a touch of color and garnish.
Step 5: Chill and Serve (Optional chilling time: 30 minutes)
- Chill (Optional): For best flavor and to allow the chicks to set, cover the platter of deviled egg chicks with plastic wrap and refrigerate for at least 30 minutes before serving. Chilling is optional but recommended, especially if serving on a warm day or making ahead of time.
- Garnish and Serve: Before serving, you can optionally garnish the platter with fresh parsley or dill sprigs to create a “nest” or grassy effect. Serve chilled and watch your adorable Deviled Egg Chicks delight everyone!
Tips for Success:
- Perfectly Peeled Eggs: For easier peeling, start with eggs that are a few days old. Tap the hard-boiled eggs all over on a hard surface to crack the shell before peeling under running water.
- Creamy Filling: Ensure your egg yolks are fully mashed to avoid lumps in the filling. Adjust mayonnaise to achieve your desired creamy consistency.
- Sharp Knife for Decorations: Use a sharp paring knife to cut the carrot beaks and feet precisely.
- Get Creative with Decorations: Feel free to get creative with your chick decorations! You can use different colored vegetables or edible markers for added detail.
Following these instructions will guide you in creating a charming flock of Deviled Egg Chicks that are as delightful to make as they are to eat! Enjoy bringing these springtime appetizers to life.
Nutritional Nest: Deviled Egg Chicks Nutrition Facts
Deviled Egg Chicks, while being adorable and festive, also offer a good source of protein and essential nutrients. When enjoyed in moderation, they can be a part of a balanced diet, especially during spring celebrations and Easter gatherings.
Serving Size & Calories (Estimates):
- Serving Size: A typical serving size is 2 Deviled Egg Chick halves (equivalent to 1 whole egg).
- Calories Per Serving (Estimated): Approximately 150-200 calories per serving (2 chick halves). This calorie count can vary slightly depending on the exact amount of mayonnaise used and the size of the eggs.
Key Nutritional Benefits (per serving, approximate and varies based on ingredients):
- High in Protein: Eggs are an excellent source of high-quality protein, providing all nine essential amino acids. Protein is crucial for building and repairing tissues, supporting muscle mass, and promoting satiety.
- Rich in Vitamins and Minerals: Eggs are packed with essential vitamins and minerals, including:
- Vitamin B12: Important for nerve function, red blood cell formation, and DNA synthesis.
- Vitamin D: Essential for calcium absorption, bone health, and immune function.
- Choline: Important for brain development and function, particularly during pregnancy and infancy.
- Selenium: An antioxidant that supports thyroid function and immune health.
- Riboflavin (Vitamin B2): Helps convert food into energy and is important for cell growth and function.
- Iodine: Essential for thyroid hormone production.
- Source of Healthy Fats: Egg yolks contain healthy fats, including monounsaturated and polyunsaturated fats. These fats are important for heart health, brain function, and hormone production.
- Lutein and Zeaxanthin: Egg yolks are a good source of lutein and zeaxanthin, antioxidants that are beneficial for eye health and may reduce the risk of age-related macular degeneration and cataracts.
Breakdown of Approximate Nutritional Values per Serving (2 chick halves):
- Calories: 150-200 kcal
- Protein: 7-8 grams
- Fat: 12-15 grams (mostly from egg yolks and mayonnaise)
- Saturated Fat: 3-4 grams
- Monounsaturated Fat: 5-6 grams
- Polyunsaturated Fat: 2-3 grams
- Cholesterol: 180-200 mg (from egg yolks)
- Sodium: 100-150 mg (varies depending on salt added and mayonnaise)
- Carbohydrates: 1-2 grams (mostly from mayonnaise and minor ingredients)
- Fiber: Less than 1 gram
Important Considerations:
- Cholesterol Content: Egg yolks are relatively high in cholesterol. While dietary cholesterol’s impact on blood cholesterol is less significant than previously thought for most people, individuals with specific health conditions (like familial hypercholesterolemia) should consult their doctor or a registered dietitian about egg consumption.
- Mayonnaise Content: Mayonnaise contributes to the fat and calorie content of deviled eggs. Using light mayonnaise or avocado mayonnaise can reduce the fat and calorie count slightly. However, full-fat mayonnaise contributes to the classic creamy texture and flavor.
- Sodium Content: Be mindful of the salt added and the sodium content of your mayonnaise, especially if you are watching your sodium intake.
- Portion Control: While nutritious, deviled eggs should be enjoyed in moderation as part of a balanced diet.
Deviled Egg Chicks offer a delightful and nutritious appetizer option, providing protein, vitamins, and healthy fats. Enjoy them as a festive treat while being mindful of portion sizes and your individual dietary needs. They are a fun and flavorful way to incorporate eggs and their nutritional benefits into your spring celebrations.
Prep Time Peeps: Getting Ready to Make Deviled Egg Chicks
Deviled Egg Chicks are wonderfully efficient to prepare, making them a perfect choice for busy hosts or last-minute gatherings. The active preparation time is relatively short, allowing you to focus on other aspects of your event or meal.
Breakdown of Prep Time:
- Hard-Boiling Eggs: Approximately 20 minutes (including boiling, standing, and cooling time). This is mostly passive time while the eggs cook and cool.
- Peeling Eggs: 5-10 minutes, depending on your peeling speed and egg freshness.
- Preparing Filling: 10-15 minutes (including slicing eggs, removing yolks, mashing yolks, and mixing ingredients).
- Filling Egg Whites: 10 minutes (spooning or piping filling into egg whites).
- Decorating as Chicks: 20-30 minutes (cutting carrot decorations, attaching beaks and feet, adding olive eyes, and paprika dusting).
Total Estimated Prep Time: 1 hour – 1 hour 25 minutes
Tips to Speed Up Prep Time:
- Multi-Tasking: While the eggs are boiling and cooling, you can prepare your decorating ingredients (carrots, olives) and gather your filling ingredients.
- Use Pre-Sliced Olives: Using pre-sliced black olives saves you the step of slicing them yourself.
- Simple Decorations: If short on time, opt for simpler chick decorations. You can just use carrot beaks and paprika for a quicker decorating process.
- Make Ahead Components: You can hard-boil and peel the eggs a day ahead of time and store them in the refrigerator. You can also prepare the deviled egg filling a few hours ahead and store it covered in the refrigerator. Assemble and decorate closer to serving time.
Make-Ahead Options:
- Hard-Boiled Eggs (1-2 days ahead): Hard-boiled eggs can be made 1-2 days in advance and stored unpeeled in the refrigerator. Peel them just before you plan to make the deviled eggs.
- Deviled Egg Filling (up to 4 hours ahead): The deviled egg filling can be prepared up to 4 hours in advance and stored covered in the refrigerator. Give it a quick stir before filling the egg whites.
- Assembled Deviled Eggs (up to 2 hours ahead, undecorated or partially decorated): You can fill the egg whites with the deviled egg mixture and store them covered in the refrigerator for up to 2 hours before decorating and serving. If you want to decorate ahead of time, you can add the carrot beaks and feet as they are less likely to wilt. Add the olive eyes and paprika dusting closer to serving to maintain freshness.
Time-Saving Strategies for Large Batches:
- Enlist Help: If making a large batch, enlist family members or friends to help with peeling eggs, filling egg whites, or decorating.
- Assembly Line: Set up an assembly line for filling and decorating. Have one person filling egg whites, another adding beaks, another adding feet, and another adding eyes.
- Piping Bag for Filling: Using a piping bag for filling egg whites is generally faster and neater than spooning, especially for larger quantities.
Deviled Egg Chicks are a relatively quick and efficient appetizer to prepare, especially with these time-saving tips and make-ahead options. You can easily manage the preparation even when you’re short on time, ensuring you have these adorable chicks ready to delight your guests!
How to Serve Deviled Egg Chicks: Presenting Your Hatchlings
Serving Deviled Egg Chicks is all about showcasing their adorable charm and springtime festivity. Presentation is key to maximizing the “aww” factor and making them a delightful centerpiece for your table. Here are some serving suggestions to make your chick flock shine:
Presentation & Plating Ideas:
- Platter Nest: Arrange the Deviled Egg Chicks on a round or oval platter to resemble a nest. You can line the platter with fresh greens like parsley, dill, or lettuce leaves to create a “nest” base. Arrange the chicks nestled amongst the greens for a natural and charming look.
- Tiered Stand: Use a tiered serving stand to display the Deviled Egg Chicks. This adds height and visual interest to your appetizer table. You can arrange the chicks on different tiers, interspersed with other spring-themed treats or garnishes.
- Individual Nests: For a more personalized touch, serve 2-3 Deviled Egg Chicks per person in small individual bowls or ramekins. You can line each bowl with a small bed of shredded lettuce or fresh herbs to mimic individual nests.
- Egg Carton Display: Get creative and use a clean, empty egg carton to display the Deviled Egg Chicks. Place each chick half in an egg slot for a whimsical and thematic presentation. Decorate the egg carton with pastel colors or spring-themed stickers for added festivity.
- Edible Grass Base: Create an edible “grass” base on your platter using shredded coconut that has been tinted green with food coloring. This adds a fun and unexpected textural element to your presentation.
Garnish & Accompaniments:
- Fresh Herbs: Use fresh parsley, dill, chives, or watercress as garnishes. Sprigs of herbs can be placed around the chicks on the platter or sprinkled on top for a touch of freshness and green.
- Paprika Dusting: A light dusting of sweet paprika is already part of the chick decoration, but you can add a bit more to enhance the color and visual appeal.
- Carrot Curls or Ribbons: Add thin carrot curls or ribbons around the platter for extra carrot garnish that complements the chick beaks and feet.
- Radish Roses: Radish roses add a touch of color and elegance to the platter. Place a few radish roses amongst the Deviled Egg Chicks for a beautiful contrast.
- Spring Vegetables: Surround the platter with other fresh spring vegetables like asparagus spears, cucumber slices, or cherry tomatoes for a colorful and healthy accompaniment.
Serving Occasions & Pairings:
- Easter Brunch: Deviled Egg Chicks are perfect for Easter brunch as a festive and adorable appetizer.
- Spring Gatherings: Serve them at spring luncheons, garden parties, baby showers, or any springtime celebration.
- Kid-Friendly Parties: These chicks are a guaranteed hit at kids’ birthday parties or Easter egg hunts. Their cute appearance makes them appealing to children.
- Appetizer or Snack: Deviled Egg Chicks can be served as a delightful appetizer before a meal or as a satisfying snack any time of day.
- Pair with:
- Fresh Fruit Platter: Serve alongside a platter of fresh spring fruits like strawberries, blueberries, and melon.
- Crackers or Toasted Bread: Offer crackers, baguette slices, or toasted bread for those who prefer to enjoy their deviled eggs with a base.
- Salad: Pair with a light spring salad for a balanced and refreshing meal.
- Sparkling Drinks: Serve with sparkling water, lemonade, or sparkling wine for a festive touch.
By focusing on creative presentation and thoughtful garnishes, you can transform simple Deviled Egg Chicks into a stunning and memorable appetizer that will be the highlight of your spring gathering. Let your imagination soar and make these little chicks the stars of your table!
Additional Tips for Deviled Egg Chick Charm
Want to make your Deviled Egg Chicks even more charming and foolproof? Here are five additional tips to elevate your chick game and ensure they are a resounding success:
1. Perfectly Smooth Filling: The Secret Weapon: For an extra smooth and luxurious deviled egg filling, consider using a food processor or blender. After mashing the egg yolks, add them to the food processor along with the mayonnaise, mustard, vinegar/lemon juice, salt, and pepper. Process until the mixture is incredibly smooth and creamy. This technique eliminates any chance of lumps and creates a truly velvety filling that pipes beautifully.
2. Piping Bag Precision: Decorating Like a Pro: While spooning the filling is perfectly acceptable, using a piping bag fitted with a star tip takes your Deviled Egg Chicks to the next level visually. It creates a more polished and professional look with defined swirls of filling. It’s also often faster and neater, especially when making a larger batch. Practice piping a few swirls on a plate before filling the egg whites to get comfortable with the technique.
3. Beak and Feet Alternatives: Carrot Creativity Beyond Triangles: While carrot triangles work perfectly for beaks, don’t be afraid to get creative with your carrot decorations. Use a small cookie cutter to create heart-shaped beaks or tiny flower-shaped feet. You can also use a vegetable peeler to create thin carrot ribbons and cut out beak and feet shapes from the ribbons for a more delicate look. Red bell pepper pieces also make vibrant red beaks and feet for a color variation.
4. Eye-Catching Eyes: Beyond Black Olives: Black olives are classic for chick eyes, but you can explore other edible eye options for added charm. Tiny capers, halved peppercorns, or even small dots of black sesame seeds can create different eye styles. For a whimsical touch, use edible candy eyes (found in baking supply stores) for extra-cute, googly-eyed chicks, especially if making these for children.
5. Flavor Boosters: Elevate the Classic Deviled Egg Base: While the classic deviled egg flavor is beloved, don’t hesitate to experiment with flavor boosters to customize your chick filling. Consider adding:
* Smoked Paprika to the Filling: Incorporate smoked paprika into the yolk mixture for a deeper, smoky flavor that complements the paprika dusting on top.
* Fresh Herbs in the Filling: Finely chopped fresh dill, chives, or parsley mixed into the filling add a fresh, herbaceous note.
* Spicy Kick: Add a dash of hot sauce, a pinch of cayenne pepper, or finely diced pickled jalapeños for a subtle heat that balances the richness of the deviled eggs.
* Garlic or Onion Powder: A pinch of garlic powder or onion powder enhances the savory depth of flavor.
By incorporating these additional tips, you can refine your Deviled Egg Chick technique, create visually stunning appetizers, and customize the flavor profile to your liking. These little details will truly elevate your chick creations and impress your guests!
Frequently Asked Questions About Deviled Egg Chicks (FAQ)
Curious about perfecting your Deviled Egg Chick creations? Here are answers to some frequently asked questions to help you become a chick-making pro:
Q1: Can I make Deviled Egg Chicks the day before serving?
A: Yes, you can definitely make Deviled Egg Chicks a day ahead of time, which is often convenient for busy hosts. Prepare the chicks completely, including filling and decorating, and then store them covered in the refrigerator. For best results, add the paprika dusting just before serving to prevent it from becoming soggy. The flavors will even meld together beautifully overnight.
Q2: How long can Deviled Egg Chicks sit out at room temperature?
A: Deviled eggs, like any egg-based dish with mayonnaise, should not sit out at room temperature for longer than 2 hours for food safety reasons. If you are serving them outdoors on a warm day, limit the time to 1 hour. After that, they should be refrigerated promptly to prevent bacterial growth.
Q3: Can I use light mayonnaise to make Deviled Egg Chicks?
A: Yes, you can use light mayonnaise to reduce the fat and calorie content of Deviled Egg Chicks. Light mayonnaise will still provide creaminess, although full-fat mayonnaise will result in a richer and creamier texture and flavor. Avocado mayonnaise is another alternative that offers a healthier fat profile.
Q4: What if my egg yolks are crumbly and dry when I mash them?
A: Overcooked egg yolks can become dry and crumbly. To prevent this, ensure you don’t overcook your hard-boiled eggs. Follow the recommended boiling and standing times in the instructions. If your yolks are already a bit dry, you can add a little extra mayonnaise, a teaspoon at a time, to the yolk mixture to achieve a creamier consistency.
Q5: Can I make vegan Deviled Egg Chicks?
A: While traditional Deviled Egg Chicks are made with eggs, you can create a vegan version using tofu or white bean-based deviled “eggs.” Firm or extra-firm tofu can be blended or mashed to mimic the texture of egg yolks. Vegan mayonnaise and other vegan-friendly ingredients can be used to create a delicious and plant-based deviled “egg” filling. Decorate them as chicks just like the traditional version for a fun and inclusive vegan appetizer.
We hope these FAQs have addressed your questions and boosted your confidence in creating adorable and delicious Deviled Egg Chicks! Enjoy bringing these springtime delights to your table and watching them bring smiles to everyone’s faces!
Print
Deviled Egg Chicks Recipe
Ingredients
- Large Eggs: 12 large eggs are the foundation of our chick flock. Choose fresh, high-quality eggs for the best flavor and texture. Using a dozen will yield 24 deviled egg chick halves, perfect for a gathering or family brunch.
- Mayonnaise: ½ cup of mayonnaise provides the creamy richness that is essential for classic deviled eggs. You can use your favorite brand of full-fat, light, or even avocado mayonnaise depending on your preference. Full-fat mayonnaise will offer the richest flavor and creamiest texture.
- Yellow Mustard: 2 teaspoons of yellow mustard adds a tangy zip and classic deviled egg flavor. Dijon mustard can also be used for a slightly more sophisticated flavor profile, but yellow mustard provides that quintessential deviled egg taste that most people recognize and love.
- White Wine Vinegar or Lemon Juice: 1 teaspoon of white wine vinegar or freshly squeezed lemon juice brightens the flavors and adds a touch of acidity to balance the richness of the mayonnaise and egg yolks. Lemon juice will impart a slightly fresher, citrusy note, while white wine vinegar offers a milder tang.
- Salt: ½ teaspoon of salt, or to taste, is crucial for seasoning the deviled egg mixture and enhancing all the other flavors. Start with ½ teaspoon and adjust to your preference.
- Black Pepper: ¼ teaspoon of freshly ground black pepper, or to taste, adds a subtle warmth and depth of flavor. Freshly ground pepper is always preferred for its brighter flavor.
- Paprika (for garnish): Sweet paprika, for dusting on top of the finished deviled eggs, adds a touch of color and a slightly sweet and smoky aroma. Smoked paprika can also be used for a deeper, smokier flavor if desired.
For the Chick Decorations:
- Carrots: 1 medium carrot is needed to create the beaks and feet for our chick decorations. Choose a firm, bright orange carrot for the best color and ease of cutting.
- Black Olives (pitted, sliced): 6-8 sliced black olives are used to create the eyes for the chicks. Pitted, sliced black olives are convenient and readily available. You can also use whole black olives and slice them yourself.
- Fresh Parsley or Dill (optional, for garnish): Fresh parsley or dill sprigs can be used as optional garnish to create a “nest” effect around the chicks on the serving platter or to represent grass. These fresh herbs add a touch of green and visual appeal.
Optional Ingredients and Variations:
- Celery: 1 tablespoon of finely diced celery can be added to the deviled egg mixture for a bit of crunch and fresh flavor.
- Sweet Pickle Relish: 1 tablespoon of sweet pickle relish can be added for a touch of sweetness and tang, adding another layer of flavor complexity.
- Hot Sauce: A dash of hot sauce (like Tabasco or your favorite brand) can be added for a subtle kick of heat.
- Garlic Powder or Onion Powder: A pinch of garlic powder or onion powder can enhance the savory flavor of the deviled eggs.
- Chives: Finely chopped fresh chives can be used as a garnish instead of or in addition to paprika, adding a mild oniony flavor and a pop of green.
- Red Bell Pepper: Small pieces of red bell pepper can be used as an alternative to carrots for the beaks and feet, offering a slightly sweeter flavor and vibrant red color.
Instructions
Step 1: Hard-Boil the Eggs (Approximately 20 minutes)
- Place Eggs in a Pot: Gently place the 12 large eggs in a single layer in a large saucepan.
- Cover with Cold Water: Add enough cold water to the saucepan to cover the eggs by about an inch.
- Bring to a Boil: Bring the water to a rolling boil over medium-high heat. Once boiling, set a timer for 1 minute.
- Turn off Heat and Cover: After 1 minute of boiling, turn off the heat completely and immediately cover the saucepan with a lid.
- Let Stand: Let the eggs stand in the hot water, covered, for 10-12 minutes for perfectly hard-boiled yolks. For slightly softer yolks, reduce the standing time to 8-10 minutes.
- Ice Bath: While the eggs are standing, prepare an ice bath in a large bowl by filling it with cold water and ice cubes.
- Cool and Peel: After 10-12 minutes, carefully transfer the hard-boiled eggs to the ice bath using a slotted spoon. Let them cool completely in the ice bath for at least 15-20 minutes. This cooling process makes the eggs easier to peel. Once cooled, gently peel the eggs under cool running water.
Step 2: Prepare the Deviled Egg Filling (Approximately 15 minutes)
- Slice Eggs in Half: Carefully slice each peeled hard-boiled egg lengthwise in half.
- Remove Yolks: Gently scoop out the yolks from each egg white half and place them in a medium-sized mixing bowl. Arrange the egg white halves on a serving platter or plate.
- Mash Yolks: Using a fork, mash the egg yolks in the bowl until they are smooth and crumbly.
- Add Mayonnaise, Mustard, Vinegar/Lemon Juice: Add ½ cup of mayonnaise, 2 teaspoons of yellow mustard, and 1 teaspoon of white wine vinegar or lemon juice to the mashed yolks.
- Season with Salt and Pepper: Add ½ teaspoon of salt and ¼ teaspoon of black pepper to the mixture.
- Mix Until Creamy: Stir all the ingredients together with a fork or spoon until the mixture is smooth, creamy, and well combined. Taste and adjust seasoning (salt, pepper, mustard, vinegar/lemon juice) as needed to your preference.
Step 3: Fill the Egg Whites (Approximately 10 minutes)
- Spoon or Pipe Filling: You can use a spoon to scoop the deviled egg filling into each egg white half, or for a neater and more professional look, transfer the filling to a piping bag fitted with a star tip.
- Fill Generously: Fill each egg white half generously with the deviled egg mixture, creating a rounded mound on top.
Step 4: Decorate as Chicks (Approximately 20-30 minutes)
- Prepare Carrot Decorations: Peel the carrot and cut thin slices. From the slices, cut out small triangles for beaks and tiny feet shapes for each chick. You will need two feet and one beak per chick half.
- Attach Beaks and Feet: Gently insert a carrot triangle beak into the filling of each deviled egg chick half, positioning it in the center of the rounded filling to resemble a beak. Place two carrot feet shapes at the base of each chick half, underneath the egg white.
- Add Olive Eyes: Take the sliced black olives and carefully place two slices on each deviled egg chick to create eyes above the beak.
- Paprika Dusting: Lightly dust the top of each deviled egg chick with sweet paprika for a touch of color and garnish.
Step 5: Chill and Serve (Optional chilling time: 30 minutes)
- Chill (Optional): For best flavor and to allow the chicks to set, cover the platter of deviled egg chicks with plastic wrap and refrigerate for at least 30 minutes before serving. Chilling is optional but recommended, especially if serving on a warm day or making ahead of time.
- Garnish and Serve: Before serving, you can optionally garnish the platter with fresh parsley or dill sprigs to create a “nest” or grassy effect. Serve chilled and watch your adorable Deviled Egg Chicks delight everyone!
Nutrition
- Serving Size: one normal portion
- Calories: 150-200
- Sodium: 100-150 mg
- Fat: 12-15 grams
- Saturated Fat: 3-4 grams
- Carbohydrates: 1-2 grams
- Fiber: Less than 1 gram
- Protein: 7-8 grams
- Cholesterol: 180-200 mg


