


Okay, this is a challenge I adore! Creating a truly decadent French Silk Pie without any dairy might seem like a culinary Everest, but let me tell you, the view from the summit is spectacular. The first time I successfully made a dairy-free version that fooled even the most ardent dairy-lovers in my family, I nearly did a little dance in the kitchen. My son, who is a chocolate connoisseur of the highest order, took one bite, his eyes widened, and he just said, “Mom, this is… unreal. Are you sure there’s no butter in this?” That, my friends, was the ultimate seal of approval. The secret lies in finding the right dairy-free alternatives that mimic the richness of butter and cream, and in treating them with the same care and technique as their dairy counterparts. This pie is pure, unadulterated chocolate luxury – silky smooth, intensely chocolatey, and utterly irresistible, all while being completely dairy-free.
The Decadence of Dairy-Free French Silk Pie: A Chocolate Lover’s Dream
French Silk Pie is the epitome of chocolate indulgence. Its name alone evokes images of luxurious, smooth, and utterly delightful textures. Traditionally, this pie relies heavily on dairy – copious amounts of butter and cream – to achieve its signature light-yet-rich, melt-in-your-mouth quality. For those avoiding dairy, the thought of enjoying such a decadent dessert might seem like a distant dream. But what if I told you that a dairy-free version, every bit as luscious and satisfying, is not only possible but also surprisingly straightforward to create?
This Dairy-Free French Silk Pie recipe is a testament to the magic of modern plant-based ingredients. We’re not just substituting; we’re carefully selecting alternatives that honor the original’s texture and taste profile. The result is a pie with an intensely deep chocolate flavor, a cloud-like, silky filling that glides over the palate, and a satisfyingly crumbly (and also dairy-free!) crust. It’s the kind of dessert that silences a room, where the only sounds are the clinking of forks and sighs of pure bliss. Whether you’re dairy-intolerant, vegan (with a note on eggs, see FAQ), or simply curious about plant-based baking, this pie will astound you with its authentic French Silk experience.
Why This Dairy-Free French Silk Pie Will Amaze You
Prepare to be captivated by this dairy-free rendition of a classic. Here’s why this particular recipe is set to become your new obsession:
- Authentic Silky Texture: The biggest challenge in a dairy-free French Silk Pie is replicating that iconic, ethereal, smooth texture. This recipe nails it. Through careful selection of dairy-free butter and a precise mixing technique, the filling achieves a lightness and silkiness that’s indistinguishable from the original.
- Intense Chocolate Flavor: Using high-quality dairy-free dark chocolate is key. This pie delivers a profound, rich chocolate experience that is sophisticated and deeply satisfying without being overly sweet.
- Surprisingly Simple: While “French Silk Pie” sounds intimidating, the process, especially with a no-bake cookie crust, is quite manageable. The magic is in the ingredients and the method, not in overly complex steps.
- Completely Dairy-Free, Potentially Vegan-Friendly: From crust to filling to topping, every component is free from dairy. For those following a fully vegan diet, the main consideration is the eggs in the filling (see FAQ for discussion and alternatives, though “true” French Silk texture with vegan egg substitutes is challenging). This recipe focuses on dairy-free, using pasteurized eggs for safety and traditional texture.
- Crowd-Pleaser Guaranteed: This pie has universal appeal. It’s elegant enough for a special occasion but comforting enough for a Tuesday night treat. Even those who normally consume dairy will be hard-pressed to notice the difference.
- Perfect Make-Ahead Dessert: Like its traditional counterpart, this pie needs ample time to chill and set. This makes it an ideal dessert to prepare a day in advance, freeing you up on the day of serving.
- Customizable Crust and Topping: While the recipe suggests a dairy-free chocolate cookie crumb crust, you could opt for a homemade dairy-free shortcrust pastry. The topping can be a luscious coconut whipped cream or a store-bought dairy-free whipped topping.
This Dairy-Free French Silk Pie isn’t just a “good alternative”; it’s a show-stopping dessert in its own right, proving that dietary restrictions don’t mean compromising on indulgence.
Ingredients for Your Dairy-Free French Silk Masterpiece
Crafting this exquisite pie requires a careful selection of dairy-free ingredients that work together to create that signature silky texture and rich flavor.
For the Dairy-Free Chocolate Cookie Crust:
- 1 ½ cups (approx. 150g) dairy-free chocolate sandwich cookie crumbs: (e.g., Oreos – many varieties are accidentally vegan/dairy-free, but always check the label, or other dairy-free chocolate cookies). You’ll need about 15-18 cookies.
- ¼ cup (56g) dairy-free butter, melted: Use a good quality brand like Miyoko’s Kitchen Cultured Vegan Butter, Earth Balance Buttery Sticks, or Country Crock Plant Butter sticks for best flavor and texture.
For the Dairy-Free French Silk Filling:
- 1 cup (227g) high-quality dairy-free butter, softened to room temperature (but not melty): Again, good quality stick-form dairy-free butter is crucial. The block/stick form behaves more like traditional butter in creaming.
- 1 ½ cups (300g) granulated sugar: Some French Silk recipes use powdered sugar for an even smoother finish, but granulated works well if creamed properly.
- 4 ounces (113g) unsweetened or bittersweet dairy-free chocolate (at least 60-70% cacao), melted and cooled slightly: Ensure it’s specifically labeled dairy-free or check ingredients carefully for milk solids, whey, etc. Chopped baking chocolate or high-quality chocolate chips work.
- 1 teaspoon pure vanilla extract
- ¼ teaspoon salt (omit if your dairy-free butter is already salted, or adjust to taste)
- 4 large pasteurized eggs: CRITICAL NOTE: Traditional French Silk Pie uses raw eggs. To ensure safety, use pasteurized eggs (eggs that have been gently heated in their shells to kill bacteria). These are available in most supermarkets. If you are uncomfortable with this or cannot find pasteurized eggs, you can explore cooked custard base methods for French Silk Pie, but this recipe follows the classic no-bake filling approach using pasteurized eggs.
For the Dairy-Free Whipped Topping & Garnish:
- 1 can (13.5-14 ounces) full-fat coconut milk, chilled in the refrigerator for at least 24 hours (or 2 cans for a very generous topping): Ensure it’s full-fat, as light coconut milk won’t whip. Do not shake the can before opening.
- ¼ to ½ cup (30-60g) powdered sugar, sifted (to taste): For sweetening the coconut whipped cream.
- ½ teaspoon pure vanilla extract: For flavoring the coconut whipped cream.
- Dairy-free chocolate shavings or curls for garnish: Use a vegetable peeler on a block of dairy-free chocolate.
Important Ingredient Notes:
- Dairy-Free Butter: The quality and type (stick vs. tub) significantly impact the filling’s ability to set and achieve the right texture. Stick forms are generally better.
- Chocolate: The better the chocolate, the better the pie. Bittersweet will give a deep flavor; unsweetened will be very intense and may require a slight increase in sugar depending on your preference.
- Pasteurized Eggs: This cannot be stressed enough for a no-bake egg filling.
With these carefully chosen components, you’re ready to create a truly unforgettable dairy-free dessert.
Step-by-Step Instructions to Crafting Dairy-Free French Silk Pie
Follow these instructions carefully, particularly the creaming and egg incorporation steps, for a truly silky, divine pie.
Phase 1: Prepare the Dairy-Free Crust
- Make Cookie Crumbs: If using whole cookies, place them in a food processor and pulse until they form fine crumbs. Alternatively, place them in a resealable bag and crush them with a rolling pin.
- Combine Crust Ingredients: In a medium bowl, combine the chocolate cookie crumbs and the melted dairy-free butter. Stir until the crumbs are evenly moistened.
- Press Crust into Pan: Press the crumb mixture firmly and evenly into the bottom and up the sides of a 9-inch pie dish. Use the bottom of a glass or measuring cup to help create a compact, even layer.
- Chill Crust: Place the crust in the refrigerator to chill and firm up for at least 30 minutes while you prepare the filling. (Alternatively, you can bake the crust at 350°F (175°C) for 8-10 minutes to make it crispier, then let it cool completely.)
Phase 2: Create the Luscious Dairy-Free French Silk Filling
- Melt Chocolate: Melt the dairy-free chocolate using a double boiler or in the microwave in 20-30 second intervals, stirring in between, until smooth. Set aside to cool slightly until it’s lukewarm but still liquid.
- Cream Dairy-Free Butter and Sugar: In the bowl of a stand mixer fitted with the paddle attachment (or using a hand mixer and a large bowl), beat the softened dairy-free butter on medium speed until creamy, about 1 minute. Gradually add the granulated sugar. Once all sugar is added, increase the speed to medium-high and beat for a full 5-8 minutes. The mixture should become very light in color and fluffy. This extended creaming is crucial for the silky texture. Scrape down the sides of the bowl periodically.
- Add Cooled Chocolate, Vanilla, and Salt: Reduce the mixer speed to low and slowly drizzle in the cooled, melted dairy-free chocolate. Add the vanilla extract and salt (if using). Mix until just combined, then beat on medium speed for another 2 minutes until smooth and glossy. Scrape down the bowl.
- Incorporate Pasteurized Eggs: This is a critical step for texture. With the mixer on medium speed, add the pasteurized eggs one at a time. Beat for at least 5 minutes after adding each egg. This long beating time is essential for emulsifying the eggs properly and incorporating air, which contributes to the pie’s light, silky texture. The mixture will increase in volume and become very smooth and glossy. Scrape down the sides of the bowl between egg additions.
Phase 3: Assemble and Chill the Pie
- Fill the Crust: Pour the prepared dairy-free chocolate silk filling into the chilled cookie crust, spreading it evenly with a spatula.
- Chill Thoroughly: Cover the pie loosely with plastic wrap (try not to let it touch the filling’s surface) and refrigerate for at least 6 hours, or preferably overnight (8-12 hours). The pie needs this time to fully set and for the flavors to meld. Do not rush this step!
Phase 4: Prepare Dairy-Free Whipped Topping and Serve
- Prepare Coconut Whipped Cream (just before serving or up to a few hours ahead):
- Carefully open the chilled can(s) of full-fat coconut milk without shaking it. Scoop out the thick, solidified coconut cream from the top, leaving the watery liquid behind (save the liquid for smoothies or other uses).
- Place the solid coconut cream in a chilled mixing bowl.
- Using a hand mixer or stand mixer with the whisk attachment, beat the coconut cream on medium-high speed until it becomes fluffy and soft peaks form (about 3-5 minutes).
- Gradually add the sifted powdered sugar and vanilla extract, beating until combined and desired sweetness/stiffness is reached. Be careful not to overbeat, as coconut cream can sometimes separate.
- Top and Garnish: Once the pie is fully chilled and set, spread or pipe the dairy-free coconut whipped cream over the top. Garnish generously with dairy-free chocolate shavings or curls.
- Serve: Slice the pie while chilled and serve immediately.
Store any leftovers tightly covered in the refrigerator. This pie is pure bliss!
Nutrition Facts (Approximate)
- Servings: This recipe typically yields 8-10 servings.
- Calories per serving (approximate): A single serving (1/8th of the pie) can range from 550 to 750 calories.
Disclaimer:
The nutritional information provided is a rough estimate and can vary significantly based on:
- Specific brands of dairy-free butter, chocolate, and cookies used.
- The exact amount of sugar used.
- The quantity of coconut whipped cream and chocolate shavings added.
- The final serving size.
This Dairy-Free French Silk Pie is an indulgent dessert, rich in fats (from dairy-free butter, chocolate, and coconut cream) and sugar. It’s designed to be a special treat. For more precise nutritional information, consider using an online recipe calculator with your specific ingredients and quantities.
Preparation and Chilling Time: A Labor of Love
This pie isn’t difficult, but it does require patience, especially for chilling. Here’s a time breakdown:
- Active Preparation Time:
- Crust: 10-15 minutes
- Filling: 25-35 minutes (includes the crucial long beating times)
- Dairy-Free Whipped Topping: 5-10 minutes
- Total Active Prep: Approximately 40 – 60 minutes
- Chilling/Setting Time:
- Crust Chilling: Minimum 30 minutes
- Pie Chilling (Essential): Minimum 6 hours, but overnight (8-12 hours) is strongly recommended for the best set and flavor.
- Total Time (from start to ready-to-serve, with overnight chilling): Approximately 9 – 14 hours.
Planning Tip: Given the extensive chilling requirement, this Dairy-Free French Silk Pie is the perfect dessert to make a day before you plan to serve it. This allows it to set perfectly and takes the pressure off on the day of your event.
How to Serve Your Exquisite Dairy-Free French Silk Pie
Presenting and serving this luxurious pie properly will enhance the enjoyment for everyone.
- Serve Thoroughly Chilled: This pie must be served cold, directly from the refrigerator. The filling is at its silkiest and most stable when well-chilled.
- Slicing for Perfection:
- For the cleanest slices, dip a long, thin, sharp knife into hot water, wipe it dry with a paper towel, and then make a cut. Repeat wiping the knife clean (and re-dipping in hot water if needed) between each slice. This prevents the creamy filling from dragging and smearing.
- Slice into wedges and use a pie server to carefully lift each piece onto a dessert plate.
- Plating and Presentation:
- The pie is stunning on its own with its layers of dark crust, rich chocolate filling, and fluffy white topping adorned with chocolate shavings.
- Optional Enhancements:
- A few fresh raspberries or strawberries on the side can add a pop of color and a tart counterpoint to the richness.
- A light dusting of cocoa powder over the plate before placing the slice.
- A drizzle of dairy-free raspberry coulis around the slice.
- Ideal Occasions:
- Holiday Gatherings: Thanksgiving, Christmas, Easter – it’s an elegant showstopper.
- Special Celebrations: Birthdays, anniversaries, dinner parties.
- Whenever a Chocolate Craving Hits: Because sometimes, you just need an incredibly good piece of chocolate pie.
- Beverage Pairings:
- Coffee or Espresso: The bitterness of coffee beautifully complements the sweet richness.
- Dairy-Free Milk: A cold glass of almond, soy, or oat milk.
- Red Wine: A fruit-forward red like a Zinfandel or a dessert wine like a Ruby Port can pair surprisingly well.
- Storing Leftovers:
- Keep any leftover pie tightly covered with plastic wrap or in an airtight container in the refrigerator.
- It will remain delicious for 2-3 days. The texture might change slightly after the first day, but it will still be incredibly enjoyable.
This Dairy-Free French Silk Pie is an experience. Serve it with pride and watch it disappear!
Additional Tips for Dairy-Free French Silk Perfection
Elevate your dairy-free pie-making with these expert tips:
- Invest in High-Quality Dairy-Free Chocolate: The chocolate is the star of the filling. Use a dairy-free dark chocolate (60-70% cacao is ideal) that you enjoy eating on its own. Good quality chocolate will melt smoother and provide a deeper, more complex flavor. Always double-check labels to ensure it’s truly dairy-free.
- Use Pasteurized Eggs – Non-Negotiable for No-Bake Filling: Since the filling isn’t baked, using pasteurized eggs is crucial for food safety. These eggs have been gently heated to kill harmful bacteria. If you absolutely cannot find them or are still concerned, research French Silk Pie recipes that involve cooking an egg-sugar custard base before incorporating the butter and chocolate – this changes the method but ensures cooked eggs.
- Dairy-Free Butter Temperature is Key: Your dairy-free butter should be softened to room temperature – firm enough to hold its shape but soft enough that your finger leaves an indent when pressed. If it’s too cold, it won’t cream properly. If it’s too melty, the filling may not set correctly. Good quality stick-form dairy-free butter often yields the best results.
- Don’t Skimp on Creaming and Beating Times: The characteristic “silk” texture comes from thoroughly creaming the dairy-free butter and sugar, and then beating extensively after each egg addition. This incorporates air and emulsifies the ingredients, resulting in a light, airy, yet rich filling. Set a timer for these steps – it makes a difference!
- Patience with Chilling is a Virtue: This pie needs adequate time to chill and set completely. A minimum of 6 hours is required, but overnight is truly best. Rushing the chilling process will result in a filling that is too soft and may not hold its shape when sliced. The wait is well worth it.
By following these tips, you’ll ensure your Dairy-Free French Silk Pie is not just good, but truly exceptional, rivaling any traditional version.
Frequently Asked Questions (FAQ) about Dairy-Free French Silk Pie
Here are some common queries you might have when embarking on your dairy-free French Silk Pie adventure:
- Q: Can I make this French Silk Pie vegan (i.e., egg-free)?
- A: Traditional French Silk Pie relies heavily on eggs for its unique airy, rich, and silky texture. Replicating this exact texture without eggs is extremely challenging. While there are vegan chocolate pie recipes using ingredients like silken tofu, avocado, or cashew cream to create a mousse-like filling, they result in a different (though potentially still delicious) type of pie, not a true French Silk Pie. If you choose to experiment with egg replacers, be aware that the texture and set will likely vary significantly. This recipe is designed as dairy-free, utilizing pasteurized eggs for authentic texture and safety.
- Q: What’s the best type of dairy-free chocolate to use?
- A: Look for high-quality dairy-free dark chocolate, typically in the 60-70% cacao range. Bittersweet or unsweetened baking chocolate bars or high-quality chocolate chips work well. Always read the ingredients list carefully to ensure there are no hidden dairy products (like milk solids, butterfat, whey, or casein). Many reputable brands now offer clearly labeled dairy-free or vegan chocolate.
- Q: Can I make this pie ahead of time?
- A: Yes, absolutely! In fact, it’s recommended. The pie needs at least 6 hours to chill and set properly, but it’s even better if allowed to chill overnight. You can make the entire pie (crust and filling) 1-2 days in advance. Prepare the dairy-free whipped topping and add it just before serving or a few hours ahead if using a stabilized topping like coconut whipped cream made correctly.
- Q: How do I store leftover Dairy-Free French Silk Pie?
- A: Leftovers must be stored in the refrigerator. Cover the pie tightly with plastic wrap or transfer slices to an airtight container. It will keep well for 2-3 days. The crust may soften slightly over time, but the filling will remain delicious.
- Q: My dairy-free filling seems a bit grainy or isn’t setting properly. What could be the cause?
- A: Several factors could contribute to this:
- Chocolate Seized or Overheated: If the melted chocolate was too hot when added, or if any water got into it, it could seize and become grainy. Ensure it’s cooled to lukewarm.
- Insufficient Creaming/Beating: Not beating the dairy-free butter and sugar long enough, or not beating sufficiently after each egg addition, can affect the texture and emulsification.
- Type of Dairy-Free Butter: Some margarine-style dairy-free spreads in tubs have higher water content and may not set as firmly as stick-form dairy-free butters designed for baking.
- Not Chilled Long Enough: The pie needs ample time in the refrigerator to fully set.
- Eggs Not Pasteurized (and raw): While not a texture issue per se, if non-pasteurized raw eggs were used and the pie isn’t setting, it’s also a food safety concern. Always use pasteurized for no-bake applications.
- A: Several factors could contribute to this:
Beyond the Recipe: The Triumph of Dairy-Free Indulgence
This Dairy-Free French Silk Pie is more than just a dessert; it’s a declaration that dietary choices or restrictions should never mean sacrificing joy, luxury, or the sheer pleasure of a truly decadent treat. There’s a profound satisfaction in mastering a recipe like this, transforming simple, plant-based ingredients into something so utterly sophisticated and delightful.
The careful creaming, the patient incorporation of each ingredient, the anticipation during the long chill – it all culminates in that first, perfect, silky bite. Sharing this pie is an act of love, whether it’s with fellow dairy-free diners who thought such richness was off-limits, or with skeptics who can’t believe it’s made without traditional butter and cream.
So, embrace the process, trust in the power of good quality dairy-free alternatives, and prepare to wow yourself and your loved ones. This Dairy-Free French Silk Pie isn’t just a recipe; it’s an experience, a celebration, and a delicious testament to how inclusive and exciting modern baking can be. Enjoy every single, silky, chocolatey moment!
Print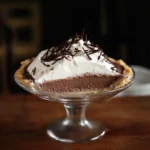
Dairy Free French Silk Pie Recipe
Ingredients
Crafting this exquisite pie requires a careful selection of dairy-free ingredients that work together to create that signature silky texture and rich flavor.
For the Dairy-Free Chocolate Cookie Crust:
-
- 1 ½ cups (approx. 150g) dairy-free chocolate sandwich cookie crumbs: (e.g., Oreos – many varieties are accidentally vegan/dairy-free, but always check the label, or other dairy-free chocolate cookies). You’ll need about 15-18 cookies.
-
- ¼ cup (56g) dairy-free butter, melted: Use a good quality brand like Miyoko’s Kitchen Cultured Vegan Butter, Earth Balance Buttery Sticks, or Country Crock Plant Butter sticks for best flavor and texture.
For the Dairy-Free French Silk Filling:
-
- 1 cup (227g) high-quality dairy-free butter, softened to room temperature (but not melty): Again, good quality stick-form dairy-free butter is crucial. The block/stick form behaves more like traditional butter in creaming.
-
- 1 ½ cups (300g) granulated sugar: Some French Silk recipes use powdered sugar for an even smoother finish, but granulated works well if creamed properly.
-
- 4 ounces (113g) unsweetened or bittersweet dairy-free chocolate (at least 60-70% cacao), melted and cooled slightly: Ensure it’s specifically labeled dairy-free or check ingredients carefully for milk solids, whey, etc. Chopped baking chocolate or high-quality chocolate chips work.
-
- 1 teaspoon pure vanilla extract
-
- ¼ teaspoon salt (omit if your dairy-free butter is already salted, or adjust to taste)
-
- 4 large pasteurized eggs: CRITICAL NOTE: Traditional French Silk Pie uses raw eggs. To ensure safety, use pasteurized eggs (eggs that have been gently heated in their shells to kill bacteria). These are available in most supermarkets. If you are uncomfortable with this or cannot find pasteurized eggs, you can explore cooked custard base methods for French Silk Pie, but this recipe follows the classic no-bake filling approach using pasteurized eggs.
For the Dairy-Free Whipped Topping & Garnish:
-
- 1 can (13.5-14 ounces) full-fat coconut milk, chilled in the refrigerator for at least 24 hours (or 2 cans for a very generous topping): Ensure it’s full-fat, as light coconut milk won’t whip. Do not shake the can before opening.
-
- ¼ to ½ cup (30-60g) powdered sugar, sifted (to taste): For sweetening the coconut whipped cream.
-
- ½ teaspoon pure vanilla extract: For flavoring the coconut whipped cream.
-
- Dairy-free chocolate shavings or curls for garnish: Use a vegetable peeler on a block of dairy-free chocolate.
Instructions
Phase 1: Prepare the Dairy-Free Crust
-
- Make Cookie Crumbs: If using whole cookies, place them in a food processor and pulse until they form fine crumbs. Alternatively, place them in a resealable bag and crush them with a rolling pin.
-
- Combine Crust Ingredients: In a medium bowl, combine the chocolate cookie crumbs and the melted dairy-free butter. Stir until the crumbs are evenly moistened.
-
- Press Crust into Pan: Press the crumb mixture firmly and evenly into the bottom and up the sides of a 9-inch pie dish. Use the bottom of a glass or measuring cup to help create a compact, even layer.
-
- Chill Crust: Place the crust in the refrigerator to chill and firm up for at least 30 minutes while you prepare the filling. (Alternatively, you can bake the crust at 350°F (175°C) for 8-10 minutes to make it crispier, then let it cool completely.)
Phase 2: Create the Luscious Dairy-Free French Silk Filling
-
- Melt Chocolate: Melt the dairy-free chocolate using a double boiler or in the microwave in 20-30 second intervals, stirring in between, until smooth. Set aside to cool slightly until it’s lukewarm but still liquid.
-
- Cream Dairy-Free Butter and Sugar: In the bowl of a stand mixer fitted with the paddle attachment (or using a hand mixer and a large bowl), beat the softened dairy-free butter on medium speed until creamy, about 1 minute. Gradually add the granulated sugar. Once all sugar is added, increase the speed to medium-high and beat for a full 5-8 minutes. The mixture should become very light in color and fluffy. This extended creaming is crucial for the silky texture. Scrape down the sides of the bowl periodically.
-
- Add Cooled Chocolate, Vanilla, and Salt: Reduce the mixer speed to low and slowly drizzle in the cooled, melted dairy-free chocolate. Add the vanilla extract and salt (if using). Mix until just combined, then beat on medium speed for another 2 minutes until smooth and glossy. Scrape down the bowl.
-
- Incorporate Pasteurized Eggs: This is a critical step for texture. With the mixer on medium speed, add the pasteurized eggs one at a time. Beat for at least 5 minutes after adding each egg. This long beating time is essential for emulsifying the eggs properly and incorporating air, which contributes to the pie’s light, silky texture. The mixture will increase in volume and become very smooth and glossy. Scrape down the sides of the bowl between egg additions.
Phase 3: Assemble and Chill the Pie
-
- Fill the Crust: Pour the prepared dairy-free chocolate silk filling into the chilled cookie crust, spreading it evenly with a spatula.
-
- Chill Thoroughly: Cover the pie loosely with plastic wrap (try not to let it touch the filling’s surface) and refrigerate for at least 6 hours, or preferably overnight (8-12 hours). The pie needs this time to fully set and for the flavors to meld. Do not rush this step!
Phase 4: Prepare Dairy-Free Whipped Topping and Serve
-
- Prepare Coconut Whipped Cream (just before serving or up to a few hours ahead):
-
- Carefully open the chilled can(s) of full-fat coconut milk without shaking it. Scoop out the thick, solidified coconut cream from the top, leaving the watery liquid behind (save the liquid for smoothies or other uses).
-
- Place the solid coconut cream in a chilled mixing bowl.
-
- Using a hand mixer or stand mixer with the whisk attachment, beat the coconut cream on medium-high speed until it becomes fluffy and soft peaks form (about 3-5 minutes).
-
- Gradually add the sifted powdered sugar and vanilla extract, beating until combined and desired sweetness/stiffness is reached. Be careful not to overbeat, as coconut cream can sometimes separate.
-
- Prepare Coconut Whipped Cream (just before serving or up to a few hours ahead):
-
- Top and Garnish: Once the pie is fully chilled and set, spread or pipe the dairy-free coconut whipped cream over the top. Garnish generously with dairy-free chocolate shavings or curls.
-
- Serve: Slice the pie while chilled and serve immediately.
Nutrition
- Serving Size: one normal portion
- Calories: 550 to 750


