

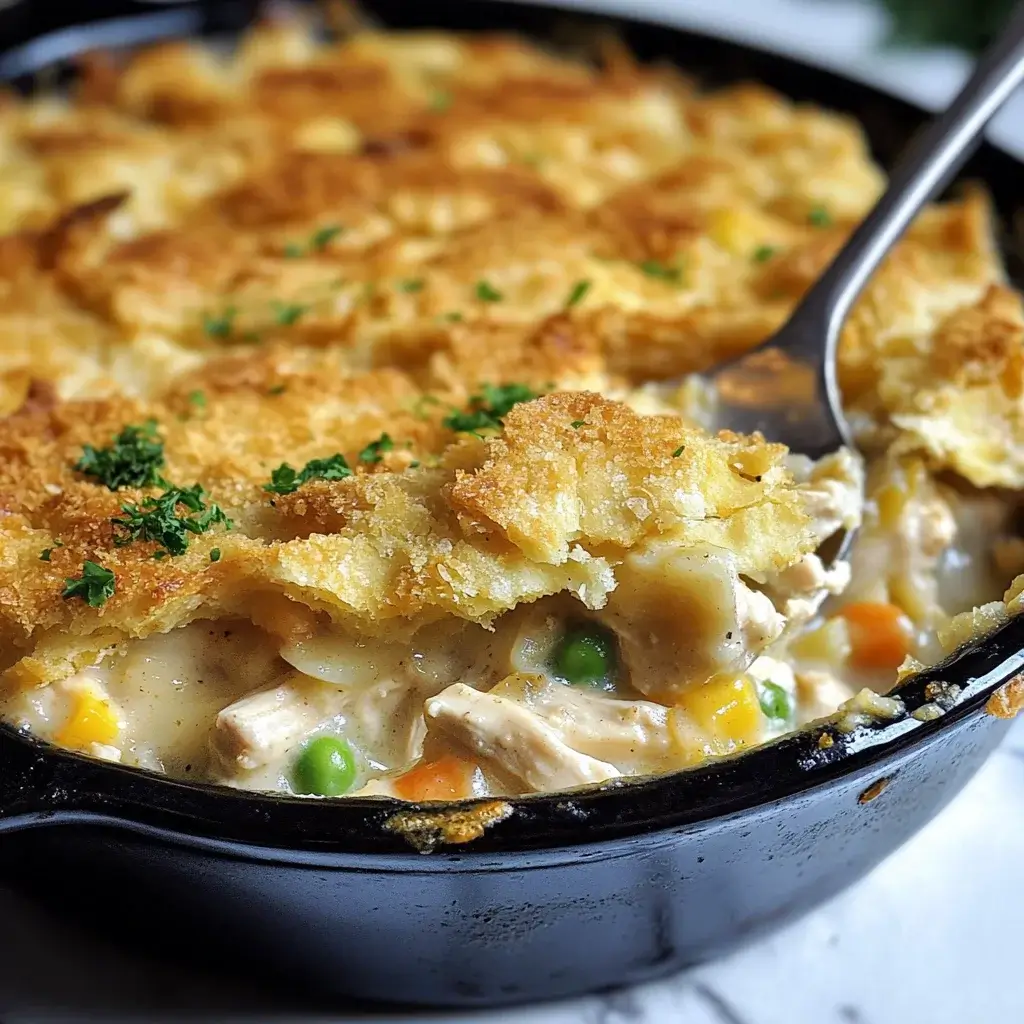
There are some recipes that just scream comfort, and for our family, chicken pot pie is at the top of that list. However, the traditional version, with its often finicky crust, can be a bit time-consuming for a busy weeknight. That’s where this game-changing Crustless Rotisserie Chicken Pot Pie Casserole swooped in and saved dinnertime on more than one occasion! The first time I made it, I was a little skeptical. Would it really feel like pot pie without the crust? The answer was a resounding YES! My husband, who is a stickler for tradition, was instantly won over by the rich, creamy filling packed with tender rotisserie chicken and colorful vegetables. The kids, who usually pick around their veggies, devoured every last bite, happily scooping up the savory sauce. The beauty of this dish lies in its simplicity and its reliance on the already flavorful rotisserie chicken, which cuts down prep time significantly. It’s become a go-to in our household, a warm, inviting hug in a bowl that’s both incredibly satisfying and surprisingly easy to whip up. It’s the kind of meal that makes everyone around the table smile, and as a home cook, that’s the best review you can ask for.
Complete with the ingredients amount
This Crustless Rotisserie Chicken Pot Pie Casserole is designed for hearty servings and is packed with flavor. The use of rotisserie chicken not only saves time but also imparts a deep, roasted flavor that permeates the entire dish. Here’s what you’ll need:
- Butter: 4 tablespoons (1/2 stick), unsalted
- Onion: 1 medium, finely chopped (about 1 cup)
- Carrots: 2 medium, peeled and diced (about 1 cup)
- Celery: 2 ribs, finely chopped (about 1 cup)
- Garlic: 3 cloves, minced (about 1 tablespoon)
- All-Purpose Flour: 1/3 cup (this creates the roux for a thick, creamy sauce)
- Chicken Broth: 3 cups, low sodium is preferred to control saltiness
- Milk: 1 cup (whole milk or 2% for richness, but others can work)
- Rotisserie Chicken: 1 whole chicken, skin removed, meat shredded (yielding about 3-4 cups of cooked chicken)
- Frozen Peas: 1 cup (no need to thaw)
- Frozen Corn: 1 cup (no need to thaw; or use a 1.5 cup bag of mixed peas and carrots, adjusting fresh carrots accordingly)
- Dried Thyme: 1 teaspoon (or 1 tablespoon fresh thyme, chopped)
- Dried Rosemary: 1/2 teaspoon, crushed (or 1.5 teaspoons fresh rosemary, chopped)
- Salt: 1 teaspoon, or to taste (adjust based on your broth and chicken)
- Black Pepper: 1/2 teaspoon, freshly ground, or to taste
- Optional Topping: 1/2 cup shredded cheddar cheese or Parmesan cheese, or a sprinkle of breadcrumbs mixed with melted butter for a bit of crunch.
- Fresh Parsley: 2 tablespoons, chopped, for garnish (optional)
Instructions
Follow these step-by-step instructions to create a delicious and comforting Crustless Rotisserie Chicken Pot Pie Casserole that your whole family will adore. This recipe focuses on building layers of flavor for a truly satisfying meal.
- Preheat and Prepare: Preheat your oven to 375°F (190°C). Lightly grease a 9×13 inch baking dish or a similar-sized casserole dish (approximately 2.5-3 quart capacity). If using an oven-safe skillet (like a large cast iron), you can make the entire dish in one pan.
- Sauté Aromatics: In a large, deep skillet or Dutch oven, melt the butter over medium heat. Once the butter is melted and shimmering, add the chopped onion, diced carrots, and chopped celery. Sauté for 8-10 minutes, stirring occasionally, until the vegetables begin to soften and the onion becomes translucent. This step is crucial for developing the foundational flavors of the casserole.
- Add Garlic: Stir in the minced garlic and cook for another 1-2 minutes until fragrant. Be careful not to burn the garlic, as it can become bitter.
- Create the Roux: Sprinkle the all-purpose flour over the sautéed vegetables. Stir continuously for 2-3 minutes to cook out the raw flour taste. The mixture will become thick and pasty – this is your roux, which will thicken the sauce.
- Build the Sauce: Gradually whisk in the chicken broth, a little at a time, ensuring each addition is fully incorporated before adding more. This helps prevent lumps. Once all the broth is added, whisk in the milk.
- Simmer and Thicken: Bring the mixture to a gentle simmer, stirring frequently. Continue to cook for 5-7 minutes, or until the sauce has thickened to a gravy-like consistency. It should coat the back of a spoon.
- Incorporate Chicken and Seasonings: Stir in the shredded rotisserie chicken, frozen peas, frozen corn, dried thyme, dried rosemary, salt, and black pepper. Mix well to ensure everything is evenly distributed and coated in the creamy sauce. Taste and adjust seasonings if necessary. At this point, the mixture will be quite full and aromatic.
- Transfer to Baking Dish (if needed): If you weren’t using an oven-safe skillet, carefully pour the chicken and vegetable mixture into your prepared baking dish, spreading it evenly.
- Optional Topping: If desired, sprinkle the top evenly with shredded cheddar cheese, Parmesan cheese, or buttered breadcrumbs for an added layer of flavor and texture.
- Bake: Place the casserole in the preheated oven and bake for 25-30 minutes, or until the filling is hot and bubbly around the edges, and the top (if using cheese or breadcrumbs) is golden brown.
- Rest and Garnish: Remove the casserole from the oven and let it rest for 5-10 minutes before serving. This allows the sauce to thicken slightly more and prevents a molten-hot first bite. Garnish with fresh chopped parsley, if desired, for a touch of color and freshness.
Nutrition Facts (Servings and calories per serving)
Understanding the nutritional profile of your meals is important for many. Please note that these values are approximate and can vary based on specific ingredient brands, exact quantities, and any substitutions made.
- Servings: This recipe generously serves 6-8 people.
- Calories per serving (approximate, based on 6 servings): Around 450-550 calories.
- Calories per serving (approximate, based on 8 servings): Around 340-420 calories.
Breakdown (Approximate per serving, based on 6 servings):
- Protein: 30-35g (Primarily from chicken)
- Fat: 20-25g (From butter, milk, chicken, and any added cheese)
- Saturated Fat: 10-12g
- Carbohydrates: 30-35g (Mainly from flour and vegetables)
- Fiber: 4-6g (From vegetables)
- Sugar: 5-8g (Naturally occurring in vegetables and milk)
To get a more precise nutritional count, you can use online recipe calculators and input your exact ingredients and quantities. This recipe provides a good balance of protein, carbohydrates, and fats, making it a wholesome and filling meal. The absence of a traditional pie crust significantly reduces the overall calorie and carbohydrate count compared to standard chicken pot pie.
Preparation time
This Crustless Rotisserie Chicken Pot Pie Casserole is designed to be relatively quick, especially thanks to the convenience of pre-cooked rotisserie chicken. Here’s a breakdown of the time involved:
- Prep Time: 20-25 minutes
- This includes:
- Chopping vegetables (onion, carrots, celery, garlic): 10-15 minutes
- Shredding the rotisserie chicken: 5-7 minutes
- Measuring out other ingredients: 3-5 minutes
- This includes:
- Cook Time: 45-55 minutes
- Sautéing vegetables and making the sauce: 20-25 minutes
- Baking time in the oven: 25-30 minutes
- Resting Time: 5-10 minutes (essential for the sauce to set slightly)
Total Time: Approximately 1 hour 10 minutes to 1 hour 30 minutes from start to finish.
While it’s not a 30-minute meal, a significant portion of the “cook time” is hands-off baking, allowing you to attend to other things or simply relax. The use of rotisserie chicken shaves off at least 30-45 minutes compared to cooking chicken from scratch specifically for the pot pie.
How to Serve
This Crustless Rotisserie Chicken Pot Pie Casserole is wonderfully versatile and can be served in a few delightful ways to make it a complete and satisfying meal. Here are some serving suggestions:
- Simply in a Bowl:
- This is the classic and perhaps best way to enjoy it. Ladle generous portions into individual bowls. The creamy, chunky filling is a meal in itself.
- Why it works: It allows you to savor every spoonful of the rich sauce, tender chicken, and perfectly cooked vegetables.
- With a Side of Bread:
- Serve with a slice of crusty bread, warm dinner rolls, or fluffy biscuits.
- Options:
- Garlic bread
- Sourdough slices
- Buttermilk biscuits (store-bought or homemade if you’re feeling ambitious and miss a bit of that bready element)
- Why it works: Perfect for mopping up every last bit of the delicious sauce from the bowl.
- Over Grains or Starches:
- While it’s crustless, you can serve the casserole over a base to add more substance.
- Options:
- Fluffy white or brown rice
- Quinoa for a healthier, protein-packed option
- Egg noodles
- Mashed potatoes (creamy mashed potatoes underneath this casserole are divine!)
- Cauliflower rice for a low-carb option
- Why it works: This stretches the meal further and adds different textures and flavors.
- Accompanied by a Fresh Salad:
- A simple green salad with a light vinaigrette provides a refreshing contrast to the richness of the casserole.
- Options:
- Mixed greens with cherry tomatoes and cucumber
- Arugula salad with a lemon-Dijon dressing
- Caesar salad (go easy on the creamy dressing if you want a lighter contrast)
- Why it works: The acidity and crispness of the salad cut through the creamy texture of the pot pie, balancing the meal.
- Garnishes for Extra Appeal:
- Don’t underestimate the power of a good garnish!
- Options:
- Freshly chopped parsley (as mentioned in the recipe)
- A sprinkle of paprika for color
- A few grinds of fresh black pepper
- A dollop of sour cream or Greek yogurt for a tangy finish (especially good if you like a little extra creaminess)
- Why it works: Garnishes add visual appeal and can introduce subtle new flavors that enhance the overall experience.
No matter how you choose to serve it, this casserole is best enjoyed warm, allowing the comforting flavors and aromas to fully envelop you.
Additional tips (5 tips)
To help you make this Crustless Rotisserie Chicken Pot Pie Casserole even more perfect for your taste and convenience, here are five additional tips:
- Vegetable Variations & Additions:
- Don’t feel limited by peas, carrots, and corn! This casserole is very forgiving. Consider adding or substituting with:
- Mushrooms: Sauté sliced cremini or button mushrooms with the onions for an earthy depth.
- Potatoes: Add 1-2 small, diced potatoes (russet or Yukon gold, parboiled or sautéed until nearly tender) for extra heartiness.
- Green Beans: Use trimmed and cut fresh green beans or frozen cut green beans.
- Broccoli Florets: Small, blanched broccoli florets can add color and nutrients.
- Leeks: Substitute part of the onion with well-washed and sliced leeks for a milder, sweeter flavor.
- Pro-Tip: If using heartier fresh vegetables like potatoes or dense broccoli, consider adding them earlier with the carrots and celery, or lightly steaming/parboiling them first to ensure they cook through.
- Don’t feel limited by peas, carrots, and corn! This casserole is very forgiving. Consider adding or substituting with:
- Boost the Creaminess:
- For an even richer, more decadent sauce, you can make a few adjustments:
- Heavy Cream: Substitute half of the milk with heavy cream.
- Cream Cheese: Whisk in 2-4 ounces of softened cream cheese into the sauce after it has thickened but before adding the chicken and vegetables. It will melt in and create an ultra-creamy texture.
- Evaporated Milk: Can be used in place of regular milk for a richer, slightly more concentrated flavor.
- Pro-Tip: If your sauce isn’t as thick as you’d like after simmering, you can create a small slurry by whisking 1 tablespoon of cornstarch with 2 tablespoons of cold water, then slowly stirring it into the simmering sauce until it thickens further.
- For an even richer, more decadent sauce, you can make a few adjustments:
- Herb Power & Flavor Enhancers:
- Fresh herbs always elevate a dish. If you have them, use them!
- Fresh vs. Dried Rule: Generally, use three times the amount of fresh herbs compared to dried (e.g., 1 tablespoon fresh thyme for 1 teaspoon dried).
- Other Herb Ideas: A pinch of sage or marjoram can also complement the chicken and vegetable flavors beautifully.
- Flavor Boosters: A dash of Worcestershire sauce or a teaspoon of Dijon mustard stirred into the sauce can add a subtle umami kick and depth. A bay leaf simmered with the sauce (and removed before baking) also adds a classic aromatic layer.
- Fresh herbs always elevate a dish. If you have them, use them!
- Make-Ahead & Freezing Instructions:
- Make-Ahead: You can assemble the entire casserole (without the optional cheese/breadcrumb topping if using breadcrumbs, as they can get soggy) up to 1 day in advance. Cover tightly with plastic wrap or foil and refrigerate. When ready to bake, you might need to add 10-15 minutes to the baking time if baking directly from cold. Add the topping just before baking.
- Freezing:
- Baked: Allow the baked casserole to cool completely. Cover tightly with plastic wrap and then a layer of foil, or transfer to a freezer-safe container. Freeze for up to 2-3 months. Thaw overnight in the refrigerator, then reheat in a 350°F (175°C) oven until heated through (about 30-45 minutes), covering with foil if it starts to brown too much.
- Unbaked: Assemble the casserole as directed, but do not bake. Allow it to cool completely if the filling is warm. Cover tightly and freeze. Thaw overnight in the refrigerator before baking as directed, potentially adding 10-15 minutes to the baking time.
- Note on Texture: Dairy-based sauces can sometimes separate slightly or change texture upon freezing and reheating, but it should still be delicious. Stirring gently after reheating can help.
- Rotisserie Chicken Savvy:
- Flavor Choice: Opt for a plain or savory-herb rotisserie chicken rather than one with strong BBQ or lemon-pepper seasonings, as these might clash with the traditional pot pie flavors.
- Efficient Shredding: The easiest time to shred a rotisserie chicken is when it’s still warm (but cool enough to handle). The meat pulls away from the bones more easily.
- Don’t Discard the Bones! Save the carcass and any leftover bones/skin to make homemade chicken stock for future recipes (including another batch of this casserole!). It’s incredibly flavorful and cost-effective. Simply simmer the bones with vegetable scraps (onion ends, carrot peels, celery tops), a bay leaf, and peppercorns in water for a few hours.
FAQ section (5 Q/A)
Here are some frequently asked questions about this Crustless Rotisserie Chicken Pot Pie Casserole recipe, with helpful answers:
Q1: Can I use raw chicken instead of rotisserie chicken?
A1: Absolutely! If you prefer to use raw chicken, you’ll need about 1.5 pounds of boneless, skinless chicken breasts or thighs. You can either:
* Poach it: Simmer the chicken in water or broth until cooked through, then shred or dice it.
* Sauté it: Dice the raw chicken into bite-sized pieces and cook it in a little olive oil or butter in the skillet before you sauté the onions, carrots, and celery. Remove the cooked chicken and set it aside, then proceed with the recipe, adding the cooked chicken back in step 7.
Ensure the chicken is cooked through before adding it to the sauce. This will add about 15-20 minutes to your prep/cook time.
Q2: How can I make this recipe gluten-free?
A2: Yes, this recipe can easily be adapted to be gluten-free. The primary source of gluten is the all-purpose flour used to make the roux.
* Gluten-Free All-Purpose Flour Blend: Substitute the regular flour with an equal amount of a good quality gluten-free all-purpose flour blend (one that contains xanthan gum is often best for thickening).
* Cornstarch or Arrowroot Slurry: Omit the flour. After the broth and milk have been added and are simmering, create a slurry by whisking 3-4 tablespoons of cornstarch (or arrowroot powder) with an equal amount of cold water or cold broth. Slowly whisk this slurry into the simmering liquid until the sauce thickens to your desired consistency. You might not need all of it.
Remember to also ensure your chicken broth is certified gluten-free.
Q3: What’s the best way to store and reheat leftovers?
A3: Leftovers are fantastic!
* Storage: Allow the casserole to cool to room temperature, then transfer it to an airtight container or cover the baking dish tightly with plastic wrap or foil. Store in the refrigerator for up to 3-4 days.
* Reheating:
* Oven (Recommended for larger portions): Preheat oven to 350°F (175°C). Place the leftover casserole (or individual portions) in an oven-safe dish. Cover with foil to prevent drying out or over-browning. Bake for 20-30 minutes, or until heated through. Remove foil for the last 5-10 minutes if you want to crisp up the top.
* Microwave (Quickest for individual servings): Place a serving on a microwave-safe plate. Cover loosely with a microwave-safe lid or paper towel. Reheat on medium-high power in 1-2 minute intervals, stirring in between, until hot.
* Stovetop: For smaller portions, you can gently reheat in a saucepan over medium-low heat, stirring occasionally. You might need to add a splash of milk or broth if it seems too thick.
Q4: Can I make this dairy-free?
A4: Yes, you can make a dairy-free version with a few substitutions:
* Butter: Replace the butter with a dairy-free butter alternative (like Earth Balance) or olive oil.
* Milk: Substitute the cow’s milk with an unsweetened, plain plant-based milk. Unsweetened almond milk, soy milk, or oat milk (ensure it’s a neutral-flavored one) would work well. Full-fat canned coconut milk could also be used for a very rich sauce, though it might impart a slight coconut flavor.
* Cheese (if using): Opt for a dairy-free shredded cheese alternative if you want a cheesy topping, or simply omit the cheese.
The overall creaminess might be slightly different, but it will still be a delicious and satisfying casserole.
Q5: I don’t have a large oven-safe skillet. What can I use instead?
A5: No problem at all! You simply prepare the sauce and filling on the stovetop in any large, deep skillet or pot (like a Dutch oven or stockpot), and then transfer it to a separate baking dish before it goes into the oven.
* Follow steps 2 through 7 (making the sauce and adding chicken/veggies) in your regular skillet or pot on the stovetop.
* Then, as directed in step 8, pour this prepared filling into a greased 9×13 inch baking dish (or a similar 2.5-3 quart casserole dish).
* Add any optional toppings and bake as instructed.
This method works perfectly and is how many casserole recipes are traditionally made. The only difference is one extra dish to wash.

Crustless Rotisserie Chicken Pot Pie Casserole recipe
Ingredients
-
- Butter: 4 tablespoons (1/2 stick), unsalted
-
- Onion: 1 medium, finely chopped (about 1 cup)
-
- Carrots: 2 medium, peeled and diced (about 1 cup)
-
- Celery: 2 ribs, finely chopped (about 1 cup)
-
- Garlic: 3 cloves, minced (about 1 tablespoon)
-
- All-Purpose Flour: 1/3 cup (this creates the roux for a thick, creamy sauce)
-
- Chicken Broth: 3 cups, low sodium is preferred to control saltiness
-
- Milk: 1 cup (whole milk or 2% for richness, but others can work)
-
- Rotisserie Chicken: 1 whole chicken, skin removed, meat shredded (yielding about 3-4 cups of cooked chicken)
-
- Frozen Peas: 1 cup (no need to thaw)
-
- Frozen Corn: 1 cup (no need to thaw; or use a 1.5 cup bag of mixed peas and carrots, adjusting fresh carrots accordingly)
-
- Dried Thyme: 1 teaspoon (or 1 tablespoon fresh thyme, chopped)
-
- Dried Rosemary: 1/2 teaspoon, crushed (or 1.5 teaspoons fresh rosemary, chopped)
-
- Salt: 1 teaspoon, or to taste (adjust based on your broth and chicken)
-
- Black Pepper: 1/2 teaspoon, freshly ground, or to taste
-
- Optional Topping: 1/2 cup shredded cheddar cheese or Parmesan cheese, or a sprinkle of breadcrumbs mixed with melted butter for a bit of crunch.
-
- Fresh Parsley: 2 tablespoons, chopped, for garnish (optional)
Instructions
-
- Preheat and Prepare: Preheat your oven to 375°F (190°C). Lightly grease a 9×13 inch baking dish or a similar-sized casserole dish (approximately 2.5-3 quart capacity). If using an oven-safe skillet (like a large cast iron), you can make the entire dish in one pan.
-
- Sauté Aromatics: In a large, deep skillet or Dutch oven, melt the butter over medium heat. Once the butter is melted and shimmering, add the chopped onion, diced carrots, and chopped celery. Sauté for 8-10 minutes, stirring occasionally, until the vegetables begin to soften and the onion becomes translucent. This step is crucial for developing the foundational flavors of the casserole.
-
- Add Garlic: Stir in the minced garlic and cook for another 1-2 minutes until fragrant. Be careful not to burn the garlic, as it can become bitter.
-
- Create the Roux: Sprinkle the all-purpose flour over the sautéed vegetables. Stir continuously for 2-3 minutes to cook out the raw flour taste. The mixture will become thick and pasty – this is your roux, which will thicken the sauce.
-
- Build the Sauce: Gradually whisk in the chicken broth, a little at a time, ensuring each addition is fully incorporated before adding more. This helps prevent lumps. Once all the broth is added, whisk in the milk.
-
- Simmer and Thicken: Bring the mixture to a gentle simmer, stirring frequently. Continue to cook for 5-7 minutes, or until the sauce has thickened to a gravy-like consistency. It should coat the back of a spoon.
-
- Incorporate Chicken and Seasonings: Stir in the shredded rotisserie chicken, frozen peas, frozen corn, dried thyme, dried rosemary, salt, and black pepper. Mix well to ensure everything is evenly distributed and coated in the creamy sauce. Taste and adjust seasonings if necessary. At this point, the mixture will be quite full and aromatic.
-
- Transfer to Baking Dish (if needed): If you weren’t using an oven-safe skillet, carefully pour the chicken and vegetable mixture into your prepared baking dish, spreading it evenly.
-
- Optional Topping: If desired, sprinkle the top evenly with shredded cheddar cheese, Parmesan cheese, or buttered breadcrumbs for an added layer of flavor and texture.
-
- Bake: Place the casserole in the preheated oven and bake for 25-30 minutes, or until the filling is hot and bubbly around the edges, and the top (if using cheese or breadcrumbs) is golden brown.
-
- Rest and Garnish: Remove the casserole from the oven and let it rest for 5-10 minutes before serving. This allows the sauce to thicken slightly more and prevents a molten-hot first bite. Garnish with fresh chopped parsley, if desired, for a touch of color and freshness.
Nutrition
- Serving Size: one normal portion
- Calories: 450-550 calories


