

Game day at our house is a serious affair. While the roar of the crowd on TV and the thrill of the game are central, let’s be honest, the food is a close second! And for years, one appetizer has consistently stolen the show: Crockpot Seven-Layer Bean Dip. I remember the first time I made it; I was skeptical. Seven layers? In a crockpot? It sounded like a recipe for a mushy mess. Boy, was I wrong! The aroma that filled my kitchen as it simmered was intoxicating, a savory, cheesy, spicy promise of deliciousness to come. And the taste? Layer upon layer of flavor and texture, from the creamy refried beans to the tangy sour cream, the zesty salsa, and the melty cheese. It was an instant hit. Now, no gathering at my home, big or small, is complete without this crockpot wonder. It’s become a family favorite, a guaranteed crowd-pleaser, and my absolute go-to appetizer when I want something easy, flavorful, and utterly satisfying. If you’re searching for the ultimate party dip that requires minimal effort but delivers maximum flavor, look no further. This Crockpot Seven-Layer Bean Dip is about to become your new best friend in the kitchen!
Ingredients for Crockpot Seven-Layer Bean Dip
Creating a truly spectacular Crockpot Seven-Layer Bean Dip is all about layering flavors and textures, and it starts with selecting the right ingredients. While the name suggests seven layers, and we’ll certainly build upon that concept, the magic lies in the quality and combination of each component. Here’s a detailed breakdown of what you’ll need to create this crowd-pleasing dip:
- Refried Beans: 2 (16-ounce) cans. The foundation of our dip, refried beans provide a creamy, comforting base. You have options here! Traditional refried beans are typically made from pinto beans and are readily available. Vegetarian refried beans are a great choice for those avoiding lard, and often taste just as rich. For a flavor twist, consider black refried beans for a slightly smoky and earthier profile. You can even opt for spicy refried beans if you want to kick up the heat right from the base layer. Look for cans labeled “fat-free” or “reduced sodium” if you’re aiming for a slightly healthier version. For the absolute best flavor, consider making your own refried beans from scratch – it’s more time-consuming, but the depth of flavor is unmatched. Warm the refried beans slightly before layering to make them easier to spread.
- Salsa: 1 (16-ounce) jar. Salsa adds a vibrant, zesty kick and moisture to the dip. The type of salsa you choose will greatly influence the overall flavor profile. A mild salsa is perfect for those who prefer a gentler heat, while a medium salsa offers a balanced spice. For those who like it hot, a hot salsa or even a habanero salsa will definitely bring the heat. Consider the style of salsa too. Pico de gallo provides a chunkier texture with fresh tomatoes, onions, and cilantro. Restaurant-style salsa is smoother and more blended. Corn salsa or black bean salsa can add extra layers of flavor and texture. For a smoky depth, try a roasted tomato salsa. Choose a salsa that complements your spice preference and desired texture.
- Sour Cream: 1 (16-ounce) container. Cool and creamy sour cream provides a delightful contrast to the savory beans and spicy salsa. It adds richness and tanginess that balances the other flavors. Full-fat sour cream will give you the richest flavor and creamiest texture. Reduced-fat sour cream is a lighter option that still provides a good creamy element. For a tangier taste, consider using Mexican crema or crème fraîche. If you’re dairy-free, plant-based sour cream alternatives made from cashews, soy, or coconut are readily available and work surprisingly well. Make sure your sour cream is chilled for the best texture in the final dip.
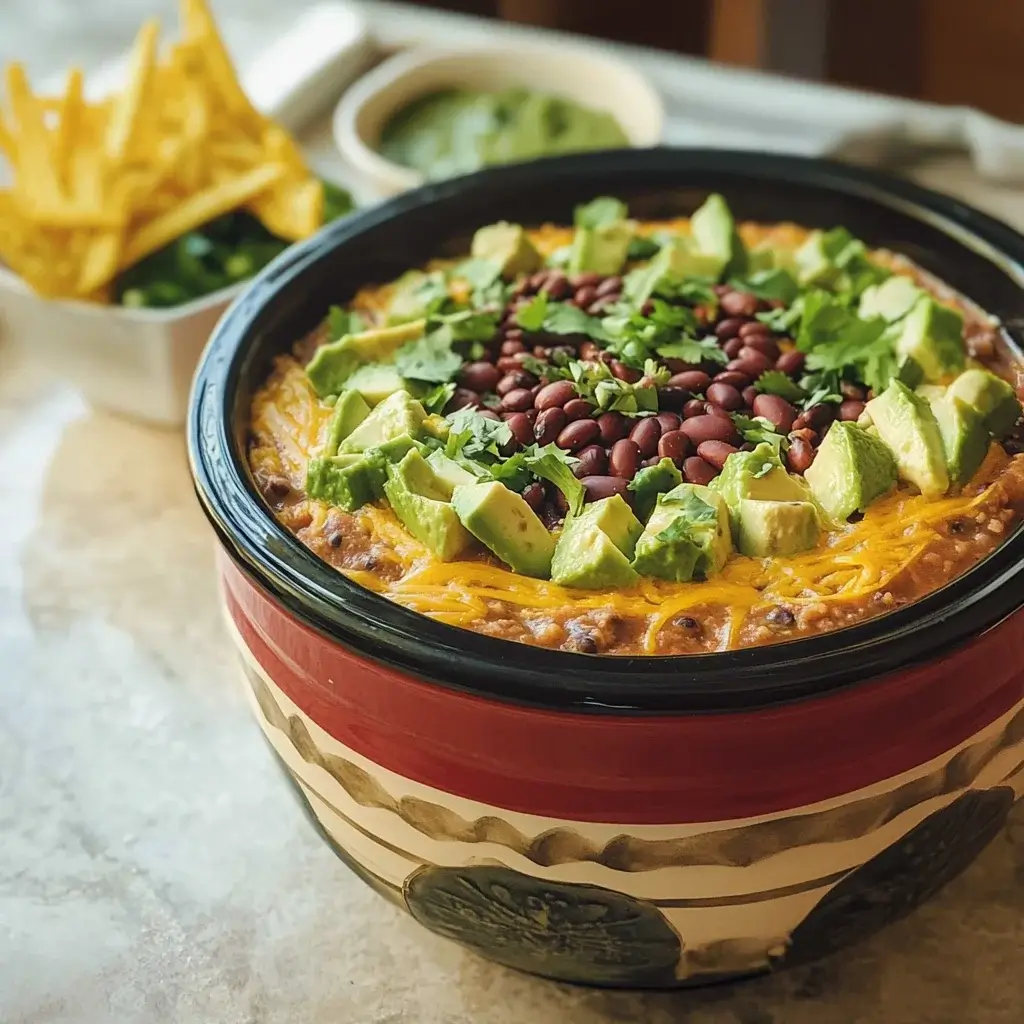
- Guacamole: 1 (16-ounce) container or homemade equivalent. Creamy, rich guacamole adds another layer of coolness and healthy fats. You can purchase pre-made guacamole for convenience – look for refrigerated guacamole in the deli or produce section for the freshest taste. Alternatively, homemade guacamole is incredibly easy to make and allows you to customize the flavors to your liking. Fresh avocados, lime juice, cilantro, onion, and jalapeno are the basic ingredients. You can adjust the spice level and add other ingredients like tomatoes or garlic to your homemade guacamole. Whether store-bought or homemade, ensure your guacamole is fresh and vibrant.
- Shredded Cheese: 2 cups. Melty, gooey cheese is a must for any good bean dip! Shredded cheddar cheese is a classic choice, offering a sharp and familiar flavor. Monterey Jack cheese melts beautifully and provides a mild, creamy taste. Pepper Jack cheese adds a spicy kick and melty goodness. A Mexican cheese blend is a convenient option that combines several cheeses like cheddar, Monterey Jack, and queso quesadilla for a complex flavor and excellent melt. Colby Jack cheese offers a milder, slightly sweeter flavor. You can use a single type of cheese or create your own blend for a customized flavor profile. Pre-shredded cheese is convenient, but freshly shredded cheese often melts more smoothly and has better flavor.
- Black Olives: 1 (4-ounce) can, sliced. Salty, briny black olives add a salty bite and visual appeal to the dip. Sliced black olives are the most convenient for layering. You can also use whole black olives and slice them yourself or roughly chop them for a chunkier texture. Kalamata olives or green olives with pimentos can be used for a different flavor profile, but traditional black olives are classic in seven-layer bean dip. Drain the olives well before layering to prevent excess moisture in the dip.
- Green Onions: 1 bunch, thinly sliced. Fresh green onions provide a mild oniony bite and a pop of fresh green color. Thinly sliced green onions are perfect for scattering over the top layer. Use both the white and green parts for maximum flavor and visual appeal. Chives can be used as a milder alternative if you prefer a less intense onion flavor. Green onions are best added fresh just before serving to maintain their crispness and vibrant color.
Optional Ingredients for Customization:
- Taco Seasoning: 1 packet. Stirring taco seasoning into the refried beans can boost the savory, Tex-Mex flavor.
- Jalapeños: Sliced or diced, fresh or pickled. Add for extra heat – pickled jalapeños offer a vinegary tang.
- Cooked Ground Beef or Chorizo: Browned and drained, add a layer of protein for a heartier dip.
- Pico de Gallo or Diced Tomatoes: For extra freshness and texture.
- Cilantro: Freshly chopped, for garnish and a fresh, herbaceous note.
- Hot Sauce: Add a few dashes to the refried beans or salsa for extra heat.
By gathering these ingredients, you’re ready to build a flavorful and satisfying Crockpot Seven-Layer Bean Dip that will be the star of any gathering. The beauty of this recipe is its adaptability – feel free to adjust ingredients and quantities to suit your taste and dietary preferences!
Instructions: Making Crockpot Seven-Layer Bean Dip
Creating Crockpot Seven-Layer Bean Dip is incredibly easy, making it a go-to appetizer for busy hosts. The slow cooker does most of the work, gently heating and melting the layers to create a harmonious and delicious dip. Here’s a step-by-step guide:
- Prepare the Crockpot: Lightly grease the inside of your crockpot. This helps prevent sticking and makes cleanup easier. You can use cooking spray or a little bit of olive oil. A 6-quart or larger slow cooker works best for this recipe, allowing ample space for all the layers. If you are using a smaller crockpot, you may need to reduce the ingredient quantities slightly.
- Layer 1: Refried Beans: Spread the refried beans evenly across the bottom of the greased crockpot. This is the foundation of your dip, so ensure it covers the entire bottom surface. If your refried beans are very thick, you can add a tablespoon or two of water or broth to thin them slightly and make them easier to spread. If you are using taco seasoning, stir it into the refried beans before spreading for enhanced flavor. Warming the refried beans slightly in the microwave or on the stovetop beforehand can also make them easier to spread evenly.
- Layer 2: Salsa: Pour the salsa evenly over the refried bean layer. Spread it gently to cover the beans completely. The salsa adds moisture and flavor to the beans and helps to create a cohesive dip. If you are using a chunky salsa like pico de gallo, you may want to drain off some of the excess liquid before layering to prevent the dip from becoming too watery.
- Layer 3: Sour Cream: Carefully spread the sour cream over the salsa layer. You can use a spoon or spatula to gently spread it in an even layer. For easier spreading, you can dollop spoonfuls of sour cream across the salsa and then gently spread them together. If you are using a thicker sour cream like Mexican crema, it may be easier to dollop it rather than spread it.
- Layer 4: Guacamole: Spoon the guacamole over the sour cream layer and spread it evenly. Similar to the sour cream, you can dollop spoonfuls and then gently spread them together. If your guacamole is very chunky, you can lightly mash it before layering to make it easier to spread smoothly.
- Layer 5: Shredded Cheese: Sprinkle the shredded cheese evenly over the guacamole layer. Ensure the cheese covers the entire surface, as it will melt and create a delicious cheesy topping. If you are using multiple types of cheese, you can layer them or mix them together before sprinkling.
- Layer 6: Black Olives: Scatter the sliced black olives evenly over the cheese layer. They add a salty, briny flavor and visual appeal. If you are using whole olives, slice or chop them before scattering.
- Layer 7: Green Onions (Optional, added later for freshness): While green onions are listed as the seventh layer, it’s best to add them fresh just before serving to maintain their crispness and vibrant color. If you prefer, you can sprinkle a small amount of green onions now and add the majority just before serving. Alternatively, you can consider the cheese layer and olive layer as layers six and seven, and reserve the green onions entirely for garnish at serving time.
- Cook in the Crockpot: Cover the crockpot and cook on low heat for 2-3 hours, or on high heat for 1-1.5 hours. Cooking time can vary depending on your crockpot and desired level of meltiness. The dip is ready when the cheese is melted and bubbly, and the dip is heated through. Keep an eye on it, especially when cooking on high heat, to prevent burning around the edges.
- Garnish and Serve: Once cooked, carefully remove the lid. If you haven’t already added them, sprinkle the thinly sliced green onions over the top of the dip. You can also add other fresh garnishes like chopped cilantro, diced tomatoes, or a dollop of sour cream for extra visual appeal. Serve hot directly from the crockpot, or keep it warm on the “warm” setting for serving throughout your gathering. Place the crockpot on a heat-safe surface and surround it with your favorite dippers.
Tips for Perfect Crockpot Cooking:
- Don’t Overcook: Overcooking can make the dip dry or cause the cheese to become oily. Cook just until the cheese is melted and bubbly.
- Check for Doneness: Use a spoon to check if the dip is heated through to the bottom layers.
- Keep Warm: Most crockpots have a “warm” setting – use this to keep the dip at a perfect serving temperature for extended periods.
- Adjust Cooking Time: Crockpots can vary in temperature. The first time you make this recipe in your crockpot, keep an eye on it and adjust cooking times as needed for future batches.
Following these instructions will result in a deliciously layered and perfectly cooked Crockpot Seven-Layer Bean Dip that’s ready to impress your guests!
Nutrition Facts for Crockpot Seven-Layer Bean Dip
Crockpot Seven-Layer Bean Dip is a flavorful and satisfying appetizer, but it’s important to be mindful of its nutritional content, especially when considering portion sizes. Here’s a general overview of the nutrition facts per serving. Please note that these are estimates and can vary depending on the specific ingredients used (e.g., fat content of sour cream, type of cheese, salsa ingredients) and serving size.
Servings: This recipe typically yields approximately 12-16 servings, depending on serving size. A serving size is generally considered to be about ½ cup to ¾ cup of dip.
Approximate Nutrition Facts Per Serving (Based on a ½ cup serving, using standard ingredients):
- Calories: Approximately 250-350 calories per serving.
- Total Fat: 15-25 grams
- Saturated Fat: 8-15 grams
- Unsaturated Fat: Varies depending on guacamole and cheese
- Cholesterol: 30-50 mg
- Sodium: 500-800 mg (can be higher depending on canned beans, salsa, and olives)
- Total Carbohydrates: 20-30 grams
- Dietary Fiber: 5-8 grams
- Sugars: 5-10 grams (primarily from salsa and beans)
- Protein: 8-12 grams
Nutritional Highlights and Considerations:
- Fiber-Rich: Refried beans and salsa contribute a good amount of dietary fiber, which is beneficial for digestion and helps promote fullness.
- Protein Source: Beans and cheese provide a decent amount of protein, which helps with satiety.
- Source of Calcium: Cheese is a good source of calcium, important for bone health.
- Vitamins and Minerals: Salsa and guacamole provide vitamins and minerals, including Vitamin C, Vitamin K, and potassium.
- High in Fat and Calories: Due to the cheese, sour cream, and guacamole, this dip is relatively high in fat and calories. Portion control is key, especially for those watching their calorie or fat intake.
- Sodium Content: Canned beans, salsa, olives, and cheese can contribute to a high sodium content. Choosing low-sodium or reduced-sodium versions of these ingredients can help lower the overall sodium level.
Tips to Make it Healthier:
- Use Reduced-Fat or Fat-Free Ingredients: Opt for reduced-fat refried beans, reduced-fat sour cream, and reduced-fat cheese.
- Increase Vegetable Content: Add a layer of sautéed vegetables like bell peppers, onions, or zucchini under the cheese layer. Or mix in some finely chopped spinach or kale into the refried beans.
- Use Greek Yogurt instead of Sour Cream: Plain Greek yogurt is a higher-protein, lower-fat alternative to sour cream.
- Make Guacamole with Less Oil (or no added oil if homemade): Reduce the amount of oil in store-bought guacamole or skip added oil if making homemade.
- Choose a Lower-Sodium Salsa and Beans: Look for salsa and refried beans labeled “low sodium” or “no salt added.”
- Portion Control: Be mindful of serving sizes. Enjoy in moderation as part of a balanced diet.
- Serve with Healthier Dippers: Offer vegetable sticks (carrots, celery, bell peppers, cucumbers) alongside tortilla chips to increase fiber and reduce calorie intake. Whole-wheat pita chips or baked tortilla chips are also better choices than regular fried tortilla chips.
Important Note: While Crockpot Seven-Layer Bean Dip can be part of a balanced diet when enjoyed in moderation, it’s important to be aware of its calorie, fat, and sodium content. Making healthier ingredient choices and practicing portion control can help make it a more nutritious option. For individuals with specific dietary concerns (e.g., sodium restrictions, high cholesterol, weight management), consider the nutritional information and adjust the recipe accordingly.
Preparation Time for Crockpot Seven-Layer Bean Dip
One of the great advantages of Crockpot Seven-Layer Bean Dip is its minimal preparation time. Most of the time is hands-off cooking in the slow cooker, making it perfect for busy days or when you need to prepare appetizers ahead of time. Here’s a breakdown of the estimated preparation time:
Total Preparation Time (Active Time): Approximately 15-20 minutes
Breakdown of Time:
- Ingredient Gathering and Opening Cans/Containers: 5 minutes. This involves getting all the ingredients out of your pantry and refrigerator, and opening cans of beans and olives, and containers of salsa, sour cream, and guacamole.
- Layering Ingredients in the Crockpot: 10-15 minutes. This is the primary active time, where you spread each layer of ingredients into the crockpot. The time will depend on your speed and how neatly you want to layer. It’s a very straightforward process – just spreading each ingredient in turn.
- Slicing Green Onions (if not pre-sliced): 2-3 minutes. If you purchased whole green onions, you’ll need to wash and thinly slice them. If you bought pre-sliced green onions, this step is even faster.
Total Cooking Time (Inactive Time):
- Low Heat: 2-3 hours
- High Heat: 1-1.5 hours
Overall Time (Active Prep + Inactive Cooking):
- Low Heat: Approximately 2 hours 15 minutes to 3 hours 20 minutes
- High Heat: Approximately 1 hour 15 minutes to 1 hour 30 minutes
Tips to Speed Up Preparation:
- Use Pre-Prepared Ingredients: Utilize pre-shredded cheese, pre-sliced black olives, pre-sliced green onions (if available), and store-bought guacamole to minimize chopping and slicing time.
- Organize Ingredients: Have all your ingredients laid out and ready to go before you start layering. This assembly-line approach makes the process faster.
- Work Efficiently: Spread each layer quickly and evenly. Don’t worry about making it perfectly artistic – the flavors will blend together beautifully in the crockpot.
- Prepare Garnishes While Cooking: While the dip is cooking in the crockpot, you can chop any additional garnishes you plan to use (cilantro, tomatoes, jalapeños) or prepare your serving platter and dippers.
Make-Ahead Considerations:
- Assemble Ahead and Cook Later: You can assemble all the layers of the dip in the crockpot several hours in advance or even the day before. Cover the crockpot and store it in the refrigerator. When you’re ready to serve, simply place the crockpot in the base and start cooking. You may need to add a little extra cooking time if starting from cold.
- Cook Ahead and Reheat (Not Recommended for Best Texture): While technically possible to cook the dip completely ahead and reheat it, it’s generally not recommended as the texture of the sour cream and guacamole may change slightly upon reheating. It’s best to cook it closer to serving time for the freshest texture and flavor. However, if you must cook it ahead, reheat gently in the crockpot on low or warm, or in a microwave at low power, stirring occasionally.
Crockpot Seven-Layer Bean Dip is truly a champion of easy appetizers. With just 15-20 minutes of active prep time, you can have a delicious and crowd-pleasing dip simmering away in your crockpot, leaving you free to focus on other party preparations or simply relax and enjoy your gathering!
How to Serve Crockpot Seven-Layer Bean Dip
Crockpot Seven-Layer Bean Dip is incredibly versatile when it comes to serving! Its warm, cheesy, and flavorful nature makes it a perfect centerpiece for any casual gathering, game day party, potluck, or Cinco de Mayo celebration. Here are some enticing ways to serve and present your dip:
- Serve Directly from the Crockpot: The most straightforward and convenient way to serve is right from the crockpot! Keep the crockpot on the “warm” setting to maintain the perfect temperature throughout your event. Place the crockpot on a heat-safe surface or trivet on your serving table. Surround it with a variety of dippers and serving utensils. This keeps the dip warm and inviting, and it’s visually appealing too.
- Transfer to a Serving Dish (for a more elegant presentation): If you prefer a more polished look, you can transfer the cooked dip from the crockpot to a serving dish. Choose an oven-safe or microwave-safe dish if you need to keep it warm. You can transfer the entire dip or just portions as needed. Garnish the serving dish with extra fresh green onions, cilantro, diced tomatoes, or a dollop of sour cream for an attractive presentation.
- Individual Serving Bowls or Cups: For a more controlled and elegant presentation, especially at larger gatherings or for individual appetizers, you can portion the dip into individual serving bowls or cups. This is great for buffet-style setups or passed appetizers. You can layer the dip in the individual cups in advance and then warm them briefly in a microwave or oven if desired (though crockpot dip is often served warm-ish, not piping hot). Garnish each individual serving for a beautiful touch.
- With a Variety of Dippers (The Key to Success!): The dippers you offer are just as important as the dip itself! Provide a diverse selection to cater to different preferences and dietary needs:
- Tortilla Chips: Classic and essential! Offer a mix of regular tortilla chips, blue corn tortilla chips, and even flavored tortilla chips (lime, chili lime). Baked tortilla chips are a healthier option.
- Vegetable Sticks: Carrots, celery, cucumber, bell pepper strips, broccoli florets, and snap peas provide healthy, crunchy, and refreshing dippers.
- Pita Bread or Pita Chips: Warm pita bread triangles or pita chips offer a softer, slightly chewy dipping option. Whole wheat pita is a healthier choice.
- Crackers: Assorted crackers, such as water crackers, wheat crackers, or multigrain crackers, provide a different texture and flavor profile.
- Pretzels: Pretzel rods or pretzel chips offer a salty and crunchy contrast.
- Breadsticks: Breadsticks, either plain or seasoned, can be a more substantial dipper.
- Cheese Crisps: For a low-carb option, consider cheese crisps (baked cheese rounds).
- Garnish Extravaganza: Don’t underestimate the power of garnishes! Fresh garnishes elevate the visual appeal and add extra flavor:
- Fresh Green Onions: Essential for a pop of color and mild onion flavor.
- Chopped Cilantro: Adds a fresh, herbaceous note.
- Diced Tomatoes or Pico de Gallo: For extra freshness and texture.
- Sour Cream or Mexican Crema: Dollops on top add extra creaminess and visual appeal.
- Sliced Jalapeños (fresh or pickled): For those who like extra heat.
- Shredded Lettuce: A bed of shredded lettuce under the dip in a serving dish can add freshness and visual appeal.
- Lime Wedges: Offer lime wedges for guests to squeeze over their dip for a burst of citrus.
- Create a Dip Bar: For a fun and interactive serving experience, set up a Crockpot Seven-Layer Bean Dip bar! Keep the crockpot of dip warm and surround it with bowls of various dippers, garnishes, and even different types of hot sauce for guests to customize their dip experience.
- Themed Serving Ware: Use festive serving dishes and platters that match your event theme. For game day, use sports-themed bowls. For Cinco de Mayo, use colorful Mexican-style serving ware. For a casual gathering, rustic wooden bowls or platters work well.
By employing these serving suggestions, you can transform your delicious Crockpot Seven-Layer Bean Dip into a stunning and irresistible centerpiece for any occasion, ensuring your guests keep coming back for more!
Additional Tips for the Best Crockpot Seven-Layer Bean Dip
To take your Crockpot Seven-Layer Bean Dip from good to absolutely amazing, here are five additional tips to keep in mind:
- Warm the Refried Beans First: While not strictly necessary, warming the refried beans slightly before layering them in the crockpot can make a noticeable difference. Slightly warmed beans are much easier to spread evenly and smoothly across the bottom of the crockpot, creating a better base layer. You can gently warm them in the microwave for a minute or two or in a saucepan on the stovetop over low heat. This also helps to jumpstart the heating process in the crockpot.
- Don’t Skimp on the Cheese Layer: The cheesy layer is a crucial element of Seven-Layer Bean Dip, providing melty, gooey goodness that binds all the flavors together. Don’t be shy with the cheese! Ensure you use a generous amount of shredded cheese and spread it evenly over the guacamole layer so it melts into a beautiful, cheesy blanket. Using a good quality cheese that melts well, like Monterey Jack, Pepper Jack, or a Mexican blend, will also significantly enhance the final texture and flavor.
- Layering Order Matters (Slightly): While the exact layering order isn’t set in stone, following the recommended order generally works best for both flavor and texture. Starting with the refried beans as a base, followed by the salsa for moisture, then the cooling sour cream and guacamole, topped with cheese, and finally olives and green onions, creates a balanced dip where each layer contributes effectively. The heavier, denser layers (beans, salsa) go on the bottom, and the lighter, creamier layers (sour cream, guacamole) go on top, followed by the toppings that benefit from being slightly heated but not fully cooked (cheese, olives), and finally fresh garnishes.
- Adjust Spice Level to Your Preference: Crockpot Seven-Layer Bean Dip is easily customizable to your spice preference. If you like a milder dip, use mild salsa and omit jalapeños. For medium heat, use medium salsa. To kick it up a notch, use hot salsa, add diced jalapeños (fresh or pickled), or stir in a pinch of cayenne pepper or a few dashes of hot sauce into the refried beans or salsa layer. Pepper Jack cheese will also add a subtle spice. You can even offer a bowl of sliced jalapeños or hot sauce on the side for guests to customize their own spice level.
- Don’t Overcook – Watch for Melted Cheese: The key to perfect Crockpot Seven-Layer Bean Dip is to cook it just long enough for the cheese to melt and the dip to be heated through, but not overcook it. Overcooking can result in a dry dip or oily cheese. Cook on low for 2-3 hours or on high for 1-1.5 hours, but start checking for doneness earlier, especially when cooking on high. The dip is ready when the cheese is fully melted and bubbly around the edges, and when a spoon inserted into the center comes out warm. Once the cheese is melted, it’s ready to serve! Keeping it on “warm” setting after cooking is fine, but avoid prolonged high heat cooking.
By incorporating these additional tips, you’ll be well on your way to creating a truly exceptional Crockpot Seven-Layer Bean Dip that’s bursting with flavor, perfectly textured, and sure to be a hit at any gathering. Enjoy the deliciousness!
Frequently Asked Questions (FAQ) about Crockpot Seven-Layer Bean Dip
Here are 5 frequently asked questions about making Crockpot Seven-Layer Bean Dip, along with detailed answers to help you create the perfect dip every time:
Q1: Can I make Seven-Layer Bean Dip without a crockpot?
A: Yes, absolutely! While this article focuses on the crockpot method, you can easily bake Seven-Layer Bean Dip in the oven. Preheat your oven to 350°F (175°C). Assemble all the layers in an oven-safe dish (a 9×13 inch baking dish works well). Bake for 20-25 minutes, or until the cheese is melted and bubbly, and the dip is heated through. Keep an eye on it to prevent burning. You can also microwave individual servings for a quick and easy warm dip – just microwave on medium power in short intervals until heated through, checking frequently to avoid overheating. For a cold version, you can layer all ingredients in a dish and serve chilled – this is often called “Seven-Layer Taco Dip” and is not cooked at all.
Q2: What can I substitute for guacamole in Seven-Layer Bean Dip?
A: If you don’t have guacamole or prefer to skip it, there are several tasty substitutes. Avocado slices or mashed avocado: Simply layer sliced or mashed fresh avocado for a similar creamy texture and flavor (though it will brown quicker than guacamole, so add lime juice). Sour cream with mashed avocado mixed in: Combine sour cream with mashed avocado and a squeeze of lime juice for a creamy, guacamole-like layer. Refried black beans: An extra layer of refried black beans can add creaminess and depth in place of guacamole. Layer of seasoned black beans: Canned black beans, rinsed and seasoned with cumin, chili powder, and lime juice, can provide a different texture but still add a hearty layer. Hummus: While not traditional, a layer of hummus can add a creamy, flavorful, and healthy alternative.
Q3: How do I prevent my Seven-Layer Bean Dip from being watery?
A: Watery bean dip can be avoided by taking a few precautions. Drain excess liquid from salsa: If your salsa is very liquidy, drain off some of the excess juice before layering it. Use thicker refried beans: If your refried beans are thin, consider using a thicker variety or simmering them in a saucepan for a few minutes to reduce excess moisture. Don’t add extra liquid: Avoid adding water or broth unless absolutely necessary to thin very thick refried beans. Use reduced-fat sour cream sparingly: While reduced-fat sour cream is lighter, it can sometimes release more liquid when heated. Full-fat sour cream is generally less prone to this. Cook uncovered (partially) in the last 30 minutes (if needed): If you notice excess liquid accumulating during cooking, you can partially uncover the crockpot during the last 30 minutes of cooking to allow some of the moisture to evaporate.
Q4: Can I add meat to Crockpot Seven-Layer Bean Dip?
A: Absolutely! Adding a layer of cooked meat can make your Crockpot Seven-Layer Bean Dip heartier and more substantial. Cooked ground beef or turkey: Brown ground beef or turkey, drain off excess fat, and season with taco seasoning. Layer this cooked meat on top of the refried beans before adding the salsa. Shredded chicken or pork: Cooked and shredded chicken or pork (like carnitas) can also be added as a meaty layer. Chorizo: Cooked and crumbled chorizo sausage adds a spicy and flavorful meaty element. Ensure any meat you add is fully cooked and drained of excess fat before layering it into the dip.
Q5: How long does Crockpot Seven-Layer Bean Dip last?
A: Crockpot Seven-Layer Bean Dip is best enjoyed fresh and warm. However, leftovers can be stored in an airtight container in the refrigerator for up to 3-4 days. Keep in mind that the texture may change slightly upon refrigeration and reheating – the sour cream and guacamole may become a bit less creamy, and the dip may be slightly less cohesive. To reheat leftovers, microwave in short intervals on medium power, stirring occasionally until heated through. You can also reheat in the oven at a low temperature (around 250°F or 120°C) until warmed through. Reheating in the crockpot is also possible on the “warm” or “low” setting, but it may take longer. For best flavor and texture, it’s recommended to consume the dip within 2-3 days of making it.
These FAQs should address common questions and concerns about Crockpot Seven-Layer Bean Dip, empowering you to make this delicious and easy appetizer with confidence and achieve perfect results every time! Enjoy!
Print
Crockpot Seven-Layer Bean Dip recipe
Ingredients
-
- Refried Beans: 2 (16-ounce) cans. The foundation of our dip, refried beans provide a creamy, comforting base. You have options here! Traditional refried beans are typically made from pinto beans and are readily available. Vegetarian refried beans are a great choice for those avoiding lard, and often taste just as rich. For a flavor twist, consider black refried beans for a slightly smoky and earthier profile. You can even opt for spicy refried beans if you want to kick up the heat right from the base layer. Look for cans labeled “fat-free” or “reduced sodium” if you’re aiming for a slightly healthier version. For the absolute best flavor, consider making your own refried beans from scratch – it’s more time-consuming, but the depth of flavor is unmatched. Warm the refried beans slightly before layering to make them easier to spread.
-
- Salsa: 1 (16-ounce) jar. Salsa adds a vibrant, zesty kick and moisture to the dip. The type of salsa you choose will greatly influence the overall flavor profile. A mild salsa is perfect for those who prefer a gentler heat, while a medium salsa offers a balanced spice. For those who like it hot, a hot salsa or even a habanero salsa will definitely bring the heat. Consider the style of salsa too. Pico de gallo provides a chunkier texture with fresh tomatoes, onions, and cilantro. Restaurant-style salsa is smoother and more blended. Corn salsa or black bean salsa can add extra layers of flavor and texture. For a smoky depth, try a roasted tomato salsa. Choose a salsa that complements your spice preference and desired texture.
-
- Sour Cream: 1 (16-ounce) container. Cool and creamy sour cream provides a delightful contrast to the savory beans and spicy salsa. It adds richness and tanginess that balances the other flavors. Full-fat sour cream will give you the richest flavor and creamiest texture. Reduced-fat sour cream is a lighter option that still provides a good creamy element. For a tangier taste, consider using Mexican crema or crème fraîche. If you’re dairy-free, plant-based sour cream alternatives made from cashews, soy, or coconut are readily available and work surprisingly well. Make sure your sour cream is chilled for the best texture in the final dip.
-
- Guacamole: 1 (16-ounce) container or homemade equivalent. Creamy, rich guacamole adds another layer of coolness and healthy fats. You can purchase pre-made guacamole for convenience – look for refrigerated guacamole in the deli or produce section for the freshest taste. Alternatively, homemade guacamole is incredibly easy to make and allows you to customize the flavors to your liking. Fresh avocados, lime juice, cilantro, onion, and jalapeno are the basic ingredients. You can adjust the spice level and add other ingredients like tomatoes or garlic to your homemade guacamole. Whether store-bought or homemade, ensure your guacamole is fresh and vibrant.
-
- Shredded Cheese: 2 cups. Melty, gooey cheese is a must for any good bean dip! Shredded cheddar cheese is a classic choice, offering a sharp and familiar flavor. Monterey Jack cheese melts beautifully and provides a mild, creamy taste. Pepper Jack cheese adds a spicy kick and melty goodness. A Mexican cheese blend is a convenient option that combines several cheeses like cheddar, Monterey Jack, and queso quesadilla for a complex flavor and excellent melt. Colby Jack cheese offers a milder, slightly sweeter flavor. You can use a single type of cheese or create your own blend for a customized flavor profile. Pre-shredded cheese is convenient, but freshly shredded cheese often melts more smoothly and has better flavor.
-
- Black Olives: 1 (4-ounce) can, sliced. Salty, briny black olives add a salty bite and visual appeal to the dip. Sliced black olives are the most convenient for layering. You can also use whole black olives and slice them yourself or roughly chop them for a chunkier texture. Kalamata olives or green olives with pimentos can be used for a different flavor profile, but traditional black olives are classic in seven-layer bean dip. Drain the olives well before layering to prevent excess moisture in the dip.
-
- Green Onions: 1 bunch, thinly sliced. Fresh green onions provide a mild oniony bite and a pop of fresh green color. Thinly sliced green onions are perfect for scattering over the top layer. Use both the white and green parts for maximum flavor and visual appeal. Chives can be used as a milder alternative if you prefer a less intense onion flavor. Green onions are best added fresh just before serving to maintain their crispness and vibrant color.
Optional Ingredients for Customization:
-
- Taco Seasoning: 1 packet. Stirring taco seasoning into the refried beans can boost the savory, Tex-Mex flavor.
-
- Jalapeños: Sliced or diced, fresh or pickled. Add for extra heat – pickled jalapeños offer a vinegary tang.
-
- Cooked Ground Beef or Chorizo: Browned and drained, add a layer of protein for a heartier dip.
-
- Pico de Gallo or Diced Tomatoes: For extra freshness and texture.
-
- Cilantro: Freshly chopped, for garnish and a fresh, herbaceous note.
-
- Hot Sauce: Add a few dashes to the refried beans or salsa for extra heat.
Instructions
-
- Prepare the Crockpot: Lightly grease the inside of your crockpot. This helps prevent sticking and makes cleanup easier. You can use cooking spray or a little bit of olive oil. A 6-quart or larger slow cooker works best for this recipe, allowing ample space for all the layers. If you are using a smaller crockpot, you may need to reduce the ingredient quantities slightly.
-
- Layer 1: Refried Beans: Spread the refried beans evenly across the bottom of the greased crockpot. This is the foundation of your dip, so ensure it covers the entire bottom surface. If your refried beans are very thick, you can add a tablespoon or two of water or broth to thin them slightly and make them easier to spread. If you are using taco seasoning, stir it into the refried beans before spreading for enhanced flavor. Warming the refried beans slightly in the microwave or on the stovetop beforehand can also make them easier to spread evenly.
-
- Layer 2: Salsa: Pour the salsa evenly over the refried bean layer. Spread it gently to cover the beans completely. The salsa adds moisture and flavor to the beans and helps to create a cohesive dip. If you are using a chunky salsa like pico de gallo, you may want to drain off some of the excess liquid before layering to prevent the dip from becoming too watery.
-
- Layer 3: Sour Cream: Carefully spread the sour cream over the salsa layer. You can use a spoon or spatula to gently spread it in an even layer. For easier spreading, you can dollop spoonfuls of sour cream across the salsa and then gently spread them together. If you are using a thicker sour cream like Mexican crema, it may be easier to dollop it rather than spread it.
-
- Layer 4: Guacamole: Spoon the guacamole over the sour cream layer and spread it evenly. Similar to the sour cream, you can dollop spoonfuls and then gently spread them together. If your guacamole is very chunky, you can lightly mash it before layering to make it easier to spread smoothly.
-
- Layer 5: Shredded Cheese: Sprinkle the shredded cheese evenly over the guacamole layer. Ensure the cheese covers the entire surface, as it will melt and create a delicious cheesy topping. If you are using multiple types of cheese, you can layer them or mix them together before sprinkling.
-
- Layer 6: Black Olives: Scatter the sliced black olives evenly over the cheese layer. They add a salty, briny flavor and visual appeal. If you are using whole olives, slice or chop them before scattering.
-
- Layer 7: Green Onions (Optional, added later for freshness): While green onions are listed as the seventh layer, it’s best to add them fresh just before serving to maintain their crispness and vibrant color. If you prefer, you can sprinkle a small amount of green onions now and add the majority just before serving. Alternatively, you can consider the cheese layer and olive layer as layers six and seven, and reserve the green onions entirely for garnish at serving time.
-
- Cook in the Crockpot: Cover the crockpot and cook on low heat for 2-3 hours, or on high heat for 1-1.5 hours. Cooking time can vary depending on your crockpot and desired level of meltiness. The dip is ready when the cheese is melted and bubbly, and the dip is heated through. Keep an eye on it, especially when cooking on high heat, to prevent burning around the edges.
-
- Garnish and Serve: Once cooked, carefully remove the lid. If you haven’t already added them, sprinkle the thinly sliced green onions over the top of the dip. You can also add other fresh garnishes like chopped cilantro, diced tomatoes, or a dollop of sour cream for extra visual appeal. Serve hot directly from the crockpot, or keep it warm on the “warm” setting for serving throughout your gathering. Place the crockpot on a heat-safe surface and surround it with your favorite dippers.
Tips for Perfect Crockpot Cooking:
-
- Don’t Overcook: Overcooking can make the dip dry or cause the cheese to become oily. Cook just until the cheese is melted and bubbly.
-
- Check for Doneness: Use a spoon to check if the dip is heated through to the bottom layers.
-
- Keep Warm: Most crockpots have a “warm” setting – use this to keep the dip at a perfect serving temperature for extended periods.
-
- Adjust Cooking Time: Crockpots can vary in temperature. The first time you make this recipe in your crockpot, keep an eye on it and adjust cooking times as needed for future batches.
Nutrition
- Serving Size: one normal portion
- Calories: 250-350
- Sugar: 5-10 grams
- Sodium: 500-800 mg
- Fat: 15-25 grams
- Saturated Fat: 8-15 grams
- Carbohydrates: 20-30 grams
- Fiber: 5-8 grams
- Protein: 8-12 grams
- Cholesterol: 30-50 mg


