

There are certain dishes that just scream “party!” in our house, and Classic Cold Taco Dip is undoubtedly one of them. I can’t count the number of potlucks, game days, or casual family get-togethers where this dip has been the undisputed champion of the snack table. The first time I made it, I was amazed by how quickly it disappeared. Even my husband, who isn’t usually a huge “dip guy,” found himself hovering around the bowl with a bag of tortilla chips. The kids love it because, well, it tastes like tacos in dip form! The layers of creamy, seasoned goodness topped with fresh, crunchy veggies and savory cheese create a symphony of textures and flavors that’s simply irresistible. It’s become such a staple that if I don’t bring it to a gathering, people actually ask where it is! It’s my go-to for a reason: minimal effort, maximum crowd-pleasing impact.
The Enduring Allure of Classic Cold Taco Dip: A Party Staple
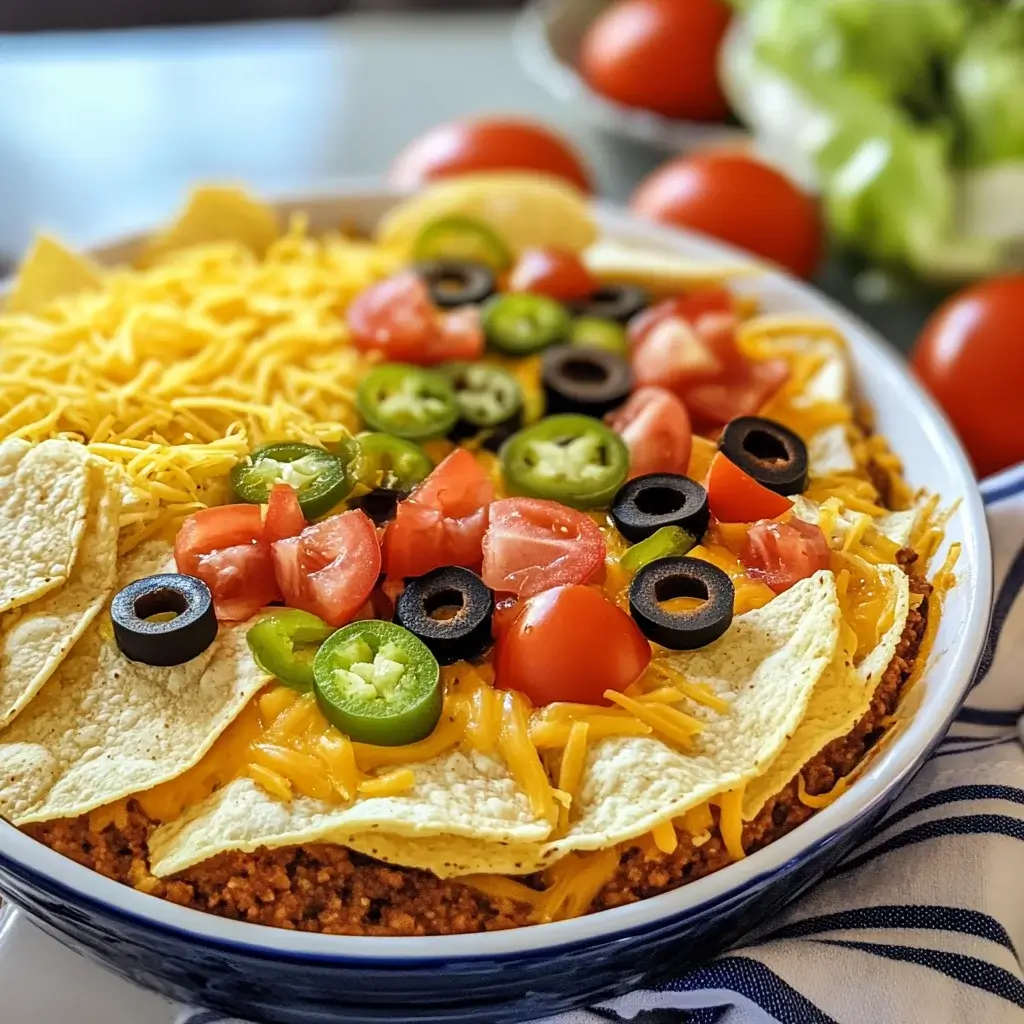
Classic Cold Taco Dip, often referred to as layered taco dip or 7-layer dip’s simpler cousin, is a quintessential party appetizer renowned for its ease of preparation, vibrant flavors, and universal appeal. This no-bake wonder combines a creamy, seasoned base with fresh, crisp toppings, creating a delightful contrast of textures and tastes that perfectly complements crunchy tortilla chips. Its beauty lies in its simplicity and its ability to be customized, making it a versatile dish for any occasion, from Super Bowl parties and summer barbecues to holiday gatherings and casual weeknight snacking.
What makes this dip so consistently popular? It’s the familiar, comforting flavors of a taco, deconstructed into an easily scoopable format. The creamy tang of the sour cream and cream cheese mixture, infused with zesty taco seasoning, forms an addictive foundation. This is then typically layered with crisp shredded lettuce, juicy diced tomatoes, savory shredded cheese, and often punctuated with piquant black olives and fresh green onions. Each bite offers a medley of sensations – cool, creamy, crunchy, fresh, and savory – that keeps everyone coming back for more. Furthermore, its “cold” nature means no oven time is required on party day, freeing you up to focus on other preparations or simply enjoy your guests. It’s a make-ahead marvel that only gets better as the flavors meld in the refrigerator.
Ingredients for The Ultimate Classic Cold Taco Dip
Crafting this beloved dip requires a selection of fresh and flavorful ingredients. Here’s what you’ll need to assemble a crowd-pleasing batch:
For the Creamy Base:
- Cream Cheese: 1 package (8 ounces / 226g), softened to room temperature. This is key for a smooth, lump-free base.
- Sour Cream: 1 container (16 ounces / 450g). Full-fat sour cream provides the richest flavor and creamiest texture, but light sour cream can be used.
- Taco Seasoning: 1 packet (approximately 1 ounce / 28g) of your favorite store-bought taco seasoning, or 3-4 tablespoons of homemade taco seasoning.
Optional Additions to the Base (for extra flavor/layers):
- Salsa: 1/2 cup of your favorite salsa (mild, medium, or hot), drained of excess liquid if very watery. This can be mixed into the cream cheese base or added as a separate thin layer.
- Refried Beans: 1 can (15-16 ounces) refried beans (optional, for a heartier dip, spread as the very first layer).
- Guacamole: 1 cup prepared guacamole (optional, as another layer).
For the Fresh Toppings (Layered on Top):
- Shredded Lettuce: 2-3 cups, finely shredded. Iceberg or Romaine lettuce works best for crunch.
- Diced Tomatoes: 2 medium ripe tomatoes, diced (about 1.5 – 2 cups). Roma tomatoes are a good choice as they have less pulp.
- Shredded Cheese: 2 cups (about 8 ounces / 226g) shredded Mexican blend cheese, cheddar cheese, or Monterey Jack cheese.
- Sliced Black Olives: 1 can (4-6 ounces) sliced black olives, drained.
- Green Onions (Scallions): 3-4, thinly sliced (both white and green parts).
For Serving:
- Tortilla Chips: A large bag (or two!) of sturdy tortilla chips, preferably scoops for optimal dipping.
Step-by-Step Instructions: Building Your Taco Dip Masterpiece
Assembling this Classic Cold Taco Dip is incredibly straightforward. Follow these steps for dip perfection:
- Prepare the Creamy Base:
- Ensure your cream cheese is fully softened. In a medium-sized mixing bowl, combine the softened cream cheese, sour cream, and taco seasoning.
- Using an electric hand mixer on low to medium speed, or a sturdy spatula and some elbow grease, mix until the ingredients are thoroughly combined, smooth, and creamy. There should be no lumps of cream cheese.
- If you’re incorporating salsa directly into the base, add it now and mix until combined.
- Spread the Base Layer:
- Select your serving dish. A 9×13 inch baking dish, a large pie plate, or any shallow serving platter (approximately 2-quart capacity) works well. A clear glass dish is excellent for showcasing the appealing layers.
- If using refried beans, spread them in an even layer on the bottom of your chosen dish.
- Carefully spread the prepared cream cheese mixture evenly over the bottom of the dish (or over the refried beans, if using). Use an offset spatula or the back of a spoon to create a smooth, even surface.
- Chill (Optional but Recommended for Flavor Melding):
- If time permits, cover the dish with plastic wrap and refrigerate the base layer for at least 30 minutes to an hour. This allows the flavors to meld and the base to firm up slightly, making it easier to spread subsequent layers.
- Add Optional Layers (If Using):
- If you’re adding a separate salsa layer (and didn’t mix it into the base), spread it gently over the chilled cream cheese mixture.
- If using guacamole, spread it carefully over the cream cheese base (or salsa layer).
- Layer the Fresh Toppings:
- Lettuce: Sprinkle the shredded lettuce evenly over the creamy base (or guacamole/salsa layer).
- Tomatoes: Distribute the diced tomatoes evenly over the lettuce. If your tomatoes are very juicy, you might consider lightly patting them with a paper towel to remove excess moisture before adding them, to prevent the dip from becoming watery.
- Cheese: Sprinkle the shredded cheese generously over the tomatoes, covering them completely.
- Olives: Scatter the drained, sliced black olives over the cheese layer.
- Green Onions: Finish by sprinkling the thinly sliced green onions over the top.
- Final Chill (Essential):
- Cover the assembled taco dip tightly with plastic wrap.
- Refrigerate for at least 1-2 hours before serving. This chilling time is crucial for a few reasons: it allows all the distinct flavors of the layers to meld together harmoniously, it ensures the dip is refreshingly cold, and it helps the layers set, making for cleaner scooping. For best results, chill for 2-4 hours, or even make it the day before.
- Serve:
- When ready to serve, remove the dip from the refrigerator.
- Serve chilled, accompanied by a generous bowl of sturdy tortilla chips. Fritos, vegetable sticks (like celery, carrots, and bell pepper strips), or pita chips also make great dippers.
Nutritional Snapshot: What’s in a Serving?
Understanding the nutritional profile of this dip can be helpful, especially when catering to guests with specific dietary needs or preferences. These figures are approximate and can vary based on the specific brands of ingredients used, portion sizes, and any optional additions.
- Servings: This recipe typically yields about 12-16 appetizer-sized servings, assuming a serving size of roughly 1/2 cup of dip.
- Calories per serving (approximate): Around 200-300 calories.
Key Nutritional Considerations:
- Fat: The majority of calories come from fat, primarily from the cream cheese, sour cream, and shredded cheese. Choosing full-fat versions contributes to the dip’s richness and satisfying texture.
- Protein: Cheese, and to a lesser extent sour cream, provide some protein. If refried beans or a meat layer (see tips) are added, the protein content will increase.
- Carbohydrates: These come mainly from the vegetables, any beans, and the tortilla chips served alongside.
- Sodium: Taco seasoning, cheese, and olives are the main contributors to the sodium content. If you’re watching your sodium intake, look for low-sodium taco seasoning or make your own, and you can rinse the olives.
For a Lighter Version:
- Substitute light cream cheese (Neufchâtel) for regular cream cheese.
- Use light sour cream or plain Greek yogurt (which also adds more protein).
- Opt for reduced-fat shredded cheese.
- Load up on more fresh vegetables in the toppings.
- Serve with baked tortilla chips or more vegetable dippers.
Remember, this is typically an indulgent party food, enjoyed in moderation as part of a larger spread.
Time Commitment: Quick to Assemble, Best to Chill
One of the most appealing aspects of Classic Cold Taco Dip is its quick assembly time, with most of the “work” being passive chilling time.
- Active Preparation Time: Approximately 20-25 minutes. This includes mixing the base, chopping vegetables, and layering the dip. If you buy pre-shredded lettuce and cheese, this time can be even shorter.
- Chilling Time (Essential):
- Optional initial chill for base: 30 minutes – 1 hour.
- Final chill for assembled dip: Minimum 1-2 hours, ideally 2-4 hours or overnight.
- Total Time (including minimum chilling): Approximately 1 hour 50 minutes to 2 hours 25 minutes. However, if you chill it longer for better flavor (recommended), the total time from start to serve will be longer, though your active involvement remains minimal.
Make-Ahead Prowess:
This dip is an excellent candidate for making ahead:
- Up to 24 hours in advance: You can fully assemble the dip, cover it tightly with plastic wrap, and refrigerate it. In fact, many find the flavors are even better when it’s made a day ahead.
- Consideration for Lettuce: If making more than a few hours ahead, some people prefer to add the shredded lettuce just before serving to ensure maximum crispness. However, if layered properly and covered well, it generally holds up fine for 24 hours.
This make-ahead convenience significantly reduces stress on party day, allowing you to focus on other elements of your gathering.
Sensational Serving Suggestions for Your Taco Dip
Presenting your Classic Cold Taco Dip thoughtfully can enhance its appeal and make it even more inviting for your guests.
- The Perfect Vessel:
- Clear Glass Dish: A 9×13 inch clear glass baking dish is a classic choice, as it beautifully showcases all the colorful layers. A glass trifle bowl can also create a stunning presentation for a deeper dip.
- Shallow Serving Platter: A large, round, or oval ceramic or stoneware platter with a slight lip works well, especially if you want a wider surface area for dipping.
- Individual Portions: For a more elegant or portion-controlled approach, layer the dip in individual clear cups or small Mason jars.
- Dippers Galore (Offer Variety):
- Tortilla Chips: The quintessential partner.
- Scoop-style chips: Ideal for loading up on dip.
- Round or triangle chips: Classic and always a hit.
- Flavored tortilla chips: Lime, jalapeño, or blue corn chips can add an extra dimension.
- Fritos Scoops: Another sturdy and popular choice.
- Vegetable Sticks: For a healthier and refreshing option:
- Celery sticks
- Carrot sticks
- Bell pepper strips (red, yellow, orange for color)
- Cucumber spears
- Jicama sticks
- Pita Chips or Toasted Baguette Slices: Offer a different texture.
- Tortilla Chips: The quintessential partner.
- Garnishing Touches:
- A sprinkle of fresh cilantro just before serving can add a pop of color and flavor.
- A dollop of sour cream or guacamole in the center (if not already layered) can be an attractive focal point.
- A few strategically placed jalapeño slices (fresh or pickled) for those who like a bit of heat.
- Serving Logistics:
- Keep it Cool: If the dip will be out for an extended period (e.g., at a summer BBQ), consider placing the serving dish on a tray of ice or using a chilled serving platter to maintain its cool temperature for food safety.
- Serving Utensils: Provide a sturdy serving spoon or spatula for guests to easily scoop the dip.
- Placement: Position the dip centrally on your snack table with dippers arranged all around it for easy access.
By paying attention to these serving details, your already delicious Classic Cold Taco Dip will become an even more irresistible centerpiece of your appetizer spread.
Pro Tips for Perfect Taco Dip Every Time
Elevate your taco dip game with these five expert tips:
- Ensure Cream Cheese is Truly Softened: This is non-negotiable for a perfectly smooth and creamy base. Cold cream cheese will result in lumps that are difficult to mix out. Let it sit at room temperature for at least 1-2 hours. If you’re in a rush, you can unwrap it, cut it into small cubes, and spread them out on a plate to soften faster (about 30-45 minutes).
- Drain Wet Ingredients Thoroughly: Excess moisture is the enemy of a good layered dip, as it can make the layers soggy and the overall dip watery. If using salsa with a lot of liquid, strain some of it off. If your diced tomatoes are particularly juicy, gently pat them with a paper towel before adding them to the dip.
- Don’t Skimp on Chilling Time: While it’s tempting to serve immediately, chilling the dip for at least 1-2 hours (preferably longer) makes a significant difference. It allows the flavors from the taco seasoning and various layers to meld and intensify, and it firms up the dip for better scooping and texture.
- Season Your Layers (Subtly): While the taco seasoning in the base is the star, consider a tiny pinch of salt on your diced tomatoes if they are very bland, or a light sprinkle of garlic powder in your refried beans (if using) to boost the flavor of individual components. Don’t overdo it, as the taco seasoning is quite flavorful.
- Layer Strategically for Texture and Integrity: Start with heavier/wetter ingredients at the bottom (like refried beans or the cream cheese base) and build up to lighter, drier ingredients. Placing lettuce before very wet ingredients like salsa (if using it as a distinct layer on top of the cream cheese) can sometimes help maintain its crispness, though the cream cheese base itself is quite dense.
Implementing these tips will ensure your Classic Cold Taco Dip is consistently delicious, with perfectly blended flavors and appealing textures every single time.
Taco Dip FAQs: Your Questions Answered
Here are answers to some frequently asked questions about making Classic Cold Taco Dip:
- Can I make taco dip ahead of time?
- Yes, absolutely! This dip is ideal for making ahead. You can assemble the entire dip up to 24 hours in advance, cover it tightly with plastic wrap, and store it in the refrigerator. Some people believe the flavors are even better the next day. If you’re concerned about the lettuce losing its crispness, you can prepare all layers except the lettuce, and then add the lettuce just before serving.
- How long does cold taco dip last in the refrigerator?
- Properly stored (covered tightly), leftover cold taco dip will last for 2-3 days in the refrigerator. Beyond that, the fresh vegetable toppings may start to wilt or become watery.
- Can I add meat to this cold taco dip?
- Yes, you can! To add meat, cook 1 pound of ground beef, ground turkey, or even chorizo until browned. Drain off any excess fat. Stir in a packet of taco seasoning and about 1/4 to 1/2 cup of water, simmering until the liquid has mostly evaporated. Allow the meat mixture to cool completely before spreading it as a layer in your dip, typically over the cream cheese base or refried beans.
- Is this taco dip recipe gluten-free?
- The dip itself, using standard ingredients, is generally gluten-free. However, always double-check the labels on your taco seasoning packet (some may contain gluten as a thickener) and your sour cream/cream cheese. To keep the entire offering gluten-free, serve it with certified gluten-free tortilla chips.
- How can I make a spicier version of this taco dip?
- There are several ways to add heat:
- Use a “hot” variety of taco seasoning.
- Mix in finely diced jalapeños (fresh or pickled) into the cream cheese base.
- Add a few dashes of your favorite hot sauce to the cream cheese mixture.
- Layer in some chopped green chilies (canned).
- Use a spicy salsa.
- Top with shredded pepper jack cheese instead of or in addition to cheddar.
- There are several ways to add heat:
Why We Love This No-Bake Classic: More Than Just a Dip
The enduring popularity of Classic Cold Taco Dip isn’t just about its taste; it’s about the experience it represents. It’s a symbol of easy entertaining, of gatherings filled with laughter, and of shared enjoyment. This dip is a culinary chameleon – equally at home at a boisterous Super Bowl party as it is at a relaxed family picnic.
Its no-bake nature is a significant draw for busy hosts. In the midst of preparing multiple dishes or tidying up before guests arrive, having a star appetizer that requires no oven time and can be made well in advance is a true blessing. This frees up valuable oven space and reduces last-minute kitchen chaos.
Furthermore, the visual appeal is undeniable. The distinct, colorful layers visible through a glass dish are inherently attractive, promising a feast for the eyes as well as the palate. It’s a dish that invites people to gather around, to scoop, to share, and to connect. Children are often drawn to its familiar “taco” elements, making it a family-friendly option that bridges generational tastes. It’s a recipe that often gets passed around, requested, and remembered, becoming a staple in many families’ culinary repertoires.
Customizing Your Classic Cold Taco Dip: Make It Your Own!
While the classic formula is fantastic, one of the best things about taco dip is its adaptability. Feel free to get creative and tailor it to your preferences or what you have on hand:
- Bean Variations: Instead of traditional refried pinto beans, try refried black beans for a different flavor, or even a layer of well-seasoned, mashed black beans if you prefer to avoid canned refried beans.
- Cheese Choices: Experiment beyond cheddar or Mexican blend. Smoked Gouda could add a unique smoky note, crumbled cotija cheese can offer an authentic Mexican flair sprinkled on top, or pepper jack can introduce a spicy kick.
- Add Some Corn: A layer of roasted corn kernels (canned and drained, or fresh corn cut off the cob and lightly sautéed or roasted) can add sweetness and another textural element.
- Pickled Elements: For an extra tangy kick, consider adding a layer of finely chopped pickled jalapeños or even some pickled red onions on top.
- Spice it Up: Beyond jalapeños, consider a drizzle of chipotle sour cream (sour cream mixed with a bit of adobo sauce from canned chipotle peppers) or a sprinkle of chili powder over one of the layers.
- Vegetarian Protein Boost: If not using meat, cooked and crumbled plant-based meat substitute seasoned with taco seasoning and cooled can be a great addition. Seasoned lentils or quinoa could also work for a heartier vegetarian version.
- Guacamole Love: If you’re a guacamole aficionado, make it a prominent layer. Ensure it’s well-seasoned.
The possibilities are nearly endless. Use the classic recipe as your canvas and don’t be afraid to experiment with different ingredients and flavor combinations to create your signature taco dip.
Final Thoughts: A Guaranteed Party Pleaser
Classic Cold Taco Dip is more than just a recipe; it’s a tradition, a reliable crowd-pleaser, and a testament to the fact that sometimes the simplest dishes are the most beloved. Its effortless preparation, combined with its vibrant layers of flavor and texture, makes it an indispensable appetizer for any host’s arsenal. Whether you stick to the time-honored classic version or venture out with your own creative twists, this dip is sure to be a highlight of your next gathering. So, gather your ingredients, embrace the ease of assembly, and get ready to watch this delightful dip disappear!
Print
Classic Cold Taco Dip recipe
Ingredients
For the Creamy Base:
-
- Cream Cheese: 1 package (8 ounces / 226g), softened to room temperature. This is key for a smooth, lump-free base.
-
- Sour Cream: 1 container (16 ounces / 450g). Full-fat sour cream provides the richest flavor and creamiest texture, but light sour cream can be used.
-
- Taco Seasoning: 1 packet (approximately 1 ounce / 28g) of your favorite store-bought taco seasoning, or 3-4 tablespoons of homemade taco seasoning.
Optional Additions to the Base (for extra flavor/layers):
-
- Salsa: 1/2 cup of your favorite salsa (mild, medium, or hot), drained of excess liquid if very watery. This can be mixed into the cream cheese base or added as a separate thin layer.
-
- Refried Beans: 1 can (15-16 ounces) refried beans (optional, for a heartier dip, spread as the very first layer).
-
- Guacamole: 1 cup prepared guacamole (optional, as another layer).
For the Fresh Toppings (Layered on Top):
-
- Shredded Lettuce: 2-3 cups, finely shredded. Iceberg or Romaine lettuce works best for crunch.
-
- Diced Tomatoes: 2 medium ripe tomatoes, diced (about 1.5 – 2 cups). Roma tomatoes are a good choice as they have less pulp.
-
- Shredded Cheese: 2 cups (about 8 ounces / 226g) shredded Mexican blend cheese, cheddar cheese, or Monterey Jack cheese.
-
- Sliced Black Olives: 1 can (4-6 ounces) sliced black olives, drained.
-
- Green Onions (Scallions): 3-4, thinly sliced (both white and green parts).
Instructions
-
- Prepare the Creamy Base:
-
- Ensure your cream cheese is fully softened. In a medium-sized mixing bowl, combine the softened cream cheese, sour cream, and taco seasoning.
-
- Using an electric hand mixer on low to medium speed, or a sturdy spatula and some elbow grease, mix until the ingredients are thoroughly combined, smooth, and creamy. There should be no lumps of cream cheese.
-
- If you’re incorporating salsa directly into the base, add it now and mix until combined.
-
- Prepare the Creamy Base:
-
- Spread the Base Layer:
-
- Select your serving dish. A 9×13 inch baking dish, a large pie plate, or any shallow serving platter (approximately 2-quart capacity) works well. A clear glass dish is excellent for showcasing the appealing layers.
-
- If using refried beans, spread them in an even layer on the bottom of your chosen dish.
-
- Carefully spread the prepared cream cheese mixture evenly over the bottom of the dish (or over the refried beans, if using). Use an offset spatula or the back of a spoon to create a smooth, even surface.
-
- Spread the Base Layer:
-
- Chill (Optional but Recommended for Flavor Melding):
-
- If time permits, cover the dish with plastic wrap and refrigerate the base layer for at least 30 minutes to an hour. This allows the flavors to meld and the base to firm up slightly, making it easier to spread subsequent layers.
-
- Chill (Optional but Recommended for Flavor Melding):
-
- Add Optional Layers (If Using):
-
- If you’re adding a separate salsa layer (and didn’t mix it into the base), spread it gently over the chilled cream cheese mixture.
-
- If using guacamole, spread it carefully over the cream cheese base (or salsa layer).
-
- Add Optional Layers (If Using):
-
- Layer the Fresh Toppings:
-
- Lettuce: Sprinkle the shredded lettuce evenly over the creamy base (or guacamole/salsa layer).
-
- Tomatoes: Distribute the diced tomatoes evenly over the lettuce. If your tomatoes are very juicy, you might consider lightly patting them with a paper towel to remove excess moisture before adding them, to prevent the dip from becoming watery.
-
- Cheese: Sprinkle the shredded cheese generously over the tomatoes, covering them completely.
-
- Olives: Scatter the drained, sliced black olives over the cheese layer.
-
- Green Onions: Finish by sprinkling the thinly sliced green onions over the top.
-
- Layer the Fresh Toppings:
-
- Final Chill (Essential):
-
- Cover the assembled taco dip tightly with plastic wrap.
-
- Refrigerate for at least 1-2 hours before serving. This chilling time is crucial for a few reasons: it allows all the distinct flavors of the layers to meld together harmoniously, it ensures the dip is refreshingly cold, and it helps the layers set, making for cleaner scooping. For best results, chill for 2-4 hours, or even make it the day before.
-
- Final Chill (Essential):
-
- Serve:
-
- When ready to serve, remove the dip from the refrigerator.
-
- Serve chilled, accompanied by a generous bowl of sturdy tortilla chips. Fritos, vegetable sticks (like celery, carrots, and bell pepper strips), or pita chips also make great dippers.
-
- Serve:
Nutrition
- Serving Size: one normal portion
- Calories: 200-300


