

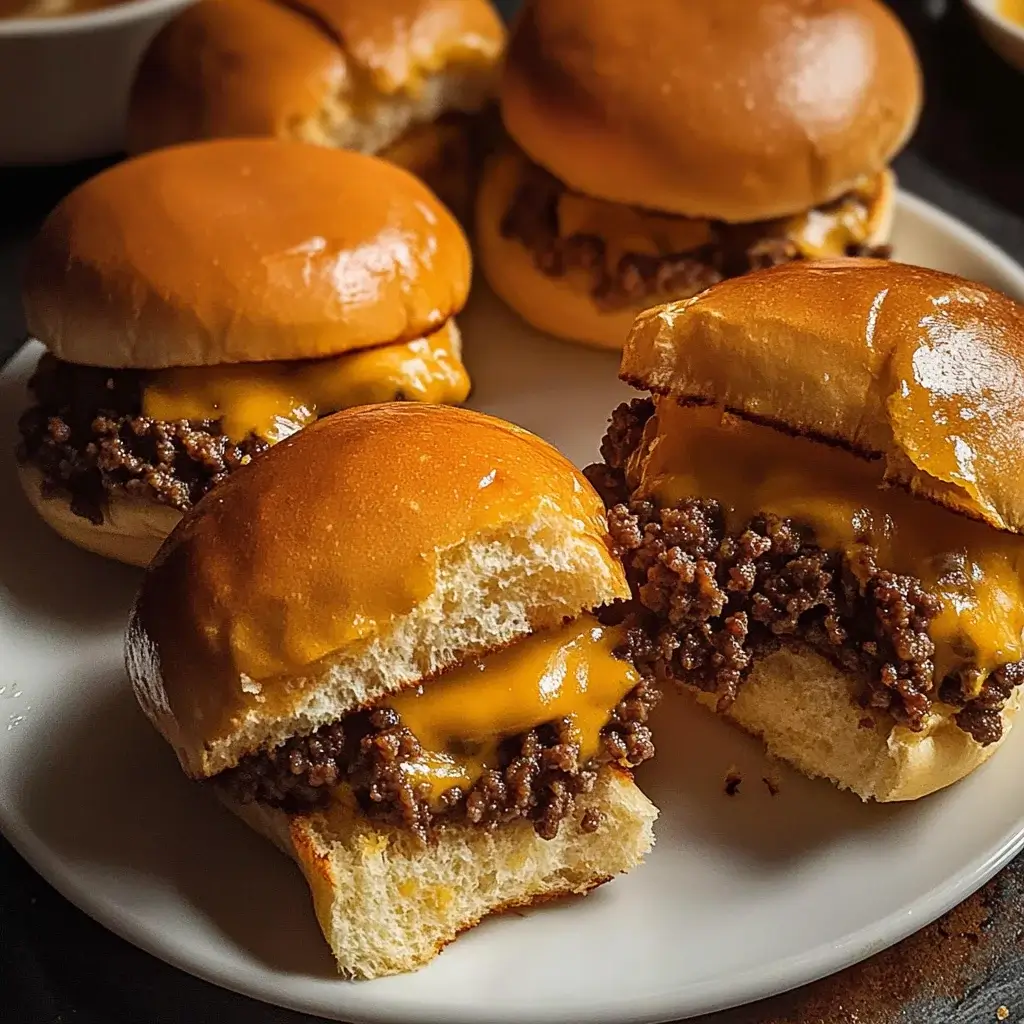
If there’s one recipe that disappears faster than I can make it at any family gathering or game day party, it’s these Cheesy Ground Beef Sliders. The first time I whipped up a batch, I was just looking for something quick, easy, and crowd-pleasing. Little did I know they would become legendary among my friends and family! My kids, who can be notoriously picky, devour these little bites of heaven and even ask to help make them. There’s something undeniably magical about the combination of savory, perfectly seasoned ground beef, ooey-gooey melted cheese, all nestled in soft, sweet slider buns that are brushed with a garlic butter topping and baked to golden perfection. They are the ultimate pull-apart comfort food, transforming simple ingredients into an explosion of flavor. The aroma alone, as they bake in the oven, is enough to draw everyone to the kitchen. They are incredibly versatile, satisfying for a quick weeknight dinner, yet impressive enough for entertaining. Trust me, once you try this recipe, it will become a permanent fixture in your go-to meal rotation.
The Ultimate Cheesy Ground Beef Sliders: Your Go-To Party Favorite!
When it comes to crowd-pleasing appetizers, easy weeknight dinners, or the perfect game day snack, Cheesy Ground Beef Sliders reign supreme. These mini burgers, baked to perfection in a single dish, offer an irresistible combination of savory seasoned ground beef, rivers of melted cheese, and soft, sweet rolls brushed with a delectable garlic butter topping. Forget fiddly individual patties; this recipe streamlines the process, making it incredibly simple to serve up a batch of warm, gooey, and utterly delicious sliders that everyone will rave about. Get ready to discover your new favorite way to enjoy a “burger” experience with minimal fuss and maximum flavor.
Complete Ingredients for Irresistible Cheesy Ground Beef Sliders
To create these mouthwatering sliders, you’ll need the following simple yet impactful ingredients:
- For the Ground Beef Filling:
- 1.5 lbs (680g) lean ground beef (85/15 or 90/10 recommended)
- 1 medium yellow onion, finely chopped
- 2 cloves garlic, minced
- 1 tablespoon Worcestershire sauce
- 2 tablespoons ketchup
- 1 teaspoon Dijon mustard (optional, for a little tang)
- 1/2 teaspoon salt (or to taste)
- 1/4 teaspoon black pepper (or to taste)
- 1/4 teaspoon onion powder
- 1/4 teaspoon garlic powder
- For the Sliders:
- 1 (12-count) package sweet Hawaiian rolls or other soft slider buns (King’s Hawaiian rolls are a popular choice)
- 8-12 slices of cheese (cheddar, American, Provolone, or Monterey Jack work well – or a combination!) You can also use 1.5-2 cups of shredded cheese.
- For the Garlic Butter Topping:
- 1/4 cup (4 tablespoons / 57g) unsalted butter, melted
- 1 teaspoon garlic powder (or 1 clove fresh garlic, minced)
- 1/2 teaspoon dried parsley flakes (or 1 tablespoon fresh chopped parsley)
- 1/2 teaspoon sesame seeds or poppy seeds (optional, for garnish)
- Pinch of onion powder (optional)
Step-by-Step Instructions for Perfect Baked Sliders
Follow these easy steps to create a batch of perfectly cheesy and delicious ground beef sliders.
- Preheat Oven and Prepare Baking Dish:
- Preheat your oven to 350°F (175°C).
- Lightly grease a 9×13 inch baking dish or line it with parchment paper for easier cleanup.
- Cook the Ground Beef Mixture:
- In a large skillet, cook the ground beef and chopped onion over medium-high heat, breaking the beef apart with a spoon, until the beef is browned and the onion is softened (about 7-10 minutes).
- Drain off any excess grease from the skillet. This is crucial to prevent soggy sliders.
- Stir in the minced garlic, Worcestershire sauce, ketchup, Dijon mustard (if using), salt, pepper, onion powder, and garlic powder. Cook for another 2-3 minutes, allowing the flavors to meld. Taste and adjust seasonings if necessary. Remove from heat.
- Prepare the Slider Buns:
- Without separating the individual rolls, carefully slice the entire slab of Hawaiian rolls (or slider buns) in half horizontally using a long serrated knife, creating a top “slab” and a bottom “slab” of buns.
- Place the bottom slab of buns into the prepared baking dish.
- Assemble the Sliders:
- Evenly spread the cooked ground beef mixture over the bottom slab of buns in the baking dish.
- Lay the cheese slices (or sprinkle shredded cheese) evenly over the ground beef layer. Ensure good coverage for maximum cheesiness!
- Place the top slab of buns over the cheese layer, aligning it with the bottom buns.
- Prepare and Apply the Garlic Butter Topping:
- In a small bowl, whisk together the melted butter, garlic powder (or minced fresh garlic), dried parsley, sesame/poppy seeds (if using), and pinch of onion powder (if using).
- Evenly brush the garlic butter mixture over the tops of the slider buns.
- Bake the Sliders:
- Cover the baking dish loosely with aluminum foil. This helps the cheese melt and the sliders heat through without the tops browning too quickly.
- Bake in the preheated oven for 15-20 minutes.
- Remove the aluminum foil and continue to bake for another 5-10 minutes, or until the tops of the sliders are golden brown and lightly toasted, and the cheese is completely melted and bubbly.
- Rest and Serve:
- Once baked, carefully remove the baking dish from the oven.
- Let the sliders rest for 3-5 minutes before slicing along the individual roll lines with a knife or pizza cutter. This helps them hold together better.
- Serve warm and enjoy the cheesy, beefy goodness!
Nutrition Facts (Approximate)
- Servings: 12 sliders (typically 2-3 sliders per person)
- Calories per slider (approximate): 250-350 calories
Disclaimer: Nutritional information is an estimate and can vary significantly based on the specific brands of ingredients used (especially the ground beef leanness, type of cheese, and buns), exact portion sizes, and any modifications made to the recipe. This estimate is for one slider.
Preparation & Cooking Time
Understanding the time commitment helps you plan this easy meal perfectly.
- Preparation Time: 15-20 minutes (includes chopping onion, cooking beef, assembling)
- Cooking Time (Baking): 20-30 minutes
- Resting Time: 3-5 minutes
- Total Time: Approximately 40-55 minutes
This makes Cheesy Ground Beef Sliders a fantastic option for a relatively quick and highly satisfying meal or appetizer.
How to Serve Your Delicious Cheesy Ground Beef Sliders
These versatile sliders are fantastic on their own but can be even better with the right accompaniments. Here’s how to serve them:
- Straight from the Baking Dish:
- The easiest way! Simply place the baking dish (on a trivet) on the table and let everyone pull apart their own warm sliders.
- Classic Dipping Sauces:
- Ketchup and Mustard: The timeless companions.
- Special Burger Sauce: Mix mayonnaise, ketchup, a bit of pickle relish or chopped pickles, a splash of vinegar, and a pinch of garlic powder and onion powder for a homemade “secret sauce.”
- Ranch Dressing: A favorite for many, especially kids.
- BBQ Sauce: Adds a smoky, sweet, or tangy dimension.
- Perfect Side Dishes:
- French Fries: Classic shoestring, crinkle-cut, or sweet potato fries.
- Tater Tots: Another fun and crispy potato option.
- Onion Rings: For an extra indulgent pairing.
- Potato Chips: A simple, crunchy side.
- Coleslaw: A creamy and tangy coleslaw provides a refreshing contrast.
- Dill Pickles or Pickle Spears: The acidity cuts through the richness.
- Simple Green Salad: With a light vinaigrette to balance the meal.
- Pasta Salad or Potato Salad: Great for potlucks or larger gatherings.
- Occasion-Specific Serving:
- Game Day: Arrange on a platter with a variety of dipping sauces and other game day snacks like wings and nachos.
- Parties: Serve as a hearty appetizer or a main component of a casual buffet.
- Weeknight Dinner: Pair with a quick salad or some steamed vegetables for a complete meal.
- Garnish (Optional):
- A sprinkle of fresh chopped chives or parsley over the sliders just before serving can add a touch of color.
Additional Tips for Even More Amazing Ground Beef Sliders (5 tips)
Want to take your cheesy ground beef sliders from great to absolutely unforgettable? Try these five expert tips:
- Don’t Overcrowd the Beef: When browning your ground beef and onions, make sure your skillet isn’t too crowded. If necessary, cook the beef in two batches. Overcrowding will steam the meat rather than brown it, leading to less flavor development. A good Maillard reaction (browning) is key!
- Toast the Buns (Optional Pre-Step for Extra Texture): For an extra layer of texture and to help prevent any potential sogginess from the beef mixture, you can lightly toast the inside of the bun slabs before assembling. Separate the top and bottom slabs, place them cut-side up on a baking sheet, and broil for 1-2 minutes (watch carefully to prevent burning!) or bake at 350°F (175°C) for 3-5 minutes until just lightly golden.
- Cheese Choices & Placement for Ultimate Melt: Don’t be afraid to mix your cheeses! A slice of American cheese offers unparalleled meltiness, while cheddar adds sharpness, and provolone brings a mild, creamy stretch. For maximum cheese coverage, consider using shredded cheese as it can fill in gaps better than slices, or use a combination. Some even like a thin layer of cheese on the bottom bun before adding the beef.
- The Magic is in the Butter Topping – Don’t Skip It! That garlic butter topping does more than just add flavor; it helps the tops of the buns get beautifully golden brown and slightly crispy, adding a wonderful textural contrast to the soft interior. Feel free to customize it – a pinch of Italian seasoning or a sprinkle of Parmesan cheese in the butter can be delicious.
- Customize Your Beef Filling: While the recipe provides a classic, delicious seasoning blend, feel free to get creative. Add a dash of liquid smoke for a smoky flavor, incorporate some finely diced cooked bacon into the beef mixture, or add a pinch of red pepper flakes for a little heat. Sautéed mushrooms or bell peppers could also be mixed in.
Frequently Asked Questions (FAQ) About Cheesy Ground Beef Sliders
Here are answers to some common questions you might have about making these sliders:
- Q: Can I make these sliders ahead of time?
- A: Yes, you can prepare them partially ahead. You can cook the ground beef mixture, let it cool, and store it in an airtight container in the refrigerator for up to 2 days. You can also assemble the sliders (up to the point of adding the butter topping) a few hours in advance, cover them, and refrigerate. Add the butter topping just before baking. They are best baked and served fresh for optimal cheesiness and texture.
- Q: Can I freeze cheesy ground beef sliders?
- A: It’s best to freeze them before baking for the best results. Assemble the sliders completely (including the butter topping), then wrap the entire baking dish tightly in plastic wrap and then foil. Freeze for up to 2-3 months. To bake from frozen, you may not need to thaw completely; add about 15-20 minutes to the initial covered baking time, then uncover and bake until golden and heated through. You can also freeze leftover baked sliders, but the buns may become a bit softer upon reheating.
- Q: Can I use different types of meat for these sliders?
- A: Absolutely! Ground turkey or ground chicken would work well as a leaner alternative; just be sure to season them well, as they can be milder in flavor than beef. You could also use ground sausage (like Italian sausage or breakfast sausage) mixed with ground beef or on its own for a different flavor profile. For a vegetarian option, plant-based ground meat crumbles can be substituted.
- Q: What’s the best way to prevent the bottom buns from getting soggy?
- A: There are a few key things:
- Drain the beef thoroughly: After cooking the ground beef mixture, make sure to drain off all excess grease.
- Don’t let them sit too long assembled before baking: Assemble just before you’re ready to bake, or within a few hours if refrigerating.
- Optional toasting: Lightly toasting the inside of the bottom buns before adding the beef (as mentioned in the tips) can create a slight barrier.
- Thicker sauce: Ensure your beef mixture isn’t overly “saucy.” The recipe is designed for a good balance.
- A: There are a few key things:
- Q: What if I don’t have Hawaiian rolls? Can I use other buns?
- A: Yes, any soft slider-sized dinner rolls will work. Brioche slider buns are another excellent choice for a slightly richer flavor. Look for rolls that come in a connected “slab” as it makes assembly much easier. If you can only find individual small rolls, you can still make them; it will just take a bit more time to arrange them and place the beef and cheese on each one.
These Cheesy Ground Beef Sliders are a guaranteed hit for any occasion. They’re simple to make, packed with flavor, and have that irresistible cheesy pull that keeps everyone coming back for more. Enjoy making – and devouring – these little bundles of joy!
Print
Cheesy Ground Beef Sliders recipe
Ingredients
-
- For the Ground Beef Filling:
-
- 1.5 lbs (680g) lean ground beef (85/15 or 90/10 recommended)
-
- 1 medium yellow onion, finely chopped
-
- 2 cloves garlic, minced
-
- 1 tablespoon Worcestershire sauce
-
- 2 tablespoons ketchup
-
- 1 teaspoon Dijon mustard (optional, for a little tang)
-
- 1/2 teaspoon salt (or to taste)
-
- 1/4 teaspoon black pepper (or to taste)
-
- 1/4 teaspoon onion powder
-
- 1/4 teaspoon garlic powder
-
- For the Ground Beef Filling:
-
- For the Sliders:
-
- 1 (12-count) package sweet Hawaiian rolls or other soft slider buns (King’s Hawaiian rolls are a popular choice)
-
- 8–12 slices of cheese (cheddar, American, Provolone, or Monterey Jack work well – or a combination!) You can also use 1.5-2 cups of shredded cheese.
-
- For the Sliders:
-
- For the Garlic Butter Topping:
-
- 1/4 cup (4 tablespoons / 57g) unsalted butter, melted
-
- 1 teaspoon garlic powder (or 1 clove fresh garlic, minced)
-
- 1/2 teaspoon dried parsley flakes (or 1 tablespoon fresh chopped parsley)
-
- 1/2 teaspoon sesame seeds or poppy seeds (optional, for garnish)
-
- Pinch of onion powder (optional)
-
- For the Garlic Butter Topping:
Instructions
-
- Preheat Oven and Prepare Baking Dish:
-
- Preheat your oven to 350°F (175°C).
-
- Lightly grease a 9×13 inch baking dish or line it with parchment paper for easier cleanup.
-
- Preheat Oven and Prepare Baking Dish:
-
- Cook the Ground Beef Mixture:
-
- In a large skillet, cook the ground beef and chopped onion over medium-high heat, breaking the beef apart with a spoon, until the beef is browned and the onion is softened (about 7-10 minutes).
-
- Drain off any excess grease from the skillet. This is crucial to prevent soggy sliders.
-
- Stir in the minced garlic, Worcestershire sauce, ketchup, Dijon mustard (if using), salt, pepper, onion powder, and garlic powder. Cook for another 2-3 minutes, allowing the flavors to meld. Taste and adjust seasonings if necessary. Remove from heat.
-
- Cook the Ground Beef Mixture:
-
- Prepare the Slider Buns:
-
- Without separating the individual rolls, carefully slice the entire slab of Hawaiian rolls (or slider buns) in half horizontally using a long serrated knife, creating a top “slab” and a bottom “slab” of buns.
-
- Place the bottom slab of buns into the prepared baking dish.
-
- Prepare the Slider Buns:
-
- Assemble the Sliders:
-
- Evenly spread the cooked ground beef mixture over the bottom slab of buns in the baking dish.
-
- Lay the cheese slices (or sprinkle shredded cheese) evenly over the ground beef layer. Ensure good coverage for maximum cheesiness!
-
- Place the top slab of buns over the cheese layer, aligning it with the bottom buns.
-
- Assemble the Sliders:
-
- Prepare and Apply the Garlic Butter Topping:
-
- In a small bowl, whisk together the melted butter, garlic powder (or minced fresh garlic), dried parsley, sesame/poppy seeds (if using), and pinch of onion powder (if using).
-
- Evenly brush the garlic butter mixture over the tops of the slider buns.
-
- Prepare and Apply the Garlic Butter Topping:
-
- Bake the Sliders:
-
- Cover the baking dish loosely with aluminum foil. This helps the cheese melt and the sliders heat through without the tops browning too quickly.
-
- Bake in the preheated oven for 15-20 minutes.
-
- Remove the aluminum foil and continue to bake for another 5-10 minutes, or until the tops of the sliders are golden brown and lightly toasted, and the cheese is completely melted and bubbly.
-
- Bake the Sliders:
-
- Rest and Serve:
-
- Once baked, carefully remove the baking dish from the oven.
-
- Let the sliders rest for 3-5 minutes before slicing along the individual roll lines with a knife or pizza cutter. This helps them hold together better.
-
- Serve warm and enjoy the cheesy, beefy goodness!
-
- Rest and Serve:
Nutrition
- Serving Size: one normal portion
- Calories: 250-350


