There are some desserts that transcend mere food; they become experiences, markers of celebration, and carriers of nostalgia. For my family, the Black Forest Cake, or Schwarzwälder Kirschtorte as it’s known in its German homeland, is exactly that. I remember the first time I attempted it, slightly intimidated by its multi-layered reputation. The kitchen filled with the deep aroma of chocolate mingling with the sweet tang of cherries, and the slight, intriguing scent of Kirschwasser. The process was involved, yes, but deeply rewarding. When I finally presented the finished cake – layers of moist chocolate sponge, clouds of whipped cream, glistening cherries, and delicate chocolate shavings – the reaction was pure magic. Eyes widened, appreciative murmurs filled the room, and the first bite silenced everyone in blissful satisfaction. It wasn’t just a cake; it was a showstopper, a testament to the joy of homemade baking. Since then, it’s become our go-to for birthdays, holidays, and sometimes, “just because” we deserve a slice of decadent happiness. This recipe is the culmination of many trials, tweaks, and triumphant moments, refined to achieve that perfect balance of rich chocolate, tart cherries, light cream, and that essential Kirsch kick. It might look complex, but trust me, breaking it down step-by-step makes it achievable, and the result? Absolutely worth every moment. Prepare to create not just a cake, but a cherished memory.
The Ultimate Black Forest Cake Recipe: A Decadent German Delight
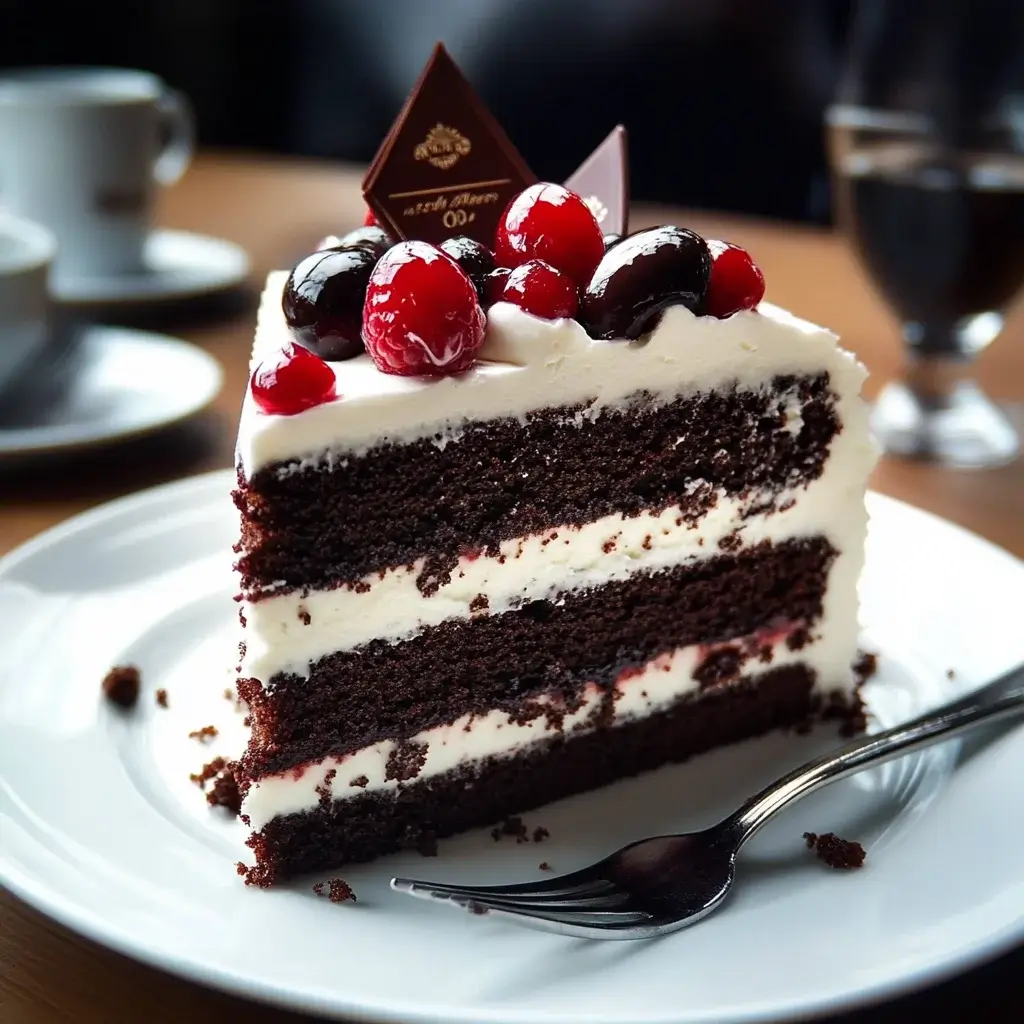
Black Forest Cake is more than just layers of chocolate, cream, and cherries; it’s a symphony of textures and flavors. Originating from the Black Forest region of Germany, famed for its sour cherries and Kirschwasser (a clear cherry brandy), this cake is a celebration of its local ingredients. A true Schwarzwälder Kirschtorte features distinct layers of chocolate sponge cake (often Biskuit or a light genoise, though richer American-style chocolate cakes are also popular adaptations), soaked generously with Kirschwasser, layered with whipped cream and tart cherries, and decorated with more cream, cherries, and chocolate shavings. This recipe aims for authenticity while ensuring a moist, flavorful result that even novice bakers can master with patience and attention to detail. Get ready to impress yourself and your guests with this iconic German dessert.
Ingredients You’ll Need for Authentic Black Forest Gateau
Gathering high-quality ingredients is the first step towards a truly exceptional Black Forest Cake. Precision in measurement, especially for the cake layers, is key. Here’s what you’ll need, broken down by component:
For the Chocolate Sponge Cake Layers (Makes three 8-inch or 9-inch layers):
- All-Purpose Flour: 2 cups (250g) – Sifted for lightness.
- Granulated Sugar: 2 cups (400g) – Provides sweetness and structure.
- Unsweetened Cocoa Powder: ¾ cup (75g) – Dutch-processed cocoa offers a deeper, richer chocolate flavor and darker color. Sift this too!
- Baking Soda: 2 teaspoons (10g) – Leavening agent.
- Baking Powder: 1 teaspoon (5g) – Additional leavening for a good rise.
- Salt: 1 teaspoon (6g) – Balances the sweetness and enhances chocolate flavor.
- Large Eggs: 2 – At room temperature for better incorporation.
- Buttermilk: 1 cup (240ml) – At room temperature. Adds moisture and tang, reacting with leaveners. (If you don’t have buttermilk, add 1 tbsp white vinegar or lemon juice to 1 cup milk and let sit for 5-10 minutes).
- Vegetable Oil: ½ cup (120ml) – Ensures a moist crumb. Use a neutral oil like canola or sunflower.
- Pure Vanilla Extract: 2 teaspoons (10ml) – Enhances all the other flavors.
- Hot Water or Hot Brewed Coffee: 1 cup (240ml) – Blooming the cocoa powder with hot liquid intensifies the chocolate flavor and adds moisture. Coffee deepens the richness.
For the Kirsch Syrup (Cherry Soak):
- Water: ½ cup (120ml)
- Granulated Sugar: ½ cup (100g)
- Kirschwasser (Cherry Brandy): ½ cup (120ml) or more, to taste – This is crucial for authentic flavor. Choose a good quality Kirsch. (See FAQ for non-alcoholic substitutions).
For the Cherry Filling:
- Sour Cherries: 2 cans (15 oz / 425g each) Morello cherries in syrup or water, drained (reserve syrup from one can if needed for syrup or non-alcoholic version), OR about 4 cups (600g) fresh or frozen pitted sour cherries. Tart cherries are key!
- Reserved Cherry Syrup OR Water: ½ cup (120ml) – If using fresh/frozen cherries or canned in water.
- Granulated Sugar: ¼ cup (50g) – Adjust based on cherry sweetness.
- Cornstarch: 2 tablespoons (16g) – To thicken the filling.
- Kirschwasser: 2 tablespoons (30ml) – Added off-heat for flavor. (Optional, but recommended).
For the Stabilized Whipped Cream Frosting:
- Heavy Whipping Cream: 4 cups (960ml) – Very cold (at least 35% milkfat).
- Powdered Sugar (Confectioners’ Sugar): 1 cup (120g), sifted – Or more, to taste.
- Pure Vanilla Extract: 2 teaspoons (10ml)
- Unflavored Gelatin: 1 tablespoon (approx. 1 packet or 9g) – For stabilization (optional but highly recommended for structure).
- Cold Water: ¼ cup (60ml) – To bloom the gelatin.
For Decoration:
- Fresh Cherries with Stems: About 16-20, for garnish.
- Chocolate Shavings or Curls: 4-6 oz (115-170g) good quality dark or semi-sweet chocolate.
Step-by-Step Instructions: Baking Your Masterpiece
Follow these detailed steps patiently. Breaking the process down makes it manageable. You can even make components ahead of time (see Tips section).
Part 1: Baking the Chocolate Sponge Cake Layers
- Preheat & Prepare: Preheat your oven to 350°F (175°C). Grease and flour three 8-inch or 9-inch round cake pans. For extra security against sticking, line the bottoms with parchment paper rounds, then grease and flour the parchment and sides.
- Combine Dry Ingredients: In a large mixing bowl, whisk together the sifted flour, sugar, sifted cocoa powder, baking soda, baking powder, and salt. Ensure there are no lumps, especially from the cocoa powder. Whisking well distributes the leaveners evenly.
- Combine Wet Ingredients: In a separate medium bowl, whisk together the room temperature eggs, buttermilk, oil, and vanilla extract until well combined.
- Combine Wet and Dry: Pour the wet ingredients into the dry ingredients. Using an electric mixer on low speed (or whisking by hand), mix until just combined. Be careful not to overmix at this stage; stop as soon as the flour streaks disappear. Overmixing develops gluten, leading to a tougher cake.
- Add Hot Liquid: Carefully pour the hot water or hot coffee into the batter. Mix on low speed again until the batter is smooth and thin. It will be quite liquidy – this is normal and contributes to the cake’s moistness. Scrape the bottom and sides of the bowl to ensure everything is incorporated.
- Divide Batter: Pour the batter evenly among the three prepared cake pans. An easy way to ensure even layers is to use a kitchen scale.
- Bake: Place the pans in the preheated oven. Bake for 30-35 minutes for 8-inch pans, or 25-30 minutes for 9-inch pans, or until a wooden skewer inserted into the center of each cake comes out clean.
- Cool: Let the cakes cool in their pans on a wire rack for about 15-20 minutes. Then, carefully invert them onto the wire rack, remove the parchment paper if used, and let them cool completely. Cooling completely is crucial before assembly (at least 1-2 hours). Warm cakes will melt the whipped cream. For best results, wrap the cooled layers tightly in plastic wrap and chill for several hours or overnight. Chilled cakes are firmer and easier to handle and frost.
Part 2: Preparing the Cherry Filling and Kirsch Syrup
- Make the Kirsch Syrup: In a small saucepan, combine the ½ cup water and ½ cup sugar. Bring to a simmer over medium heat, stirring until the sugar is completely dissolved. Remove from heat and let it cool slightly. Stir in the ½ cup Kirschwasser. Set aside to cool completely.
- Prepare the Cherry Filling: Drain the canned cherries, reserving ½ cup of the syrup if packed in syrup. If using fresh or frozen cherries, you’ll use water instead of reserved syrup.
- Thicken the Filling: In a medium saucepan, whisk together the reserved cherry syrup (or water), ¼ cup sugar, and cornstarch until smooth. Add the drained cherries.
- Cook the Filling: Place the saucepan over medium heat. Bring the mixture to a simmer, stirring constantly to prevent scorching and lumps. Cook for about 2-3 minutes, or until the mixture has thickened noticeably and become glossy. The consistency should coat the back of a spoon.
- Add Kirsch (Optional): Remove the saucepan from the heat. Stir in the 2 tablespoons of Kirschwasser, if using. This adds another layer of authentic flavor.
- Cool Completely: Transfer the cherry filling to a bowl, cover the surface directly with plastic wrap (to prevent a skin from forming), and let it cool completely. Refrigerate until needed.
Part 3: Making the Stabilized Whipped Cream Frosting
Using gelatin ensures your whipped cream holds its shape beautifully, especially important for layering and piping.
- Chill Everything: Make sure your heavy cream is very cold. Chill the mixing bowl and whisk attachment (metal bowls work best) in the freezer for 10-15 minutes before you start. Cold equipment helps the cream whip up faster and achieve better volume.
- Bloom the Gelatin: Pour the ¼ cup cold water into a small, microwave-safe bowl. Sprinkle the gelatin evenly over the water. Let it sit undisturbed for 5-10 minutes until it looks spongy and has absorbed the water (this is called “blooming”).
- Dissolve the Gelatin: Microwave the bloomed gelatin on high for 5-10 seconds, just until it liquefies. It should be clear, not boiling. Alternatively, set the bowl over a small pan of simmering water and stir until dissolved. Let it cool slightly for a minute or two – you don’t want it hot, but it needs to be liquid.
- Start Whipping: Pour the very cold heavy cream into the chilled mixing bowl. Add the sifted powdered sugar and vanilla extract. Start mixing on low speed, gradually increasing to medium-high.
- Add Gelatin: Once the cream starts to thicken slightly and reaches the soft peak stage (peaks form but slump over immediately), slowly drizzle the slightly cooled, liquid gelatin into the cream while the mixer is running on medium speed. Ensure it gets incorporated evenly and doesn’t hit the whisk directly while liquid, which could cause strands.
- Whip to Stiff Peaks: Increase the mixer speed to high and continue whipping until stiff peaks form. Stiff peaks stand straight up when the whisk is lifted and hold their shape well. Be careful not to overwhip, or the cream will become grainy and start turning into butter. The cream should look smooth, voluminous, and stable.
- Use Immediately or Chill Briefly: Stabilized whipped cream is best used immediately for assembly. If you need to wait a few minutes, keep it covered in the refrigerator.
Part 4: Assembling the Black Forest Cake
- Level the Cakes (Optional but Recommended): If your cake layers have domes, use a long serrated knife to carefully trim the tops so they are flat and even. This makes layering much easier and results in a more stable, professional-looking cake. (Save the scraps for snacking!)
- Prepare the Base: Place one chocolate cake layer onto your serving plate or a cake stand. If desired, place strips of parchment paper under the edges of the cake layer to keep the plate clean during frosting; you can slide them out later.
- Soak the First Layer: Generously brush the first cake layer with the cooled Kirsch syrup. Don’t be shy – the syrup adds moisture and the signature Kirsch flavor. Aim for about ⅓ of the syrup for this layer.
- Add Cream and Cherries: Spread about 1 to 1.5 cups of the stabilized whipped cream evenly over the soaked cake layer, creating a relatively thick layer. Create a small dam of cream around the edge to hold the cherries in. Spoon about half of the cooled cherry filling over the cream, spreading it gently within the dam.
- Add the Second Layer: Carefully place the second cake layer on top of the cherry filling. Press down gently to level it.
- Soak and Fill Second Layer: Brush the second layer generously with another ⅓ of the Kirsch syrup. Spread another 1 to 1.5 cups of whipped cream over the second layer, again creating a dam. Spoon the remaining half of the cherry filling over the cream.
- Add the Top Layer: Place the third cake layer on top. Gently press down. Brush this final layer with the remaining ⅓ of the Kirsch syrup.
- Crumb Coat (Optional but Recommended): Apply a thin layer of whipped cream all over the top and sides of the cake. This is called a “crumb coat” and it traps any loose crumbs, ensuring your final layer of frosting is clean. Chill the cake in the refrigerator for about 30 minutes to let the crumb coat set.
Part 5: Decorating Your Gateau
- Final Frosting: Once the crumb coat is set (or if you skipped it, proceed carefully), cover the entire cake – top and sides – with the remaining stabilized whipped cream. Use an offset spatula for a smooth finish, or create decorative swirls.
- Apply Chocolate Shavings: Gently press the chocolate shavings onto the sides of the cake. You can also sprinkle some on top. The easiest way to do this is to hold the cake over a large baking sheet (to catch excess shavings) and gently scoop handfuls of shavings and press them against the creamed sides.
- Pipe Rosettes: Fit a piping bag with a large star tip (like a Wilton 1M or 2D). Fill the bag with some of the whipped cream (you might need to reserve some specifically for this or ensure you have enough remaining). Pipe decorative rosettes or dollops of cream evenly around the top edge of the cake. Typically, you’ll pipe one rosette for each slice you intend to cut (e.g., 12 or 16).
- Garnish with Cherries: Place one fresh cherry (with stem, if possible) onto each piped rosette of whipped cream.
- Final Chill: Refrigerate the fully assembled and decorated cake for at least 4-6 hours, or preferably overnight. This allows the flavors to meld beautifully, the cream to fully set, and the cake layers to absorb the syrup properly. This chilling step is crucial for the best taste and texture.
Nutritional Information (Approximate)
- Servings: 12-16 slices
- Calories per serving (approximate, based on 1/14th of the cake): 550-700 kcal
Disclaimer: Nutritional information is an estimate only and can vary significantly based on specific ingredients used (e.g., fat content of cream, type of chocolate, sugar content in canned cherries), portion size, and any substitutions made. This cake is an indulgent dessert meant for special occasions.
Time Commitment: Preparation and Baking
Understanding the time involved helps in planning:
- Active Preparation Time: 1.5 – 2 hours (includes mixing cake batter, making syrup & filling, whipping cream, assembly, and decoration). This can be spread out.
- Baking Time: 30-35 minutes
- Cooling Time (Cake Layers): 2-3 hours minimum (includes initial pan cooling and complete cooling on rack).
- Cooling Time (Syrup & Filling): 1 hour minimum.
- Chilling Time (Assembled Cake): 4-6 hours minimum, preferably overnight (8-12 hours).
- Total Time (Start to Finish, including chilling): Approximately 8 – 18 hours (most of this is hands-off cooling/chilling time).
How to Serve Your Stunning Black Forest Cake
Presenting and serving this masterpiece correctly enhances the experience:
- Serve Chilled: Black Forest Cake is best served cold, straight from the refrigerator. The cold temperature keeps the whipped cream firm and the flavors distinct and refreshing.
- Use a Sharp Knife: For clean slices, use a long, sharp knife. Dip the knife in hot water and wipe it clean between each cut. This prevents the cream from dragging and ensures neat layers are visible in each slice.
- Presentation: Serve slices on individual dessert plates. The contrast between the dark chocolate, white cream, and red cherries is visually stunning on its own.
- Accompaniments:
- Coffee: A strong cup of black coffee or an espresso beautifully cuts through the richness of the cake.
- Tea: A simple black tea or even a fruit-infused herbal tea works well.
- Kirsch: For adults who appreciate it, a small glass of Kirschwasser served alongside the cake complements its flavors perfectly.
- Nothing Else Needed: Honestly, this cake is so flavorful and complex, it truly stands alone!
- Occasions: Perfect for birthdays, holidays (especially Christmas), dinner parties, or any time you want a truly impressive dessert centerpiece.
Pro Tips for Black Forest Cake Perfection
- Ingredient Quality Matters: Use the best ingredients you can find, especially the chocolate, cocoa powder, and Kirschwasser. Dutch-processed cocoa gives a deeper flavor and color. Good quality dark chocolate (at least 60-70% cacao) makes superior shavings. Authentic German Kirschwasser provides the characteristic flavor profile.
- Don’t Skip the Kirsch (or Substitute Wisely): The Kirschwasser syrup soak is fundamental to the authentic Black Forest flavor. Be generous with it! If you must make it non-alcoholic, use the reserved cherry syrup (from Morello cherries packed in syrup) mixed with a little water and perhaps a ½ teaspoon of almond extract or cherry extract for an aromatic hint, but understand the flavor profile will be different.
- Stabilize Your Whipped Cream: For a cake with multiple layers held together by whipped cream, stabilization is key, especially if the cake will sit out for a short while or needs to last a couple of days. The gelatin method described is reliable. Ensure the cream, bowl, and whisk are very cold for best results. Avoid overwhipping.
- Chill, Chill, Chill: Patience during the chilling stages is crucial. Cooling the cake layers completely (and even chilling them wrapped) makes them easier to handle and prevents melting the cream. Chilling the assembled cake for several hours (or overnight) is essential for the flavors to meld, the syrup to soak in properly, and the cream to set firmly, making slicing much cleaner. Don’t rush this step!
- Measure Accurately, Especially Flour: Baking is a science. Use measuring cups designed for dry ingredients (scoop and level method) or, even better, use a kitchen scale for weighing ingredients like flour, sugar, and cocoa powder (gram measurements provided). This ensures the correct ratio of ingredients for the best cake texture.
Frequently Asked Questions (FAQ) about Black Forest Cake
Q1: Can I make Black Forest Cake without alcohol (Kirschwasser)?
A: Yes, you can make a non-alcoholic version, though the flavor will differ from the traditional German cake. For the syrup soak, replace the Kirschwasser with reserved syrup from canned Morello cherries (if packed in syrup), potentially diluted with a little water, or use a simple syrup infused with cherry juice or a non-alcoholic cherry extract. A tiny dash of almond extract can sometimes mimic the aromatic quality. Omit the Kirschwasser from the cherry filling or replace it with a splash of cherry juice or extract. It will still be a delicious chocolate cherry cream cake.
Q2: Can I use fresh or frozen cherries instead of canned?
A: Absolutely! Tart (sour) cherries like Morello or Montmorency are best for authentic flavor. If using fresh cherries, pit them first. If using frozen, thaw them slightly but you can often cook them from partially frozen in the filling. You will need to make the syrup for the filling from scratch using water, sugar, and cornstarch as described in the recipe (using ½ cup water instead of reserved syrup). Adjust the sugar based on the tartness of your cherries. Fresh cherries also make a beautiful garnish.
Q3: How far in advance can I make this cake? Can components be made ahead?
A: Yes, you can break down the process.
- Cake Layers: Bake up to 2 days ahead. Cool completely, wrap tightly in plastic wrap, and store at room temperature for a day or in the refrigerator for 2-3 days. You can even freeze them for up to a month (thaw in the refrigerator overnight before using).
- Cherry Filling & Syrup: Make up to 3 days ahead. Cool completely, cover, and store in the refrigerator.
- Whipped Cream: Stabilized whipped cream holds up better, but it’s ideally made just before assembly for the best texture. However, you can make it a few hours ahead and keep it well-covered in the fridge.
- Assembly: Assemble the cake the day before you plan to serve it. The overnight chilling period is beneficial for the flavors to meld. Decorate fully (including shavings and fresh cherries) before the final chill.
Q4: How do I store leftover Black Forest Cake? How long does it last?
A: Store leftover cake in an airtight container (a cake carrier works well) in the refrigerator. Due to the fresh whipped cream, it should not be left at room temperature for more than an hour or two. Properly stored, it will last for about 3-4 days in the refrigerator. The texture might change slightly after the first couple of days (the cream might weep a little or the cake might become slightly denser), but it will still be delicious. Freezing assembled slices is not generally recommended as the whipped cream texture changes upon thawing.
Q5: My whipped cream isn’t holding its shape / is weeping. What went wrong?
A: Several factors could be at play:
- Cream Not Cold Enough: Heavy cream needs to be very cold (straight from the fridge) to whip properly. Chilling the bowl and whisk helps too.
- Low Fat Content: Ensure you’re using heavy whipping cream or heavy cream with at least 35% milkfat. Lighter creams won’t whip as well or hold their shape.
- Overwhipping/Underwhipping: Under-whipped cream won’t be stable (soft peaks). Over-whipped cream becomes grainy and can start to separate (turn into butter), which also makes it unstable and prone to weeping. Whip just until stiff, glossy peaks form.
- Stabilization: If not using a stabilizer like gelatin (or powdered sugar with cornstarch, or a commercial stabilizer), regular whipped cream will naturally soften and potentially weep over time, especially under the weight of cake layers or in warmer conditions. Using the gelatin method significantly improves stability.
- Liquid Added Incorrectly: If adding liquid gelatin, ensure it’s slightly cooled and drizzled in slowly while mixing; adding hot gelatin or adding it too quickly can cause issues.
Black Forest Cake recipe
Ingredients
For the Chocolate Sponge Cake Layers (Makes three 8-inch or 9-inch layers):
-
- All-Purpose Flour: 2 cups (250g) – Sifted for lightness.
-
- Granulated Sugar: 2 cups (400g) – Provides sweetness and structure.
-
- Unsweetened Cocoa Powder: ¾ cup (75g) – Dutch-processed cocoa offers a deeper, richer chocolate flavor and darker color. Sift this too!
-
- Baking Soda: 2 teaspoons (10g) – Leavening agent.
-
- Baking Powder: 1 teaspoon (5g) – Additional leavening for a good rise.
-
- Salt: 1 teaspoon (6g) – Balances the sweetness and enhances chocolate flavor.
-
- Large Eggs: 2 – At room temperature for better incorporation.
-
- Buttermilk: 1 cup (240ml) – At room temperature. Adds moisture and tang, reacting with leaveners. (If you don’t have buttermilk, add 1 tbsp white vinegar or lemon juice to 1 cup milk and let sit for 5-10 minutes).
-
- Vegetable Oil: ½ cup (120ml) – Ensures a moist crumb. Use a neutral oil like canola or sunflower.
-
- Pure Vanilla Extract: 2 teaspoons (10ml) – Enhances all the other flavors.
-
- Hot Water or Hot Brewed Coffee: 1 cup (240ml) – Blooming the cocoa powder with hot liquid intensifies the chocolate flavor and adds moisture. Coffee deepens the richness.
For the Kirsch Syrup (Cherry Soak):
-
- Water: ½ cup (120ml)
-
- Granulated Sugar: ½ cup (100g)
-
- Kirschwasser (Cherry Brandy): ½ cup (120ml) or more, to taste – This is crucial for authentic flavor. Choose a good quality Kirsch. (See FAQ for non-alcoholic substitutions).
For the Cherry Filling:
-
- Sour Cherries: 2 cans (15 oz / 425g each) Morello cherries in syrup or water, drained (reserve syrup from one can if needed for syrup or non-alcoholic version), OR about 4 cups (600g) fresh or frozen pitted sour cherries. Tart cherries are key!
-
- Reserved Cherry Syrup OR Water: ½ cup (120ml) – If using fresh/frozen cherries or canned in water.
-
- Granulated Sugar: ¼ cup (50g) – Adjust based on cherry sweetness.
-
- Cornstarch: 2 tablespoons (16g) – To thicken the filling.
-
- Kirschwasser: 2 tablespoons (30ml) – Added off-heat for flavor. (Optional, but recommended).
For the Stabilized Whipped Cream Frosting:
-
- Heavy Whipping Cream: 4 cups (960ml) – Very cold (at least 35% milkfat).
-
- Powdered Sugar (Confectioners’ Sugar): 1 cup (120g), sifted – Or more, to taste.
-
- Pure Vanilla Extract: 2 teaspoons (10ml)
-
- Unflavored Gelatin: 1 tablespoon (approx. 1 packet or 9g) – For stabilization (optional but highly recommended for structure).
-
- Cold Water: ¼ cup (60ml) – To bloom the gelatin.
For Decoration:
-
- Fresh Cherries with Stems: About 16-20, for garnish.
-
- Chocolate Shavings or Curls: 4-6 oz (115-170g) good quality dark or semi-sweet chocolate.
Instructions
Part 1: Baking the Chocolate Sponge Cake Layers
-
- Preheat & Prepare: Preheat your oven to 350°F (175°C). Grease and flour three 8-inch or 9-inch round cake pans. For extra security against sticking, line the bottoms with parchment paper rounds, then grease and flour the parchment and sides.
-
- Combine Dry Ingredients: In a large mixing bowl, whisk together the sifted flour, sugar, sifted cocoa powder, baking soda, baking powder, and salt. Ensure there are no lumps, especially from the cocoa powder. Whisking well distributes the leaveners evenly.
-
- Combine Wet Ingredients: In a separate medium bowl, whisk together the room temperature eggs, buttermilk, oil, and vanilla extract until well combined.
-
- Combine Wet and Dry: Pour the wet ingredients into the dry ingredients. Using an electric mixer on low speed (or whisking by hand), mix until just combined. Be careful not to overmix at this stage; stop as soon as the flour streaks disappear. Overmixing develops gluten, leading to a tougher cake.
-
- Add Hot Liquid: Carefully pour the hot water or hot coffee into the batter. Mix on low speed again until the batter is smooth and thin. It will be quite liquidy – this is normal and contributes to the cake’s moistness. Scrape the bottom and sides of the bowl to ensure everything is incorporated.
-
- Divide Batter: Pour the batter evenly among the three prepared cake pans. An easy way to ensure even layers is to use a kitchen scale.
-
- Bake: Place the pans in the preheated oven. Bake for 30-35 minutes for 8-inch pans, or 25-30 minutes for 9-inch pans, or until a wooden skewer inserted into the center of each cake comes out clean.
-
- Cool: Let the cakes cool in their pans on a wire rack for about 15-20 minutes. Then, carefully invert them onto the wire rack, remove the parchment paper if used, and let them cool completely. Cooling completely is crucial before assembly (at least 1-2 hours). Warm cakes will melt the whipped cream. For best results, wrap the cooled layers tightly in plastic wrap and chill for several hours or overnight. Chilled cakes are firmer and easier to handle and frost.
Part 2: Preparing the Cherry Filling and Kirsch Syrup
-
- Make the Kirsch Syrup: In a small saucepan, combine the ½ cup water and ½ cup sugar. Bring to a simmer over medium heat, stirring until the sugar is completely dissolved. Remove from heat and let it cool slightly. Stir in the ½ cup Kirschwasser. Set aside to cool completely.
-
- Prepare the Cherry Filling: Drain the canned cherries, reserving ½ cup of the syrup if packed in syrup. If using fresh or frozen cherries, you’ll use water instead of reserved syrup.
-
- Thicken the Filling: In a medium saucepan, whisk together the reserved cherry syrup (or water), ¼ cup sugar, and cornstarch until smooth. Add the drained cherries.
-
- Cook the Filling: Place the saucepan over medium heat. Bring the mixture to a simmer, stirring constantly to prevent scorching and lumps. Cook for about 2-3 minutes, or until the mixture has thickened noticeably and become glossy. The consistency should coat the back of a spoon.
-
- Add Kirsch (Optional): Remove the saucepan from the heat. Stir in the 2 tablespoons of Kirschwasser, if using. This adds another layer of authentic flavor.
-
- Cool Completely: Transfer the cherry filling to a bowl, cover the surface directly with plastic wrap (to prevent a skin from forming), and let it cool completely. Refrigerate until needed.
Part 3: Making the Stabilized Whipped Cream Frosting
Using gelatin ensures your whipped cream holds its shape beautifully, especially important for layering and piping.
-
- Chill Everything: Make sure your heavy cream is very cold. Chill the mixing bowl and whisk attachment (metal bowls work best) in the freezer for 10-15 minutes before you start. Cold equipment helps the cream whip up faster and achieve better volume.
-
- Bloom the Gelatin: Pour the ¼ cup cold water into a small, microwave-safe bowl. Sprinkle the gelatin evenly over the water. Let it sit undisturbed for 5-10 minutes until it looks spongy and has absorbed the water (this is called “blooming”).
-
- Dissolve the Gelatin: Microwave the bloomed gelatin on high for 5-10 seconds, just until it liquefies. It should be clear, not boiling. Alternatively, set the bowl over a small pan of simmering water and stir until dissolved. Let it cool slightly for a minute or two – you don’t want it hot, but it needs to be liquid.
-
- Start Whipping: Pour the very cold heavy cream into the chilled mixing bowl. Add the sifted powdered sugar and vanilla extract. Start mixing on low speed, gradually increasing to medium-high.
-
- Add Gelatin: Once the cream starts to thicken slightly and reaches the soft peak stage (peaks form but slump over immediately), slowly drizzle the slightly cooled, liquid gelatin into the cream while the mixer is running on medium speed. Ensure it gets incorporated evenly and doesn’t hit the whisk directly while liquid, which could cause strands.
-
- Whip to Stiff Peaks: Increase the mixer speed to high and continue whipping until stiff peaks form. Stiff peaks stand straight up when the whisk is lifted and hold their shape well. Be careful not to overwhip, or the cream will become grainy and start turning into butter. The cream should look smooth, voluminous, and stable.
-
- Use Immediately or Chill Briefly: Stabilized whipped cream is best used immediately for assembly. If you need to wait a few minutes, keep it covered in the refrigerator.
Part 4: Assembling the Black Forest Cake
-
- Level the Cakes (Optional but Recommended): If your cake layers have domes, use a long serrated knife to carefully trim the tops so they are flat and even. This makes layering much easier and results in a more stable, professional-looking cake. (Save the scraps for snacking!)
-
- Prepare the Base: Place one chocolate cake layer onto your serving plate or a cake stand. If desired, place strips of parchment paper under the edges of the cake layer to keep the plate clean during frosting; you can slide them out later.
-
- Soak the First Layer: Generously brush the first cake layer with the cooled Kirsch syrup. Don’t be shy – the syrup adds moisture and the signature Kirsch flavor. Aim for about ⅓ of the syrup for this layer.
-
- Add Cream and Cherries: Spread about 1 to 1.5 cups of the stabilized whipped cream evenly over the soaked cake layer, creating a relatively thick layer. Create a small dam of cream around the edge to hold the cherries in. Spoon about half of the cooled cherry filling over the cream, spreading it gently within the dam.
-
- Add the Second Layer: Carefully place the second cake layer on top of the cherry filling. Press down gently to level it.
-
- Soak and Fill Second Layer: Brush the second layer generously with another ⅓ of the Kirsch syrup. Spread another 1 to 1.5 cups of whipped cream over the second layer, again creating a dam. Spoon the remaining half of the cherry filling over the cream.
-
- Add the Top Layer: Place the third cake layer on top. Gently press down. Brush this final layer with the remaining ⅓ of the Kirsch syrup.
-
- Crumb Coat (Optional but Recommended): Apply a thin layer of whipped cream all over the top and sides of the cake. This is called a “crumb coat” and it traps any loose crumbs, ensuring your final layer of frosting is clean. Chill the cake in the refrigerator for about 30 minutes to let the crumb coat set.
Part 5: Decorating Your Gateau
-
- Final Frosting: Once the crumb coat is set (or if you skipped it, proceed carefully), cover the entire cake – top and sides – with the remaining stabilized whipped cream. Use an offset spatula for a smooth finish, or create decorative swirls.
-
- Apply Chocolate Shavings: Gently press the chocolate shavings onto the sides of the cake. You can also sprinkle some on top. The easiest way to do this is to hold the cake over a large baking sheet (to catch excess shavings) and gently scoop handfuls of shavings and press them against the creamed sides.
-
- Pipe Rosettes: Fit a piping bag with a large star tip (like a Wilton 1M or 2D). Fill the bag with some of the whipped cream (you might need to reserve some specifically for this or ensure you have enough remaining). Pipe decorative rosettes or dollops of cream evenly around the top edge of the cake. Typically, you’ll pipe one rosette for each slice you intend to cut (e.g., 12 or 16).
-
- Garnish with Cherries: Place one fresh cherry (with stem, if possible) onto each piped rosette of whipped cream.
-
- Final Chill: Refrigerate the fully assembled and decorated cake for at least 4-6 hours, or preferably overnight. This allows the flavors to meld beautifully, the cream to fully set, and the cake layers to absorb the syrup properly. This chilling step is crucial for the best taste and texture.
Nutrition
- Serving Size: one normal portion
- Calories: 550-700