


It’s funny how certain desserts can transport you right back to childhood, to sunny afternoons and family gatherings. For me, banana pudding is that dessert. I’ve tasted countless versions – some with fancy custards, others with quick-fix instant mixes. But the recipe I’m about to share? This one is the one. The first time I made it for a big family potluck, I was a little nervous. Would it live up to the nostalgic ideal everyone held? The silence that fell over the table as spoons clinked against bowls, followed by contented sighs and requests for seconds, was all the answer I needed. My notoriously picky nephew, who usually turns his nose up at anything with fruit, actually asked for the recipe! It’s that perfect balance of creamy, sweet, banana-infused goodness, with the delightful textural contrast of softened vanilla wafers. It’s not just a dessert; it’s a bowlful of comfort, a taste of home, and a guaranteed crowd-pleaser. This banana pudding has since become my signature dish, the one everyone requests, and I’m so excited to share its magic with you.
The Ultimate Banana Pudding Recipe: A Symphony of Creamy Delight
This isn’t just any banana pudding; it’s an experience. We’re going for a rich, homemade custard base – no instant pudding mix here, though the results are surprisingly easy to achieve. The layering of ripe bananas, crisp vanilla wafers (that will soften to cake-like perfection), and luscious custard, all topped with a cloud of freshly whipped cream, creates a dessert that is truly iconic. Prepare yourself for rave reviews, because this recipe is a game-changer.
Ingredients: The Building Blocks of Banana Pudding Perfection
Gathering high-quality ingredients is the first step towards banana pudding nirvana. Here’s what you’ll need:
- For the Custard:
- 3/4 cup (150g) granulated sugar
- 1/3 cup (40g) all-purpose flour
- 1/4 teaspoon salt
- 3 large egg yolks (save the whites for another recipe or a meringue topping, if desired)
- 2 cups (480ml) whole milk
- 1 tablespoon unsalted butter
- 1 1/2 teaspoons pure vanilla extract
- For Assembly & Topping:
- 1 (11-ounce or approx. 300g) box Nilla Wafers (or similar vanilla wafer cookies)
- 4-5 large, ripe bananas, sliced about 1/4-inch thick (you want them ripe but still firm enough to hold their shape)
- 1 1/2 cups (360ml) heavy whipping cream, cold
- 1/4 cup (30g) powdered sugar (confectioners’ sugar)
- 1/2 teaspoon pure vanilla extract (for the whipped cream)
A Note on Ingredients:
- Bananas: Use bananas that are perfectly ripe – yellow with a few brown speckles. Green bananas will be starchy and lack sweetness, while overly ripe, mushy bananas can make the pudding watery and too intensely flavored.
- Milk: Whole milk provides the richness needed for a creamy custard. You can use 2%, but the result will be slightly less decadent.
- Vanilla Wafers: Nilla Wafers are classic for a reason. Their distinct flavor and texture are integral to traditional banana pudding. If you can’t find them, any crisp, plain vanilla cookie could work, but the flavor profile might change slightly.
- Vanilla Extract: Pure vanilla extract makes a world of difference. Avoid imitation vanilla if you can.
Step-by-Step Instructions: Crafting Your Banana Pudding Masterpiece
Patience and attention to detail are key here, especially when making the custard. Follow these steps carefully for a flawless result.
Part 1: Making the Homemade Vanilla Custard
- Prepare Dry Ingredients: In a medium, heavy-bottomed saucepan, whisk together the granulated sugar, all-purpose flour, and salt. Breaking up any lumps in the flour now will help ensure a smooth custard.
- Incorporate Egg Yolks: Add the egg yolks to the saucepan. Whisk them into the dry ingredients until the mixture is well combined and looks like a thick, pale yellow paste.
- Temper the Eggs: Gradually pour the whole milk into the egg yolk mixture, whisking constantly. Start with just a splash of milk to loosen the paste, then continue adding the milk in a slow, steady stream while whisking. This gradual addition helps temper the eggs, preventing them from scrambling when heated.
- Cook the Custard: Place the saucepan over medium heat. Cook, whisking constantly and thoroughly, scraping the bottom and corners of the pan to prevent scorching and sticking. This is the most crucial step. Don’t walk away!
- Thicken the Custard: Continue to cook and whisk until the custard comes to a gentle boil and thickens considerably. This should take about 8-12 minutes. Once it starts to bubble, cook for 1-2 minutes more, still whisking, to ensure the flour is fully cooked out and the custard is properly thickened. It should be thick enough to coat the back of a spoon.
- Finish the Custard: Remove the saucepan from the heat. Immediately stir in the tablespoon of butter and 1 1/2 teaspoons of vanilla extract until the butter is melted and everything is smooth.
- Strain (Optional but Recommended): For an ultra-smooth custard, strain it through a fine-mesh sieve into a clean bowl. This will catch any small bits of cooked egg or undissolved flour.
- Cool the Custard: Press a piece of plastic wrap directly onto the surface of the custard. This prevents a skin from forming as it cools. Let the custard cool at room temperature for about 30 minutes to an hour before refrigerating it until completely chilled – at least 2-3 hours, or preferably overnight. The custard needs to be cold before assembling the pudding.
Part 2: Assembling the Banana Pudding
- Choose Your Vessel: You can assemble the banana pudding in a large trifle bowl (about 2.5 to 3-quart capacity) for a beautiful presentation, a 9×13 inch baking dish, or even individual serving dishes like ramekins or mason jars.
- First Layer of Wafers: Arrange a single layer of Nilla Wafers, closely packed, on the bottom of your chosen dish. You may need to break some wafers to fill in gaps.
- First Layer of Bananas: Top the wafers with a single layer of sliced bananas, distributing them evenly.
- First Layer of Custard: Spread about one-third of the chilled vanilla custard evenly over the bananas.
- Repeat Layers: Repeat the layering process two more times: Nilla Wafers, then sliced bananas, then custard. You should end with a layer of custard on top. If your dish is shallower, you might only do two layers of each. Aim to use most of your wafers and bananas, reserving a few wafers for garnish if desired.
- Chill for Flavors to Meld: Cover the assembled pudding with plastic wrap, pressing it gently onto the surface of the top custard layer if there’s no whipped cream yet (or just cover the dish). Refrigerate for at least 4 hours, but preferably 6-8 hours or even overnight. This chilling time is crucial. It allows the wafers to soften to a cake-like consistency and the flavors to meld together beautifully. Don’t rush this step!
Part 3: Making the Whipped Cream Topping (Just Before Serving)
- Chill Equipment: For the best whipped cream, ensure your heavy cream is very cold. It also helps to chill your mixing bowl and whisk (or beaters) in the freezer for about 10-15 minutes beforehand.
- Whip the Cream: In the chilled bowl, combine the cold heavy whipping cream, powdered sugar, and 1/2 teaspoon of vanilla extract.
- Beat to Stiff Peaks: Using an electric mixer (handheld or stand mixer with a whisk attachment), beat the cream mixture on medium-high speed. Start on low speed to avoid splatters, then increase. Continue beating until stiff peaks form. Stiff peaks mean that when you lift the beaters, the cream will hold its shape and the peaks will stand straight up or curl over slightly at the tip without collapsing. Be careful not to overbeat, or you’ll start making butter!
- Top the Pudding: Gently spread or pipe the fresh whipped cream over the top of the chilled banana pudding just before you plan to serve it.
- Garnish (Optional): Garnish with crushed Nilla Wafers, a few whole Nilla Wafers, or even a few fresh banana slices (though banana slices will brown quickly, so add them at the very last minute if using).
Nutritional Snapshot: Indulgence in Moderation
While undeniably a treat, it’s always good to have an idea of the nutritional content. Please note these are approximations and can vary based on specific ingredients and portion sizes.
- Servings: This recipe makes approximately 10-12 servings.
- Calories per serving (approximate): 350-450 calories.
This dessert is rich and satisfying, so a moderate portion is often all you need to feel completely content. It’s a celebration dessert, meant to be enjoyed!
Time Investment: Planning Your Pudding Adventure
Good banana pudding requires some patience, mostly for chilling. Here’s a breakdown:
- Active Preparation Time (Custard & Assembly): Approximately 30-40 minutes.
- Making custard: 20-25 minutes
- Assembling: 10-15 minutes
- Custard Chilling Time: Minimum 2-3 hours, preferably overnight.
- Assembled Pudding Chilling Time: Minimum 4 hours, preferably 6-8 hours or overnight.
- Whipped Cream Preparation (just before serving): 5-7 minutes.
Total Time (including chilling): Roughly 6.5 hours to overnight. For the absolute best flavor and texture, making it a day ahead is highly recommended. The wait is worth it, trust me!
How to Serve: Presenting Your Banana Pudding with Flair
Banana pudding is delightful no matter how it’s served, but here are some ideas to elevate the experience:
- Classic Trifle Bowl: This is the quintessential way to show off those beautiful layers. A clear glass trifle bowl makes for a stunning centerpiece.
- Serve with a large serving spoon.
- Individual Parfaits or Mason Jars: For portion control and an elegant presentation, layer the pudding in individual glass cups, ramekins, or small mason jars.
- This is great for parties as it’s easy for guests to grab and go.
- Garnish each individual serving.
- Family-Style in a Baking Dish: A 9×13 inch glass or ceramic baking dish works perfectly for a more casual, family-style serving.
- Still looks lovely, especially when topped generously with whipped cream.
- Garnish Power:
- Crushed Nilla Wafers: Sprinkle generously over the whipped cream for added texture and flavor.
- Whole Nilla Wafers: Artistically arrange a few whole wafers around the edge or in the center.
- Fresh Banana Slices: Add these just before serving as they brown quickly. A light toss in lemon juice can help slow browning, but it might slightly alter the flavor.
- Chocolate Shavings: For a decadent twist, a few dark or milk chocolate shavings can be a lovely addition.
- Caramel Drizzle: A very thin drizzle of caramel sauce can complement the banana flavor beautifully, but use sparingly.
- Serving Temperature: Banana pudding is best served chilled. Take it out of the refrigerator about 15-20 minutes before serving to let it soften slightly, making it easier to scoop and enhancing the flavors.
Pro Tips for Pudding Perfection: Elevate Your Banana Pudding Game
- Don’t Skimp on Chilling Time: This is perhaps the most crucial tip. Chilling allows the custard to set fully, the Nilla Wafers to soften to that perfect cake-like consistency, and all the flavors to meld together into a harmonious blend. Rushing this step will result in a less flavorful and texturally inferior pudding. Aim for at least 4 hours after assembly, but overnight is truly ideal.
- Preventing Brown Bananas (Inside the Pudding): While the bananas layered inside the pudding are somewhat protected by the custard, you can give them extra protection. After slicing the bananas, you can very lightly toss them with a tiny amount of lemon juice (about 1 teaspoon for 4-5 bananas). Blot them gently with a paper towel before layering. The acidity helps prevent browning. Use sparingly so as not to impart a strong lemon flavor. Alternatively, work quickly when layering.
- The Art of Custard Making: Constant whisking is non-negotiable when cooking your custard. This prevents scorching on the bottom of the pan and ensures a silky-smooth texture. Also, bringing it to a gentle boil and cooking for that extra minute or two ensures the flour taste is cooked out and the custard reaches its optimal thickness. Straining it afterwards is an extra step that guarantees smoothness.
- Perfectly Whipped Cream: Use very cold heavy cream and, if possible, chill your bowl and beaters. Start beating on low speed and gradually increase to medium-high. Watch it carefully – stop as soon as stiff peaks form. Over-whipped cream will become grainy and eventually turn into butter. For extra stability, especially if making ahead, you can add a tablespoon of instant vanilla pudding mix (dry) to the cream along with the powdered sugar.
- Wafer Wisdom: Don’t be shy with the Nilla Wafers. They provide structure and absorb the delicious custard, transforming into soft, cakey layers. Ensure an even, fairly dense layer each time. Some people even like to briefly dip the wafers in milk before layering for extra softness, but I find they soften perfectly with sufficient chilling time in the custard.
Frequently Asked Questions (FAQ) About Banana Pudding
Q1: Can I make banana pudding ahead of time?
A1: Absolutely! Banana pudding is actually better when made ahead. It needs several hours (ideally 6-8, or even overnight) in the refrigerator for the flavors to meld and the wafers to soften. You can assemble the entire pudding (custard, wafers, bananas) up to 24 hours in advance. However, it’s best to make and add the fresh whipped cream topping just before serving for the best texture and appearance. If you must add whipped cream earlier, stabilized whipped cream (using a bit of gelatin or instant pudding mix) will hold up better.
Q2: How long does banana pudding last in the refrigerator?
A2: Properly stored (covered tightly with plastic wrap), banana pudding will last for about 3 days in the refrigerator. After this, the bananas may start to get overly mushy and brown, and the texture can become watery. It’s definitely best enjoyed within the first 1-2 days.
Q3: Can I use instant pudding mix instead of making homemade custard?
A3: You can, and many quick banana pudding recipes call for it. However, the flavor and texture of homemade custard are far superior and create a richer, more authentic-tasting banana pudding. If you’re short on time, instant vanilla pudding (prepared according to package directions, perhaps using a bit less milk for a thicker consistency) can be a substitute, but the depth of flavor will be different. This recipe is designed around the deliciousness of from-scratch custard.
Q4: Why do my bananas turn brown in the pudding, and how can I prevent it?
A4: Bananas brown due to oxidation when exposed to air. Inside the pudding, they are somewhat protected by the custard. To minimize browning:
* Use ripe but firm bananas (not overripe).
* Slice and layer them quickly.
* Ensure they are well-covered by the custard layers.
* As mentioned in the tips, a very light toss in diluted lemon juice can help, but be cautious with the amount to avoid altering the flavor.
For bananas used as a garnish on top, add them at the very last second before serving.
Q5: Can I freeze banana pudding?
A5: Technically, you can, but it’s generally not recommended. Freezing and thawing can significantly alter the texture of the custard, making it watery or separated. The bananas can also become very mushy and release excess liquid upon thawing. The Nilla Wafers may also become overly soggy. For the best quality, banana pudding is best made fresh and enjoyed within a few days from the refrigerator.
This banana pudding recipe, with its rich homemade custard and perfect balance of flavors and textures, is more than just a dessert – it’s a tradition in the making. It’s the kind of comforting, soul-satisfying sweet treat that brings people together and creates lasting memories. Enjoy every creamy, dreamy spoonful!
Print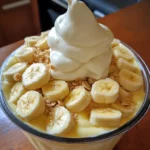
Banana Pudding Recipe
Ingredients
-
- For the Custard:
-
- 3/4 cup (150g) granulated sugar
-
- 1/3 cup (40g) all-purpose flour
-
- 1/4 teaspoon salt
-
- 3 large egg yolks (save the whites for another recipe or a meringue topping, if desired)
-
- 2 cups (480ml) whole milk
-
- 1 tablespoon unsalted butter
-
- 1 1/2 teaspoons pure vanilla extract
-
- For the Custard:
-
- For Assembly & Topping:
-
- 1 (11-ounce or approx. 300g) box Nilla Wafers (or similar vanilla wafer cookies)
-
- 4–5 large, ripe bananas, sliced about 1/4-inch thick (you want them ripe but still firm enough to hold their shape)
-
- 1 1/2 cups (360ml) heavy whipping cream, cold
-
- 1/4 cup (30g) powdered sugar (confectioners’ sugar)
-
- 1/2 teaspoon pure vanilla extract (for the whipped cream)
-
- For Assembly & Topping:
Instructions
Part 1: Making the Homemade Vanilla Custard
-
- Prepare Dry Ingredients: In a medium, heavy-bottomed saucepan, whisk together the granulated sugar, all-purpose flour, and salt. Breaking up any lumps in the flour now will help ensure a smooth custard.
-
- Incorporate Egg Yolks: Add the egg yolks to the saucepan. Whisk them into the dry ingredients until the mixture is well combined and looks like a thick, pale yellow paste.
-
- Temper the Eggs: Gradually pour the whole milk into the egg yolk mixture, whisking constantly. Start with just a splash of milk to loosen the paste, then continue adding the milk in a slow, steady stream while whisking. This gradual addition helps temper the eggs, preventing them from scrambling when heated.
-
- Cook the Custard: Place the saucepan over medium heat. Cook, whisking constantly and thoroughly, scraping the bottom and corners of the pan to prevent scorching and sticking. This is the most crucial step. Don’t walk away!
-
- Thicken the Custard: Continue to cook and whisk until the custard comes to a gentle boil and thickens considerably. This should take about 8-12 minutes. Once it starts to bubble, cook for 1-2 minutes more, still whisking, to ensure the flour is fully cooked out and the custard is properly thickened. It should be thick enough to coat the back of a spoon.
-
- Finish the Custard: Remove the saucepan from the heat. Immediately stir in the tablespoon of butter and 1 1/2 teaspoons of vanilla extract until the butter is melted and everything is smooth.
-
- Strain (Optional but Recommended): For an ultra-smooth custard, strain it through a fine-mesh sieve into a clean bowl. This will catch any small bits of cooked egg or undissolved flour.
-
- Cool the Custard: Press a piece of plastic wrap directly onto the surface of the custard. This prevents a skin from forming as it cools. Let the custard cool at room temperature for about 30 minutes to an hour before refrigerating it until completely chilled – at least 2-3 hours, or preferably overnight. The custard needs to be cold before assembling the pudding.
Part 2: Assembling the Banana Pudding
-
- Choose Your Vessel: You can assemble the banana pudding in a large trifle bowl (about 2.5 to 3-quart capacity) for a beautiful presentation, a 9×13 inch baking dish, or even individual serving dishes like ramekins or mason jars.
-
- First Layer of Wafers: Arrange a single layer of Nilla Wafers, closely packed, on the bottom of your chosen dish. You may need to break some wafers to fill in gaps.
-
- First Layer of Bananas: Top the wafers with a single layer of sliced bananas, distributing them evenly.
-
- First Layer of Custard: Spread about one-third of the chilled vanilla custard evenly over the bananas.
-
- Repeat Layers: Repeat the layering process two more times: Nilla Wafers, then sliced bananas, then custard. You should end with a layer of custard on top. If your dish is shallower, you might only do two layers of each. Aim to use most of your wafers and bananas, reserving a few wafers for garnish if desired.
-
- Chill for Flavors to Meld: Cover the assembled pudding with plastic wrap, pressing it gently onto the surface of the top custard layer if there’s no whipped cream yet (or just cover the dish). Refrigerate for at least 4 hours, but preferably 6-8 hours or even overnight. This chilling time is crucial. It allows the wafers to soften to a cake-like consistency and the flavors to meld together beautifully. Don’t rush this step!
Part 3: Making the Whipped Cream Topping (Just Before Serving)
-
- Chill Equipment: For the best whipped cream, ensure your heavy cream is very cold. It also helps to chill your mixing bowl and whisk (or beaters) in the freezer for about 10-15 minutes beforehand.
-
- Whip the Cream: In the chilled bowl, combine the cold heavy whipping cream, powdered sugar, and 1/2 teaspoon of vanilla extract.
-
- Beat to Stiff Peaks: Using an electric mixer (handheld or stand mixer with a whisk attachment), beat the cream mixture on medium-high speed. Start on low speed to avoid splatters, then increase. Continue beating until stiff peaks form. Stiff peaks mean that when you lift the beaters, the cream will hold its shape and the peaks will stand straight up or curl over slightly at the tip without collapsing. Be careful not to overbeat, or you’ll start making butter!
-
- Top the Pudding: Gently spread or pipe the fresh whipped cream over the top of the chilled banana pudding just before you plan to serve it.
-
- Garnish (Optional): Garnish with crushed Nilla Wafers, a few whole Nilla Wafers, or even a few fresh banana slices (though banana slices will brown quickly, so add them at the very last minute if using).
Nutrition
- Serving Size: one normal portion
- Calories: 350-450


