

Winter is the perfect time to indulge in cute and delicious baked goods, and what could be more delightful than Polar Bear Cookies? These cookies are not only tasty but also an adorable addition to any holiday cookie platter. Made with a soft-batch cream cheese cookie base and topped with luscious buttercream frosting, these cookies are as pleasing to the palate as they are to the eyes. In this comprehensive guide, we’ll explore everything you need to know about making these delightful cookies, from ingredients to serving tips.
Ingredients
To make these charming Polar Bear Cookies, you’ll need a variety of ingredients for both the cookies themselves and the frosting. Here’s a detailed list:
For the Soft-Batch Cream Cheese Cookies:
- 3/4 cup (1 1/2 sticks) unsalted butter, at room temperature (170g)
- 1/2 cup full-fat cream cheese, at room temperature (113g)
- 1 1/2 cups granulated sugar (300g)
- 1 large egg, at room temperature (56g)
- 2 teaspoons vanilla extract (8g)
- 3 cups all-purpose flour (375g)
- 1 tablespoon cornstarch (8g)
- 1/2 teaspoon baking powder (2g)
- 1/2 teaspoon fine salt (3g)
For the Buttercream Frosting:
- 1 cup unsalted butter, at room temperature (226g)
- 1 tablespoon vanilla extract (12g)
- 1/2 teaspoon fine salt (3g)
- 3 1/2 cups powdered sugar (454g or 1 lb. box)
- 1/4 cup heavy cream (60g)
For Decorations:
- 1 cup white sanding sugar
- 30 large chocolate chips (preferably Ghirardelli dark chocolate)
- Round black sprinkles
- Round red or pink sprinkles
Additional Supplies:
- Parchment paper or silicone baking mat
- Large baking sheets/cookie trays
- 2 1/2 inch circle cookie cutter
- 3/4 inch circle cutter
- Large piping bag
Instructions
Creating these adorable cookies is a straightforward process. Follow these detailed steps to ensure perfect results every time.
Soft-Batch Cream Cheese Cookies
- Prepare the Dough:
- In a large bowl or the bowl of a stand mixer, beat 3/4 cup butter and 1/2 cup cream cheese on medium speed until smooth.
- Add 1 1/2 cups granulated sugar and mix on medium-high speed until the mixture is lighter in color.
- Incorporate 1 egg and 2 teaspoons vanilla extract; mix until well combined.
- In a separate bowl, whisk together the flour, cornstarch, baking powder, and salt.
- Gradually add the dry ingredients to the wet mixture, mixing on low speed until just incorporated. Scrape the sides of the bowl as needed.
- Chill the Dough:
- Divide the dough in half, wrap each portion in plastic wrap, and flatten into a 1/2 inch thick rectangle.
- Chill in the fridge for 2 hours or in the freezer for 30 minutes.
- Roll and Cut the Dough:
- Preheat the oven to 350°F (175°C) and line baking sheets with parchment paper.
- Generously dust your work surface with flour. Roll the chilled dough to 1/3 inch thick and cut out 2 1/2 inch circles.
- Use a 3/4-inch circle cutter to cut out smaller circles for the ears. Attach two small circles to each large circle to form ears.
- Bake the Cookies:
- Chill the cut-out cookies in the fridge for 15 minutes.
- Bake on the top rack for 12-14 minutes, ensuring edges do not brown.
- Cool on the pan for 15 minutes, then transfer to a wire rack.
Buttercream Frosting
- Prepare the Frosting:
- Beat 1 cup of butter on medium speed until smooth.
- Mix in 1 tablespoon vanilla and 1/2 teaspoon salt.
- Gradually add powdered sugar and cream, mixing until smooth and of desired consistency.
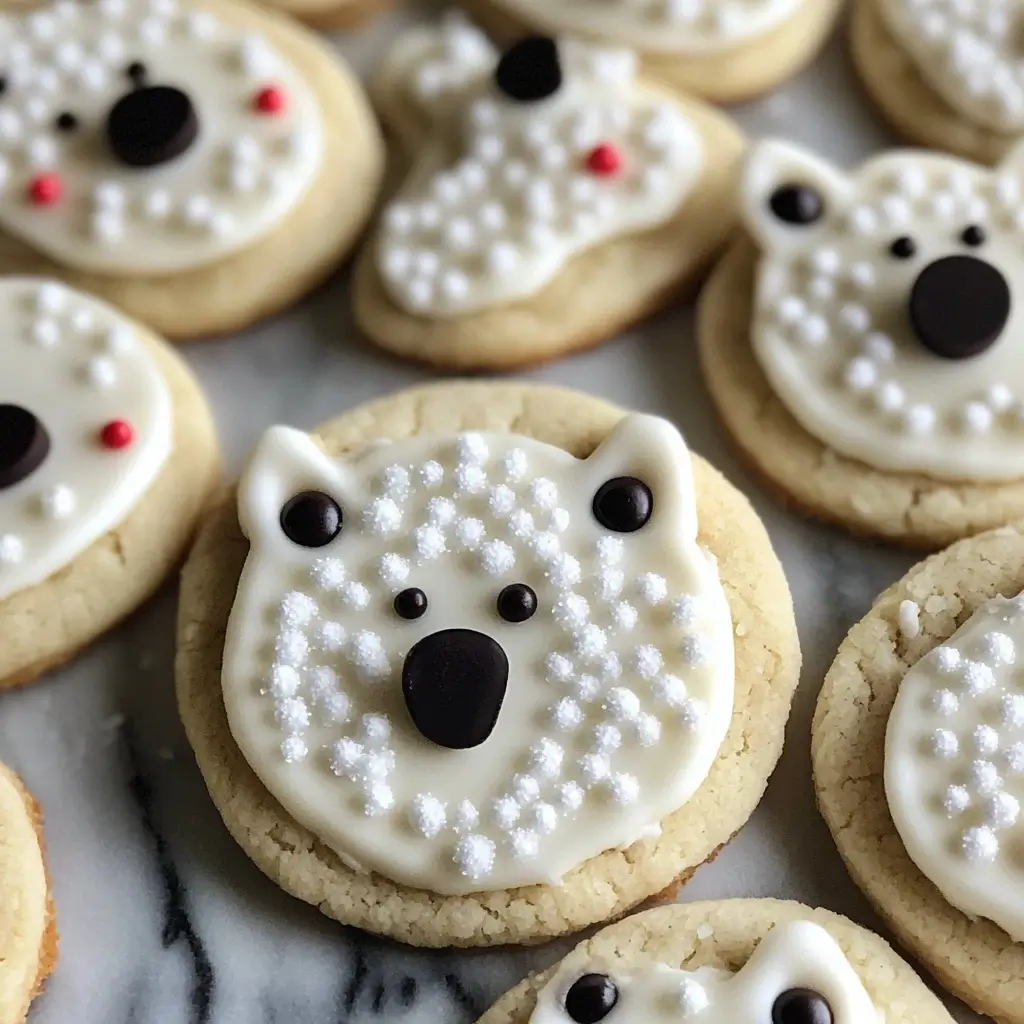
- Decorate the Cookies:
- Pour white sanding sugar into a bowl.
- Pipe a thin layer of frosting onto each cookie, then press into sanding sugar.
- Pipe a small oval for the muzzle and decorate with chocolate chips and sprinkles for facial features.
Nutrition Facts
While these cookies are a treat, it’s important to enjoy them in moderation. Here’s a rough estimate of the nutritional content per cookie:
- Calories: 250
- Total Fat: 12g
- Saturated Fat: 7g
- Cholesterol: 40mg
- Sodium: 60mg
- Total Carbohydrates: 33g
- Dietary Fiber: 0g
- Sugars: 20g
- Protein: 2g
How to Serve
Polar Bear Cookies are perfect for a variety of occasions, and their charming design and delightful flavor make them a versatile treat that can elevate any event. Here are some detailed suggestions for serving these adorable cookies in various contexts:
Holiday Parties
Polar Bear Cookies are an ideal addition to holiday gatherings, evoking the spirit of winter and the joy of the season. Their whimsical appearance adds a festive touch to any dessert table.
- Presentation: Arrange the cookies on a large, decorative platter or tiered stand to create an eye-catching centerpiece. Consider using a snowy backdrop, like a white tablecloth or faux snow, to enhance their wintery theme. You can also sprinkle some edible glitter or powdered sugar over the cookies to mimic the look of fresh snow.
- Pairing: Complement the cookies with a variety of seasonal drinks, such as hot cocoa, spiced cider, or holiday-themed cocktails. Offering a selection of beverages allows guests to enjoy the cookies in different ways, enhancing their overall experience.
- Themed Decor: Incorporate additional winter-themed decorations, such as snowflake ornaments, pinecones, or small evergreen branches, around the cookie display. This not only reinforces the winter theme but also creates a cozy, inviting atmosphere.
Cookie Exchanges
When participating in a cookie exchange, Polar Bear Cookies are sure to stand out as a favorite among fellow participants. Their intricate designs and delicious taste make them an impressive choice that showcases your baking skills.
- Packaging: Consider using clear cellophane bags tied with festive ribbons for individual cookies or using cookie boxes to create sets. Including a small card with the recipe or a personal note adds a thoughtful touch, allowing others to appreciate the effort that went into making them.
- Flavor Variations: While the classic Polar Bear Cookie is delightful on its own, consider making a few variations to offer something unique. You can experiment with different flavors, such as adding peppermint extract to the icing or incorporating crushed candy canes as a decorative element.
- Presentation at Exchange: When presenting your cookies at the exchange, arrange them in a way that highlights their uniqueness. You could create a small display with a polar bear theme, using stuffed animals or winter decorations to tie everything together. This not only showcases your cookies but also makes your setup more memorable.
Gift Giving
Polar Bear Cookies make for a thoughtful and heartfelt homemade gift, perfect for friends, family, or colleagues during the holiday season or any special occasion.
- Creative Packaging: Invest in decorative boxes, tins, or jars to package your cookies. You could choose festive colors and patterns that resonate with the holiday season or opt for a more rustic look with kraft paper and twine for a charming, homemade feel. Adding a personalized label or tag with a sweet message can further enhance the gift’s appeal.
- Gift Baskets: Consider including Polar Bear Cookies as part of a larger gift basket. Complement them with other homemade treats, such as fudge, brownies, or seasonal jams. Adding a cozy blanket or a festive mug can create a lovely themed gift that encourages the recipient to enjoy a cozy evening with your baked goods.
- Personal Touch: To make the gift even more special, consider including a handwritten note explaining the significance of the cookies or sharing a memory associated with baking them. This personal touch not only makes the gift more meaningful but also strengthens the bond between you and the recipient.
Whether you’re hosting a festive gathering, participating in a cookie exchange, or giving a heartfelt gift, Polar Bear Cookies are sure to bring joy and delight to any occasion. Their charming appearance and delicious flavor make them a beloved treat that will be cherished by all who receive them.
Additional Tips
To ensure your Polar Bear Cookies turn out perfectly, consider the following tips:
Chill the Dough
Chilling the dough is a vital step in the cookie-making process, especially for designs that require precision, such as Polar Bear Cookies. When you chill the dough, it firms up, which helps maintain the shape of the cookies during baking. Here are a few detailed pointers on how to properly chill your dough:
- Timing: Aim to chill the dough for at least 30 minutes to an hour. If you have the time, chilling overnight can enhance the flavor and texture even more. The longer the dough chills, the less likely it is to spread in the oven.
- Covering: Wrap the dough tightly in plastic wrap or place it in an airtight container to prevent it from drying out or absorbing any odors from the fridge. If you’re using multiple colors of dough for your Polar Bears, consider chilling each color separately.
- Portioning: If you prefer to work in smaller batches, divide the dough into portions before chilling. This way, you can take out just what you need, keeping the rest cold and ready to work with.
- Checking Consistency: After chilling, the dough should be firm but still pliable enough to roll out. If it feels too hard, let it sit at room temperature for a few minutes before rolling.
Use Quality Ingredients
The quality of your ingredients can significantly impact the flavor and texture of your Polar Bear Cookies. Here are some detailed insights into selecting the best ingredients:
- Butter: Use unsalted butter for better control over the salt content in your cookies. Look for high-fat European-style butter, which typically has a richer flavor and creamier texture compared to standard butter. If possible, let the butter come to room temperature before mixing; this allows for better incorporation and a smoother dough.
- Chocolate Chips: Choose high-quality chocolate chips or chunks for the best melting and flavor. Brands like Guittard or Ghirardelli offer premium options that have a richer taste compared to generic brands. Consider using a mix of semi-sweet and white chocolate chips to enhance the visual appeal of your Polar Bears while providing a delightful contrast of flavors.
- Flour: For an extra light and fluffy cookie, sift your all-purpose flour before measuring. This can prevent clumps and ensures that you’re using the correct amount. If you’re feeling adventurous, you could also substitute a portion of the all-purpose flour with cake flour for a softer texture.
- Flavorings and Add-ins: Don’t shy away from experimenting with additional flavorings, such as vanilla extract or almond extract, to elevate your cookies. Incorporating mini marshmallows can add a fun twist, resembling the Polar Bear’s fur.
Experiment with Decorations
Personalizing your Polar Bear Cookies can be one of the most enjoyable parts of the baking process. Here are some creative ideas for decorations that not only enhance the appearance but also add to the flavor:
- Icing Techniques: Use royal icing or a buttercream frosting to create intricate designs for the bears’ faces. You can pipe out details like eyes, noses, and even scarves. If you’re looking for a simple approach, consider using a food-safe marker to draw on the cookies once they’ve cooled.
- Texturing: For a fun twist on the classic Polar Bear design, consider rolling the cookies in coarse sugar or coconut flakes before baking to simulate fur. This adds both texture and an extra layer of sweetness.
- Color Variations: While traditional Polar Bears are white, you can experiment with different shades and colors by using food coloring in your icing or dough. Create a rainbow of Polar Bears to make your cookie platter more festive.
- Accessories: Consider adding edible accessories like mini chocolate chips for eyes or candy pieces for scarves. You could also use fondant to create small shapes, like snowflakes or icebergs, to accompany your cookies on a decorative platter.
- Themed Presentation: When serving your Polar Bear Cookies, think about how to display them. Using a snowy backdrop of powdered sugar or shredded coconut can create a winter wonderland effect. Alternatively, place them on a decorative plate surrounded by faux snow or small ornaments to enhance the theme of your baking.
By following these detailed tips, you can ensure that your Polar Bear Cookies not only look adorable but also taste delicious, making them a hit at any gathering or celebration. Happy baking!
FAQs
Q: Can I freeze the cookie dough? A: Yes, the dough can be frozen for up to a month. Thaw in the fridge overnight before rolling.
Q: What if I don’t have certain decorations? A: You can use fondant or additional colored icing to create the polar bear faces.
Q: How long do these cookies keep? A: Store them in an airtight container at room temperature for up to a week.
Conclusion
Polar Bear Cookies are a delightful and whimsical winter treat that will bring smiles to faces young and old alike. With their soft, chewy texture and rich buttercream frosting, they are sure to become a favorite in your holiday baking repertoire. Whether you’re making them for a party, a gift, or just because, these cookies are a fun and rewarding baking project. Enjoy the process and the delicious results!


